
Wall Decor with Hanging Crochet Flowers Pattern is a beautiful and creative crochet project that combines delicate flowers, textured stitches, and elegant home décor into one charming handmade piece. Whether you are decorating a cozy living room, a nursery, a craft room, or creating a thoughtful handmade gift, this Wall Decor with Hanging Crochet Flowers Pattern offers endless possibilities for personalization while helping you improve your crochet skills. Throughout this tutorial, you will learn how to build every section step by step using clear crochet stitch instructions, making it enjoyable for beginners with patience as well as experienced crocheters looking for a relaxing project.
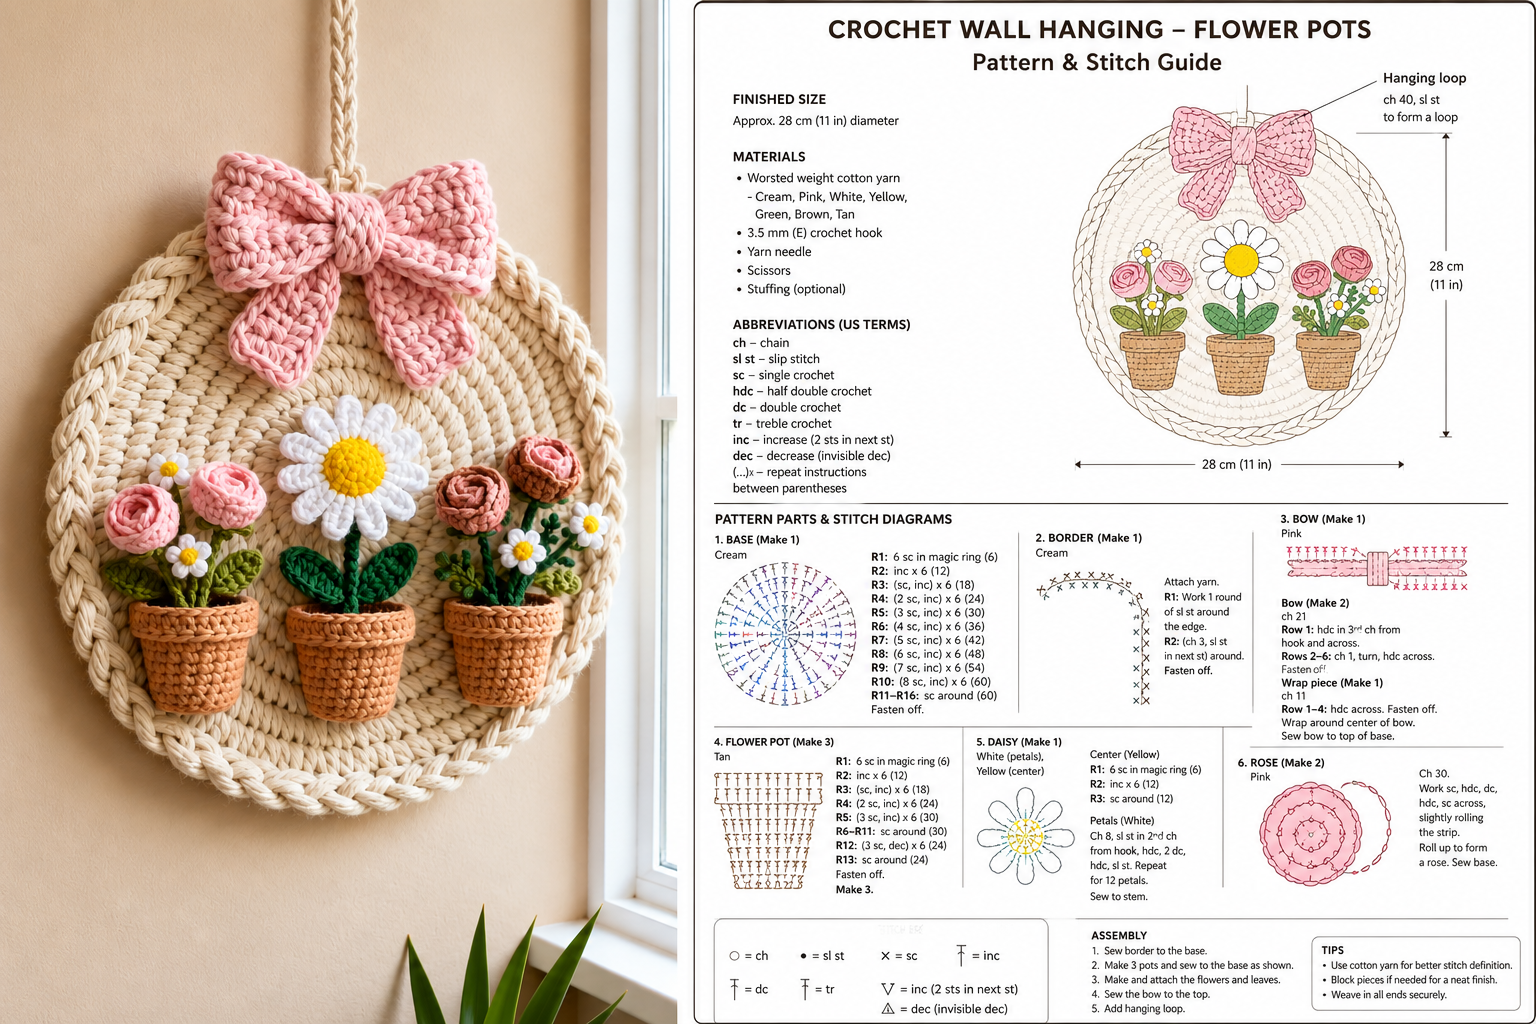
Crochet wall decorations have become increasingly popular because they combine texture, warmth, and personality in a way that store-bought decorations often cannot. A handmade floral hanging instantly transforms an empty wall into a welcoming focal point. This project features a large circular crochet base, decorative braided edging, adorable miniature flower pots, realistic crochet flowers, leafy greenery, and a large decorative bow that completes the elegant farmhouse-inspired style. Every element can easily be customized with your favorite colors while maintaining the timeless appearance of the original design.
One of the greatest advantages of this Wall Decor with Hanging Crochet Flowers Pattern is its flexibility. You can make the flowers brighter for spring, choose warm earthy tones for autumn, or create pastel combinations perfect for Easter or nursery decorations. The crochet techniques remain the same while the finished project reflects your own creativity. In this article, you’ll discover every important step, the recommended crochet stitches, assembly tips, finishing methods, and useful techniques that will help your project look professional from beginning to end.
Materials and Crochet Stitches Needed
Before beginning, gather all your materials so the project flows smoothly without interruptions.
Choose medium or bulky cotton yarn for the circular base because it creates excellent structure and keeps the decoration flat against the wall. Cotton yarn also highlights stitch definition beautifully.
DISCOVER MORE FREE PATTERNS HERE!
For the flowers, leaves, flower pots, and bow, use lightweight cotton yarn in several colors. Soft cream, blush pink, yellow, green, brown, and white create the classic appearance shown in the pattern.
Use crochet hooks appropriate for your yarn weight. Most crocheters will use between a 3.5 mm hook for details and a 5 mm hook for the larger base.
Additional supplies include fiberfill for slight flower shaping if desired, yarn needle, stitch markers, scissors, measuring tape, and a wooden ring or crochet hanging loop.
The basic crochet stitch abbreviations used throughout this project include:
ch = Chain
sl st = Slip Stitch
sc = Single Crochet
hdc = Half Double Crochet
dc = Double Crochet
tr = Treble Crochet
inc = Increase
dec = Decrease
BLO = Back Loop Only
FLO = Front Loop Only
These stitches are enough to complete the entire decoration without requiring advanced crochet experience.
Step-by-Step Crochet Instructions for the Pattern
Begin by making a magic ring and crochet six sc into the center. Pull the ring tightly closed to create a neat beginning. Continue increasing evenly in each round until the circle reaches your desired diameter.
Once the circle is large enough, work several rounds of sc without increases to stabilize the edge. If your work begins to curl, gently block the piece before continuing.
For the decorative braided border, crochet a long rope using chains and sl st, or use crochet cord made with repeated sc. Attach this rope carefully around the outer edge using a yarn needle, making sure the braid stays even all the way around.
Create the hanging loop by chaining approximately 60 to 80 stitches depending on your preferred hanging length. Work back across the chain using sl st or sc for added strength. Sew the ends securely to the back of the circular base.
To crochet each flower pot, begin with a magic ring and gradually increase using sc rounds until reaching the desired width. Continue without increases for the body of the pot, then create the rim using one round of hdc worked into the front loops for extra definition.
Now crochet the flowers individually. For the daisy center, work six sc into a magic ring and increase until the center reaches the proper size. Attach white petals made with chains, dc, and sl st around the edge. Rose flowers are created by crocheting a long strip using alternating dc stitches before rolling the strip tightly into a spiral and sewing the base securely.
Assembling the Wall Decor Beautifully
Before sewing anything permanently, arrange all flower pots on the circular base until the composition feels balanced. Taking a photograph during this stage can help you compare different layouts.
Position the largest flower in the center to naturally attract attention. Smaller flowers should surround it while maintaining visual balance between both sides of the decoration.
Crochet several leaves using chains followed by sc, hdc, and dc stitches worked along both sides of the starting chain. Sew these beneath each flower to create realistic foliage.
Attach the flower stems using green yarn. Surface crochet, embroidered stems, or crocheted cords all produce attractive results depending on your preferred style.
Crochet the large decorative bow separately. Begin with a rectangle worked entirely in hdc rows. Cinch the middle tightly using matching yarn before attaching the tails underneath. Sew the finished bow securely to the top center of the hanging.
Finally, attach every flower pot carefully with invisible stitches from the back whenever possible. Check that all components are firmly secured, especially if the decoration will hang in a child’s room or frequently handled area.
Finishing Tips, Customization Ideas, and Care Instructions
Blocking the finished circular base greatly improves its appearance. Lightly steam or wet block according to your yarn manufacturer’s recommendations before final assembly.
Experiment with different flower varieties including tulips, lavender, sunflowers, daisies, peonies, or wildflowers. Seasonal flowers allow you to enjoy this same Wall Decor with Hanging Crochet Flowers Pattern throughout the year.
Color combinations can completely transform the project. Neutral tones create a modern farmhouse style, while vibrant colors give the decoration a cheerful spring appearance.
Personalize the design further by adding embroidered names, small butterflies, tiny bees, pearls, wooden buttons, or miniature crochet ladybugs between the flowers.
To keep your crochet wall decoration looking beautiful, dust it regularly with a soft brush. If washing becomes necessary, gently hand wash using mild soap, reshape while damp, and allow it to air dry flat.
Most importantly, enjoy the creative process. Handmade crochet decorations are never identical, and those tiny variations make every finished project unique and full of character.
FAQ
Is this Wall Decor with Hanging Crochet Flowers Pattern suitable for beginners?
Yes. Beginners who already know the basic crochet stitches such as chain, single crochet, double crochet, and slip stitch can complete this project by working carefully through each section.
What type of yarn works best?
Cotton yarn is highly recommended because it provides excellent stitch definition, durability, and structure for decorative wall hangings.
Can I make the decoration larger?
Absolutely. Simply continue increasing the circular base until it reaches your preferred size before adding the decorative border and floral elements.
How many hours does this project usually take?
Depending on your crochet speed and experience, most crocheters can complete the project within one weekend or over several relaxing evenings.
Can I replace the flowers with other crochet motifs?
Yes. Hearts, butterflies, mushrooms, pumpkins, birds, or seasonal ornaments can easily replace the flowers while using the same circular base.
Should the flowers be sewn or glued?
Sewing is strongly recommended because it provides greater durability and a cleaner handmade finish than glue.
How do I keep the circular base from curling?
Maintain even tension, increase consistently according to the pattern, and block the finished circle before attaching decorative pieces.
Can this project be used as a handmade gift?
Definitely. It makes a thoughtful gift for birthdays, Mother’s Day, baby showers, housewarmings, weddings, or anyone who appreciates handmade crochet decorations.
Conclusion
This Wall Decor with Hanging Crochet Flowers Pattern demonstrates how a combination of simple crochet stitches can become a beautiful handmade piece of home décor. Throughout this guide, you learned how to crochet the circular base, create the decorative braided edge, make realistic flower pots, crochet delicate flowers and leaves, assemble every element professionally, and finish the project with careful blocking and thoughtful customization. By following these step-by-step crochet instructions and practicing each technique, you can confidently create a unique wall decoration that reflects your own style and creativity.
EASILY FIND THE PDF FOR THIS PATTERN HERE!
If you enjoyed this tutorial, please leave your honest opinion about the project and share your suggestions. Your feedback helps improve future crochet tutorials and inspires even more creative handmade designs for the crochet community.