
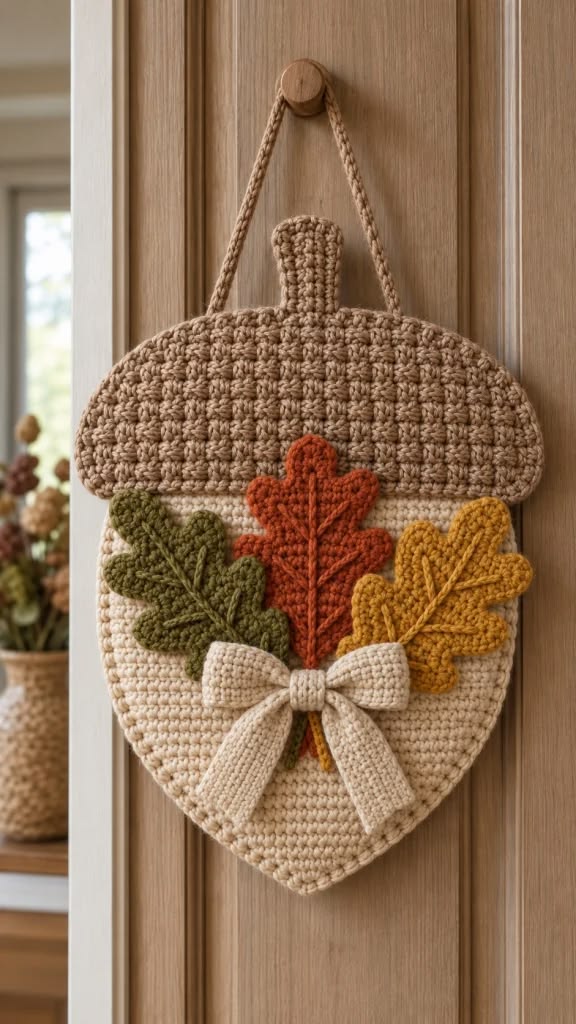
The Crochet wall hanging in the shape of nuts Pattern is a charming autumn-inspired project that combines cozy textures, beautiful seasonal colors, and handmade creativity. Inspired by the natural shape of an acorn, this decorative crochet piece features a rounded cream-colored body, a textured brown cap, colorful oak leaves, and an elegant crochet bow. The finished decoration brings a welcoming farmhouse atmosphere to doors, walls, entryways, and seasonal displays. Whether you enjoy making handmade gifts or decorating your home for fall, this crochet acorn wall hanging offers a delightful opportunity to explore different crochet techniques while creating something truly special. Its combination of dimensional stitching and warm earthy colors makes it especially attractive for autumn decorating, Thanksgiving celebrations, and rustic home interiors.
One of the most appealing features of this Crochet wall hanging in the shape of nuts Pattern is the way simple crochet stitches can be transformed into an intricate-looking decoration. Although the finished piece includes several decorative elements, the construction becomes manageable when divided into individual components. The main acorn body is created using rows of single crochet stitches, while the textured cap uses raised stitches to produce a rich, woven appearance. The autumn leaves are crocheted separately and attached to the front, allowing the maker to experiment with different shapes and color combinations. Finally, a soft cream bow and a braided hanging cord complete the design. This combination of techniques makes the project particularly rewarding for crocheters who want to develop their skills beyond basic scarves and blankets.
Another wonderful advantage of this crochet autumn wall decoration is its versatility. The pattern can be adapted to different sizes, yarn weights, and seasonal color palettes without losing its distinctive acorn silhouette. Traditional shades such as beige, caramel, olive green, burnt orange, and mustard yellow create a natural autumn appearance, while alternative colors can produce a more contemporary decorative style. The project also provides an opportunity to practice shaping, textured crochet stitches, decorative appliqués, and careful assembly. Throughout this tutorial, you will learn how to construct the acorn body, crochet the textured cap, create realistic oak leaves, make a decorative bow, and assemble everything into a finished wall hanging. The instructions use US crochet terminology, making them suitable for American crocheters who prefer clearly explained stitches and practical step-by-step guidance.
1. Materials, Crochet Stitches, and Preparation for the Acorn Wall Hanging
Before beginning your Crochet wall hanging in the shape of nuts Pattern, gather the materials needed to create each decorative component. Choosing a consistent yarn weight is important because it helps the body, cap, leaves, and bow maintain balanced proportions. Medium-weight cotton yarn is particularly suitable for this project because it produces defined stitches and a firm fabric that holds its shape. Acrylic yarn can also be used, although the finished decoration may feel slightly softer. For an attractive autumn design, select cream yarn for the main body, warm brown for the cap, olive green, burnt orange, and mustard yellow for the leaves, and matching cream yarn for the decorative bow. A neutral color palette allows the textured stitches to remain the central feature of the finished decoration.
DISCOVER MORE FREE PATTERNS HERE!
Materials needed:
-
Medium-weight yarn (Category 4) in cream, brown, olive green, burnt orange, and mustard yellow
-
4.0 mm crochet hook, or a size that creates a firm fabric
-
Yarn needle for sewing and weaving in ends
-
Sharp scissors
-
Stitch markers
-
Measuring tape
-
Small amount of polyester fiberfill or lightweight interfacing, optional
-
Two strands of yarn for a braided hanging cord
-
Optional fabric backing for additional stability
For the finished decoration shown in the reference image, aim for an approximate size of 30 cm wide and 38 cm tall, excluding the hanging cord. These measurements are suggested proportions rather than an exact gauge-based reproduction. Your final dimensions will depend on yarn thickness, hook size, and personal crochet tension. Before starting, create a small gauge swatch using single crochet stitches. A practical target is approximately 16 single crochet stitches and 18 rows across 10 cm, although exact gauge is less important than achieving a dense fabric. If the stitches appear loose, switch to a smaller crochet hook. A firm crochet fabric helps the acorn maintain its shape and provides a stable surface for attaching the decorative leaves.
Understanding the crochet abbreviations will make the instructions easier to follow. This tutorial uses standard US crochet terms, which differ from some international crochet conventions.
Crochet stitch abbreviations (US terms):
-
ch: Chain
-
sl st: Slip stitch
-
sc: Single crochet
-
hdc: Half double crochet
-
dc: Double crochet
-
tr: Treble crochet
-
BLO: Back loop only
-
FLO: Front loop only
-
sc2tog: Single crochet two stitches together
-
inc: Work two single crochet stitches into the same stitch
-
FPdc: Front post double crochet
-
BPdc: Back post double crochet
-
st/sts: Stitch/stitches
-
RS: Right side
-
WS: Wrong side
-
FO: Fasten off
The single crochet stitch forms the foundation of the acorn body and several decorative components. To make a single crochet, insert the hook into the designated stitch, yarn over, and pull up a loop. Yarn over again and pull through both loops on the hook. The half double crochet and double crochet stitches are used to shape the leaves, while treble crochet creates additional height along their lobes. Raised front post and back post stitches add dimension to the brown acorn cap. When working a front post double crochet, insert the hook from front to back and then to front around the post of the indicated stitch. Complete the double crochet normally. For a back post double crochet, work around the post from the opposite direction. These techniques create the attractive raised texture associated with this decorative pattern.
Color selection plays an important role in making the crochet acorn decoration resemble the autumn-inspired design. Cream or ivory yarn provides a gentle contrast against the brown cap, while olive green, pumpkin orange, and golden yellow create a realistic arrangement of fall leaves. If you prefer a softer appearance, replace the brighter shades with sage green, terracotta, and muted gold. Using the same yarn thickness for all decorative components helps prevent the leaves from becoming too bulky or too delicate. The bow can be made in the same cream shade as the acorn body, creating visual harmony between the main structure and the final embellishment.
Before crocheting, organize the project into manageable sections. Begin with the cream-colored body, then create the textured brown cap and its small stem. After those main pieces are complete, crochet three oak leaves and a cream bow. Finish by preparing the braided hanging cord and assembling the components. Working in this order allows you to check the proportions before permanently attaching the decorations. The following instructions provide an original, workable interpretation of the photographed design rather than an exact stitch-for-stitch reconstruction from the image. Adjustments may be necessary to achieve the desired dimensions and silhouette.
2. Step-by-Step Instructions for Crocheting the Acorn Body and Textured Cap
The main body of the Crochet wall hanging in the shape of nuts Pattern forms the lower portion of the acorn. It has a broad, gently rounded upper edge and a pointed bottom that resembles a natural acorn shell. To create this shape, work a flat panel in cream yarn, beginning at the bottom point and increasing gradually toward the upper edge. This construction makes the shaping easier to control and allows the decorative cap to overlap the top of the body. Use single crochet stitches throughout the main panel to produce a uniform texture. Remember that the turning chain does not count as a stitch in this pattern.
Step 1: Crochet the pointed acorn body. With cream yarn, ch 3. Row 1: Work 2 sc into the second ch from the hook and 1 sc into the next ch (3 sts). Ch 1 and turn. Row 2: Work 2 sc into the first st, sc in the next st, and 2 sc into the last st (5 sts). Ch 1 and turn. Row 3: Sc across (5 sts). For subsequent increase rows, work 2 sc in the first and last stitches and 1 sc in every stitch between them. Alternate one increase row with one even row until the panel reaches 49 stitches across. This requires 22 increase rows after Row 2, with even rows between them. Continue working evenly for approximately 6 additional rows, or until the body has the desired height. Fasten off, leaving a long yarn tail for assembly.
Step 2: Round the upper sides and reinforce the panel. The basic triangle can be softened into a more natural acorn silhouette through gentle blocking and edging. Attach cream yarn at one upper corner and work single crochet stitches around the outside edges. Place 2 sc into selected stitches along the lower curves to prevent the fabric from pulling inward. At the pointed bottom, work 3 sc into the tip stitch to create a smooth turn. Along the upper edge, work one sc into each available stitch. Join with a slip stitch and fasten off. If you prefer a more substantial wall hanging, crochet a second identical panel and join the two pieces with single crochet stitches around their edges. A small amount of lightweight stuffing may be added before closing, but avoid overfilling because the decoration should remain relatively flat against the wall.
Step 3: Create the textured brown acorn cap. With brown yarn, ch 50. Row 1: Work 1 sc into the second ch from the hook and each remaining ch (49 sts). Ch 2 and turn. Row 2: Dc across (49 sts). Ch 2 and turn. Row 3: Alternate FPdc and BPdc around the posts of the previous row, beginning with FPdc and ending with FPdc (49 sts). Ch 2 and turn. Row 4: Continue the raised stitch pattern by working FPdc around stitches that project toward you and BPdc around stitches that recede. Repeat the textured pattern until the cap measures approximately 9–11 cm tall. For a more pronounced woven appearance, maintain consistent tension and avoid pulling the post stitches too tightly.
Step 4: Shape the cap into a rounded dome. The brown cap should extend slightly beyond the cream body, creating the recognizable acorn shape. After completing the textured rectangle, work a single crochet border around the entire piece. Along each short side, distribute the stitches evenly and add extra stitches at the upper corners to create a gentle curve. To form a rounded cap rather than a straight rectangle, work one or two additional edging rounds, placing increases near the corners and keeping the central sections even. If the corners remain too square, shape them during blocking or fold the outermost edges slightly toward the back before sewing. Position the cap over the upper portion of the cream body so that it overlaps approximately 2–3 cm. The brown section should resemble a broad protective shell covering the top of the acorn.
Step 5: Crochet the small acorn stem. The stem sits at the center of the cap and adds an important finishing detail. With brown yarn, ch 9. Row 1: Sc into the second ch from the hook and each remaining ch (8 sts). Ch 1 and turn. Rows 2–8: Sc across all 8 sts. Fasten off, leaving a long tail. Fold the rectangle lengthwise and sew the long edges together to create a slightly rounded stem. For a fuller appearance, insert a narrow strip of yarn or a small amount of fiberfill before closing. Position the stem vertically at the center of the upper edge of the cap, allowing approximately 4–5 cm to remain visible above the dome. Secure it with several small stitches from the back so that the seam remains hidden.
Step 6: Join the acorn components securely. Place the brown cap over the cream body, aligning the centers carefully. The cap should extend slightly beyond both sides of the cream panel, creating the characteristic oversized acorn top. Use a yarn needle and matching brown yarn to sew the cap along its lower and side edges, leaving the raised texture undisturbed. If you are making a two-layer wall hanging, stitch through the front layer only whenever possible to keep the back neat. Check that the cap lies flat and that the stem remains centered. At this stage, the basic crochet acorn wall hanging is complete, providing a beautiful foundation for the colorful autumn leaves and decorative bow.
3. How to Crochet Autumn Oak Leaves and the Decorative Cream Bow
The colorful oak leaves are among the most eye-catching details of this Crochet wall hanging in the shape of nuts Pattern. Their layered arrangement gives the decoration a natural autumn appearance, while their raised surfaces add dimension and visual interest. Three leaves work especially well for this design: one olive green leaf on the left, one burnt orange leaf in the center, and one mustard yellow leaf on the right. Each leaf can be crocheted separately using a combination of chain stitches, single crochet, half double crochet, double crochet, and treble crochet. The goal is to create broad, rounded lobes that resemble traditional oak leaves rather than narrow pointed foliage.
Step 1: Crochet the foundation of the first oak leaf. With olive green yarn, ch 17. Beginning in the second ch from the hook, work 1 sc, 1 hdc, 3 dc, 4 tr, 3 dc, 2 hdc, and 2 sc across the foundation chain. Work 3 sc into the final chain to turn around the end. Continue along the opposite side of the foundation chain, working a mirrored sequence of stitches to form an elongated oval leaf center. Join with a sl st. This central shape provides the foundation for the rounded lobes that will be added along the outer edges. If the leaf curls excessively, loosen your tension slightly or use a crochet hook one size larger for the foundation section.
Step 2: Form the rounded oak leaf lobes. Work around the outer edge of the leaf, creating small decorative projections. For each lobe, use the following sequence in an available edge stitch or space: (sc, hdc, 2 dc, hdc, sc). Skip one or two edge stitches between lobes, depending on the spacing and size of your leaf. Repeat the sequence approximately three times along each side, keeping the upper lobes slightly smaller than the central ones. At the leaf tip, work a small pointed section using (sc, hdc, dc, hdc, sc). Adjust the spacing so the fabric lies flat and the lobes are distributed symmetrically. The finished leaf should have a softly scalloped outline similar to the oak leaves visible in the reference image.
Step 3: Add leaf veins and repeat in autumn colors. To create raised veins, use a yarn needle and a matching or slightly lighter shade of yarn. Begin at the lower center of the leaf and embroider a straight line toward the tip using surface stitches. Add smaller diagonal lines extending from the central vein toward each lobe. Alternatively, use surface slip stitches with a crochet hook to create the same effect. Repeat the entire leaf-making process using burnt orange and mustard yellow yarn. The orange leaf can be made slightly taller by increasing the foundation chain to 19 stitches and distributing the additional stitches through the center. The yellow leaf can remain approximately the same size as the green one, creating a balanced arrangement.
Step 4: Arrange the three leaves on the acorn body. Before sewing, place the finished leaves on the cream-colored portion of the acorn. Position the olive green leaf diagonally toward the lower left, the burnt orange leaf vertically in the center, and the mustard yellow leaf diagonally toward the lower right. Allow the leaves to overlap slightly, creating a layered arrangement that resembles a small autumn bouquet. The orange leaf should remain the tallest and most central element, while the green and yellow leaves frame it naturally. Use stitch markers or temporary pins to hold the leaves in place while adjusting their positions. Once satisfied, sew around selected outer edges and along the central veins, leaving some lobes slightly raised for a three-dimensional appearance.
Step 5: Crochet the decorative cream bow. With cream yarn, ch 13. Row 1: Sc into the second ch from the hook and each remaining ch (12 sts). Ch 1 and turn. Rows 2–7: Sc across all 12 sts. Fasten off. This rectangle forms the two upper loops of the bow. Pinch the rectangle at its center to create the bow shape. For the tails, crochet two separate strips by chaining 9 and working 1 sc into the second ch from the hook and each remaining ch (8 sts). Continue working even rows until each strip measures approximately 12–14 cm long. Fasten off and weave in the ends. Round the lower corners with a simple single crochet edging if desired.
Step 6: Assemble and attach the bow. Place the two crocheted tails behind the center of the folded bow rectangle, allowing them to hang diagonally downward. Secure the pieces together with a few stitches. To create the central knot, ch 6 and work 5 sc across for approximately 4 rows, producing a narrow strip. Wrap this strip around the pinched center of the bow and tails, then sew the ends together at the back. Position the completed bow over the lower stems of the three oak leaves, hiding the attachment points and creating a polished decorative finish. Sew the bow securely to the cream acorn body, attaching the center firmly while allowing the loops and tails to remain slightly raised. This finishing touch gives the handmade crochet wall hanging its soft, elegant farmhouse character.
4. Final Assembly, Hanging Cord, Finishing Techniques, and Decorative Ideas
The final stage of the Crochet wall hanging in the shape of nuts Pattern focuses on making the decoration attractive, balanced, and durable enough for seasonal display. Once the body, cap, stem, leaves, and bow have been completed, examine the entire piece carefully. Check that the brown cap is centered, the leaves are arranged evenly, and the bow covers the lower leaf stems without hiding too much of their beautiful texture. Small adjustments can make a significant difference in the overall appearance. If any component seems loose, add a few discreet stitches using matching yarn. A well-assembled crochet decoration should feel secure while still retaining the soft, dimensional quality that makes handmade projects so appealing.
Step 1: Make the braided hanging cord. Cut three lengths of brown yarn approximately 65–75 cm long, then fold them together if you want a thicker braid. Tie the strands securely at one end and braid them evenly until the cord reaches approximately 35–40 cm, or the length needed for your preferred hanging height. Tie the opposite end to prevent unraveling. Attach one end of the braid to the upper left side of the acorn cap and the other end to the upper right side. Sew through several stitches on the back of the cap to distribute the weight evenly. The cord should form a symmetrical inverted V when the decoration is hanging. For additional strength, reinforce the attachment points with several passes of yarn.
Step 2: Reinforce the structure for wall display. Because the finished crochet acorn decoration contains several layered elements, additional support may be helpful, especially if the project is made with soft yarn. One option is to attach a second crocheted body panel to the back, creating a double-layer construction. Another option is to sew a lightweight fabric backing behind the cream panel and brown cap. If using fabric, cut it slightly smaller than the finished crochet outline so that it remains hidden from the front. Hand-sew the backing around the perimeter with small stitches. Avoid using heavy cardboard in areas where the decoration may be exposed to moisture, since cardboard can warp over time. The goal is to provide gentle support without making the wall hanging stiff or uncomfortable to handle.
Step 3: Weave in yarn ends and refine the details. Use a yarn needle to weave every loose yarn end through the back of the crochet fabric. For secure finishing, pass the yarn through several stitches, change direction, and weave through another short section before trimming. Pay particular attention to the ends around the leaves and bow, where loose strands could become visible from the front. If the textured cap has uneven areas, gently reshape them with your fingers. Check that the embroidered leaf veins remain clearly visible and that the leaf edges are not curling excessively. Small finishing details help transform the project from a collection of crocheted pieces into a cohesive, professionally presented autumn crochet wall hanging.
Step 4: Block the finished decoration carefully. Blocking can help improve the shape of the acorn body and flatten the leaf appliqués. If your yarn is suitable for wet blocking, lightly dampen the crocheted components and arrange them on a clean towel or blocking mat. Shape the lower body into a smooth pointed curve and adjust the leaf lobes until they appear symmetrical. Allow everything to dry completely before hanging. If the decoration is already assembled, use a light mist of water rather than soaking the entire project. Always follow the yarn manufacturer’s care recommendations, especially when working with acrylic fibers. Avoid excessive heat, which can permanently alter synthetic yarn. Proper blocking helps the stitches settle and gives the finished wall hanging a more refined appearance.
Step 5: Personalize the design for different decorating styles. Although the traditional autumn palette is especially beautiful, the Crochet wall hanging in the shape of nuts Pattern can be adapted in many creative ways. For a rustic farmhouse look, use oatmeal, chocolate brown, olive green, and muted terracotta yarn. For a brighter seasonal decoration, choose pumpkin orange, golden yellow, burgundy, and deep forest green. A neutral Scandinavian-inspired version could feature cream, beige, taupe, and soft gray. You can also replace the cream bow with a contrasting brown or mustard-colored bow, add embroidered decorative details, or create additional leaves around the center. Keep the embellishments relatively lightweight so the finished piece hangs evenly and maintains its recognizable acorn shape.
Step 6: Display and care for your handmade crochet decoration. Once the project is complete, hang it from a sturdy wall hook, decorative peg, or interior door hanger. Choose a location where the acorn can hang freely without being compressed against furniture or other objects. Entryways, living rooms, craft rooms, and covered interior spaces are excellent display locations. Avoid exposing the decoration to prolonged direct sunlight, heavy moisture, or outdoor weather, as these conditions may affect the yarn colors and shape. For cleaning, gently remove dust with a soft brush or use careful spot cleaning according to the yarn label. Store the wall hanging flat between seasons to protect the raised leaves, textured cap, and decorative bow. With appropriate care, this handmade piece can become a favorite part of your annual autumn decorating tradition.
Frequently Asked Questions (FAQ)
1. Is the Crochet wall hanging in the shape of nuts Pattern suitable for beginners?
This project is best suited to confident beginners or intermediate crocheters. The main body uses basic single crochet stitches, making it relatively easy to construct. However, the textured cap, shaped oak leaves, and decorative assembly require additional techniques. Beginners can complete the project successfully by practicing the individual stitches before starting and working through each component separately.
2. What type of yarn is best for making a crochet acorn wall hanging?
Medium-weight cotton yarn is an excellent choice because it provides clear stitch definition and helps the finished decoration maintain its shape. Cotton-blend yarns are also suitable. Acrylic yarn can be used for a softer and lighter decoration, although additional backing may be helpful. Choosing a consistent yarn weight for all components produces a more balanced result.
3. How much yarn do I need for this crochet wall hanging?
Yarn requirements depend on the finished size, stitch tension, and thickness of the yarn. For a medium-sized decoration, approximately 150–200 g of cream yarn, 100–150 g of brown yarn, and 20–40 g of each leaf color should provide a reasonable starting allowance. These quantities are estimates, so having a little extra yarn available is recommended.
4. Can I make the acorn wall hanging larger or smaller?
Yes. The Crochet wall hanging in the shape of nuts Pattern can be resized by changing the yarn weight, hook size, and number of stitches. To create a larger acorn, continue the body increases until the desired width is reached and adjust the cap accordingly. For a smaller version, stop increasing earlier and make proportionally smaller leaves and a bow. Always compare the pieces before assembly to maintain balanced proportions.
5. How do I prevent the crochet acorn from curling?
Curling often occurs when the crochet tension is too tight, the increases are insufficient, or the stitches are unevenly distributed. Try using a slightly larger hook, maintaining consistent tension, and adjusting the number of edging stitches. Gentle blocking can also help the body and leaves lie flatter. If the decoration remains unstable, a lightweight backing can provide additional support.
6. What is the best way to attach the oak leaves securely?
The most reliable method is to sew the leaves to the main body using a yarn needle and matching yarn. Stitch along the central veins and selected outer edges while leaving some lobes slightly raised. This technique provides stability without flattening the decorative texture. For heavier leaves, add a few extra stitches near the base and center of each appliqué.
7. Can I use different leaf shapes instead of oak leaves?
Absolutely. Although oak leaves complement the acorn design beautifully, maple leaves, simple oval leaves, or other autumn-inspired shapes can also be used. Choose leaf patterns that are proportional to the acorn body and arrange them in a balanced composition. Mixing leaf shapes can create a more natural woodland appearance.
8. How long does it take to complete the crochet wall hanging?
The completion time varies depending on experience and the level of detail. An intermediate crocheter may finish the project in approximately 6–10 hours, while beginners may need additional time to practice the textured stitches and leaf shaping. Working on the project over several sessions can make the process more comfortable and enjoyable.
9. Can this crochet wall hanging be washed?
The decoration may be gently spot-cleaned, depending on the yarn used. Because it contains raised leaves, a bow, and a textured cap, frequent machine washing is not recommended. If deeper cleaning is necessary and all materials are washable, gently hand wash the piece and reshape it while drying flat. Always follow the care instructions for your specific yarn.
10. Is this crochet pattern suitable for handmade gifts?
Yes. A handmade crochet acorn wall hanging makes a thoughtful seasonal gift for friends, family members, teachers, and anyone who enjoys rustic home décor. Its warm autumn colors and decorative details make it especially appropriate for housewarming celebrations, Thanksgiving gatherings, and fall birthdays. Personalizing the colors can make each finished piece feel unique.
11. How can I make the brown acorn cap more textured?
For a more pronounced texture, alternate front post and back post double crochet stitches while maintaining consistent tension. You can also experiment with bobble stitches, puff stitches, or carefully arranged raised crochet patterns. Keep in mind that heavier textures may require additional structural support, particularly when using thick yarn.
12. Can I sell finished decorations made from this pattern?
Finished handmade items based on this original tutorial can be created for personal use, gifts, or small-scale sales. If you plan to sell finished decorations, consider developing your own color combinations and decorative details to make your work distinctive. Accurate product descriptions, clear photographs, and careful craftsmanship can help customers understand the quality and handmade nature of each piece.
13. Why does my crochet bow look flat instead of dimensional?
A flat bow usually needs more shaping around the center. Pinch the rectangular bow piece firmly before wrapping the central band, and position the tails behind the loops at a slight angle. You can also add a few hidden stitches near the center to hold the loops in place. Using firm cotton yarn helps the bow maintain its shape without requiring heavy stuffing.
14. What makes this pattern a good choice for autumn home décor?
The acorn silhouette, oak leaves, earthy colors, and textured crochet stitches reflect familiar elements of the fall season. The decoration combines natural woodland inspiration with the warmth of handmade fabric art. Its neutral cream body and brown cap also make it easy to coordinate with existing rustic, farmhouse, and seasonal decorations.
Conclusion
The Crochet wall hanging in the shape of nuts Pattern is a beautiful way to celebrate autumn through handmade crochet. By combining a pointed cream acorn body, a richly textured brown cap, colorful oak leaves, a soft decorative bow, and a braided hanging cord, this project creates a charming seasonal decoration with depth, warmth, and personality.
Throughout this tutorial, you learned how to select suitable yarn and materials, understand essential US crochet stitches, shape the acorn body, create raised textures, crochet decorative oak leaves, assemble a dimensional bow, and finish the wall hanging for display. Each stage contributes to the final appearance while offering opportunities to develop your crochet skills and experiment with creative details.
EASILY FIND THE FREE PDF FOR THIS PATTERN HERE!
Whether you make this crochet autumn wall hanging for your own home, as a thoughtful handmade gift, or as part of a collection of seasonal decorations, the project offers a satisfying combination of craftsmanship and creativity. Its adaptable colors and decorative elements make it a versatile pattern that can be enjoyed year after year. We would love to hear your sincere opinion! 🍂🧶 What do you think of this crochet acorn wall hanging? Which autumn colors would you choose for your version? Share your honest feedback, creative ideas, and suggestions in the comments. Your experiences and recommendations can inspire other crochet enthusiasts and help make future handmade projects even more enjoyable!