
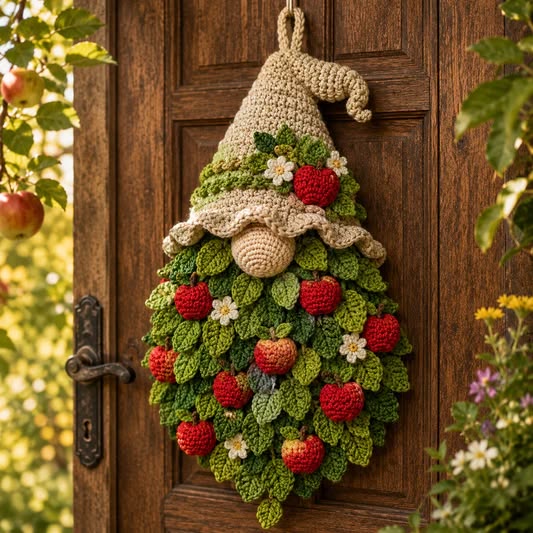
The Crochet gnome wall hanging with a leaf Pattern is a delightful handmade decoration that combines the charm of a woodland gnome with the natural beauty of textured crochet leaves, colorful apples, and delicate flowers. This creative crochet project is perfect for anyone who enjoys seasonal decorations, rustic farmhouse accessories, and unique handmade gifts. Inspired by the cozy woodland design shown in the photograph, this pattern features a long beige gnome hat, a rounded nose, and a beautiful cascading arrangement of green leaves. Bright red apples and small white flowers add cheerful details that make the finished piece especially attractive. Whether displayed on a wooden door, in a kitchen, or on a living room wall, this crochet gnome wall hanging brings warmth and personality to any space.
One of the most appealing aspects of this Crochet gnome wall hanging with a leaf Pattern is the opportunity to combine several basic crochet techniques into one beautiful project. Although the finished decoration looks elaborate, it can be created by making individual components and carefully assembling them. The project uses familiar stitches such as single crochet (sc), half double crochet (hdc), double crochet (dc), and slip stitch (sl st). These stitches help create the gnome’s textured hat, dimensional leaves, miniature apples, and decorative flowers. Beginners with some experience working in rounds can follow the instructions, while intermediate crocheters will enjoy experimenting with different colors, leaf arrangements, and embellishments. The pattern also offers a wonderful opportunity to practice shaping, increasing, decreasing, and joining separate crochet pieces.
Creating a handmade crochet gnome decoration is more than simply following a pattern; it is an enjoyable way to express creativity through yarn and texture. The combination of natural green shades, warm beige yarn, and vibrant red apples gives this design a welcoming countryside appearance. The layered leaves create a full, flowing body that resembles a small woodland tree, while the oversized hat and rounded nose give the gnome its unmistakable personality. This tutorial explains the entire process, from choosing materials and understanding American crochet abbreviations to constructing each decorative element and assembling the finished wall hanging. By following the detailed instructions and working patiently through each stage, you can create a beautiful crochet leaf gnome that celebrates the charm of handmade craftsmanship.
Materials, Crochet Stitches, and Preparation for the Crochet Gnome Wall Hanging
Before beginning the Crochet gnome wall hanging with a leaf Pattern, gather all the necessary supplies and organize your yarn colors. For a decoration approximately 40–45 cm long and 20–25 cm wide, use medium-weight cotton or acrylic yarn in beige, cream, dark green, olive green, light green, red, yellow, brown, and white. A 3.5 mm or 4 mm crochet hook works well with most medium-weight yarns, although the exact size should match your yarn and desired stitch tension. You will also need polyester fiberfill for the nose and apples, a tapestry needle, scissors, stitch markers, and a sturdy hanging cord. A piece of felt or crocheted backing can provide additional support for the finished decoration.
DISCOVER MORE FREE PATTERNS HERE!
Understanding the US crochet terminology is essential for following this pattern accurately. The main abbreviations are ch (chain), sc (single crochet), hdc (half double crochet), dc (double crochet), tr (treble crochet), sl st (slip stitch), st (stitch), inc (increase), and dec (decrease). An increase means working two single crochet stitches into the same stitch, while a decrease combines two stitches into one using the invisible decrease method when possible. The abbreviation MR refers to a magic ring, a popular technique for starting circular crochet pieces without leaving a large opening in the center. Instructions written inside parentheses followed by a multiplication symbol indicate that the sequence should be repeated the specified number of times.
Begin by preparing the colors for the crochet gnome hat, which forms the upper section of the decoration. Choose beige or natural cotton yarn for the main hat and cream yarn for its decorative brim. The hat should have a gently tapered shape, with a curved tip that resembles a traditional woodland gnome cap. For a slightly rustic appearance, choose yarn with a soft matte finish rather than a shiny texture. Keep your stitches firm and consistent so the hat maintains its shape. If you prefer a fuller three-dimensional design, you can lightly stuff the hat with polyester fiberfill before closing its opening or attaching it to the backing.
The next important component is the crochet leaf pattern, which creates the gnome’s flowing body. Prepare at least three different green yarn shades to give the leaves depth and visual interest. Dark green leaves work particularly well in the background, while olive and lighter green leaves can be positioned toward the front. For the approximate size described in this tutorial, plan to make between 35 and 45 leaves, depending on their individual dimensions and the fullness you want. Making leaves in several sizes creates a more organic arrangement and prevents the finished decoration from looking overly symmetrical.
For the decorative accents, prepare red yarn for the crochet apples, white and yellow yarn for the miniature flowers, and small amounts of brown or green yarn for apple stems and leaves. Approximately eight to ten apples and five to seven flowers will create a balanced appearance similar to the reference design. These decorations are optional in quantity, but they contribute significantly to the woodland theme. The apples should be small enough to sit comfortably among the leaves without making the hanging excessively heavy. Use lightweight stuffing and secure each embellishment firmly so the finished piece can be displayed safely.
Finally, prepare a stable foundation for assembling the crochet wall hanging decoration. One practical option is to crochet a flat, elongated backing panel using dark green yarn. Begin with a foundation chain of 21 stitches, work 20 sc across, and continue in rows until the panel measures approximately 25–30 cm long. To create a tapered lower section, decrease one stitch at each end of every other row during the final 8–10 rows. This backing will remain mostly hidden beneath the overlapping leaves. It provides a secure surface for sewing the individual components and helps the finished gnome maintain its shape when hanging vertically.
Step-by-Step Instructions for Crocheting the Gnome Hat, Nose, and Leaf Body
Start the crochet gnome hat pattern using beige yarn and a magic ring. Round 1: Work 6 sc into the MR (6). Round 2: Work 1 sc in each stitch around (6). Round 3: Repeat (1 sc, inc) three times (9). Round 4: Work 1 sc in each stitch around (9). Round 5: Repeat (2 sc, inc) three times (12). Continue increasing by three stitches on every second round, adding one additional sc between increases each time. For example, Round 7 is (3 sc, inc) repeated three times (15), and Round 9 is (4 sc, inc) repeated three times (18). Continue this progression until the hat reaches approximately 54 stitches around, or the desired width. Work two or three additional rounds without increasing, then fasten off, leaving a long tail for sewing. For a gently curved tip, bend the narrow upper section and secure it with a few discreet stitches.
To create the decorative crochet hat brim, attach cream-colored yarn to the lower edge of the hat. Round 1: Work 1 sc into each stitch around the opening. Round 2: Repeat (2 sc, inc) around, adjusting the final stitches if necessary. Round 3: Work 1 hdc in each stitch around. For a softly ruffled edge, work the following decorative sequence repeatedly: (sl st, skip 1 st, 5 dc in the next st, skip 1 st). Continue around the brim, making small adjustments where needed to maintain an even appearance. The resulting scalloped border should extend outward slightly, resembling the textured brim visible in the photograph. Fasten off and weave in the ends securely.
The rounded crochet gnome nose is worked separately using beige or light tan yarn. Round 1: Make 6 sc in a magic ring (6). Round 2: Inc in every stitch (12). Round 3: Repeat (1 sc, inc) six times (18). Round 4: Repeat (2 sc, inc) six times (24). Rounds 5–7: Work 24 sc around. Round 8: Repeat (2 sc, dec) six times (18). Round 9: Repeat (1 sc, dec) six times (12). Add a small amount of polyester fiberfill, keeping the nose rounded but not overly firm. Round 10: Dec six times (6). Fasten off, close the remaining opening, and leave a long sewing tail. Position the nose directly beneath the hat brim, allowing it to protrude slightly for a charming three-dimensional effect.
Next, begin the crochet leaf body by making individual pointed leaves. For a medium leaf, ch 11. Starting in the second chain from the hook, work sl st, sc, hdc, dc, dc, tr, dc, hdc, sc, and sl st along one side of the foundation chain. Ch 2 at the tip, then continue working along the opposite side of the foundation chain with sl st, sc, hdc, dc, tr, dc, dc, hdc, sc, and sl st, placing each stitch into the corresponding available chain position. Join with a sl st and fasten off. For a more defined leaf, work a surface slip-stitch line down the center using a contrasting shade of green. This creates a visible central vein and enhances the realistic botanical appearance.
Create smaller and larger leaves by adjusting the foundation chain and stitch heights. For small leaves, begin with ch 8 and use mostly sc, hdc, and dc stitches. For larger leaves, begin with ch 13 or ch 15 and incorporate additional dc and tr stitches near the center to produce a wider shape. Maintain pointed ends by using shorter stitches near both tips. You can also add a narrow border of sc around each leaf to strengthen its outline. Make approximately 12 small leaves, 18 medium leaves, and 10 large leaves as a starting point. The exact number can be adjusted according to the size of your backing panel and the density of the arrangement.
Once the leaves are complete, arrange them over the backing to form the flowing body of the Crochet gnome wall hanging with a leaf Pattern. Start at the lower point of the backing and position the longest leaves so they extend downward naturally. Work upward in overlapping rows, placing darker leaves beneath lighter ones to create depth. Allow the outer edges to extend beyond the backing so the silhouette resembles a leafy woodland cloak. Secure each leaf near its base with a tapestry needle and matching yarn, leaving its tip free to move slightly. This method produces the layered, dimensional texture that makes the finished decoration visually interesting.
How to Crochet the Apples, Flowers, and Decorative Woodland Details
The miniature crochet apple pattern adds vibrant color to the green leaf arrangement. Begin with red yarn and a magic ring. Round 1: Work 6 sc into the MR (6). Round 2: Inc around (12). Round 3: Repeat (1 sc, inc) six times (18). Round 4: Repeat (2 sc, inc) six times (24). Rounds 5–7: Work 24 sc around. Round 8: Repeat (2 sc, dec) six times (18). Round 9: Repeat (1 sc, dec) six times (12). Lightly stuff the apple, then Round 10: Dec six times (6). Close the opening and weave the yarn tail through the center of the apple from top to bottom, pulling gently to create a slight indentation. This gives the fruit a more recognizable apple shape.
To finish each crochet apple embellishment, add a small brown stem and a green leaf. For the stem, ch 4 with brown yarn and work 3 sl st back along the chain. Sew the stem into the top indentation. For the small green leaf, ch 5, then work sl st, sc, hdc, and sc along one side of the chain. Fasten off and sew the leaf beside the stem. Repeat this process until you have approximately eight to ten apples. For a more natural appearance, use two red shades or add a little yellow yarn to some apples, creating subtle color variations. Avoid making every apple identical, as small differences add character to handmade decorations.
The delicate crochet flower pattern provides a lovely contrast to the bold red apples. Using yellow yarn, make a magic ring and work 5 sc into the ring. Join with a sl st and fasten off. Attach white yarn to any stitch. To create the first petal, ch 2, work 2 dc into the same stitch, ch 2, and sl st into that same stitch. Repeat this petal sequence in each of the remaining four stitches, creating a five-petal flower. Fasten off and weave in the ends. If desired, add a small French knot or a tiny embroidered dot in the center to emphasize the yellow flower center. Make five to seven flowers for the decoration.
For additional texture, create a few small crochet foliage clusters using darker green yarn. Ch 12, then work a combination of sl st, sc, and hdc stitches along the chain to form a narrow curved vine. Attach two or three small leaves to the vine at different points. These clusters can fill gaps between larger leaves and help the decoration look fuller without adding too much weight. You may also crochet a few tiny rounded leaves using a foundation chain of five stitches. The goal is to create an irregular, natural arrangement rather than a perfectly repeated pattern.
Now arrange the crochet apples and flowers across the leaf body before sewing them permanently. Place the larger apples toward the center and lower sections, where they will stand out against the green foliage. Position smaller apples near the sides to create a balanced composition. Distribute the white flowers between the apples, allowing their bright petals to provide visual separation between the red and green elements. Avoid placing all the decorations in straight lines. Instead, use a gentle diagonal or scattered arrangement to imitate fruit and flowers growing naturally among leaves.
Secure each apple and flower using a tapestry needle and matching yarn. Sew through the back of the decorative piece and into several stitches of the backing or underlying leaves, repeating the attachment until the embellishment is stable. Keep the stitches hidden whenever possible. For a more polished handmade crochet wall decoration, tuck the loose yarn ends into the back of the work rather than cutting them close to the knots. Check that the apples remain evenly distributed and that the flowers are not concealed beneath surrounding leaves. Once all decorative elements are attached, gently reshape the leaves with your fingers to restore their natural layered appearance.
Assembling, Finishing, and Displaying the Crochet Gnome Wall Hanging with a Leaf Pattern
The final assembly brings all the components of the Crochet gnome wall hanging with a leaf Pattern together. Lay the completed leafy body on a flat surface and position the gnome hat over its upper edge. The hat should overlap the top row of leaves slightly, creating the impression that the foliage flows naturally from beneath the brim. Place the rounded nose directly under the center of the hat, allowing it to sit in front of the leaves. Adjust the position until the proportions look balanced. The hat should remain the main feature at the top, while the leafy body forms a long, tapered silhouette beneath it.
Attach the crochet gnome hat securely to the backing using a tapestry needle and beige yarn. Sew along the lower edge and a short section of each side, keeping the stitches hidden beneath the decorative brim. If the hat is lightly stuffed, distribute the fiberfill evenly before finishing the attachment. Next, sew the nose into place with several firm stitches. Make sure it remains centered and protrudes slightly below the brim. The nose is one of the most recognizable features of a traditional gnome, so careful positioning makes a noticeable difference in the finished appearance.
Create a sturdy crochet hanging loop using beige yarn. Ch approximately 25–30 stitches, depending on the desired loop length. Starting in the second chain from the hook, work 1 sc in each chain to create a reinforced cord. Fasten off, leaving long tails at both ends. Fold the cord into a loop and sew both ends securely to the upper back of the hat, ideally connecting them to the backing as well. Reinforce the attachment by stitching through several rows. If the decoration will be displayed on a door, ensure the loop is strong enough to support the complete weight of the finished project.
For a professional finish, examine the back of the crochet leaf wall hanging and secure any loose yarn ends. If the backing is visible from the sides, add more leaves or trim the backing carefully without cutting into the stitches. You may also sew a second flat crocheted panel over the reverse side to conceal attachment threads and provide additional stability. If you choose this method, make the second panel slightly smaller than the decorative silhouette so it remains hidden from the front. Avoid excessive stuffing or heavy embellishments, as these may cause the hanging to lose its natural shape.
The finished crochet gnome wall hanging with apples and leaves can be displayed in several ways. It looks especially attractive against a wooden door, where the beige hat and green foliage contrast beautifully with the warm background. It can also decorate a kitchen wall, craft room, covered porch, or seasonal display. The apples and flowers give the design a cheerful countryside character, making it suitable for autumn decorating, harvest celebrations, and farmhouse-inspired interiors. For winter, you could replace the apples with red berries and add a few small white snowflakes. For spring, use brighter green leaves and pastel flowers.
Proper care will help preserve the appearance of your handmade crochet gnome decoration. Because the design includes many individual components, gentle spot cleaning is usually preferable to machine washing. Use a soft, slightly damp cloth to remove surface dust, and allow the decoration to air-dry completely. Avoid wringing or twisting the leaves, as this can distort their shape. Store the hanging flat or loosely supported when not in use, keeping it away from excessive moisture and direct sunlight. With careful handling, this charming project can remain a favorite handmade decoration for many seasons.
Frequently Asked Questions (FAQ) About the Crochet Gnome Wall Hanging with a Leaf Pattern
1. Is the Crochet gnome wall hanging with a leaf Pattern suitable for beginners?
Yes, this project is suitable for confident beginners who already understand basic crochet stitches and simple increases and decreases. The decoration is assembled from individual components, allowing you to practice one technique at a time. Beginners may find it helpful to complete the hat, nose, and a few leaves before attempting the smaller apples and flowers. The most challenging part is usually arranging and attaching the individual pieces rather than crocheting them.
2. What yarn is best for making a crochet gnome wall hanging?
Medium-weight cotton yarn is an excellent choice because it produces clearly defined stitches and helps the leaves maintain their shape. Acrylic yarn is another affordable and lightweight option, especially for decorative projects. Cotton-acrylic blends can provide a balance of softness and structure. For the most consistent results, use yarns of similar thickness throughout the project.
3. How much yarn is needed for this crochet gnome pattern?
The exact amount depends on the finished size, yarn thickness, and number of decorative elements. For a medium-sized wall hanging, approximately 150–200 g of green yarn, 50–75 g of beige and cream yarn combined, and 30–50 g of red yarn should provide a useful starting estimate. Small leftover amounts of white, yellow, and brown yarn are generally sufficient for the flowers and stems. It is wise to keep a little extra green yarn available in case you decide to add more leaves.
4. How long does it take to complete the crochet gnome wall hanging?
Most crocheters can complete the project in approximately 8–15 hours, although the time varies with experience and the number of embellishments. The leaves often require the greatest amount of time because many individual pieces must be made. Working in stages can make the project more enjoyable. For example, you can crochet the hat and nose on one day, prepare the leaves over several sessions, and finish the apples, flowers, and assembly afterward.
5. Can I make the crochet gnome wall hanging larger or smaller?
Absolutely. To make a larger decoration, increase the number of rounds in the hat, use longer foundation chains for the leaves, and create a larger backing panel. For a smaller version, use finer yarn, a smaller hook, and fewer leaves. Maintain the proportions between the hat, nose, and leafy body to preserve the recognizable gnome silhouette. Adjust the number of apples and flowers to suit the final dimensions.
6. How can I make the crochet leaves look more realistic?
Using multiple green shades is one of the simplest ways to create realistic foliage. Combine dark green, olive, moss, and light green leaves, and vary their sizes and directions. Adding a central vein with surface slip stitches or simple embroidery creates additional definition. When assembling the decoration, overlap the leaves rather than placing them in perfectly straight rows. This produces a more natural, layered appearance.
7. Can I use this crochet gnome pattern for Christmas decorations?
Yes. Although the original design has a woodland and harvest-inspired appearance, it can easily be adapted for Christmas. Replace the apples with small red berries, add white crocheted snowflakes, or use dark green and gold yarn for the foliage. A red or cream hat can also create a festive look. These changes allow the same basic construction method to be used for different seasonal decorations.
8. Do I need to use stuffing for the entire crochet gnome?
No. Stuffing is mainly needed for the rounded nose and miniature apples. The hat may be lightly stuffed if you want additional volume, but the leaf body should remain relatively flat so it hangs naturally. Adding too much stuffing can make the decoration heavy and difficult to display. A flat backing provides sufficient structure for the foliage.
9. How do I keep the crochet wall hanging from curling or losing its shape?
Consistent stitch tension and a stable backing help prevent unwanted curling. If individual leaves curl excessively, you can gently reshape them using a blocking method appropriate for the yarn fiber. Allow the pieces to dry completely before assembly. Attaching each leaf securely near its base also helps maintain the overall shape while leaving the tips free for a natural appearance.
10. Can I sell finished decorations made using this crochet pattern?
Handmade crochet decorations can be attractive items for craft fairs, seasonal markets, and small handmade businesses. If you create your own finished pieces, consider the cost of materials, production time, packaging, and your desired profit when setting prices. If working from someone else’s published pattern, review any applicable licensing terms and respect the original designer’s protected photographs and written instructions. Developing your own color combinations and decorative arrangements can also help give your finished work a distinctive appearance.
11. What is the best way to attach the apples and flowers securely?
The most reliable method is to sew each embellishment directly to the backing or to several sturdy stitches beneath the leaves. Use matching yarn and a tapestry needle, making multiple passes through the attachment points. This method is generally more durable than relying only on craft glue. Always check the attachments before displaying the decoration, especially if it will hang on a frequently used door.
12. Can I replace the apples with other crochet decorations?
Yes. The leaf body provides a versatile foundation for many decorative themes. Small pumpkins, cherries, mushrooms, berries, butterflies, or seasonal flowers can replace the apples. Keep the embellishments lightweight and proportionate to the size of the hanging. Changing these details is a simple way to create different versions of the same Crochet gnome wall hanging with a leaf Pattern throughout the year.
Conclusion: Create Your Own Beautiful Crochet Gnome Wall Hanging
The Crochet gnome wall hanging with a leaf Pattern is a charming project that brings together traditional crochet techniques, botanical textures, and playful decorative details. Throughout this tutorial, you learned how to choose suitable materials, understand American crochet abbreviations, create a tapered gnome hat, crochet a rounded nose, make dimensional green leaves, and add miniature apples and flowers. You also discovered how to assemble the individual pieces onto a supportive backing, attach a sturdy hanging loop, and finish the decoration for a polished handmade appearance.
One of the greatest advantages of this crochet gnome pattern is its flexibility. By changing the colors, leaf sizes, and decorative accents, you can create a unique wall hanging that matches your home décor or celebrates a particular season. The combination of textured foliage, cheerful apples, and a whimsical gnome hat makes this project especially appealing for anyone who loves crochet home decorations, woodland crochet projects, and handmade seasonal crafts.
Whether you are making this decoration for your own home or preparing a thoughtful handmade gift, take your time and enjoy each stage of the creative process. Every leaf, flower, and apple adds personality to the finished piece, making it a wonderful example of the beauty of handmade crochet.
EASILY FIND THE FREE PDF FOR THIS PATTERN HERE!
We would love to hear your sincere opinion! 🍃🍎 Have you tried making a crochet gnome wall hanging, or would you like to create one using this pattern? Share your honest thoughts, experiences, and suggestions in the comments. Tell us which colors or decorative details you would choose, and feel free to suggest new crochet projects you would enjoy learning. Your feedback and creative ideas are always welcome and can inspire even more beautiful handmade creations! 🧶❤️