
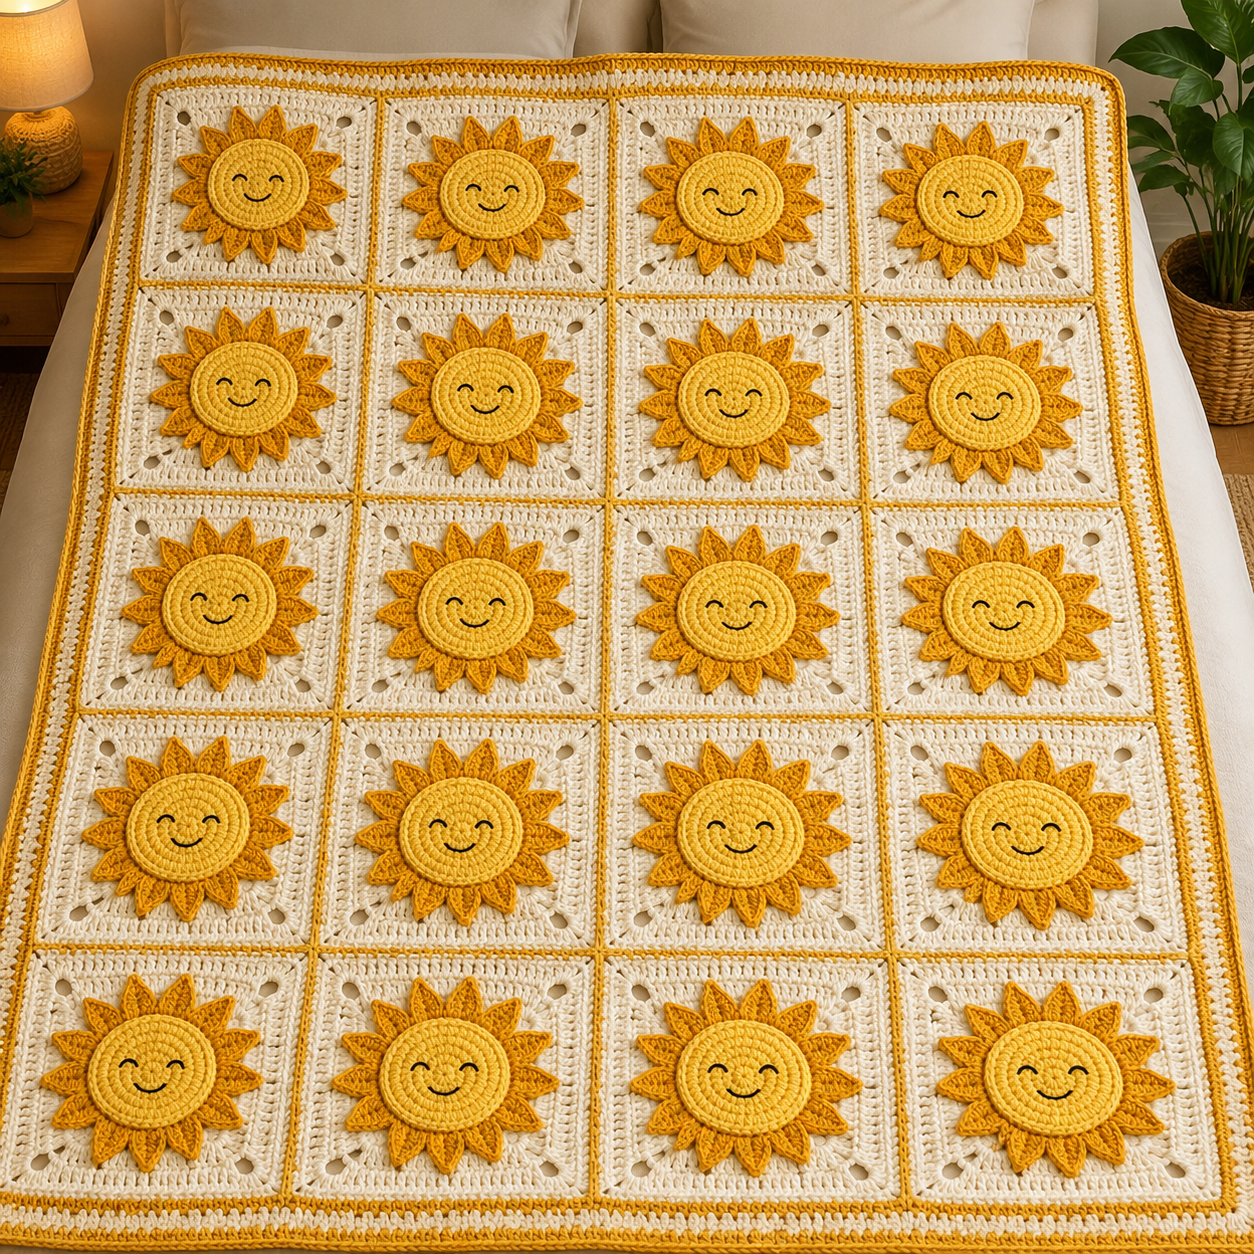
Crochet Square with a Sun Motif Pattern is a cheerful crochet project that combines the timeless structure of a granny-style square with a bright, dimensional sun placed at the center. Inspired by the handmade piece shown in the reference image, this design uses warm golden yarn for the sun, soft cream yarn for the surrounding square, and simple embroidery to create a friendly smiling face. The result can work beautifully as an individual decorative block or as part of a larger blanket, cushion cover, wall hanging, baby-room decoration, or seasonal home accessory. Although the finished piece looks detailed, the construction becomes much easier when it is divided into separate stages: crocheting the circular center, forming the sun rays, building the square background, joining the elements, and adding the embroidered facial details. This tutorial explains those stages in approachable terms so that crocheters who already understand basic stitches can reproduce a similar effect. Because yarn weight, hook size, and personal tension can slightly change the dimensions, the instructions also encourage measuring and adjusting the work as you go.
The central idea behind the Crochet Square with a Sun Motif Pattern is the contrast between circular and geometric crochet construction. The yellow center begins as a flat circle worked in rounds, while the pointed rays create the recognizable silhouette of the sun. Behind it, a cream square uses increases at four corners to transform straightforward crochet rows into a balanced frame. Decorative spaces near the corners give the block a lighter appearance and help reproduce the airy look visible in the reference project. This combination makes the pattern especially useful for learning how crochet shapes interact: a circle can become an appliqué, triangular rays can add texture, and a traditional square can function as a stable foundation. The pattern does not depend on unusual materials or complicated equipment, making it suitable for a comfortable afternoon project once the basic techniques are understood. For the cleanest result, consistent tension is more important than crocheting quickly.
Before starting the Crochet Square with a Sun Motif Pattern, gather medium-weight cotton or cotton-blend yarn in golden yellow, cream or ivory, and a small amount of black yarn or embroidery thread. A crochet hook around 4.0 mm to 4.5 mm is a practical starting point for many medium-weight yarns, although the yarn label should always guide the final choice. You will also need scissors, a yarn needle, stitch markers, and optionally blocking pins and a blocking mat. In the instructions, MR means magic ring, ch means chain, sl st means slip stitch, sc means single crochet, hdc means half double crochet, dc means double crochet, tr means treble crochet, inc means increase, st/sts means stitch or stitches, sp means space, rep means repeat, and FO means fasten off. Numbers inside parentheses show the approximate stitch count at the end of a round where relevant. Read each round completely before crocheting it, especially during the sun-ray and corner sections.
Crocheting the Round Sun Center
Begin the Crochet Square with a Sun Motif Pattern with the golden-yellow yarn. Make an MR, then work 6 sc into the MR. Pull the ring closed and join with a sl st if you prefer joined rounds. Alternatively, you can work continuously and place a stitch marker in the first stitch of every round. The second method can make the circular center appear slightly smoother because there is no visible joining seam. Round 1: MR, 6 sc, close ring. (6 sts). Keep the starting ring secure but avoid pulling so tightly that the stitches become difficult to enter.
DISCOVER MORE FREE PATTERNS HERE!
For Round 2, increase in every stitch around: [2 sc in next st] x 6. (12 sts). For Round 3, work [sc in next st, 2 sc in next st] x 6. (18 sts). These regularly spaced increases create a flat circle. Check the piece after each round. If it begins curling upward, your stitches may be too tight or additional increases may be necessary. If the circle becomes noticeably wavy, there may be too many increases for your tension.
Continue with Round 4: [sc in next 2 sts, 2 sc in next st] x 6. (24 sts). Then crochet Round 5: [sc in next 3 sts, 2 sc in next st] x 6. (30 sts). For Round 6, work [sc in next 4 sts, 2 sc in next st] x 6. (36 sts). At this stage the yellow circle should already resemble the center of the sun. Smooth it gently with your fingers and check that the increases are distributed evenly rather than stacked directly over one another.
To create a slightly larger center like the one suggested by the reference image, work Round 7: [sc in next 5 sts, 2 sc in next st] x 6. (42 sts). Follow with Round 8: [sc in next 6 sts, 2 sc in next st] x 6. (48 sts) if additional diameter is required. You do not necessarily need both rounds when using thick yarn. The important goal is a flat yellow disk large enough to become the visual focal point without covering almost the entire cream square.
The term increase, abbreviated as inc, simply means placing more than one stitch into the same stitch from the previous round. In this project, increases allow the circumference of the circle to grow at approximately the same rate as its diameter. This is one of the most useful techniques to understand when crocheting circular appliqués, flowers, coasters, hats, and other projects worked from the center outward. Maintaining a predictable increase rhythm also keeps the sun center symmetrical.
Before moving to the rays, place the yellow circle on a flat surface and check its shape. A small amount of natural curling can usually be corrected during blocking, but severe rippling is easier to fix immediately. If necessary, remove the final round and adjust your hook size or tension. Once satisfied, do not cut the yarn if you plan to crochet the rays directly into the outer round. Keeping the same yarn attached creates a cleaner transition and reduces the number of ends that must be woven in later.
Creating the Pointed Crochet Sun Rays
The rays are what transform the simple circle into the recognizable Crochet Square with a Sun Motif Pattern. The sample appearance can be recreated with approximately 12 pointed rays, although the exact number can be adjusted according to your final stitch count. Divide the outer edge as evenly as possible and place stitch markers around the circle. Equal spacing is more important than following an exact number because different yarn weights may produce slightly different circular dimensions.
For a compact ray worked directly from the sun, begin at the marked position and crochet approximately: sl st in next st, sc in next st, hdc in next st, dc in next st, tr in next st, ch 1, tr in next st, dc in next st, hdc in next st, sc in next st, sl st in next st. This sequence rises gradually toward the center and then descends, creating a pointed triangular shape. Depending on your stitch count, reduce the number of base stitches slightly so all rays fit evenly.
For a more dimensional ray similar to a small crocheted triangle, you can work each ray in short turning rows. Attach the golden yarn, ch 1, sc across 5 or 6 selected sts, turn. On the following row, ch 1, sc2tog, sc across until 2 sts remain, sc2tog, turn. Repeat the decrease process until only one or two stitches remain. FO and weave in the yarn end. This produces defined triangular rays and can closely imitate the raised appearance of the motif in the reference image.
The abbreviation sc2tog means single crochet two stitches together. Insert the hook into the next stitch, yarn over and pull up a loop; insert the hook into the following stitch, yarn over and pull up another loop; yarn over again and pull through all loops. The result turns two stitches into one and therefore narrows the row. On the sun rays, symmetrical decreases on both sides help the triangle reach a centered point.
Repeat the chosen ray method around the entire yellow disk. Try to make every ray similar in height, but small handmade differences can add character to the finished piece. Once the last ray is completed, weave in all yellow yarn tails on the back. Arrange the points with your fingers, checking their spacing from the center of the motif. If one ray bends significantly, lightly dampen it and shape it during blocking rather than stretching it aggressively.
At this point, the primary motif of the Crochet Square with a Sun Motif Pattern is complete. Set the sun aside temporarily if you are making the square as a separate foundation. Separating the construction into a sun appliqué and a cream square is particularly beginner-friendly because each part can be blocked individually before assembly. It also makes color changes easier and allows you to position the sun precisely in the middle before sewing.
Making the Cream Crochet Square and Joining the Motif
For the cream background, begin with an MR and crochet a traditional square worked from the center outward. One practical foundation is ch 3 to count as the first dc, then crochet 2 dc, ch 2, 3 dc, ch 2, 3 dc, ch 2, 3 dc, ch 2 into the ring. Join to the top of the beginning chain using a sl st. You now have four groups of double crochet separated by four corner spaces. Pull the magic ring closed carefully.
For the next round, sl st to the nearest corner space, ch 3, 2 dc, ch 2, 3 dc into that same corner. Work 3 dc into the next available space, then crochet [3 dc, ch 2, 3 dc] in the next corner. Continue around using the same principle. Each ch-2 corner space receives two groups of stitches because those increases allow the square to expand without becoming rounded.
As the square grows, continue working rows of dc along each side while keeping [2 dc or 3 dc, ch 2, 2 dc or 3 dc] increases at the corners according to your preferred stitch density. To reproduce the more open detail visible near the corners of the inspiration, introduce occasional ch-2 spaces. For example, work several dc, ch 2, skip 2 sts, then continue with dc. On the following round, crochet directly into that chain space.
The term chain space, or ch-sp, refers to the opening created when chain stitches span across one or more stitches. In the Crochet Square with a Sun Motif Pattern, these openings give the cream foundation visual lightness while allowing the bright central sun to remain dominant. They are decorative rather than essential, so beginners may work solid dc rows if they prefer. Maintaining four clear corners is far more important than reproducing every opening exactly.
Continue enlarging the square until there is enough cream background visible around the yellow sun. Lay the sun over the square frequently while crocheting. Ideally, the tips of the rays should sit comfortably inside the outer border rather than extending beyond it. Finish the square with one or two rounds of sc, hdc, or dc to create a stronger frame. In each corner, increase sufficiently—for example 3 sc in the corner st—to prevent the border from pulling inward.
Once both pieces are finished and lightly blocked, position the sun in the exact center of the square. Thread a yarn needle with matching yellow yarn and sew around the outer edges of the rays using small, discreet stitches. Alternatively, attach only selected points if you prefer slightly raised rays. Make sure the sewing stitches do not pull the cream square out of shape. Secure the yarn at the back, weave through several stitches, and trim the remaining tail.
Adding the Smile, Finishing the Square, and Using the Pattern
The friendly face adds personality to the Crochet Square with a Sun Motif Pattern. Use black embroidery thread or thin black yarn and a blunt yarn needle. Before stitching, identify the horizontal center of the yellow circle. Place two temporary markers where the eyes will sit. Positioning both eyes at approximately the same height creates a balanced expression, while leaving enough space below them allows room for the curved smile.
To create closed smiling eyes, make a small curved embroidered line for each eye. Several short stitches usually look cleaner than attempting to force one long stitch into a curve. Avoid pulling the black thread too tightly because the yellow crochet fabric can pucker. After making the first eye, count the crochet rows or stitches to position the second eye symmetrically. Secure each yarn tail carefully on the back of the sun.
For the mouth, begin near one side of the smile and make a gentle downward curve followed by an upward curve toward the other side. A basic backstitch or small surface stitches work well. The exact facial expression is flexible, so the mouth can be wider, smaller, or slightly curved depending on the style you prefer. The simple closed-eye smile shown in the inspiration gives the sun a warm and playful character without requiring complicated embroidery.
After finishing the face, weave in every remaining yarn end. Thread each tail through the back of several stitches in one direction, reverse direction, and pass through several additional stitches before trimming. This method helps prevent the tails from loosening during normal handling. If the square will be incorporated into a washable blanket, secure the yarn ends particularly carefully and follow the washing instructions recommended for your chosen yarn.
Blocking is one of the most useful finishing techniques for this project. Lightly dampen the square or use the blocking method suitable for the fiber, then shape it into an even square. Pin the four corners first, followed by the middle of each side. Arrange all sun rays so they radiate evenly from the center. Allow the piece to dry completely before removing the pins. Blocking can greatly improve the definition of the square, decorative spaces, and pointed rays.
The finished Crochet Square with a Sun Motif Pattern can be used in many creative ways. Make several matching blocks for a baby blanket, combine sun squares with plain cream squares for a larger throw, sew one onto a cushion cover, or display a single block as cheerful fiber art. Changing the background and sun colors provides even more options. Soft yellow and cream create a calm look, while orange, gold, blue, green, or pastel backgrounds can make the same basic construction feel completely different.
Frequently Asked Questions About the Crochet Square with a Sun Motif Pattern
What skill level is recommended for this crochet pattern?
The project is best suited to an adventurous beginner or intermediate crocheter. Basic stitches such as sc, hdc, dc, tr, chains, increases, decreases, and slip stitches are used. A beginner can still complete the project by practicing the circular center and square separately before assembling them.
What yarn works best for a Crochet Square with a Sun Motif Pattern?
Cotton and cotton-blend yarns are excellent choices because they provide clear stitch definition and help the rays maintain their shape. Acrylic yarn can also be used, particularly for blankets and cushions. The most important point is to use similar yarn weight for the sun and square so both pieces remain proportionate.
What crochet hook size should I use?
A 4.0 mm to 4.5 mm hook is a practical starting range for many medium-weight yarns. However, your yarn label and individual crochet tension should guide the final decision. If the fabric is too stiff, move to a slightly larger hook. If the stitches are loose and the motif lacks definition, try a slightly smaller hook.
Why is my crochet sun center becoming wavy?
A wavy circle usually indicates that the circumference is increasing too quickly. Check whether you accidentally added extra stitches or increases. You can remove the last round and reduce the number of increases. Yarn type and tension can also affect how quickly a circle expands.
Why is my sun center curling instead of lying flat?
Curling often occurs when there are too few increases or the stitches are too tight. Confirm the stitch count and gently relax your tension. Moving up one hook size may also help. Mild curling can usually be corrected through blocking, but strong curling should be fixed before adding the rays.
How many rays should the crochet sun have?
Approximately twelve rays work nicely for this style, but there is no mandatory number. The total depends on the diameter of the yellow center, yarn thickness, hook size, and number of stitches used at the base of each ray. Even spacing produces a more polished result than forcing a predetermined ray count.
Can the sun be crocheted directly onto the square?
Yes, but creating the sun and cream background separately is often easier. Separate construction allows both pieces to be adjusted and blocked before joining. It also gives you greater control over the exact placement of the motif.
Can I make the square larger?
Yes. Continue adding rounds around the cream section while maintaining increases at all four corners. You can alternate solid rounds with rounds containing chain spaces to preserve the decorative appearance. Stop when the square reaches the dimensions required for your project.
How do I keep the corners square instead of rounded?
Use consistent corner increases in every round. A typical corner can contain a combination such as dc, ch 2, dc or larger groups such as 3 dc, ch 2, 3 dc, depending on the construction. Blocking afterward will further define the corners.
Can I use this motif for a blanket?
Absolutely. Multiple Crochet Square with a Sun Motif Pattern blocks can be joined to create a blanket. For easier assembly, make every square with the same yarn weight, hook size, number of rounds, and approximate finished dimensions. Blocking all blocks to equal measurements before joining will produce cleaner seams.
How can I make the face safe for a baby project?
Embroidered facial features are a practical option because they avoid separate hard components such as plastic eyes. Make the embroidery secure, weave in all ends carefully, and inspect the finished piece regularly if it will be used by a young child. Avoid loose decorative parts that could detach.
Do I have to embroider a face on the sun?
No. The motif works equally well as a traditional sun without facial details. You can leave the yellow center plain, add simple surface embroidery, or personalize it according to the intended project. The smile is decorative and does not affect the crochet construction.
How do I make every square the same size?
Use the same yarn, hook, stitch counts, number of rounds, and tension whenever possible. Measure each block before fastening off and block all finished squares to matching dimensions. Keeping simple notes about your final stitch counts is especially useful when producing many blocks.
Can the colors be changed?
Yes. Although gold and cream closely match the warm look of the reference design, the pattern is highly adaptable. A pale-blue square with a golden sun creates a sky-inspired effect, while pastel combinations work well for nursery décor. Stronger contrasting shades can create a more graphic and contemporary appearance.
What does FO mean in crochet instructions?
FO means fasten off. After completing the final stitch, cut the yarn while leaving a short tail, pull the tail through the remaining loop, and tighten gently. The tail should then be securely woven into the back of the crochet fabric.
Conclusion
The Crochet Square with a Sun Motif Pattern brings together several valuable crochet techniques in one joyful project. You learned how to build a flat circular center with systematic increases, how to turn the edge into pointed sun rays, how to create a structured cream square with decorative chain spaces, and how to assemble the two crochet components neatly. The tutorial also covered essential crochet abbreviations such as MR, ch, sc, hdc, dc, tr, sl st, sc2tog, ch-sp, and FO, making the project useful not only as a finished decoration but also as practice for future crochet patterns.
The most important part of achieving an attractive result is maintaining consistent tension and checking the shape frequently. A properly formed circular center should lie relatively flat, the rays should be distributed evenly, and the square should maintain four clearly defined corners. Small differences between handmade stitches are completely natural, while careful blocking can refine the final shape and help every element look more balanced.
EASILY FIND THE PDF FOR THIS PATTERN HERE!
Once you understand the basic construction, the Crochet Square with a Sun Motif Pattern becomes easy to personalize. You can change the colors, enlarge the cream border, modify the number or length of the rays, leave the center plain, or embroider different expressions. Multiple squares can also be joined into larger handmade pieces, giving this single motif plenty of creative possibilities. If you make this project, leave your sincere opinion about the pattern and share any suggestions that could make the Crochet Square with a Sun Motif Pattern even more useful for other crochet lovers. Your experience with yarn choice, colors, hook sizes, or personal modifications can inspire new variations and help other makers approach the project with confidence. A useful next step is to save the stitch abbreviations and final measurements from your first finished square so every additional block can be reproduced at the same size.