
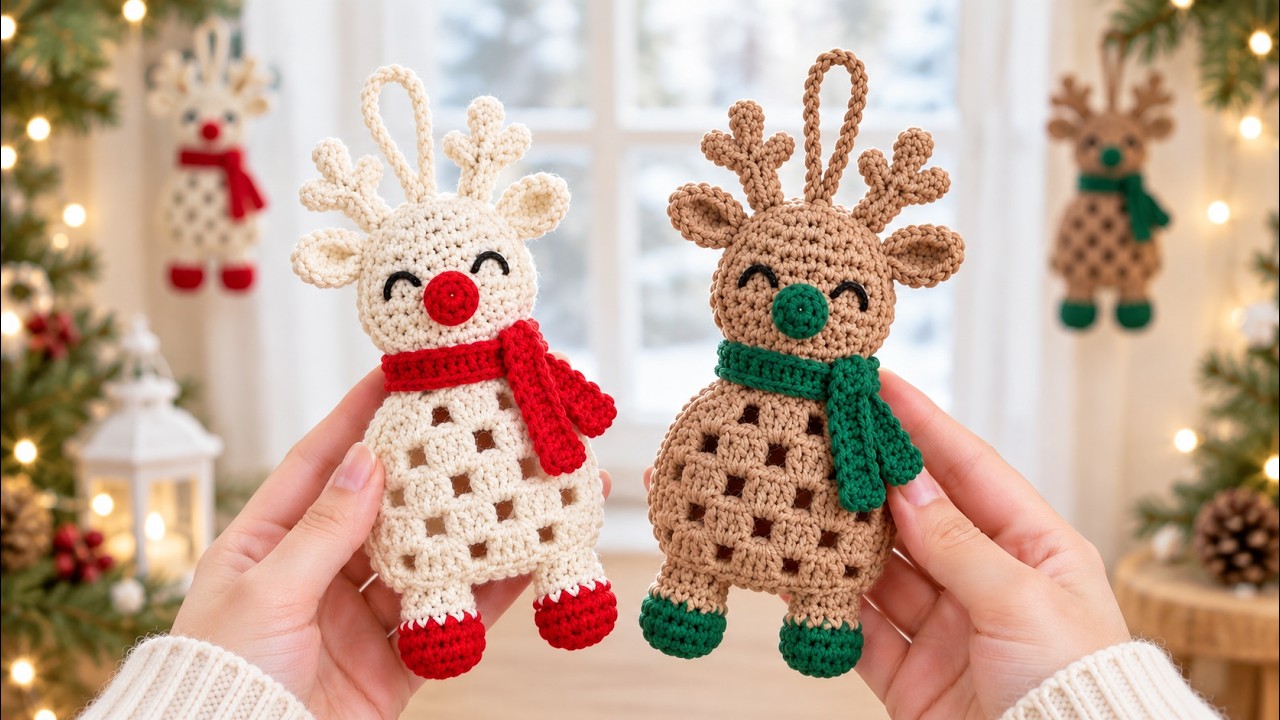
This Crochet reindeer Pattern turns a festive character into a charming handmade ornament with a cheerful face and a classic granny square body.
Inspired by the reindeer in the reference photo, this project combines a rounded head, branching antlers, little ears, and colorful boots.
A bright scarf and matching nose give each reindeer its own personality without requiring complicated colorwork.
Choose cream yarn with red accessories for a traditional Christmas look, or use caramel yarn with forest green details.
The instructions below use US crochet terms, with measurements in centimeters wherever size is discussed.
This is an original interpretation of the pictured design; your finished proportions will vary with your yarn, hook, and tension.
One appealing feature of this Crochet reindeer Pattern is the combination of solid crochet and an airy granny square.
The head and boots use closely worked stitches, while the body features clusters separated by small decorative openings.
That contrast creates texture and helps the ornament feel light enough to hang from a sturdy Christmas tree branch.
You will practice working in rounds, increasing, decreasing, making small tubes, and sewing separate pieces together.
Although the project includes several components, each part uses a short sequence that you can complete at a comfortable pace.
Read the full pattern before beginning so you understand how the head, body, and accessories fit together.
For a polished result, keep your stitches consistent and use the same yarn weight throughout the main pieces.
A smaller hook helps prevent stuffing from showing through the head, nose, antlers, and boots.
Embroidered eyes create the smiling expression shown in the photograph and avoid the need for plastic eye attachments.
The finished reindeer is intended as a decorative Christmas ornament, particularly when made with a hanging loop and scarf.
This tutorial provides an adaptable construction method rather than a tested replica with a guaranteed finished size.
Take your time with the assembly, because balanced placement of the features makes a noticeable difference to the finished character.
1. Gather Materials and Learn the US Crochet Terms
Materials: Gather approximately 40–60 g of DK cotton yarn in cream or caramel, plus small amounts of red or green for the nose, scarf, and boots. You also need black embroidery thread, polyester stuffing, a yarn needle, scissors, stitch markers, and a 2.5–3 mm crochet hook. These yarn quantities are estimates. Select a hook that produces firm fabric for the stuffed pieces without making your hands uncomfortable.
DISCOVER MORE FREE PATTERNS HERE!
US crochet abbreviations: ch means chain; sl st means slip stitch; sc means single crochet; hdc means half double crochet; dc means double crochet; st/sts means stitch/stitches; and MR means magic ring. An inc, or increase, is 2 sc in the same stitch. A dec, or decrease, joins 2 stitches into one. Numbers in parentheses at the end of a round indicate the completed stitch count.
How to make the basic stitches: For sc, insert the hook, yarn over, pull up a loop, then yarn over and draw through both loops. For hdc, yarn over before inserting the hook, pull up a loop, then yarn over and draw through all three loops. For dc, yarn over, insert the hook, pull up a loop, then draw yarn through two loops twice. Make chains by drawing yarn through the loop already on your hook.
Useful pattern techniques: A granny cluster in this tutorial means 3 dc worked into the same space. To make an invisible decrease, insert the hook through the front loops of the next two stitches, yarn over and draw through both front loops, then yarn over and draw through the remaining two loops. Instructions in brackets are repeated as directed. Unless otherwise stated, work the stuffed components in continuous rounds without joining.
Size and tension: Aim for a granny square approximately 10–12 cm wide and a head approximately 7–8 cm across after stuffing. Your Crochet reindeer Pattern may finish around 21–25 cm tall, excluding the hanging loop, depending on your tension and component placement. These are approximate targets. Make the body first, then compare it with the head before completing all the smaller pieces.
Color planning and preparation: Use the main color for the body, head, ears, antlers, and upper legs. Choose one contrasting color for the nose, boots, and scarf to echo the coordinated photograph. Leave sewing tails approximately 20–25 cm long wherever instructed. Mark the first stitch of each continuous round and move the marker upward as you work, checking stitch counts before continuing.
2. Crochet the Granny Square Body and Rounded Head
Body, round 1: With the main color, make an MR. Ch 3, counting this as the first dc, then work 2 dc into the ring. Next, work [ch 2, 3 dc] three times, followed by ch 2. Join with a sl st to the top of the beginning ch 3. You should have four 3-dc clusters and four corner spaces. Close the ring firmly and secure the starting tail.
Body, round 2: Sl st across the next two stitches and into the corner space. Ch 3, work 2 dc, ch 2, and 3 dc into that same space. Ch 1, then work [(3 dc, ch 2, 3 dc) in the next corner, ch 1] three times. Join to the top of the beginning ch 3. Each corner now contains two clusters, separated by a ch-2 corner space.
Body, rounds 3–4 and edging: Begin each round in a corner space, using sl sts to reach it. Work (3 dc, ch 2, 3 dc) in every corner and 3 dc in each side ch-1 space, placing ch 1 between neighboring groups. Join each round. After round 4, check the width; add another round only if needed for your preferred proportions. Edge with 1 sc in each dc, 1 sc in each ch-1 space, and 3 sc in each corner. Fasten off and weave in the ends.
Head, increasing rounds: Make an MR in the main color. Round 1: 6 sc into the ring (6). Round 2: inc around (12). Round 3: [sc, inc] six times (18). Round 4: [2 sc, inc] six times (24). Round 5: [3 sc, inc] six times (30). Round 6: [4 sc, inc] six times (36). Round 7: [5 sc, inc] six times (42). Round 8: [6 sc, inc] six times (48).
Head, shaping and closing: Rounds 9–13: sc around (48 each round). Round 14: [6 sc, dec] six times (42). Round 15: [5 sc, dec] six times (36). Round 16: [4 sc, dec] six times (30). Round 17: [3 sc, dec] six times (24). Add stuffing, then work round 18: [2 sc, dec] six times (18). Round 19: [sc, dec] six times (12). Round 20: dec six times (6). Fasten off, thread through the remaining front loops, and close.
Shape the head and position the body: Gently flatten the stuffed head between your palms to create a rounded face with a slightly shallower profile. Keep it softly padded rather than tightly packed. Lay the granny square with one edge horizontal and position the head over the center of its upper edge. Let the lower head overlap the square slightly, but wait to sew them together until the face and antlers are complete.
3. Make the Nose, Ears, Antlers, Legs, and Scarf
Nose: Using the accessory color, work 6 sc into an MR (6). Round 2: inc around (12). Round 3: sc around (12). Round 4: dec six times (6). Add a tiny amount of stuffing before closing. Fasten off with a long sewing tail. Position this small rounded nose near the lower center of the face. Pin it in place while checking that enough room remains above it for the embroidered eyes.
Ears, make two: With the main color, work 6 sc into an MR (6). Round 2: inc around (12). Round 3: [sc, inc] six times (18). Round 4: sc around (18). Round 5: [sc, dec] six times (12). Leave the ears unstuffed, flatten each opening, and close through both layers with 6 sc. Fasten off with a sewing tail. Pinch the base slightly when attaching to create a shallow cup.
Antler stems, make two: Work 6 sc into an MR using the main color or a slightly darker brown. Continue with 6 sc per round for seven additional rounds, producing a narrow tube eight rounds tall. Add a very small amount of stuffing if needed, using the blunt end of your hook to guide it. Flatten the open base and leave a long tail. Avoid wire inserts; these antlers can be supported by firm stitches and secure sewing.
Antler branches, make four: For each branch, work 4 sc into an MR, followed by two rounds of 4 sc. Fasten off with a sewing tail and leave unstuffed. Sew two branches onto the upper portion of each stem, placing them at slightly different heights and angles. Close each branch base against the stem with small stitches. The completed antlers should resemble short forks, with a central tip and two side branches.
Boots and upper legs, make two: In the accessory color, work round 1: 6 sc in an MR (6); round 2: inc around (12); round 3: [sc, inc] six times (18). Round 4: sc around (18). Round 5: [sc, dec] six times (12). Change to the main color and work rounds 6–8 with 12 sc each. Lightly stuff the boots and lower legs, flatten the opening, and close with 6 sc through both layers. Leave sewing tails.
Scarf: With the accessory color, ch 61. Row 1: sc in the second chain from the hook and each remaining chain (60). Rows 2–3: ch 1, turn, and sc across (60). Fasten off and weave in the ends. The scarf should measure approximately 28–35 cm, depending on tension. Check that it wraps around the lower head with two visible ends; adjust the starting chain if your reindeer needs a different length.
4. Assemble the Reindeer and Finish the Ornament
Embroider the smiling eyes: Mark two curved eyes above the nose, approximately 2–2.5 cm apart. Use black embroidery thread to stitch each eye as a small upside-down U, matching the closed, smiling expression in the photo. Make several short stitches instead of one long loose strand. Secure the thread discreetly and bury the ends inside the head. Check both eyes from the front before sewing on the nose.
Attach ears and antlers: Sew the ears to opposite sides of the upper head, angling them gently outward. Attach each antler slightly above and inward from an ear. Use several passes through the antler base and head fabric so the components remain upright. Keep the sewing tension even; pulling too firmly may distort the head. Compare both sides frequently to maintain a balanced silhouette.
Join the head, body, and legs: Sew the lower back of the head to the upper center of the granny square, working across a broad section rather than one narrow point. Attach the legs to the lower edge, one near each corner, leaving a small gap between them. Sew into the solid crochet stitches instead of bridging open spaces. Allow the boots to project beneath the square so their contrasting color remains visible.
Add the scarf and hanging loop: Wrap the scarf around the join beneath the head and cross the ends toward one side. Secure the overlap and both ends with a few matching stitches. For the loop, ch 30 in the main color, then sl st back along the chain if you prefer additional thickness. Fasten both ends securely to the top of the head between the antlers, adjusting the chain length as desired.
Complete the finishing check: Lay the ornament flat and inspect every attachment, especially the antlers, nose, boots, and hanging loop. Weave in remaining ends through several stitches, reversing direction once to help secure them. If the granny square curls, gently shape the body following your yarn label’s care instructions. Keep heat and moisture away from the stuffed components unless the materials are suitable for that treatment.
Personalize and display: Repeat the Crochet reindeer Pattern in cream and red, caramel and green, or another coordinated holiday palette. Slight differences in ear angle and scarf placement give a matching pair individual expressions. Hang the finished piece from a suitable branch, ornament stand, or wall hook. To preserve its shape, store it flat in a clean, dry container and avoid placing heavy decorations on top.
Frequently Asked Questions
Is this Crochet reindeer Pattern suitable for beginners?
It is best suited to confident beginners who can make single crochet, double crochet, increases, and decreases. The granny square is repetitive, but the small antler tubes require patience. Work slowly, mark the first stitch, and finish one component at a time.
What yarn works best for a crochet reindeer ornament?
DK cotton is a useful choice because it gives clear stitch definition and helps small details retain their shape. A smooth acrylic yarn can also work. Using the same yarn weight for all components makes it easier to keep the head, body, scarf, and boots proportional.
Why does the stuffing show through my stitches?
The hook may be too large for your yarn, or the head may contain too much stuffing. Try a smaller hook and add filling gradually. The stitches should form a close fabric, while the stuffing supports the shape without stretching the gaps.
Can I make the reindeer larger or smaller?
Yes. Changing yarn weight and hook size will change the overall dimensions, although the exact result depends on tension. Use thicker yarn with a suitable hook for a larger decoration or thinner yarn for a smaller ornament. Recheck the scarf and loop lengths after resizing.
Does the granny square body need stuffing or backing?
The body in this version is a single flat granny square and does not need stuffing. Its openings are part of the design. If you prefer a firmer decoration, you can sew on a matching fabric backing, but that changes the construction and appearance.
How do I stop the antlers from flopping?
Use firm stitches, keep stuffing minimal, and attach each stem over a broad area at its base. If your antlers still lean, shorten the stems by one or two rounds. Excess stuffing can make them heavy without improving their support.
Can I use safety eyes instead of embroidery?
You can change the expression with plastic eyes for an adult display ornament, but embroidery matches the photograph more closely. This pattern includes a loop, scarf, and attached components and has not been tested as a children’s toy. Keep the finished decoration out of reach of babies and young children.
How should I clean the finished reindeer?
Follow the care instructions for both the yarn and stuffing. Gentle spot cleaning is a practical option for a decorative piece. Avoid twisting the antlers or pulling the scarf, and let the ornament dry completely before storing it.
Conclusion
This Crochet reindeer Pattern brings together a classic granny square body, a softly stuffed head, embroidered eyes, branching antlers, and colorful winter accessories. By following the US crochet instructions, checking stitch counts, and sewing each component securely, you can create a festive decoration inspired by the reference photograph. The same construction also gives you room to experiment with different holiday colors and expressions.
EASILY FIND THE FREE VIDEO FOR THIS PATTERN HERE!
Leave your honest opinion about the project and share any suggestions for improving the instructions. Your feedback about the assembly, color choices, and small details can help make future crochet tutorials clearer and more enjoyable.