
The Crochet pinecone Pattern brings the layered beauty of a woodland pinecone into a soft, colorful ornament.
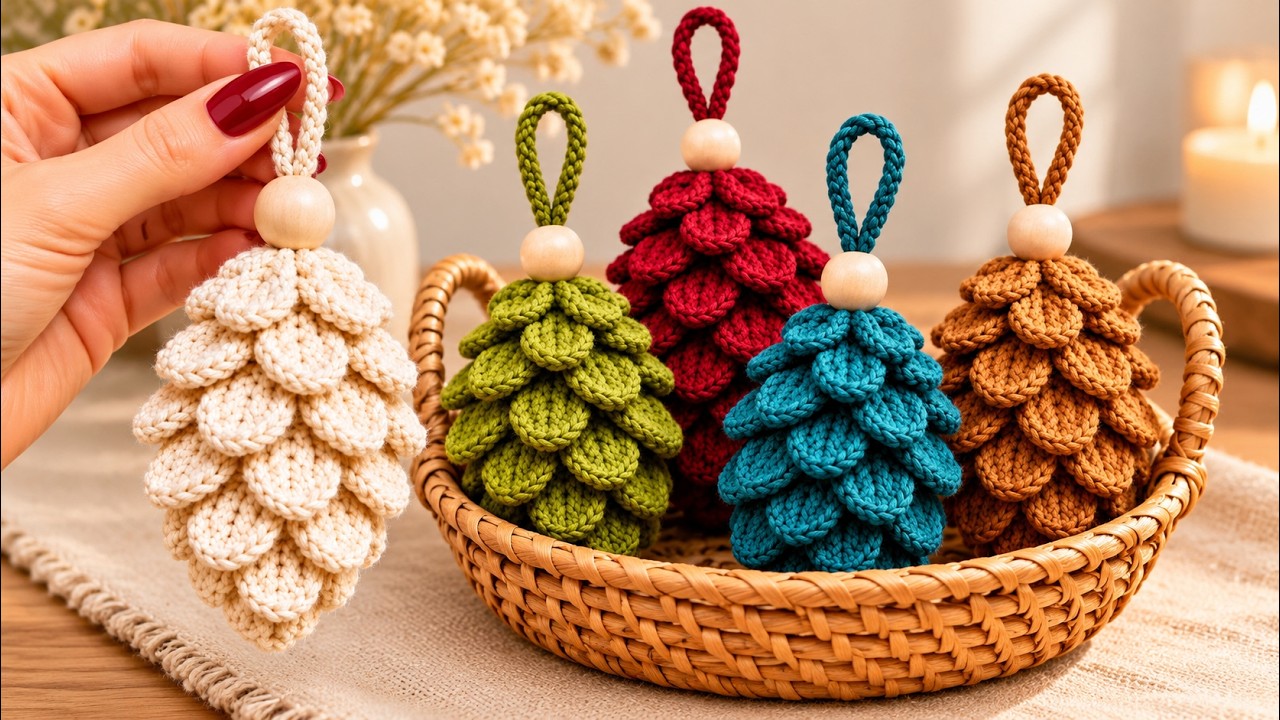
Inspired by the photograph, this project combines overlapping crochet scales, a gently tapered body, and a hanging loop.
A wooden bead adds a simple finishing touch, while the textured surface gives each ornament its distinctive character.
Choose cream for a snowy look, green for a forest theme, or burgundy and caramel for warm seasonal decorations.
The same construction also works beautifully in teal, especially when you want something a little unexpected.
This tutorial explains a photo-inspired version using US crochet terms, with individual scales sewn onto a stuffed foundation.
A crochet pinecone gets its recognizable shape from the arrangement of its scales rather than from complicated stitches.
You will first crochet a narrow, rounded core, then make small oval pieces that overlap from the bottom upward.
This approach lets you adjust the spacing as you work and gives you control over the finished silhouette.
The instructions include stitch counts, assembly guidance, and explanations of the abbreviations used throughout the pattern.
Although the ornament looks detailed, its main stitches are single crochet, slip stitch, and simple increases and decreases.
Beginners who can count stitches and sew small crochet pieces together can approach the project one section at a time.
In this Crochet pinecone Pattern, the word “pattern” refers to both the written stitch instructions and the placement of the layers.
The photograph provides the visual inspiration; the instructions below are a proposed construction rather than a verified transcription of the pictured pieces.
Your finished size will depend on your yarn, hook, tension, and how closely you overlap the scales.
Plan for an ornament approximately 12–15 cm tall, excluding the bead and hanging loop, and adjust the arrangement during assembly.
Make one sample scale before completing the whole set so you can check its size against the core.
That small preparation step helps you create an ornament with balanced proportions and a pleasantly full texture.
1. Gather Materials and Learn the US Crochet Abbreviations
For one ornament, gather approximately 60–90 g of DK or light worsted yarn, a 3 mm crochet hook, polyester stuffing, a yarn needle, scissors, and stitch markers. This yarn quantity is a starting estimate, since fiber and tension affect consumption. Smooth cotton or a cotton blend makes the individual scales easy to see, while acrylic creates a softer finish.
DISCOVER MORE FREE PATTERNS HERE!
Choose a hook that produces a firm fabric without making your hands uncomfortable. Crochet a small sample in single crochet and stretch it gently between your fingers. If large holes appear, try a slightly smaller hook. Consistency matters more than achieving an exact gauge because this ornament does not need to fit a particular body measurement.
The basic US crochet abbreviations are ch = chain, sl st = slip stitch, sc = single crochet, st = stitch, and sts = stitches. To make a single crochet, insert your hook into the indicated stitch, yarn over, pull up a loop, yarn over again, and draw through both loops. A slip stitch pulls the yarn through the stitch and the loop already on your hook.
You will also use inc = increase, meaning work two single crochet stitches into one stitch, and dec = decrease, meaning combine two stitches into one. An invisible decrease is useful for the stuffed core: insert your hook under the front loop of each of the next two stitches, yarn over and pull through both front loops, then complete a single crochet.
A magic ring, abbreviated MR, creates an adjustable center for the bottom of the core. Numbers in parentheses indicate the stitch count after completing a round. Instructions in brackets followed by a repetition number tell you how often to repeat that sequence. Work the core in a continuous spiral, without joining rounds, and move your stitch marker to the first stitch of each new round.
For the finishing details, prepare an optional wooden bead approximately 2–2.5 cm wide, with a hole large enough for the hanging cord. A bead-free version also looks attractive. Keep loose beads away from young children, and treat the finished piece as a decorative ornament. Use the same yarn color for the core and scales so small gaps remain visually unobtrusive.
2. Crochet the Stuffed Pinecone Core
Begin the crochet pinecone core at its narrow bottom tip. Round 1: work 6 sc into a magic ring (6). Tighten the ring securely. Round 2: sc in each stitch around (6). Round 3: inc in each stitch around (12). These first rounds create a small rounded point that will remain partly visible beneath the lowest scales.
Continue widening gradually. Round 4: sc around (12). Round 5: [sc in the next stitch, inc] 6 times (18). Round 6: sc around (18). Round 7: [sc in the next 2 stitches, inc] 6 times (24). Count after each increase round; correcting an extra stitch now is much easier than adjusting the scale placement later.
Build the fuller middle section. Rounds 8–9: sc around (24 stitches per round). Round 10: [sc in the next 3 stitches, inc] 6 times (30). Rounds 11–16: sc around (30 stitches per round). The body should resemble an elongated rounded cone, with its lower end narrower than its middle.
Start tapering the upper section. Round 17: [sc in the next 3 stitches, dec] 6 times (24). Round 18: sc around (24). Round 19: [sc in the next 2 stitches, dec] 6 times (18). Add small pieces of stuffing through the opening, pushing them gently toward the bottom with your fingers or the blunt end of a crochet hook.
Finish shaping the top. Round 20: sc around (18). Round 21: [sc in the next stitch, dec] 6 times (12). Add enough stuffing to support the shape while keeping the body slightly compressible. Round 22: dec 6 times (6). Cut the yarn, leaving a sewing tail, then thread it through the front loops of the remaining six stitches and pull closed.
Secure the tail and bury it inside the core. Roll the body gently between your palms to distribute the stuffing. The rounded point faces downward, and the decrease rounds form the top. Before continuing, check that the body feels evenly filled. If it leans to one side, redistribute the stuffing before adding the scales, since assembly will make later adjustments more difficult.
3. Make the Overlapping Crochet Scales
The layered surface of this Crochet pinecone Pattern uses separate oval scales. Prepare 24 standard scales and 6 smaller scales as an initial set, then make extras if your spacing requires them. Because the photograph does not establish gauge or exact dimensions, use the core and your sample pieces to guide the final quantity. Each scale is attached at one short end and hangs downward.
For a standard scale, ch 7. Round 1: starting in the second chain from the hook, sc in the next 5 chains, then work 3 sc in the final chain. Rotate the foundation so you can crochet along its unused underside. Sc in the next 4 chains, then work 2 sc into the chain that received the first single crochet (14).
Work Round 2 as follows: inc in the first stitch, sc in the next 4 stitches, inc in each of the next 3 stitches, sc in the next 4 stitches, and inc in each of the final 2 stitches (20). Sl st into the first stitch to finish; this joining slip stitch does not count as an additional stitch. Leave a tail approximately 25 cm long for attachment.
For a small scale, ch 5. Round 1: starting in the second chain from the hook, sc in the next 3 chains, work 3 sc in the final chain, rotate, sc in the next 2 chains along the underside, then work 2 sc into the first worked chain (10). Round 2: inc, sc in the next 2 stitches, inc in each of the next 3 stitches, sc in the next 2 stitches, then inc in each of the final 2 stitches (16).
Join each small scale with a slip stitch and leave a sewing tail. Weave in the starting tails on all scales, keeping the attachment tails available. Smooth each piece with your fingers and identify its two rounded ends. Choose one as the attachment end and position the remaining tail there with a few discreet stitches on the reverse side if necessary.
Arrange the completed pieces beside the core before sewing. The standard scales belong on the four lower tiers, while the smaller pieces form the top tier. A slight natural cup can make the ornament look fuller, but heavily curled edges may indicate tight tension or missed stitches. Check the counts before changing hook size, and keep the scale edges flexible rather than stiff.
4. Assemble the Pinecone and Add the Hanging Loop
Begin assembly near the lower portion of the core. Position six standard scales around the body, with their attachment ends approximately 2.5–3 cm above the bottom tip. Let the lower ends point toward the tip. Use removable markers or temporary yarn tacking to check the arrangement, spacing the pieces around the entire circumference before attaching any permanently.
Sew only the upper 0.5–1 cm of each scale to the core, using several small stitches through both layers. Leave the lower portion free so it can lift away from the body. Keep your sewing tension gentle: pulling too tightly creates dents and makes the scales stand awkwardly. Secure each tail and bury it inside the stuffed foundation.
Add a second tier of six standard scales approximately 1.5–2 cm above the first attachment line. Rotate their placement so the center of each new scale sits over a gap between two scales below. Repeat this arrangement for the third and fourth standard tiers, adjusting the vertical spacing to suit your core. Each tier should overlap the attachment stitches of the previous one.
Finish with six small scales around the upper taper. Check the ornament from every side before securing the last pieces. If an obvious gap remains, reposition a neighboring scale or add another piece. The goal is a balanced layered pinecone texture, with a narrow lower tip and a neatly covered top. Exact tier spacing may vary with your finished scale dimensions.
For the hanging loop, leave a long starting tail, ch enough stitches to make a cord approximately 16–20 cm long, and slip stitch back along the chain, beginning in the second chain from the hook. Fasten off with another long tail. Fold the cord in half, pass both ends through the optional wooden bead, and sew the ends securely into the top of the core beneath the bead.
Lift the ornament by its loop and check that it hangs straight. Reinforce the attachment if the top shifts or pulls. Shape the scales gently with your fingers and trim any remaining yarn ends after securing them. For routine care, dust with a soft brush or spot clean according to the yarn label, avoiding prolonged soaking of the wooden bead.
FAQ: Crochet Pinecone Pattern
Is this Crochet pinecone Pattern suitable for beginners?
It suits beginners who already understand chains, single crochet, and basic stitch counting. The individual components use straightforward stitches, but sewing the scales evenly requires patience. Make the core and one sample scale first, then practice attaching that scale before preparing the remaining pieces.
Does this pattern use crocodile stitch?
No. This version creates its overlapping texture with separate oval scales sewn onto a stuffed foundation. Crocodile stitch is another way to create a layered appearance, but its construction differs. The separate-scale method makes it easier to reposition individual pieces while matching the overall shape of the reference.
How many scales will I need?
Start with 30 scales: 24 standard and 6 small. That provides five suggested tiers of six pieces. Your final quantity may change because yarn thickness, gauge, and attachment spacing affect coverage. Make additional scales if necessary instead of stretching existing pieces until they become distorted.
Why can I see the stuffed core between the scales?
Small glimpses may occur when the ornament moves, but large gaps usually mean the tiers are too far apart or their positions are not staggered. Move the upper tier slightly downward, rotate the pieces to cover gaps, or add a scale. Matching the core yarn to the scale yarn helps the layers blend.
Can I make the ornament larger or smaller?
Yes. Using a different yarn weight and a suitable hook changes the size of all components together. Still, check a sample scale against the finished core before assembly. Changing only the number of core rounds may require a different number of tiers or scales to preserve balanced proportions.
Why are my oval scales curling?
Some cupping adds dimension, but strong curling can result from missed increases, tight stitches, or an incorrect foundation count. Confirm 14 and 20 stitches for standard-scale rounds, or 10 and 16 stitches for small-scale rounds. Gently shape the finished pieces without stretching their edges excessively.
Can I leave out the wooden bead?
Absolutely. Sew the hanging loop directly into the top of the core and arrange the small scales around its attachment. You can also add a small yarn wrap around the base of the loop. This produces a cohesive finish using only yarn and stuffing.
What colors work well for crochet pinecone ornaments?
Brown, caramel, and cream emphasize the woodland shape. Burgundy, olive, and teal echo the colorful ornaments in the photograph. A single color highlights the stitch texture, while subtle variations between tiers create depth. Use yarns of similar thickness when combining colors within one ornament.
Conclusion
This Crochet pinecone Pattern explains how to crochet a tapered stuffed core, make two sizes of oval scales, and sew them into overlapping tiers. You also learned how to stagger the layers, conceal attachment stitches, and add a reinforced hanging loop with an optional wooden bead. Working carefully through these stages creates a textured ornament inspired by the pinecones in the photograph.
Choose your favorite color, take time with the scale placement, and enjoy watching the shape develop one layer at a time. Please leave your honest opinion about the project and share any suggestions for improving the instructions. Your thoughts on the assembly method, preferred colors, and useful variations can help make the tutorial clearer for other crocheters.