
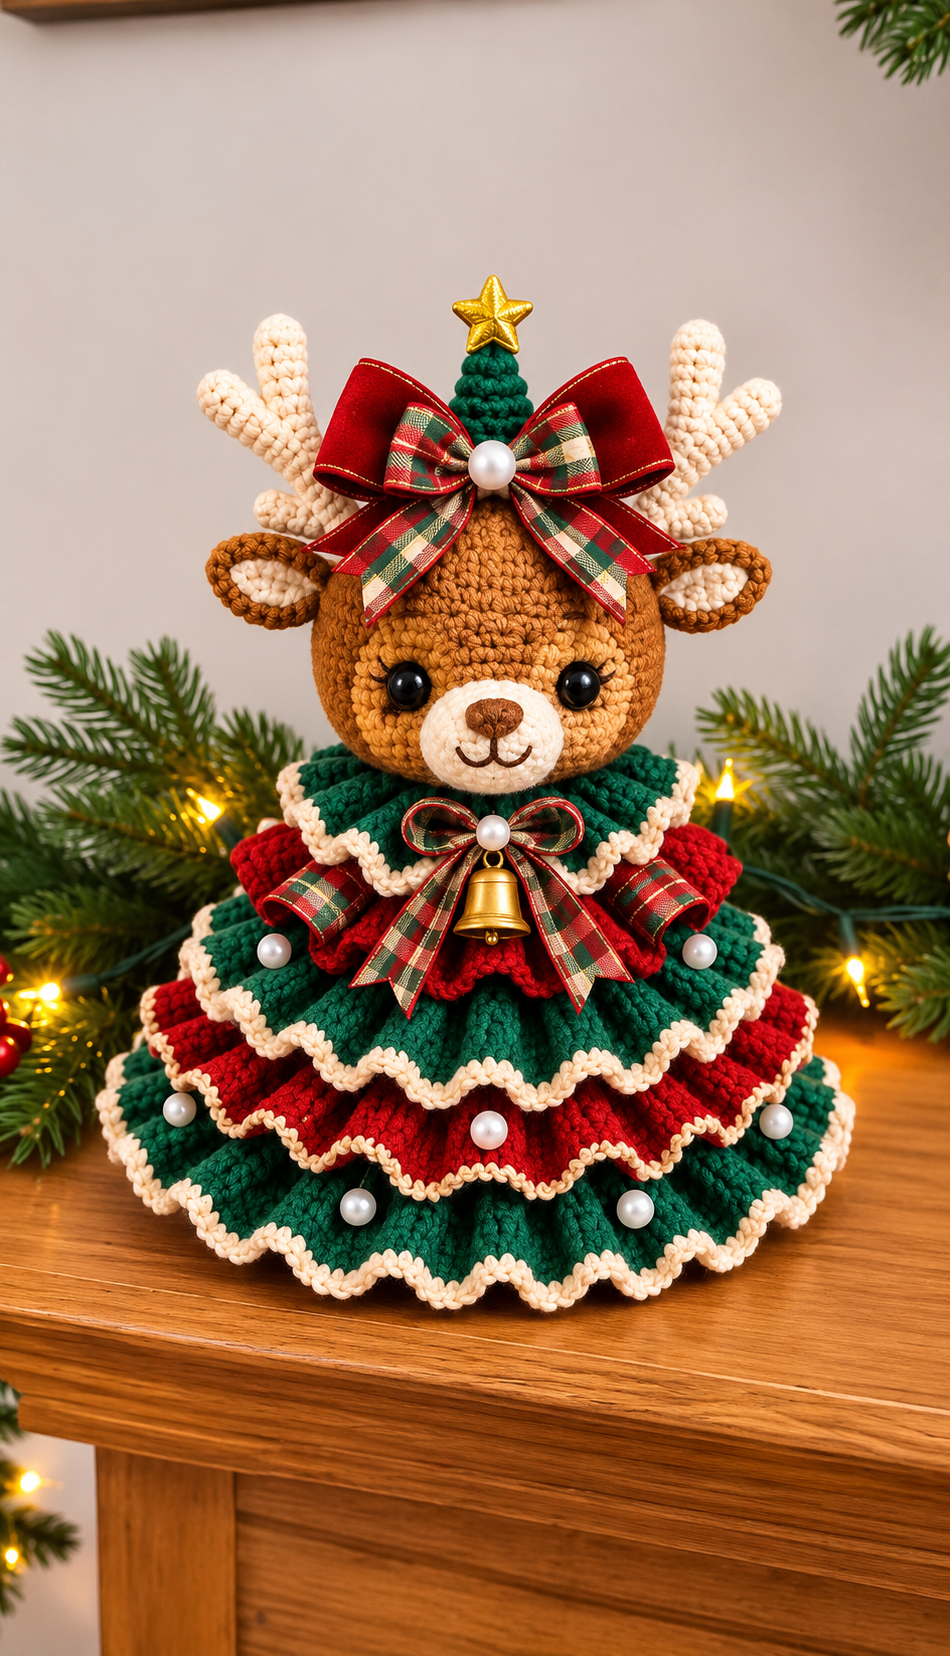
The Crochet Christmas tree with reindeer Pattern is a charming holiday project that combines the warmth of handmade crochet with the joyful spirit of Christmas. Featuring an adorable reindeer with delicate antlers, expressive eyes, a sweet embroidered smile, and a beautiful layered Christmas tree dress, this decoration brings personality and festive elegance to any home. The combination of deep green, traditional Christmas red, warm brown, and soft cream creates a timeless holiday color palette. Decorative ribbons, pearl accents, and a golden bell complete the design, making it especially attractive as a handmade Christmas centerpiece. Whether displayed on a mantel, wooden shelf, entryway table, or holiday dessert station, this crochet Christmas tree with reindeer can become a treasured part of your seasonal decorations.
Creating a Crochet Christmas tree with reindeer Pattern is also an enjoyable opportunity to practice several important crochet techniques. The project combines amigurumi crochet, circular construction, shaping with increases and decreases, textured stitches, decorative edging, and layered crochet fabric. Each technique contributes to the finished appearance of the decoration. The rounded reindeer head is worked using traditional amigurumi methods, while the Christmas tree dress is created with expanding circular layers that form a beautiful cascading silhouette. Small details such as the crocheted ears, antlers, muzzle, and miniature Christmas tree topper help transform the design into a recognizable holiday character. Although the finished piece looks elaborate, crocheters with basic experience can complete it by following a carefully organized sequence of steps.
This detailed crochet reindeer Christmas tree tutorial explains how to recreate a decoration inspired by the photographed model, using US crochet terminology throughout the instructions. The pattern includes a practical materials list, stitch abbreviations, approximate measurements, construction guidance, and finishing recommendations. Because the photograph does not provide an original written stitch chart, the instructions below are an independently developed pattern designed to reproduce its main visual features rather than an exact transcription of an existing design. The suggested finished decoration measures approximately 30–35 cm tall, depending on yarn thickness, hook size, stuffing, and decorative accessories. You can also customize the colors, ribbon arrangements, and embellishments to create a unique handmade Christmas ornament that reflects your personal style.
1. Materials, Crochet Stitches, and Preparation for the Christmas Reindeer Tree
The first step in making this Crochet Christmas tree with reindeer Pattern is selecting yarn that provides both structure and softness. Medium-weight acrylic or cotton-blend yarn works well because it creates clearly defined stitches while maintaining enough flexibility for the layered tree dress. For a decoration approximately 32 cm tall, prepare around 120 g of forest green yarn, 100 g of Christmas red yarn, 80 g of medium brown yarn, 40 g of caramel yarn, and 50 g of cream yarn. You will also need a small quantity of dark green yarn for the miniature tree topper and dark brown embroidery thread for facial details. These quantities are estimates, and the amount required may vary according to your tension and the fullness of the ruffles.
DISCOVER MORE FREE PATTERNS HERE!
For tools, use a 3.5 mm crochet hook with medium-weight yarn, or select a hook approximately 0.5–1 mm smaller than the yarn label recommends when creating tightly stuffed amigurumi pieces. You will also need a yarn needle, stitch markers, scissors, polyester fiberfill, and sewing pins. To reproduce the decorative appearance of the photographed reindeer, prepare two black safety eyes measuring approximately 10–12 mm, several imitation pearls, a small golden bell, a metallic star, and Christmas plaid ribbon. If the decoration will be accessible to young children, replace safety eyes with embroidered eyes and omit detachable beads, bells, and other small accessories.
Before beginning the pattern, become familiar with the US crochet stitch abbreviations used throughout the project. The main stitches are ch (chain), sl st (slip stitch), sc (single crochet), hdc (half double crochet), dc (double crochet), and tr (treble crochet). You will also use inc (increase), meaning two single crochet stitches worked into the same stitch, and dec (decrease), meaning an invisible single crochet decrease worked across two stitches. The abbreviation st means stitch, sts means stitches, rnd means round, BLO means back loop only, and FO means fasten off. Parentheses followed by a number indicate the stitch count at the end of a round.
Understanding the basic stitches makes the crochet Christmas tree with reindeer much easier to assemble. To create a single crochet, insert the hook into the indicated stitch, yarn over, pull up a loop, yarn over again, and pull through both loops on the hook. For a half double crochet, yarn over before inserting the hook, pull up a loop, and yarn over to pull through all three loops. For a double crochet, yarn over, insert the hook, pull up a loop, and complete the stitch by pulling through two loops twice. A treble crochet begins with two yarn overs and is completed by pulling through two loops three times. These stitches are especially useful when creating the curved edges and decorative texture of the Christmas tree skirt.
The pattern is constructed in several separate components, which are assembled after crocheting. The main pieces include a rounded reindeer head, two ears, two antlers, a small muzzle, a miniature green Christmas tree, a supporting body, and multiple flared layers forming the tree-shaped dress. The reindeer head is worked in continuous spiral rounds, while the decorative skirt layers are worked in joined rounds. Keeping these construction methods separate helps maintain the rounded amigurumi shape and produces symmetrical ruffles. Place a stitch marker in the first stitch of each continuous round and move it upward as you work.
Before crocheting the full decoration, make a small gauge sample using your chosen yarn and hook. For the amigurumi sections, aim for approximately 18–20 single crochet stitches across 10 cm, although a tight fabric without visible stuffing gaps is more important than matching an exact gauge. For the skirt, slightly looser tension helps the fabric spread naturally into decorative waves. The Christmas crochet decoration pattern is designed to be flexible, so minor differences in gauge are acceptable. However, keeping consistent tension is important when making matching ears, antlers, and evenly distributed ruffles. Organize your materials before starting so that each component can be completed without interrupting the construction process.
2. How to Crochet the Reindeer Head, Antlers, Ears, and Facial Details
Begin the amigurumi reindeer head using medium brown yarn and a 3.5 mm crochet hook. Create a magic ring and work 6 sc into the center for Round 1. For Round 2, work 2 sc into each stitch around (12 sts). Round 3: 1 sc, inc, repeat six times (18 sts). Round 4: 2 sc, inc, repeat six times (24 sts). Round 5: 3 sc, inc, repeat six times (30 sts). Continue increasing in the same manner, adding one additional sc between increases in each round, until Round 10 contains 60 stitches. Work Rounds 11–18 evenly with 60 sc per round. This creates the upper rounded portion of the reindeer head and provides enough space for the facial features.
To shape the lower part of the head, begin decreasing gradually. Round 19: 8 sc, dec, repeat six times (54 sts). Round 20: 7 sc, dec, repeat six times (48 sts). Round 21: 6 sc, dec, repeat six times (42 sts). Before continuing, position the eyes between Rounds 13 and 14, leaving approximately 9 stitches between their insertion points. Adjust the spacing slightly to create the sweet expression visible in the reference photograph. Continue with Round 22: 5 sc, dec six times (36 sts). Round 23: 4 sc, dec six times (30 sts). Add polyester fiberfill firmly but evenly, making sure the head maintains a rounded shape. Round 24: 3 sc, dec six times (24 sts). Round 25: 2 sc, dec six times (18 sts). Finish with Round 26: 1 sc, dec six times (12 sts), then Round 27: six decreases (6 sts). Fasten off and close the opening.
The muzzle gives the crochet reindeer Christmas tree its friendly personality. Using cream yarn, begin with 6 sc in a magic ring. Increase to 12 stitches in Round 2, 18 stitches in Round 3, and 24 stitches in Round 4. Work Rounds 5 and 6 evenly with 24 sc, then fasten off with a long sewing tail. Add a small amount of stuffing and sew the muzzle to the lower front of the head, centered beneath the eyes. Using dark brown yarn, embroider a rounded triangular nose near the upper center of the muzzle. Create a short vertical line beneath the nose, followed by two gently curved lines forming a smile. For extra expression, embroider a few small eyelashes beside the outer corners of the eyes.
Next, crochet two matching ears using medium brown yarn for the outer sections and cream yarn for the inner details. For each outer ear, chain 9. Beginning in the second chain from the hook, work 2 sc, 2 hdc, 3 dc, and 3 sc into the final chain. Continue along the opposite side of the foundation chain with 3 dc, 2 hdc, and 2 sc, then fasten off. Make two smaller cream-colored inserts using a chain of 7, working 2 sc, 2 hdc, 3 sc into the final chain, then 2 hdc and 2 sc along the opposite side. Sew each cream insert onto its corresponding brown ear. Attach the ears symmetrically to the sides of the head, slightly below the intended antler positions.
The antlers are an essential feature of this reindeer crochet pattern. Using cream yarn, create two main antler stems. For each stem, work 6 sc into a magic ring and continue with 6 sc for 11 rounds, stuffing lightly as you go. Make two shorter branches by working 5 sc into a magic ring and continuing evenly for 5 rounds. Create two additional small branches using 5 sc for 4 rounds. Sew one branch to each main stem near the upper section and attach the smaller branch slightly lower on the opposite side. Shape the pieces gently with your fingers to produce a natural branching appearance. Attach both antlers securely to the upper back of the head, checking that they stand upright and remain balanced.
Complete the reindeer head with the miniature crochet Christmas tree topper. Using dark green yarn, begin with 4 sc in a magic ring. Round 2: 4 sc. Round 3: 1 sc, inc twice (6 sts). Round 4: 6 sc. Round 5: 2 sc, inc twice (8 sts). Round 6: 8 sc. Round 7: 3 sc, inc twice (10 sts). Round 8: 10 sc. Round 9: 4 sc, inc twice (12 sts). Round 10: 12 sc. Fasten off, stuff lightly, and attach the small cone to the top center of the head. Add a lightweight golden star at its tip. Finish this section with a decorative plaid ribbon bow positioned in front of the miniature tree, creating the festive appearance shown in the photograph.
3. Creating the Layered Christmas Tree Dress with Red and Green Crochet Ruffles
The distinctive feature of this Crochet Christmas tree with reindeer Pattern is its full, layered Christmas tree dress. Begin by creating a stable supporting body using green yarn. Work 6 sc into a magic ring and increase by six stitches per round until you reach 36 stitches in Round 6. Continue working evenly for 8 rounds to create a short cylindrical torso. For a wider lower support, work 5 sc, inc six times to reach 42 stitches, then continue evenly for another 4 rounds. Fasten off with a long sewing tail. Lightly stuff the body, keeping the lower section broad enough to support the head and the decorative skirt. A circular fabric-covered cardboard insert may be placed inside a display-only base if additional stability is required.
To create the first skirt layer, use forest green yarn and begin with a foundation chain of 42 stitches. Join with a slip stitch to form a ring, taking care not to twist the chain. Round 1: ch 1, work 42 sc around, and join. Round 2: ch 2, work 1 hdc into each stitch, and join (42 sts). Round 3: ch 2, work 1 hdc, 2 hdc in the next stitch around (63 sts). Round 4: ch 2, work 2 hdc, 2 hdc in the next stitch around (84 sts). Round 5: ch 3, work 1 dc into each stitch around (84 sts). Round 6: ch 3, work 3 dc, 2 dc in the next stitch around (105 sts). This gradual increase creates a circular shape that begins to flare outward.
For the decorative lower edge, continue with Round 7 using green yarn. Work 1 sc, skip 1 stitch, 5 dc into the next stitch, skip 1 stitch around, repeating the sequence until the edge is complete. Because 105 stitches divide evenly into groups of five, the scalloped border will form 21 shells. Change to cream yarn and work one slip stitch or loosely worked single crochet into each stitch around the scalloped edge. Avoid pulling the edging too tightly, as this may cause the ruffles to curl inward. Fasten off and weave in the ends. This completes one crochet Christmas tree skirt layer with a softly scalloped cream border.
Create additional layers using the same basic method while adjusting their starting circumference and depth. For a decoration approximately 32 cm tall, make five visible ruffled tiers, alternating green and red. A practical arrangement is a lower green tier beginning with 66 foundation stitches, a red tier beginning with 60 stitches, a middle green tier beginning with 54 stitches, an upper red tier beginning with 48 stitches, and a top green tier beginning with 42 stitches. Each tier should be worked with increasing rounds similar to the first example, adding stitches evenly until the fabric produces the desired fullness. The wider lower layers should extend farther outward, while the upper layers remain shorter to create the recognizable triangular silhouette of a Christmas tree.
When creating the red and green crochet ruffles, maintain the same cream-colored edging on every tier. This consistent border visually separates the layers and emphasizes their wavy shapes. The lower green tier may be approximately 11–13 cm deep, while the upper tiers can gradually decrease to around 6–9 cm. These measurements are flexible and should be adjusted according to the proportions of your reindeer head. If the ruffles appear too flat, add another increase round before working the scalloped border. If the fabric becomes excessively wavy or crowded, reduce the number of increases in the final rounds. The objective is to create full, cascading layers that resemble the branches of a decorated Christmas tree.
Assemble the dress by arranging the tiers from largest to smallest around the supporting body. Position the lower green layer first, followed by the lower red layer, middle green layer, upper red layer, and upper green layer. Allow each upper tier to overlap the attachment area of the tier beneath it. Secure the inner foundation edge of each tier to the supporting body using matching yarn and small whipstitches. Space the layers evenly and rotate them slightly so that the scalloped edges are distributed naturally around the entire decoration. Once assembled, the layered crochet Christmas tree should stand with a balanced, full shape and enough structure to support the reindeer head above it.
4. Assembling, Decorating, and Finishing the Crochet Christmas Tree with Reindeer
Once the individual components are complete, begin assembling the Crochet Christmas tree with reindeer Pattern by attaching the reindeer head to the upper section of the supporting body. Use a yarn needle and a long strand of medium brown or green yarn to create several secure stitches around the connection point. Because the head is relatively large compared with the body, reinforce the attachment by stitching through the center of the neck area multiple times. Position the head so that the muzzle faces directly forward and the antlers remain symmetrical. If the decoration leans, adjust the stuffing and check that the bottom skirt layer rests evenly on the display surface.
The next step is adding the decorative collar that visually connects the reindeer head with the Christmas tree dress. Using green yarn, chain 36 and join to form a ring. Work one round of sc, followed by one round of hdc. For the next round, work 2 hdc, 2 hdc in the next stitch around to create a gentle flare. Finish with a cream-colored scalloped border using small groups of three double crochet stitches separated by slip stitches. Place the collar around the neck and sew it securely over the top section of the dress. This detail softens the transition between the rounded head and the layered skirt while adding another decorative element to the finished Christmas amigurumi decoration.
Decorative ribbon bows give the project its elegant Christmas appearance. Cut two pieces of plaid ribbon approximately 20–25 cm long and one wider piece of solid red ribbon measuring approximately 30 cm. Form a layered bow by arranging the plaid ribbon over the red ribbon, creating symmetrical loops on both sides. Secure the center with thread or a narrow strip of ribbon. Attach the larger bow beneath the miniature Christmas tree on the reindeer’s head, positioning it between the antlers. Create a smaller matching bow for the front of the collar. The combination of plaid fabric and crochet texture adds visual interest while maintaining a traditional red-and-green Christmas color scheme.
Add the golden bell beneath the smaller collar bow using strong sewing thread. Position the bell so that it hangs at the center of the upper green skirt layer. For the pearl decorations, distribute small imitation pearls across the red and green tiers, placing them near the outer sections of the scalloped edges. The reference design features pearls in different positions rather than perfectly aligned rows, which creates a more natural ornamental appearance. Sew each pearl individually and securely instead of relying on glue alone. If you prefer a fully crocheted decoration, replace the pearls with small cream-colored crochet bobbles and create a miniature bell-shaped ornament using yellow or metallic-colored yarn.
For the final finishing touches, inspect every part of the crochet reindeer Christmas tree centerpiece. Check that the antlers are firmly attached, the ears are symmetrical, and the facial embroidery is neat. Adjust the skirt layers with your fingers so that the red and green ruffles fall naturally. Weave in any remaining yarn ends on the inside of the decoration, trimming them only after they are secure. If the skirt needs additional shaping, lightly steam the ruffles from a safe distance without pressing the iron directly against the yarn. Allow the decoration to dry completely before arranging the ribbons and embellishments. Avoid excessive heat, especially when working with acrylic yarn.
Display your completed handmade crochet Christmas tree with reindeer on a stable, dry surface where the layered skirt can spread without being compressed. A wooden mantel, decorative shelf, holiday table, or covered entryway console can provide an attractive setting. Pair the decoration with artificial pine branches, battery-operated Christmas lights, and small ornaments to create a coordinated seasonal arrangement. Avoid placing the piece near candles, open flames, or strong heat sources. When Christmas is over, store the decoration in a clean box with tissue paper around the antlers and ribbon bows to preserve its shape. With proper care, this handmade crochet project can remain part of your holiday traditions for many years.
Frequently Asked Questions About the Crochet Christmas Tree with Reindeer Pattern
Is the Crochet Christmas tree with reindeer Pattern suitable for beginners?
This project is best suited to confident beginners or intermediate crocheters. The basic stitches are relatively simple, but the decoration includes several separate components, amigurumi shaping, layered ruffles, and detailed assembly. Beginners who already understand single crochet, increases, decreases, and working in the round can complete the project by following the instructions carefully and working one section at a time.
What type of yarn is best for a crochet Christmas tree with reindeer?
Medium-weight acrylic yarn is an excellent choice because it is widely available, affordable, and offered in many Christmas colors. Cotton yarn also works well, especially when you want a more defined stitch texture. Cotton-blend yarn provides a balance between softness and structure. The most important consideration is selecting yarn that maintains its shape while allowing the decorative skirt to form natural ruffles.
How much yarn do I need to complete the decoration?
For a finished decoration measuring approximately 30–35 cm tall, prepare around 390 g of yarn distributed among the main colors, with additional small quantities for embroidery and the miniature tree topper. The exact amount depends on the size of the hook, yarn thickness, stitch tension, and number of decorative layers. Purchasing a little extra green and red yarn is helpful because these colors are used extensively in the skirt.
Can I make the crochet Christmas tree with reindeer larger or smaller?
Yes. You can change the finished size by selecting a different yarn weight and adjusting the hook accordingly. Bulky yarn creates a larger decoration, while lightweight yarn produces a smaller version. For more precise resizing, adjust the number of increase rounds in the head and the starting circumference of the skirt tiers. Keep the proportions balanced so that the head does not appear too large or too small compared with the Christmas tree dress.
How do I keep the crochet Christmas tree standing upright?
A stable supporting body and evenly distributed stuffing are essential. Use firm stitches for the torso and avoid placing excessive stuffing in the upper portion of the decoration. The lower skirt should spread evenly across the display surface. For a decorative piece intended only for adult display, a covered circular cardboard insert inside the base can provide additional stability. Make sure the head is centered and securely attached.
Can I replace the plastic safety eyes with embroidered eyes?
Absolutely. Embroidered eyes are a practical alternative, especially when creating decorations that may be handled by children. Use dark brown or black embroidery thread to create small rounded eyes and add short eyelashes for expression. Embroidered details also make the piece easier to maintain because there are fewer rigid components that could become loose over time.
How do I make the Christmas tree skirt look fuller?
The fullness of the skirt depends on the number of increases and the depth of each crocheted tier. To create more dramatic ruffles, add additional increase rounds before working the scalloped border. You can also increase the number of overlapping tiers. However, adding too many stitches may make the skirt heavy or excessively crowded, so adjust gradually and check the appearance after each round.
Can I use different colors for this Christmas crochet pattern?
Yes. Although traditional red, green, brown, and cream create a classic Christmas appearance, the pattern can be customized with many other combinations. White and gold produce an elegant winter theme, while pastel pink and mint green create a softer decorative style. Silver and navy blue can give the project a modern holiday appearance. Maintain enough contrast between the skirt layers and their borders to keep the decorative details visible.
How long does it take to crochet the Christmas tree with reindeer?
The total time depends on experience, yarn choice, and the level of decoration. An intermediate crocheter may need approximately 12–18 hours to complete the project, while a beginner may require additional time. The layered skirt and detailed assembly generally take the longest. Working the decoration over several sessions can make the process more enjoyable and help maintain consistent stitch tension.
Can I wash the finished crochet Christmas decoration?
If the decoration contains removable ribbons and washable yarn, gentle spot cleaning is usually the safest method. Avoid soaking the entire piece when it contains cardboard supports, metallic ornaments, bells, or glued decorations. Use a slightly damp cloth to clean the surface and allow it to air-dry completely. Always follow the care instructions for the specific yarn used in the project.
Can this pattern be used to make handmade Christmas gifts?
Yes. A completed crochet Christmas tree with reindeer makes a thoughtful handmade gift for family members, friends, teachers, and people who appreciate seasonal crafts. You can personalize the decoration by choosing favorite colors, adding an embroidered initial, or creating matching miniature ornaments. For gifting, ensure that all embellishments are securely attached and include basic care instructions.
What is the difference between amigurumi and traditional crochet in this project?
Amigurumi refers to the technique of crocheting stuffed three-dimensional figures, usually with tightly worked single crochet stitches. In this project, the reindeer head, muzzle, antlers, and miniature tree use amigurumi-style construction. The layered Christmas tree skirt uses more traditional crochet techniques, including half double crochet, double crochet, increases, and scalloped edging. Combining both methods creates the distinctive shape and texture of the decoration.
Conclusion: Create a Beautiful Handmade Crochet Christmas Tree with Reindeer
The Crochet Christmas tree with reindeer Pattern brings together several enjoyable crochet techniques in one memorable holiday project. Throughout this tutorial, you learned how to select suitable materials, understand the essential US crochet abbreviations, create a rounded amigurumi reindeer head, crochet the ears and antlers, and assemble a miniature Christmas tree topper. You also discovered how to construct the layered red-and-green skirt, create cream-colored scalloped borders, and add festive decorative details.
One of the most rewarding aspects of this handmade crochet Christmas decoration is the freedom to personalize it. Every choice, from the yarn colors to the ribbons and pearl accents, contributes to a finished piece that feels unique. The combination of a friendly reindeer character and a traditional Christmas tree silhouette makes this project especially appealing for seasonal home decoration and thoughtful handmade gifts.
With patience, consistent stitch tension, and careful assembly, you can create a beautiful crochet Christmas tree with reindeer that captures the warmth and creativity of the holiday season. The techniques practiced in this project can also be applied to other amigurumi figures, decorative Christmas ornaments, and layered crochet designs.
EASILY FIND THE FREE PDF FOR THIS PATTERN HERE!
We would love to hear your sincere opinion! What do you think of this Crochet Christmas tree with reindeer Pattern? Would you use traditional Christmas colors, or would you prefer a different combination? Share your honest feedback, creative suggestions, and ideas for improving the project in the comments. Your experiences and suggestions can inspire other crochet enthusiasts to create their own beautiful handmade Christmas decorations.