
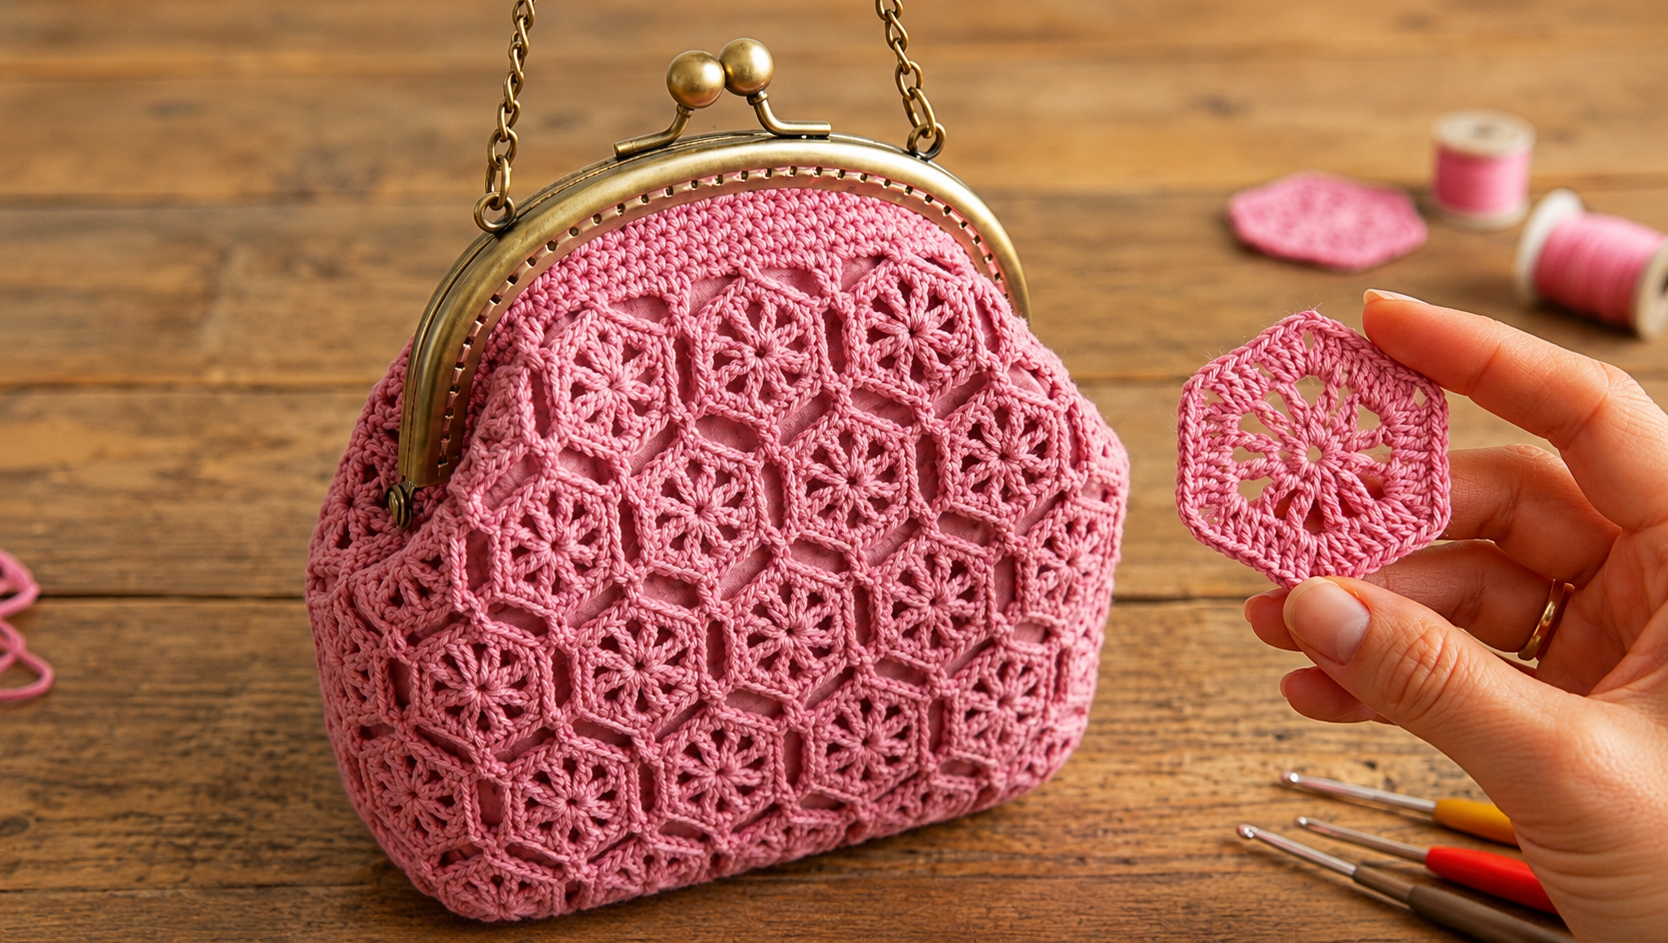
Crochet bag with motifs Pattern is a beautiful way to combine traditional crochet techniques with a practical accessory that feels handmade, elegant, and highly customizable. The bag shown in the reference image is built from multiple floral crochet motifs joined together to create a textured surface, then finished with a structured metal purse frame and a chain handle. This type of project is especially appealing because each motif can be made separately, allowing you to work at a comfortable pace before assembling the complete bag.
One of the most important features of a Crochet bag with motifs Pattern is the repetition of small geometric pieces. In this design, the motifs resemble floral squares or slightly rounded geometric blocks with an openwork flower in the center. When placed side by side, they form an attractive lattice effect. This construction method also makes the project flexible because you can increase or decrease the finished bag size simply by changing the number of motifs. The same technique can be adapted to shoulder bags, coin purses, clutches, or small evening bags.
Before beginning, it is useful to understand the main crochet skills involved. You will work with chain stitches, slip stitches, single crochet, double crochet, clusters, spaces, motif joining, and edging. The exact stitch count can be adjusted according to yarn thickness and hook size, so the instructions below focus on a practical motif structure inspired by the photograph rather than claiming an exact reproduction of a commercial pattern. For the most balanced result, crochet one test motif first, measure it, and then calculate how many motifs you need for the desired dimensions of your finished Crochet bag with motifs Pattern.
Materials, Crochet Abbreviations, and Preparation
For this Crochet bag with motifs Pattern, choose a smooth cotton or cotton-blend yarn because it gives the motifs clear definition and helps the bag maintain its shape. A lightweight cotton yarn works particularly well for the delicate floral appearance visible in the reference. You will also need a crochet hook appropriate for your yarn, scissors, yarn needle, removable stitch markers, fabric for lining, sewing thread, a purse frame, and an optional metal chain handle.
DISCOVER MORE FREE PATTERNS HERE!
The basic crochet keys used throughout the project are ch = chain, sl st = slip stitch, sc = single crochet, dc = double crochet, sp = space, and st = stitch. When the instructions say to work several stitches into the same space, insert the hook into the same opening for each stitch. These abbreviations make it much easier to follow a motif pattern without repeating long stitch names in every round.
Begin by creating a small gauge motif. Make one complete flower square, gently block it, and measure its width. For example, if one finished motif measures approximately 6 cm across, five motifs placed side by side would create a panel about 30 cm wide before accounting for joining and shaping. Gauge is especially important for a framed bag because the upper edge must eventually fit the width of the metal purse frame.
Yarn color also has a strong effect on the finished design. The pink tone shown in the image emphasizes the romantic floral texture, but the Crochet bag with motifs Pattern can look equally attractive in cream, burgundy, navy, sage green, mustard, or even multiple coordinated colors. Solid yarn makes the stitch structure easier to see, while variegated yarn creates a more playful patchwork appearance.
Before crocheting all the motifs, decide approximately how large you want the bag to be. A compact handbag may require only a few rows of motifs, while a larger shoulder bag can use several additional rows. Keep in mind that the sides and bottom also require depth. You can create this depth by wrapping motifs around the sides, adding separate side panels, or crocheting additional edging between the front and back sections.
Finally, prepare a flat workspace where you can arrange completed motifs. As each motif is finished, place it in the planned layout. This simple step prevents accidental color or orientation mistakes and helps you visualize the final Crochet bag with motifs Pattern before joining begins.
Step-by-Step Floral Crochet Motif Pattern
Start the central flower with a magic ring or with 4 chains joined with a slip stitch to form a small circle. Chain 3 to represent the height of the first double crochet. Work additional double crochet stitches into the center ring, spacing them so that the first round creates the foundation for the petals. Join the round with a slip stitch.
For the next round, create open spaces that will separate the petals. A practical sequence is to chain 3 or 4 stitches, skip one or more base stitches, and attach the chain with a slip stitch or single crochet. Repeat evenly around the circle. These loops become the foundation spaces for the decorative flower petals in the Crochet bag with motifs Pattern.
To form each petal, work several tall stitches into one chain space. One useful sequence is sc, half double crochet, 3 dc, half double crochet, sc into the same space. Repeat this petal sequence around the flower. Depending on the number of loops created in the previous round, you can make six or eight petals. Keep the tension consistent so that each flower remains symmetrical.
After the petals are complete, begin transforming the circular flower into a geometric motif. Work behind or around the petals and create chain spaces at regular intervals. These chains form the outer framework. At the points that will become corners, make longer chain spaces or stitch groups such as 3 dc, ch 2, 3 dc. These corner groups help the motif naturally develop into a square or rounded-square shape.
Continue the outer round by working double crochets and chains along each side. A simple structure may include 3 dc, ch 1, 3 dc between corner sections. The goal is to create a stable border while maintaining small open spaces. These openings provide the lace-like appearance that makes the Crochet bag with motifs Pattern visually distinctive.
Finish the motif with a strengthening round. You can work single crochet around the outer edge, placing additional stitches into the corners. Fasten off and weave the yarn tail into the back. Make one or two additional motifs and compare them carefully. Once the size and appearance are consistent, continue making enough motifs for your planned bag layout.
Joining the Motifs and Building the Bag Shape
Arrange all completed motifs on a flat surface before joining. For a bag similar to the reference image, the motifs can be placed in horizontal and vertical rows, creating one large decorative panel. You may create separate front and back panels or crochet one wider piece that continues around the sides. Both methods work well for a Crochet bag with motifs Pattern.
One of the easiest joining methods is the slip stitch join. Place two motifs with their right sides facing each other. Insert your hook through matching outer loops on both motifs and work slip stitches along the edge. This method creates a firm seam and gives the bag additional structure. If you prefer a flatter seam, use a yarn needle and whipstitch the motifs together.
Another beautiful technique is join-as-you-go crochet. With this method, the final round of a new motif is connected directly to the neighboring motif while you crochet. Instead of completing an entire chain space normally, you attach part of that space to the corresponding chain space of the completed motif. This creates an integrated appearance and reduces finishing work.
After joining the front panel, create the back panel using the same number of motifs. Check that both sections have the same dimensions. If one panel appears slightly smaller, gently block it before continuing. Consistent panel dimensions are especially important when constructing a Crochet bag with motifs Pattern with a rigid metal frame.
To create the sides and bottom, you have several options. You may crochet a long strip of single crochet and attach it around three sides of the panels, or you can use additional motifs as side pieces. A plain crochet gusset gives the bag a slightly more structured appearance and allows the floral motifs to remain the main decorative feature.
Join the front, side, bottom, and back sections carefully. Reinforce the lower corners with additional slip stitches or single crochet because these areas receive more stress when the bag is filled. Once the shell is completely assembled, turn it right side out and check the overall shape before attaching the lining and hardware.
Lining, Purse Frame, Finishing, and Styling
A fabric lining is highly recommended for a Crochet bag with motifs Pattern because the open spaces between crochet stitches can allow small objects to slip through. Choose a lightweight cotton fabric or another tightly woven material. Place the finished crochet bag over folded lining fabric and trace the approximate shape, adding a seam allowance around all edges.
Cut two lining pieces and sew them together along the sides and bottom. Leave the top open. If desired, add an interior pocket before assembling the lining. Turn the lining right side out and insert it inside the crochet shell. The wrong sides of the crochet and fabric should face each other.
Pin or clip the lining around the upper edge. Hand sew it securely using small, discreet stitches. Avoid pulling the thread too tightly because this could distort the crochet. The lining should support the bag without changing its natural shape.
Next, prepare the metal purse frame. Many frames include small holes along the edge specifically for sewing. Center the crochet bag carefully inside the frame before attaching it. Starting near the center, sew through the frame holes and the reinforced top edge of the crochet fabric. Work gradually toward both corners, checking alignment frequently.
If the frame includes loops for a handle, attach a metal chain after the frame has been securely sewn in place. A chain handle complements the vintage appearance of the floral motifs, but a crocheted strap can also be used. For a handmade strap, work a long row of foundation chains and cover them with several rows of single crochet until the desired strength is achieved.
Complete the Crochet bag with motifs Pattern by weaving in any remaining yarn ends and gently blocking the exterior. Avoid excessive stretching around the purse frame. Once dry, inspect the seams, lining, and handle attachment. The finished result should feel structured enough to use while still preserving the soft handmade character of the crochet motifs.
FAQ About Crochet bag with motifs Pattern
How many motifs do I need for a Crochet bag with motifs Pattern?
The number depends on the size of each motif and the desired bag dimensions. Crochet one motif first and measure it. Then arrange paper squares or finished motifs to estimate the number required for the front, back, sides, and bottom.
What yarn is best for a crochet motif bag?
Cotton yarn is one of the best choices because it produces defined stitches and has less stretch than many soft acrylic yarns. Cotton blends can also work well if you want a slightly softer texture.
Can beginners make this crochet bag?
Yes, although it is best for beginners who already understand basic stitches such as chain, slip stitch, single crochet, and double crochet. Because the bag is constructed from repeated motifs, you can practice the same small pattern several times and gradually improve consistency.
How do I keep all the crochet motifs the same size?
Use the same yarn, hook, stitch tension, and number of stitches for every motif. Blocking the motifs before joining can also help equalize small differences in size.
Should a crochet motif bag have a lining?
A lining is strongly recommended. It protects the crochet fabric, helps the bag hold its shape, and prevents small items such as coins, keys, or makeup products from passing through open crochet spaces.
How do I attach a metal frame to the crochet bag?
Most sew-in purse frames contain holes along the metal edge. Reinforce the top of the crochet bag first, center it inside the frame, and sew through the holes using strong thread or matching yarn.
Can I make the motifs larger?
Yes. You can add additional border rounds around each finished flower motif. Increasing the motif size reduces the total number of motifs required, while smaller motifs create a more detailed surface.
Can different colors be used in the same bag?
Absolutely. You can make the center flowers in one color and the borders in another, alternate several colors, or create a scrap-yarn version. A limited color palette usually produces a more coordinated appearance.
What is the easiest method for joining crochet motifs?
Slip stitch joining is one of the easiest and strongest methods. Whipstitch sewing is also beginner-friendly. Join-as-you-go crochet creates a beautiful result but requires slightly more practice.
How can I make the bag stronger?
Use firm cotton yarn, crochet the stitches with consistent tension, reinforce the seams, add a fabric lining, and strengthen the top edge before attaching the purse frame. These details greatly improve durability.
Can the same Crochet bag with motifs Pattern be made without a metal frame?
Yes. Instead of a frame, crochet several firm edging rounds around the opening and add handles or a shoulder strap. You can also include a zipper, magnetic closure, button loop, or drawstring.
How do I wash a crochet motif bag?
Hand washing is usually the safest choice, especially when the bag contains a metal frame and fabric lining. Use cool water and mild detergent, avoid twisting the bag, reshape it carefully, and allow it to dry flat.
Why are my motifs curling?
Curling can occur when the stitch tension is too tight or when there are not enough stitches in the outer rounds. Gentle blocking may correct mild curling. If the problem is severe, increase the number of stitches or chain spaces in the final round.
How can I adapt the pattern to make a larger handbag?
Add more motifs to each row, increase the number of motif rows, or use wider side gussets. Always calculate the final width before purchasing or attaching the purse frame.
Conclusion
The Crochet bag with motifs Pattern combines decorative crochet, practical construction, and creative freedom in one rewarding project. By starting with repeated floral motifs, you can gradually build the front and back panels without needing to crochet the entire bag at once. Understanding the basic crochet keys such as ch, sl st, sc, dc, stitch spaces, corner groups, and motif joining makes the process much easier to follow.
Throughout this tutorial, you learned how to create the central flower, transform it into a geometric motif, repeat the motif consistently, join several pieces into panels, create the sides and bottom, add a fabric lining, and finish the project with a structured purse frame and handle. These same techniques can also be adapted to clutches, shoulder bags, small purses, and other motif-based crochet accessories.
The greatest advantage of this Crochet bag with motifs Pattern is how easily it can be personalized. Changing the yarn color, motif size, number of squares, joining method, lining fabric, or handle style can completely transform the finished design while keeping the same construction principles.
Take your time when making and arranging the motifs, especially before joining them permanently. Careful alignment, consistent stitch tension, reinforced seams, and a well-fitted lining will give your handmade bag a cleaner appearance and improve its durability.
Once you understand the motif construction, you can experiment with new flower centers, contrasting borders, different geometric arrangements, and alternative closures. Crochet motif projects are an excellent way to turn a collection of small handmade pieces into something practical and visually impressive. If you make your own Crochet bag with motifs Pattern, leave your sincere opinion about the project and share your suggestions. Your ideas about colors, motif combinations, handles, closures, and finishing techniques can inspire even more creative versions of this beautiful handmade crochet bag.