
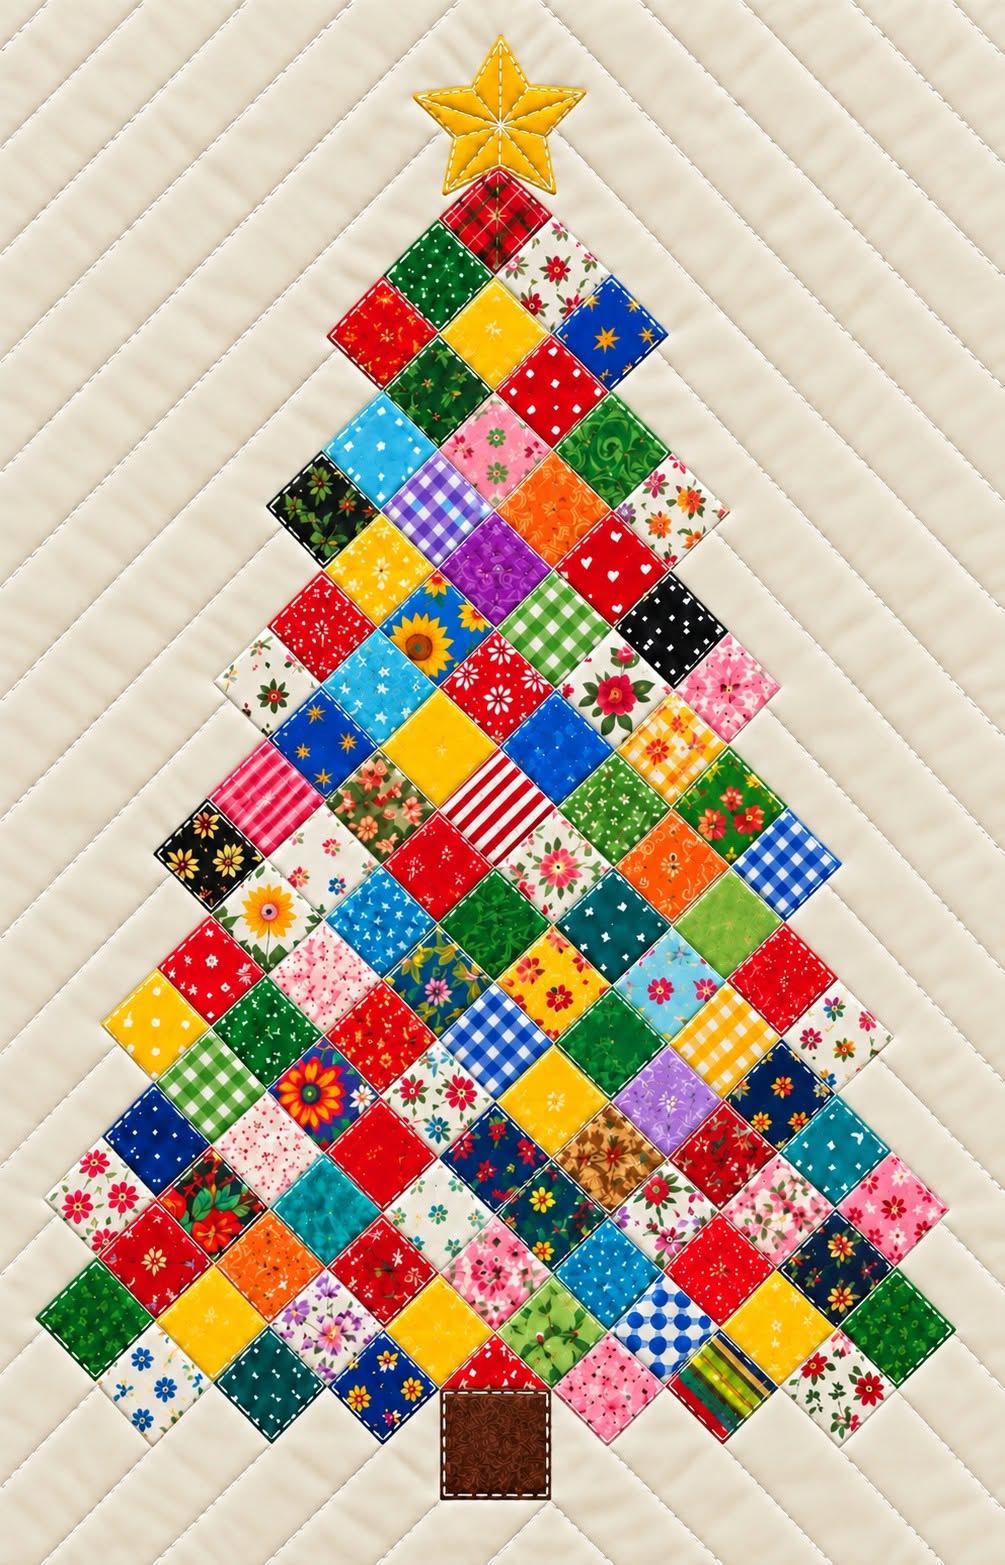
The Patchwork Wall Hanging with Christmas Tree Motif Pattern is a charming way to combine traditional quilting techniques with the warm, festive atmosphere of Christmas. Inspired by the project shown in the reference image, this design transforms small pieces of colorful fabric into a recognizable Christmas tree that can become a beautiful handmade wall decoration. The most attractive feature of this project is the way simple geometric fabric pieces work together to create something much more elaborate. Instead of relying on a complicated appliqué silhouette, the tree is constructed from individual patchwork units arranged in progressively wider rows. Traditional Christmas colors such as green, red, cream, and golden yellow make the design immediately festive, while printed fabrics introduce personality and visual movement. It is also an excellent project for using small fabric scraps left over from previous quilting projects. With careful cutting, accurate seams, pressing, and thoughtful color placement, even relatively simple fabric squares and rectangles can create a polished seasonal decoration.
Creating a Patchwork Wall Hanging with Christmas Tree Motif Pattern also gives quilters plenty of freedom to personalize the finished piece. The reference design uses many different Christmas-inspired prints, including greens, reds, neutral fabrics, and occasional golden accents, creating a scrappy appearance without losing the recognizable tree shape. You do not need every fabric to match perfectly. In fact, controlled variety is part of the beauty of a scrap quilt Christmas tree. Small-scale prints generally work especially well because they remain visible even after the fabric has been cut into smaller units. The light background surrounding the tree provides important contrast and allows the colorful patchwork to become the focal point. At the top, a golden star completes the Christmas tree silhouette, while a small brown trunk anchors the bottom of the composition. These simple details make the project easy to recognize while preserving the handmade character that makes patchwork decorations so appealing.
Before beginning this Christmas tree quilt pattern, it is helpful to think of the project as three separate stages: preparing the individual patchwork units, arranging them into the tree silhouette, and finishing everything as a quilted wall hanging. The exact dimensions can be adapted according to the wall space available, so there is no requirement to reproduce the photograph at one particular size. A practical starting point is to make individual finished patchwork blocks approximately 5 cm to 7.5 cm wide, depending on how large you want the wall hanging to become. Remember that unfinished pieces must include your preferred seam allowance, commonly around 6 mm for patchwork construction. Beginners should make a test unit before cutting the entire project because this helps confirm the finished dimensions. The goal is not simply to copy every printed square in the photograph, but to reproduce its construction idea: a broad triangular tree assembled from colorful patchwork, surrounded by a quiet background and finished with a star and trunk.
Materials, Fabric Selection, and Preparing the Christmas Patchwork
The first step in making the Patchwork Wall Hanging with Christmas Tree Motif Pattern is collecting the fabrics. Choose several shades of green fabric as the dominant color because green establishes the visual identity of the Christmas tree. Add red prints for warmth and contrast, cream or white prints for lighter areas, and yellow or golden fabrics for highlights. Scraps containing small Christmas motifs can be included, but ordinary dots, florals, checks, stars, and geometric prints work equally well. A mixture of approximately 8 to 15 different fabrics can create the varied appearance seen in the reference project.
DISCOVER MORE FREE PATTERNS HERE!
For the background, select a light neutral quilting cotton such as white, ivory, cream, or very pale beige. The background should be visually quieter than the tree itself so that the colorful patchwork Christmas tree remains clearly defined. You will also need backing fabric, batting, binding fabric, coordinating sewing thread, and a small piece of brown fabric for the trunk. For the star, golden yellow cotton works beautifully. Basic tools include a rotary cutter or fabric scissors, cutting mat, quilting ruler, pins or clips, iron, ironing surface, and sewing machine.
Next, decide on the approximate size of your individual units. For a medium wall hanging, you might begin with patchwork pieces that finish at approximately 5 cm square. Cut pieces slightly larger to accommodate your seam allowance. Some sections can be made from single squares, while others can be created by joining smaller rectangles or squares first. This variation is useful because the reference design does not look like a rigid grid of identical fabrics. Instead, it has a lively scrappy patchwork effect created by different colors and prints distributed throughout the tree.
Organize the cut pieces by color before sewing. Make separate groups for dark green, medium green, red, cream, yellow, and multicolored Christmas prints. This simple preparation makes the layout stage much easier. Avoid placing every red square together or concentrating all the yellow pieces in one section. The strongest Christmas quilt design usually distributes accent colors throughout the tree. Green should remain dominant, while red, cream, and gold provide rhythm and contrast.
Begin constructing small patchwork units by placing two pieces right sides together and sewing along the selected seam allowance. Press the seam carefully after stitching. Continue joining pieces until you have several small square or rectangular patchwork sections. Pressing is especially important because accumulated seam bulk can make a wall hanging uneven. You can press seams to one side or open them depending on the construction method, but consistency will make later assembly easier.
Before permanently joining the tree, arrange all the completed patchwork pieces on a large flat surface. Begin with a narrow top and gradually widen each level toward the bottom. Step away from the layout occasionally and look at the overall distribution of colors. If one area looks too dark, move a cream or yellow patch into that section. If the tree lacks definition, add additional green pieces around its outer edges. This planning stage is one of the most enjoyable parts of making the Patchwork Wall Hanging with Christmas Tree Motif Pattern, because you can experiment freely before committing to the final arrangement.
Step-by-Step Assembly of the Christmas Tree Motif
Start assembling the tree from the upper section. The reference project uses a geometric, stepped silhouette rather than a perfectly smooth triangle, which is ideal for patchwork construction. Position a small patchwork section close to the top and build the following rows progressively wider. Think of the design as a series of overlapping visual tiers. The upper branches should remain relatively narrow, the middle branches become wider, and the lowest section forms the broadest part of the Christmas tree motif.
Sew neighboring patchwork units together carefully, matching edges wherever possible. When joining small pieces, accuracy matters because tiny variations can become more noticeable across a larger arrangement. Pin or clip intersections before sewing if necessary. Stitch slowly over areas containing several seam allowances to prevent the layers from shifting. After each group is completed, press it before attaching the next section. Good pressing helps maintain the clean geometric appearance that makes this patchwork wall hanging attractive.
Continue constructing the middle portion of the tree with a balanced mixture of green, red, cream, and golden fabrics. Green should visually connect the separate sections so that the eye reads the entire arrangement as one tree. Red fabrics can be scattered throughout like Christmas ornaments, while yellow pieces suggest warm lights or golden decorations. Cream patches break up heavily saturated areas and prevent the tree from becoming visually crowded. There is no requirement for the left and right sides to be perfectly symmetrical; slight differences reinforce the handcrafted patchwork style.
For the lower portion, increase the width substantially to establish the characteristic triangular tree silhouette. Lay out this section before sewing and check that the outer edges form convincing branch-like steps. The bottom should feel visually substantial without becoming a perfect rectangle. If you are adapting the Christmas tree patchwork pattern to a larger wall hanging, this is the easiest area to expand. Simply add more patchwork units while maintaining the gradual progression from narrow at the top to wide at the bottom.
Create the trunk from a brown fabric rectangle. A finished trunk approximately 5 cm to 8 cm wide can work well for a medium-sized hanging, although its dimensions should be proportional to your tree. The trunk can be a solid brown fabric, a wood-grain print, or even a tiny pieced block. Position it centrally beneath the lowest branches. The trunk should extend downward enough to remain visible but should not compete with the colorful tree.
Finish the main motif with the golden Christmas star. You can create the star as a simple fabric appliqué rather than attempting to piece all of its points into the background. Draw a symmetrical five-point star onto paper to create a reusable template, transfer the shape to the fabric using an appropriate fabric-marking method, and cut it carefully. Depending on your preferred appliqué technique, include a turning allowance or prepare the piece for raw-edge appliqué. Position the star directly above the tree, leaving a small visual connection between the two elements. Stitch around the star securely using a straight stitch, narrow zigzag, or decorative appliqué stitch.
Adding the Background, Quilting, Binding, and Finishing Details
Once the patchwork Christmas tree has been assembled, prepare the light background. One approach is to construct a complete background panel and appliqué the finished tree onto it. Another is to piece background sections around the tree. For an accessible version of the project, appliquéing the tree to a solid background is often easier because you can position the entire motif before permanent stitching. Center the tree carefully and leave enough background space around the top, sides, and bottom for quilting and binding.
Secure the tree to the background using pins, temporary fabric-safe adhesive, or another preferred appliqué preparation method. Stitch around the outer edges of the tree so that every section remains securely attached. A narrow straight stitch can create a clean appearance, while a small zigzag or blanket stitch provides a more decorative finish. Take extra care around the stepped corners of the branches. Pivot with the needle down when changing direction to create neat corners around the Christmas tree appliqué.
After attaching the tree, prepare the traditional quilt sandwich. Place the backing fabric wrong side up, position the batting over it, and place the completed quilt top right side up. Smooth all three layers carefully from the center toward the edges. Baste the layers with quilting pins, temporary basting spray suitable for quilting, or long temporary stitches. The backing and batting should extend beyond the quilt top during this stage so that minor shifting during quilting does not leave uncovered areas.
Quilt the layers together using a design that complements rather than overwhelms the patchwork. Straight diagonal quilting is particularly effective for a project like the one in the reference image because it creates subtle texture across the light background. You can also quilt around the silhouette of the tree to emphasize its shape. Another option is simple echo quilting, where lines follow the outer edge of the tree at regular intervals. Beginners do not need complicated free-motion quilting; evenly spaced straight lines can produce an attractive professional-looking result.
Once quilting is complete, trim the backing and batting so that all layers are square and even. Prepare the quilt binding by joining fabric strips and pressing them lengthwise. Attach the binding around the perimeter, paying special attention to neat corners. Binding can coordinate with the background for a subtle finish or use one of the Christmas colors for stronger contrast. Because this project will hang vertically, check that the finished edges remain straight before completing the final hand or machine stitching.
Finally, add a hanging system to the back. A simple fabric hanging sleeve is an excellent solution for a quilted wall decoration. Cut a strip of fabric slightly shorter than the finished width, form it into a tube, and attach it securely to the upper back without allowing stitches to show prominently on the front. A lightweight rod can then slide through the sleeve. Press the completed project gently, inspect all seams and appliqué edges, and remove loose threads. Your Patchwork Wall Hanging with Christmas Tree Motif Pattern is now ready to bring handmade Christmas character to a wall, entryway, sewing room, or seasonal display.
FAQ About the Patchwork Wall Hanging with Christmas Tree Motif Pattern
What is a Patchwork Wall Hanging with Christmas Tree Motif Pattern? It is a decorative quilted textile designed primarily for display rather than use as a bed quilt. Small pieces of fabric are combined to form a Christmas tree motif, usually against a contrasting background. The project can incorporate patchwork piecing, appliqué, quilting, binding, and decorative stitching, making it a useful project for practicing several fundamental sewing techniques in one manageable design.
Can beginners make this Christmas patchwork project? Yes. Beginners can simplify the pattern by using larger squares and rectangles and by appliquéing the completed tree onto a solid background. The most important skills are accurate cutting, maintaining a consistent seam allowance, pressing seams regularly, and arranging colors before sewing. Working slowly is more important than attempting complicated techniques. A beginner-friendly Christmas wall hanging pattern can still look detailed because the variety of fabrics creates much of the visual interest.
What fabrics are best for a Christmas tree quilted wall hanging? Quilting cotton is one of the easiest choices because it is stable, widely available, easy to cut, and comfortable to sew. Choose several greens for the main tree, reds for festive contrast, cream or white for highlights, yellow or gold for accents, and brown for the trunk. Christmas prints are optional. Ordinary quilting fabrics in complementary colors can create an equally attractive Christmas patchwork pattern.
How large should the finished wall hanging be? There is no mandatory size. A small version can be designed for a narrow wall, while a larger version can become the focal point of a holiday display. The dimensions should be determined by the size of the individual patchwork units and the number of rows used to form the tree. Before cutting all your fabric, create a paper or fabric layout so you can estimate the finished width and height while remembering to account for seam allowances and the surrounding background.
Can I make this project entirely from fabric scraps? Absolutely. In fact, a scrap fabric Christmas tree is particularly suitable for this design because many small pieces are required. Save green, red, cream, gold, and Christmas-themed scraps from previous projects and organize them by color. Even very small leftovers can sometimes be combined into larger patchwork units. The key is maintaining enough green throughout the design to preserve the visual impression of a Christmas tree.
How can I personalize the Patchwork Wall Hanging with Christmas Tree Motif Pattern? Personalization can come from fabric choices, quilting designs, decorative stitches, star shapes, and the overall dimensions of the tree. You could use traditional red and green fabrics, rustic country prints, modern geometric fabrics, or a softer neutral Christmas palette. Small embroidered details can also be incorporated if desired. The basic tree structure provides a flexible foundation, allowing each handmade Patchwork Wall Hanging with Christmas Tree Motif Pattern to have its own character while maintaining the same recognizable seasonal composition.
Conclusion
The Patchwork Wall Hanging with Christmas Tree Motif Pattern demonstrates how simple pieces of fabric can be transformed into an expressive Christmas decoration through careful arrangement and traditional quilting techniques. Starting with a selection of green, red, cream, yellow, and brown fabrics, you can create small patchwork units and arrange them from narrow to wide until they form the stepped silhouette of a festive Christmas tree.
Throughout the project, the most important techniques are accurate fabric cutting, consistent seam allowances, patchwork piecing, careful pressing, appliqué, layering, quilting, and binding. The golden star and brown trunk provide recognizable finishing details, while the light background gives the colorful tree enough contrast to become the centerpiece of the wall hanging.
One of the greatest advantages of this project is its flexibility. You can use leftover scraps, change the dimensions, substitute colors, introduce favorite Christmas prints, or adapt the quilting design to match your experience level. Rather than worrying about reproducing every fabric placement exactly, focus on maintaining the triangular tree shape and distributing the main colors evenly throughout the composition.
EASILY FIND THE FREE PDF FOR THIS PATTERN HERE!
The finished wall hanging can become part of your seasonal décor or a meaningful handmade gift. It is also a wonderful project for turning small pieces from previous sewing projects into something useful and decorative. If you create your own Patchwork Wall Hanging with Christmas Tree Motif Pattern, leave your sincere opinion about the project and share your suggestions. What colors, fabrics, quilting details, or Christmas embellishments would you add to make this pattern uniquely yours?