
The Fabric Table Runner with Christmas Poinsettia Print Pattern is a beautiful holiday sewing project that combines traditional Christmas colors, elegant floral appliqué, and decorative fabric details into one handmade table decoration. Featuring vibrant red poinsettias, deep green holly leaves, delicate white accents, and a festive plaid bow, this Christmas table runner brings warmth and personality to any dining space. Whether you enjoy sewing seasonal decorations or want to create something meaningful for your family, this pattern offers an opportunity to transform simple fabrics into a memorable holiday centerpiece. The combination of layered petals, embroidered branches, and carefully arranged embellishments creates a dimensional appearance that looks especially charming on a Christmas dinner table. Although the finished design appears elaborate, the project becomes manageable when divided into individual sewing and assembly stages. With patience, basic sewing supplies, and the right instructions, even an enthusiastic beginner can learn the techniques needed to complete this decorative runner.
One of the most appealing features of the Fabric Table Runner with Christmas Poinsettia Print Pattern is its combination of fabric appliqué, decorative stitching, layered floral arrangements, and traditional Christmas sewing techniques. Unlike a conventional rectangular runner, this design features an elongated ornamental silhouette with softly curved edges and pointed ends. Its cream-colored central panel provides a beautiful contrast against the rich red and green decorations surrounding the border. Large poinsettia flowers create focal points along the length of the runner, while smaller holly leaves and berry clusters fill the spaces between them. The plaid bow near the upper end introduces a classic Christmas detail that complements the floral arrangement. Each element contributes to the overall composition, making the project suitable for holiday decorating, handmade gifts, and seasonal craft displays. Because the design uses separate fabric components, you can prepare the pieces gradually and assemble them once all the decorative elements are ready.
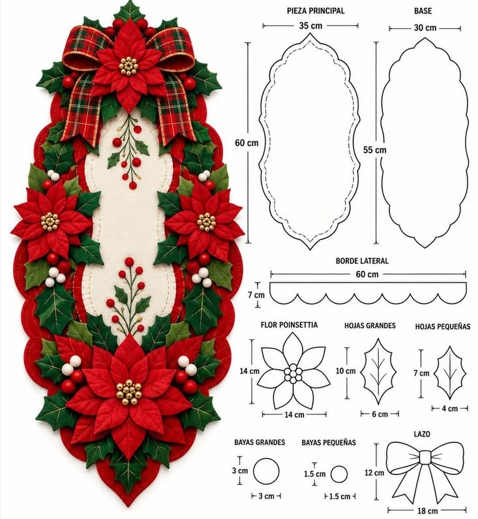
Creating a handmade Christmas table runner is also a wonderful way to practice valuable sewing skills while producing something that can be enjoyed year after year. This tutorial explains how to select suitable fabrics, prepare the pattern pieces, cut the main body, create dimensional poinsettias, assemble holly leaves, embroider decorative branches, and finish the edges. The measurements follow the reference illustration and are presented in centimeters, with practical sewing recommendations for readers in the United States. The main decorative panel measures approximately 35 cm wide and 60 cm long, while the backing template measures approximately 30 cm wide and 55 cm long. The reference also includes a 60 cm decorative side-border template, individual flower and leaf patterns, berry circles, and a ribbon bow. Some of these measurements represent template dimensions rather than guaranteed finished dimensions, so checking the pieces against one another before sewing is essential. By following the instructions carefully, you can create a personalized Christmas decoration that captures the layered, festive character of the original design.
1. Materials, Fabric Selection, and Preparing the Christmas Table Runner Pattern
Before beginning your Fabric Table Runner with Christmas Poinsettia Print Pattern, gather the materials needed for both the runner’s construction and its decorative appliqué. Choose medium-weight cotton fabric for the main panel and backing because cotton is easy to cut, press, and sew. Cream or ivory cotton works particularly well for the central section, while red and green fabrics provide the traditional holiday color palette. For dimensional poinsettias, consider using felt, cotton reinforced with lightweight fusible interfacing, or another fabric that holds its shape. Select coordinating embroidery floss, polyester sewing thread, and a plaid ribbon for the bow. Small white and red fabric berries complete the design, while gold-colored beads or embroidered French knots can create attractive flower centers. Keep all embellishments securely attached because the runner will be handled and stored repeatedly.
DISCOVER MORE FREE PATTERNS HERE!
The essential sewing supplies include a sewing machine, fabric scissors, rotary cutter, cutting mat, measuring tape, fabric marking pencil, hand-sewing needles, straight pins or sewing clips, iron, and ironing board. You will also need lightweight fusible interfacing, optional thin quilt batting, embroidery floss, and a fabric adhesive suitable for temporary positioning. For the floral details, prepare several shades of red and green fabric to create visual depth. Dark green works beautifully for holly leaves, while brighter green pieces can be used as accents. A small quantity of white fabric or felt is useful for making decorative berries. If you prefer a more traditional finish, use gold or cream embroidery thread to highlight selected flower centers and stems. Always test the iron temperature and any adhesive on a scrap before applying them to your project.
The reference pattern provides several important measurements that help maintain the proportions of the finished decoration. Use the following cutting guide when preparing the templates:
| Pattern component | Reference measurement |
|---|---|
| Main decorative panel | 35 × 60 cm |
| Base or backing template | 30 × 55 cm |
| Scalloped side-border strip | 60 × 7 cm |
| Poinsettia flower template | 14 × 14 cm |
| Large holly leaf | 10 × 6 cm |
| Small holly leaf | 7 × 4 cm |
| Large berry circle | 3 cm diameter |
| Small berry circle | 1.5 cm diameter |
| Decorative bow | 18 × 12 cm |
These are the measurements shown in the illustration. The backing is smaller than the main decorative panel, so treat the two outlines as separate templates and confirm their intended overlap rather than assuming they form a conventional right-sides-together pair. The scalloped strip also requires a placement check before cutting multiple copies. For turned fabric components, add a 0.7 cm seam allowance outside the template outline unless the template already includes it. Felt appliqué pieces that are stitched directly around their edges generally do not require additional seam allowance.
Begin preparing the main pattern by transferring the elongated ornamental shape onto paper. Draw a vertical centerline and use it to keep both sides symmetrical. The outline should have gently curved sides and pointed ends, matching the distinctive silhouette shown in the reference. Cut out the paper template and place it over your cream-colored cotton fabric. Trace the outline using a removable fabric marker, making sure the fabric is flat and wrinkle-free. If you plan to use a turned-edge finish, add the appropriate seam allowance before cutting. Repeat the tracing process for any interfacing or batting layers required by your chosen construction method. Accurate preparation at this stage will make the remaining sewing steps easier and help prevent distortion when the floral decorations are attached.
Next, prepare the backing and decorative border pieces. The illustrated backing template is approximately 30 cm wide and 55 cm long, with a similar elongated shape. Because it is smaller than the decorative panel, it can serve as a recessed backing or support layer when properly finished. If you prefer a fully enclosed runner with a turned outer seam, instead trace the actual finished outer silhouette onto a separate backing piece and add matching seam allowances. For the red scalloped border, transfer the 60 cm by 7 cm template and mark the rounded scallops carefully. The reference shows a sequence of repeated curved sections, so try to maintain consistent spacing. Cut a test section first and check how it follows the runner’s edge before preparing the complete border.
Finally, organize the smaller templates before beginning the appliqué work. Transfer the 14 cm poinsettia flower, 10 × 6 cm large holly leaf, 7 × 4 cm small holly leaf, and both berry-circle sizes onto sturdy paper or template plastic. Label each pattern piece clearly so that the measurements remain easy to identify. Prepare several red fabric sections for the large flowers and green pieces for the surrounding foliage. For the bow, use the illustrated 18 × 12 cm dimensions as the target decorative size and adjust the fabric cutting dimensions according to the construction method you select. Arrange all pieces on a clean work surface and compare their scale with the main panel. This simple preparation step helps establish the correct proportions and makes the Christmas sewing process more enjoyable.
2. Cutting and Sewing the Main Fabric Table Runner with Decorative Scalloped Edges
The foundation of the Fabric Table Runner with Christmas Poinsettia Print Pattern is its carefully shaped fabric body. Start by pressing the cream-colored fabric and placing the main template over the wrong side. Trace the outline, including the pointed ends and gently curved sides. If using a quilted construction, cut a layer of thin batting to fit inside the finished seam allowance. Lightweight batting provides stability without making the runner excessively thick. You may also use fusible interfacing if you prefer a flatter decorative surface. Once the layers are prepared, baste them together to prevent shifting. Keep the fabric smooth and avoid stretching the curved sections, since distortion can affect the symmetry of the finished runner.
To create a neat outer structure, decide whether you want a turned-edge runner or a decorative appliqué-style construction. For a turned-edge runner, use matching front and backing outlines with seam allowances. Place the fabrics right sides together, position the batting as appropriate for your construction method, and sew around the perimeter using a 0.7 cm seam allowance. Leave an opening approximately 8–10 cm long along a relatively straight section. Clip carefully into the seam allowance around inward curves and trim bulky areas near the pointed ends without cutting through the stitching. Turn the runner right side out, gently shape the edges, and press it flat. Close the opening with a ladder stitch or narrow machine stitching. This method creates a clean, finished foundation suitable for the decorative appliqué.
If you wish to reproduce the smaller backing shown in the illustration, construct the front panel and backing separately before joining them. Finish the raw edges of the cream panel using a narrow hem, facing, or suitable binding. Prepare the smaller backing in the same manner, ensuring that all edges are enclosed. Center the backing beneath the front panel and attach it with discreet stitching, keeping the support layer away from any unfinished outer edges. This approach creates a layered appearance rather than a conventional enclosed seam. The smaller backing should not be stretched to match the larger panel, because doing so could cause wrinkles. Carefully pressing both pieces before assembly helps the finished runner lie flat on the table.
The red scalloped fabric border is one of the most recognizable features of the reference design. Transfer the scalloped strip pattern onto red fabric, using the illustrated 60 cm length and 7 cm depth as a guide. Because the runner has curved sides, the strip may need to be divided into shorter sections or adjusted to follow the perimeter. For a turned scalloped border, cut matching fabric pieces, sew them right sides together around the scalloped edge, and leave the attachment edge accessible. Clip into the valleys between scallops, trim excess fabric from rounded areas, and turn the pieces right side out. Press each curve carefully using a pressing cloth. Alternatively, cut the scalloped shapes from felt and secure them with decorative edge stitching.
Position the completed scalloped sections around the outside of the cream panel, allowing the red curves to remain visible beyond the central area. Pin or baste the sections before permanent stitching. Check the spacing on both sides and around the pointed ends so that the border looks balanced. Use a narrow straight stitch, blanket stitch, or another decorative appliqué stitch to attach the border securely. If using a sewing machine, stitch slowly around the curved sections and stop with the needle down whenever you need to pivot. Matching red thread creates a subtle finish, while contrasting thread can emphasize the scalloped design. Avoid pulling the fabric as you sew because this may distort the border.
After attaching the border, examine the entire foundation before adding flowers or leaves. Lay the runner on a flat surface and confirm that the edges are smooth, the pointed ends remain symmetrical, and the center panel is properly aligned. If you notice small wrinkles, use gentle steam and a pressing cloth to reshape the fabric. This is also an excellent time to add light quilting stitches to the cream center, if desired. Simple echo quilting around the ornamental outline can create subtle texture without competing with the floral decoration. Keep quilting minimal in areas where thick appliqué layers will later be attached. Once the base is stable and neatly finished, it is ready for the Christmas poinsettia arrangement.
3. Creating the Poinsettia Flowers, Holly Leaves, Berries, and Christmas Bow
The poinsettia appliqué flowers are the main decorative elements of this Christmas table runner. The reference includes a flower template measuring approximately 14 × 14 cm, with rounded, pointed petals arranged around a central cluster. Begin by tracing the flower shape onto red fabric or felt. For a dimensional appearance similar to the illustration, create separate petal layers instead of using a single flat flower. Cut several larger petals for the outer layer and slightly smaller petals for the inner layer, using the reference outline as a guide. Reinforce lightweight cotton with fusible interfacing to help the petals retain their shape. Arrange the petals in a circular pattern, overlapping them slightly toward the center. Once satisfied with the arrangement, secure the layers with small hand stitches or machine stitching.
To give the poinsettias their characteristic textured appearance, add decorative embroidery stitches along the center of each petal. A simple straight stitch or stem stitch works well for representing the veins. Choose a darker red embroidery floss for subtle contrast, or use coordinating thread for a softer appearance. Work from the center of each petal toward its pointed tip, keeping the stitches evenly spaced. For additional dimension, gently fold selected petals along their centerlines before securing them to the flower base. This technique creates natural-looking shadows between the layers. Complete each flower by attaching a cluster of small gold-colored beads, fabric-covered knots, or embroidered French knots in the center. If using beads, stitch each one securely so that it cannot detach during cleaning or storage.
The reference design features prominent poinsettia arrangements near the upper and lower sections, with additional flowers positioned along the sides. For a similar composition, prepare approximately five large poinsettia flowers, adjusting the number if your finished runner differs in size. Before attaching them, arrange the flowers on the main panel and photograph the layout for reference. Position the largest flowers near the pointed ends and place the remaining flowers along the decorative border. Leave enough space for holly leaves and berry clusters to fill the gaps. The flowers should overlap some of the green foliage without completely covering the cream center. This layered arrangement creates the lush Christmas appearance shown in the illustration.
Next, create the holly leaf appliqué pieces using the two illustrated sizes. The large leaves measure approximately 10 × 6 cm, while the smaller leaves measure approximately 7 × 4 cm. Trace the pointed holly shapes onto green felt or stabilized cotton fabric, then cut them carefully with sharp scissors. If using cotton, consider making each leaf from two fabric layers sewn right sides together, leaving a small turning opening. Turn the leaves, press them flat, and close the openings with hand stitching. Add a central vein using green embroidery floss and stitch smaller branching veins toward the leaf points. Using several shades of green adds depth to the arrangement. Prepare enough leaves to surround the flowers and create a balanced decorative border, then pin them temporarily in position.
The berry details introduce attractive contrast against the green foliage. According to the reference, the large berry template has a 3 cm diameter, while the smaller version measures 1.5 cm. Cut circles from white or red fabric, depending on the appearance you want to reproduce. To create softly rounded fabric berries, sew small running stitches around the edge of each circle, place a tiny amount of polyester stuffing in the center, and gently pull the thread to gather the fabric into a ball. Secure the opening with several small stitches. Alternatively, use flat felt circles for a simpler appliqué method. Arrange the berries in small groups among the holly leaves, especially near the poinsettia flowers. The white berries provide a delicate contrast, while red berries complement the embroidered branches in the center panel.
Complete the decorative components by making the Christmas plaid bow, which measures approximately 18 cm wide and 12 cm tall in the reference. Choose a red-and-green plaid ribbon or fabric that coordinates with the poinsettia flowers. If using fabric, sew a long rectangular strip, turn it right side out, and press it flat before forming two symmetrical loops. Gather the middle with strong thread and wrap a smaller fabric strip around the center to conceal the gathering stitches. Add two pointed ribbon tails beneath the loops and secure them with hand stitching. Position the bow near the upper end of the runner, above the top poinsettia arrangement. Its placement should feel balanced without hiding too much of the floral decoration. For easier laundering, you can attach the bow with a removable, securely fastened method rather than sewing it permanently.
4. Assembling the Christmas Floral Arrangement and Finishing the Table Runner
With the fabric components prepared, you can begin assembling the Fabric Table Runner with Christmas Poinsettia Print Pattern. Place the runner on a clean, flat surface and arrange the large flowers along the red scalloped border. Use the reference image to guide the composition, keeping the floral arrangement visually balanced from top to bottom. Position the largest poinsettia near the lower pointed end and distribute the remaining flowers along the sides and upper section. Slide the green holly leaves beneath the flowers so that their pointed tips extend outward. This layering technique helps create the full, dimensional appearance associated with traditional Christmas decorations. Pin the pieces carefully, making sure that the overall arrangement remains symmetrical without appearing overly rigid.
Begin attaching the holly leaves before sewing the flowers in place. Use a blanket stitch, narrow zigzag stitch, or small hand appliqué stitches around the edges of the leaves. Work from the lower foliage layers toward the upper decorative elements, allowing selected leaves to remain slightly raised if you want a three-dimensional effect. Once the foliage is secure, position the poinsettia flowers over the leaf bases. Stitch through the centers and selected lower petals, leaving the outer petal tips free to create depth. Reinforce the attachment points with several extra stitches because these flowers contain multiple fabric layers. Check the back of the runner regularly to prevent loose threads or uneven tension. Taking time during this stage will help the finished piece remain attractive through repeated holiday use.
The cream-colored center provides space for delicate Christmas embroidery details. In the reference, small red berries and green branching stems decorate the central area without overwhelming the surrounding flowers. Use a removable fabric marker to sketch a few curved stems and short branches. Embroider the stems with green floss using a stem stitch or backstitch, then add small leaves with lazy daisy stitches or satin stitches. Create the red berries using French knots, satin-stitched circles, or tiny fabric appliqué pieces. Keep the embroidery relatively simple so that the cream background remains visible. If your fabric is lightweight, place a small piece of embroidery stabilizer beneath the stitching area to prevent puckering. Remove or trim the stabilizer according to its instructions once the embroidery is complete.
After the embroidery is finished, attach the prepared berry clusters among the holly leaves and poinsettia flowers. Place white berries in groups of two or three, following the general arrangement shown in the reference. Use strong hand-sewing thread to secure each fabric berry through its gathered base. Avoid attaching the berries only with temporary craft glue, especially if the runner will be handled frequently. Next, position the plaid bow at the upper end of the design and check that it sits comfortably above the top floral arrangement. Sew the bow securely through its center band, taking care not to flatten the loops. Gently reshape the bow and flower petals with your fingers to restore their dimensional appearance. The combination of floral appliqué, embroidery, and decorative fabric elements should now resemble the festive composition in the original pattern.
The final finishing stage focuses on stitching quality, fabric stability, and overall presentation. Turn the runner over and inspect the backing for loose threads, visible knots, or unfinished attachment points. Trim unnecessary thread ends and reinforce any areas that appear weak. If your appliqué stitches pass through the backing, you may add a separate finished lining to conceal them, provided that the additional layer does not create excessive bulk. Press the runner from the back using a pressing cloth and low heat appropriate for the materials. Avoid pressing directly onto raised petals, beads, berries, or the plaid bow. Instead, press the flat fabric sections and gently steam around the decorative elements when safe for the fabric. This careful approach preserves the dimensional flowers and helps the runner maintain its shape.
Your completed handmade Christmas poinsettia table runner can be displayed on a dining table, buffet, sideboard, or decorative holiday table. Place it where the floral details can be appreciated without being crushed by heavy objects. Because the design includes raised fabric flowers, beads, and berries, it is best used as a decorative accent rather than directly beneath hot cookware or food-serving dishes. For cleaning, follow the care requirements of the most delicate materials used in the project. Spot cleaning is often the safest option for heavily embellished pieces, although carefully constructed washable versions may tolerate gentle hand washing. Allow the runner to dry flat and store it with tissue paper supporting the flowers and bow. With thoughtful care, this handmade decoration can become a cherished part of your Christmas traditions for many years.
Frequently Asked Questions (FAQ)
1. Is the Fabric Table Runner with Christmas Poinsettia Print Pattern suitable for beginners?
Yes. Beginners who know how to sew a straight seam and use basic hand stitches can complete this project by working through the construction stages individually. The most challenging parts are the curved scalloped border and dimensional poinsettia flowers. Using felt for the floral pieces simplifies the process because felt generally does not fray and requires less edge finishing.
2. What is the finished size of this Christmas table runner?
The reference illustration shows a main decorative panel measuring approximately 35 cm wide and 60 cm long, along with a smaller backing template measuring 30 × 55 cm. The final dimensions depend on the seam allowances, border placement, and whether the flowers and leaves extend beyond the foundation. Measure the completed runner before choosing its display location.
3. What type of fabric works best for Christmas poinsettia appliqué?
Cotton, felt, and cotton reinforced with lightweight interfacing are excellent choices. Cotton offers flexibility and a traditional sewn appearance, while felt makes it easier to create crisp flower and leaf shapes. Combining the two materials can produce beautiful dimensional results.
4. Can I make the poinsettia flowers without a sewing machine?
Absolutely. The flowers can be assembled using hand stitches, including running stitches, blanket stitches, and small securing stitches. Hand sewing is especially useful for attaching the flower centers and creating raised petals. A sewing machine simply helps speed up the construction of the larger fabric sections.
5. How many poinsettia flowers should I prepare?
The illustrated arrangement suggests approximately five prominent poinsettia flowers. You can use fewer flowers for a simpler design or add smaller flowers if you increase the runner’s dimensions. Arrange the pieces on the foundation before sewing to determine the most attractive composition.
6. How do I keep the holly leaves from curling or losing their shape?
Apply lightweight fusible interfacing to cotton leaves before cutting, or use felt with enough body to hold the pointed shapes. Decorative embroidery along the center veins can also provide some stability. Avoid stretching the fabric while stitching the leaves in place.
7. Can I use Christmas printed fabric instead of solid red and green fabrics?
Yes. Small-scale Christmas prints, plaid fabrics, and subtle holiday patterns can work beautifully. However, using too many busy prints may make the floral arrangement difficult to distinguish. A combination of solid fabrics and carefully selected printed accents usually creates a balanced appearance.
8. What is the best stitch for attaching fabric appliqué?
A narrow zigzag stitch, blanket stitch, or traditional hand appliqué stitch can be used. Blanket stitching works particularly well for felt flowers and leaves, while a narrow zigzag stitch helps secure cotton appliqué edges. Choose the method that best matches your materials and preferred finish.
9. Can I make a longer Christmas table runner using this pattern?
Yes. You can extend the central body while maintaining the width of the original design. Add additional holly leaves, berry clusters, or poinsettia flowers to fill the longer space. Remember to adjust the backing and scalloped border templates accordingly. A longer version may be better suited to a large dining table.
10. How long does it take to complete this Christmas sewing project?
The time required depends on sewing experience and the level of decorative detail. A confident sewist may complete the project over a weekend, while beginners may prefer several shorter sessions. Preparing the flowers and leaves in batches can make the work easier to organize.
11. Can I wash a Christmas table runner decorated with beads and fabric berries?
Spot cleaning is generally recommended for a heavily embellished runner. If every material is washable and the embellishments are securely sewn, gentle hand washing may be possible. Always test fabrics for color bleeding and avoid twisting, scrubbing, or machine drying raised floral decorations.
12. Can this pattern be used to make handmade Christmas gifts?
Yes. A handmade poinsettia runner makes a thoughtful gift for family members, friends, and people who enjoy seasonal home decorations. You can personalize the colors, embroidery, or bow to suit the recipient’s decorating style. Including a small care instruction card is a practical finishing touch.
13. How can I make the runner look more professional?
Accurate cutting, consistent seam allowances, careful pressing, and secure appliqué stitching make a significant difference. Take time to balance the flowers and leaves before attaching them. Avoid overcrowding the cream center, and keep the decorative stitching neat and evenly spaced.
14. Can I use this design for other Christmas decorations?
Certainly. The poinsettia flowers, holly leaves, berries, and plaid bow can be adapted for wall hangings, quilted placemats, decorative cushions, fabric wreaths, and holiday table centerpieces. Adjust the dimensions and construction method to suit each new project.
Conclusion: Create a Beautiful Handmade Christmas Table Runner
The Fabric Table Runner with Christmas Poinsettia Print Pattern brings together several enjoyable sewing techniques in one festive project. Throughout this tutorial, you have learned how to prepare the main fabric foundation, interpret the pattern measurements, construct a decorative scalloped border, create layered poinsettia flowers, sew holly leaves, make fabric berries, embroider Christmas branches, and assemble the finished floral arrangement. Each stage contributes to a unique holiday decoration that combines traditional Christmas colors with the warmth of handmade craftsmanship.
One of the greatest advantages of this project is its versatility. You can follow the classic red, green, cream, and plaid combination shown in the reference or experiment with different fabrics to create a personalized version. Whether displayed on a dining table or presented as a handmade gift, the finished runner offers a beautiful way to celebrate the holiday season and practice your Christmas sewing, fabric appliqué, and decorative embroidery skills.
Most importantly, remember that handmade projects do not need to be absolutely perfect to be meaningful. Small differences in flower placement, stitching, and fabric choices make every creation unique. Take pride in the time and care you invest in your work, and enjoy the process of transforming individual fabric pieces into a complete Christmas decoration.
EASILY FIND THE FREE PDF FOR THIS PATTERN HERE!
Now I would love to hear from you! ❤️🎄 What do you think of this Fabric Table Runner with Christmas Poinsettia Print Pattern? Would you use traditional Christmas colors, or would you create your own color combination? Leave your sincere opinion, share your suggestions, and tell us which part of this project you enjoyed the most. Your ideas and experiences can inspire other sewing enthusiasts to create their own beautiful handmade Christmas decorations!