
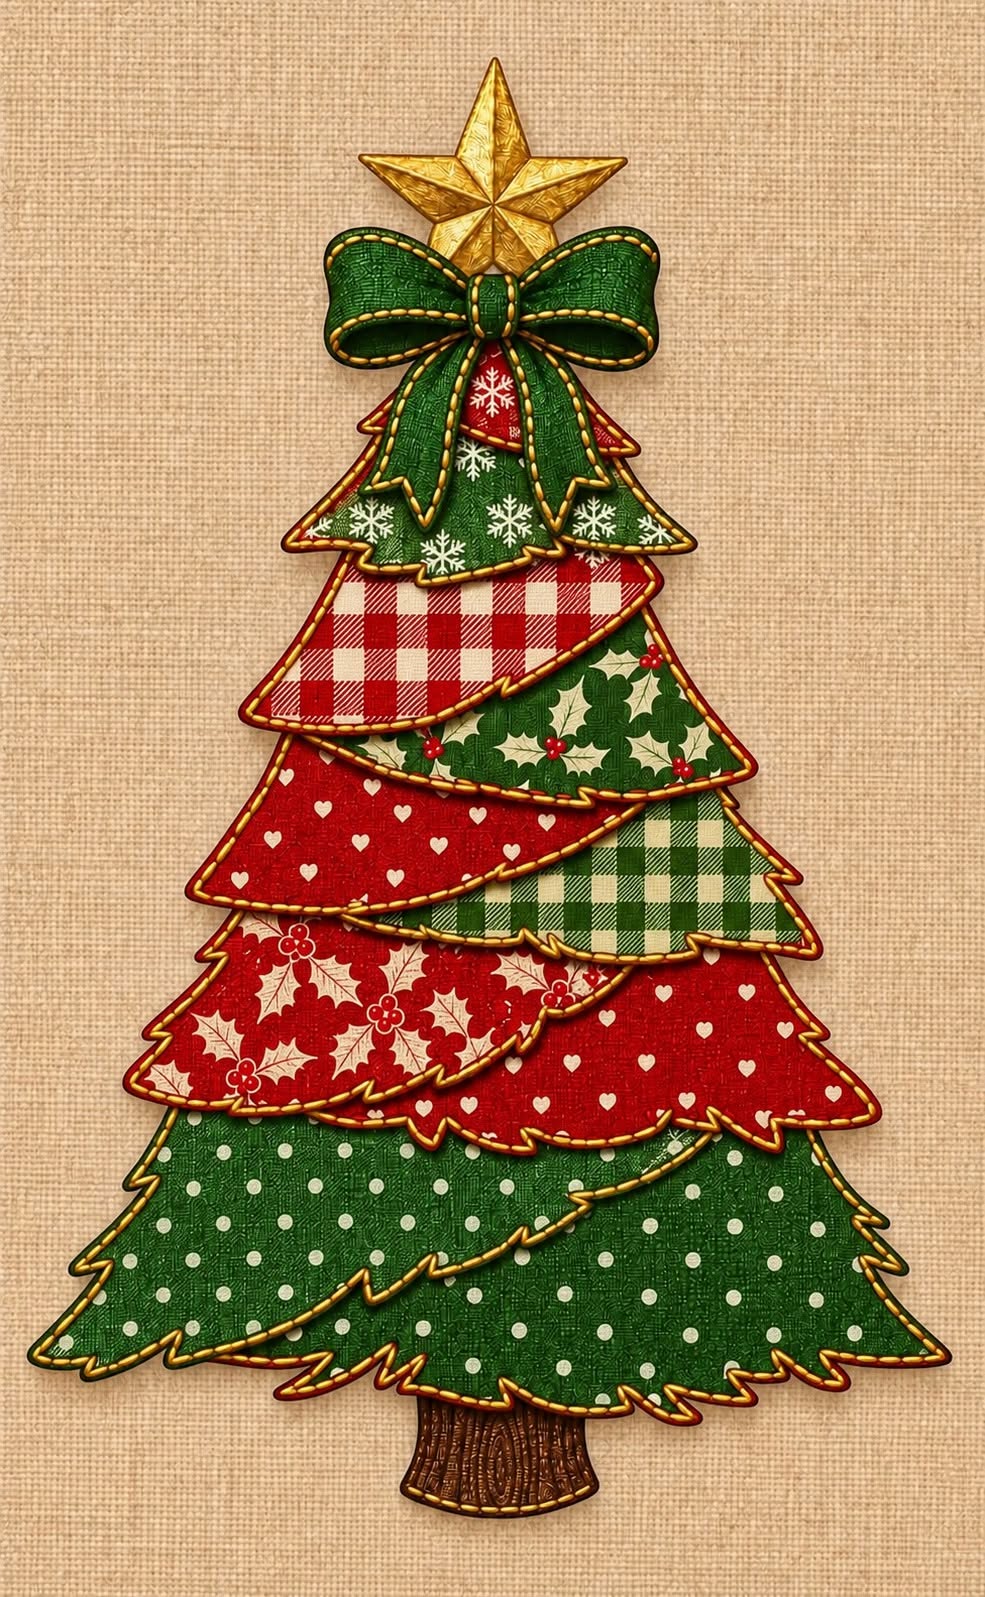
The Fabric Christmas Tree Fabric Pattern is a charming sewing project that combines traditional Christmas colors, layered fabric pieces, decorative stitching, and simple appliqué techniques to create a festive tree with a beautiful handmade personality. Inspired by the project shown in the reference image, this design is built from overlapping tree-shaped fabric sections arranged from smaller pieces at the top to wider pieces near the bottom. The combination of red, green, cream, plaid, polka-dot, holly, snowflake, and heart fabrics gives the finished decoration a cozy country-Christmas appearance. A large fabric bow, a golden star, and a small brown trunk complete the composition. Because every section can be made separately before final assembly, the project is approachable for confident beginners while still offering plenty of creative possibilities for experienced sewists.
One of the greatest advantages of working with a Fabric Christmas Tree Fabric Pattern is that you do not need to reproduce every print in the photograph exactly. The important idea is to maintain a harmonious Christmas palette while alternating prints, colors, and visual textures from one layer to another. Red and green are the dominant colors, while cream works as a neutral element that keeps the composition from becoming too heavy. You can use quilting cotton, fabric scraps, leftover Christmas prints, gingham, plaid, tiny polka dots, holly patterns, hearts, or snowflake fabrics. The visible decorative stitches around the edges are also an important part of the handmade appearance because they emphasize every individual tree section and make the layers look more dimensional.
This tutorial explains how to recreate the project step by step, including how to prepare the fabric pattern, develop the layered tree shapes, add seam allowance, organize the prints, sew each piece, create the trunk, make the decorative bow, and finish the star. The exact final dimensions can be adapted to your needs, but a finished tree approximately 45 to 55 cm tall works well as a wall decoration, door ornament, sewing-room decoration, or seasonal handmade gift. Before cutting your favorite fabrics, it is a good idea to create all pattern pieces on paper first. This makes it easier to test the proportions, change the size, and arrange the layers until the silhouette resembles the Christmas tree in the reference image.
Materials and Preparing the Fabric Christmas Tree Fabric Pattern
Start by gathering several pieces of 100% cotton fabric in traditional Christmas colors. A useful combination is three or four red prints, three green prints, and two cream prints. To reproduce the appearance of the reference project, consider using red polka dots, red plaid, red snowflakes, green gingham, green tartan, cream holly prints, and a subtle cream heart pattern. Small-scale prints usually work especially well because the individual shapes are not very large.
DISCOVER MORE FREE PATTERNS HERE!
You will also need lightweight fusible interfacing or thin batting. Interfacing helps the sections maintain their shape, while batting gives the project a softer and slightly raised appearance. If you want a flatter wall hanging, choose lightweight interfacing. For a more dimensional textile decoration, use thin batting between the front fabric and backing fabric. Avoid very thick batting because it can make the overlapping layers difficult to arrange neatly.
For the basic Fabric Christmas Tree Fabric Pattern, draw several horizontal tree sections rather than one complete triangular tree. Each section should resemble a wide, shallow Christmas-tree branch with pointed or gently scalloped lower edges. The upper layers should be narrower, and each successive piece should gradually become wider. Preparing approximately 10 to 12 overlapping sections creates the rich layered effect visible in the project. You can adjust the number depending on the finished height you want.
Begin with a small upper section around 15 cm wide, then gradually increase the width of each pattern piece by approximately 2.5 to 4 cm. The widest bottom section can measure approximately 42 to 46 cm. The height of individual sections can range from about 7 to 11 cm. These measurements are flexible because the characteristic look comes primarily from the overlapping arrangement rather than from mathematically identical pieces.
Add approximately 0.7 to 1 cm of seam allowance around every paper pattern if you plan to sew each shape with a separate backing. Mark the center of every piece at the top and bottom because those marks will help you align the layers later. If you prefer a raw-edge appliqué method, you can eliminate the seam allowance and finish the edges with decorative machine stitching instead.
Before cutting, place the paper sections on a flat surface and arrange them in the shape of the complete tree. Overlap each upper layer over the section beneath it by approximately 2 to 4 cm. This test arrangement is one of the most useful steps in making a successful Fabric Christmas Tree Fabric Pattern, because it allows you to correct the silhouette and spacing before any fabric is cut.
Cutting, Stitching, and Creating the Layered Tree Sections
Once the paper templates are ready, decide which fabric print will be used for each layer. Try not to place identical colors directly beside one another unless you intentionally want a continuous section. Alternating red fabric, green fabric, and cream Christmas fabric creates stronger visual contrast and makes the overlapping construction easier to see. The reference design uses this principle effectively by distributing prints throughout the tree.
Trace each paper template onto the wrong side of the selected fabric. If using the turned-edge method, cut one front piece and one backing piece for every tree layer. You may use matching fabric for the backs or a simple coordinating cotton. Cut interfacing or thin batting slightly smaller than the fabric pieces so unnecessary bulk does not accumulate directly inside the seam allowance.
Place the front and backing fabrics with their right sides together. Position the batting or interfacing against the wrong side of one fabric layer. Sew around the outline using your planned 0.7 to 1 cm seam allowance, leaving a small opening along an edge that will later be hidden underneath another piece. Clip carefully around inner angles and trim excessive fabric around sharp points. These small cuts help the fabric turn smoothly without pulling.
Turn each piece right side out through the opening and use a blunt turning tool to gently shape the corners and branch points. Press the piece carefully with an iron, following the heat recommendations for your interfacing. Close the opening with a small hand stitch or narrow machine stitch. Repeat the process until every section of your Fabric Christmas Tree Fabric Pattern has been prepared.
Decorative topstitching is an important detail in the reference image. Sew approximately 3 to 5 mm from the finished edge using a contrasting thread. Dark brown, cream, red, or gold-toned thread can all work beautifully depending on the fabric. A slightly longer stitch length can make the stitching more visible. You can also use hand embroidery or a running stitch if you prefer a more rustic appearance.
After stitching all the layers, arrange them again on a table from largest at the bottom to smallest at the top. Adjust the overlap until no unwanted gaps appear between sections. At this stage, take a photograph of the arrangement or lightly mark the placement with removable fabric chalk. This simple preparation makes final assembly much easier because you already know exactly where each piece belongs.
Assembling the Tree, Trunk, Star, and Decorative Bow
Begin final assembly with the tree trunk. Cut a small rectangular or slightly tapered piece approximately 8 to 10 cm wide and 10 to 12 cm tall. Brown cotton with a woodgrain print works particularly well because it resembles the trunk shown in the reference image. Sew it using the same front-and-back method as the tree layers, or reinforce it with interfacing if additional stability is needed.
Position the trunk underneath the widest tree layer so that only the lower section remains visible. Secure it with a few hidden stitches or a small amount of fabric-safe fusible web before continuing. The widest red or green branch layer should overlap the upper portion of the trunk, helping the construction look natural and hiding the attachment stitches.
Next, begin stacking the fabric Christmas tree layers from the bottom upward. Center each piece using the marks created earlier. Overlap every section slightly, making sure the upper edge of the lower piece is completely covered. Instead of sewing across the entire visible surface, secure each layer primarily through the hidden overlapping area. This preserves the dimensional appearance of the individual branches.
Continue upward while alternating patterns. For example, you might begin with a red polka-dot layer, followed by green plaid, cream hearts, red gingham, another green print, cream holly, red snowflakes, and smaller green layers near the top. There is no single mandatory order. The objective is to create balanced distribution throughout the Fabric Christmas Tree Fabric Pattern.
To create the fabric bow, cut two rounded rectangular pieces approximately 24 to 28 cm long and 9 to 11 cm high for the bow loops. You can make one continuous bow shape or sew two separate loop sections. Add two ribbon tails approximately 8 cm wide and 18 to 22 cm long, shaping the lower ends into decorative points. Use red fabric reinforced with lightweight interfacing so the bow keeps its form.
For the golden Christmas star, draw a classic five-point star approximately 12 to 15 cm wide. Cut two fabric pieces and add interfacing or thin batting between them. Sew, turn, press, and topstitch just as you did for the tree sections. Position the star behind the uppermost green section and place the large red bow in front of it. The combination of the star and bow becomes the focal point at the top of the finished tree.
Finishing Details, Display Ideas, and Professional Sewing Tips
Before permanently attaching the top decorations, examine the entire tree from a short distance. Check whether the left and right sides feel visually balanced. Because the project consists of many irregular layers, perfect symmetry is unnecessary, but the overall silhouette should still resemble a full Christmas tree. Reposition any piece that seems too far to one side before stitching everything securely.
For additional dimension, avoid sewing every edge completely flat. Attaching only the upper hidden portions of the layers allows the lower branch points to lift slightly away from the surface. This creates soft shadows and makes the Fabric Christmas Tree Fabric Pattern look more like the dimensional textile project in the reference photograph.
The decorative stitching can also be customized. A running stitch, blanket stitch, narrow zigzag stitch, or straight topstitch can all produce attractive results. If your fabric contains strong patterns, choose a simple stitch so the design does not become visually crowded. With quieter fabrics, contrasting decorative thread can become a beautiful feature of the finished project.
If you plan to hang the tree, sew a small fabric loop or ribbon hanger behind the star before completing the final assembly. Another option is to attach the finished tree to a larger fabric background and turn it into a Christmas wall hanging. A neutral cream, linen-look, or soft beige background works especially well because it allows the red and green layers to remain the main focus.
Scraps from the project can be used to make matching ornaments, miniature trees, gift tags, coasters, or small appliqué designs. This makes the Fabric Christmas Tree Fabric Pattern particularly useful for anyone who keeps leftover quilting cotton. Even relatively small fabric pieces can become one of the upper tree sections, bow details, or decorative accents.
Finally, press the completed project gently from the back whenever possible. Avoid flattening the layered front too heavily because part of its charm comes from the slightly dimensional construction. Trim loose threads, check every attachment point, and make sure the star, bow, trunk, and layers are secure. Your handmade Fabric Christmas Tree Fabric Pattern is now ready for seasonal decorating.
Frequently Asked Questions About the Fabric Christmas Tree Fabric Pattern
What is a Fabric Christmas Tree Fabric Pattern?
A Fabric Christmas Tree Fabric Pattern is a sewing template used to create a decorative Christmas tree from individual fabric pieces. In this project, the tree is constructed from several overlapping sections rather than from a single triangular piece. This gives the finished decoration more texture, depth, and opportunities for combining Christmas prints.
What fabric is best for this project?
Quilting cotton is one of the best choices because it is easy to cut, press, sew, and stabilize. Cotton also comes in an enormous range of Christmas patterns such as plaid, gingham, holly, snowflakes, hearts, stars, and polka dots. Lightweight canvas or linen blends may also work, although they produce a slightly heavier project.
Can beginners make this fabric Christmas tree?
Yes. A beginner with basic straight-stitch sewing experience can complete this project. The most important skills are accurate cutting, careful pressing, turning sewn pieces right side out, and arranging the layers neatly. Starting with fewer and slightly larger layers can make the first version even easier.
Do I need a sewing machine?
A sewing machine is helpful and will make the project faster, but it is not absolutely necessary. The sections can also be sewn and topstitched by hand. Hand stitching can actually enhance the rustic appearance, especially if you use visible running stitches around the edges.
How much fabric is required?
Because the project uses multiple prints, it works very well as a fabric scrap project. Fat quarters or smaller leftover pieces are usually sufficient for most individual sections. The total amount depends on your final tree size, but you normally do not need large continuous pieces of any single print.
Should I use batting or interfacing?
Either option works. Thin batting creates a soft, quilted appearance, while fusible interfacing creates cleaner, flatter shapes. For a wall decoration similar to the reference project, lightweight fusible interfacing or very thin batting is usually sufficient.
How do I make the tree larger or smaller?
Resize every pattern section proportionally. If you enlarge the widest layer by 20%, enlarge the remaining layers, trunk, bow, and star by approximately the same percentage. Keeping the proportions consistent prevents the top decorations from looking too large or too small for the tree.
Can I use different colors instead of red and green?
Absolutely. Traditional red, green, cream, and gold create the classic Christmas appearance shown in the project, but the same Fabric Christmas Tree Fabric Pattern can be made with blue and silver, burgundy and gold, pink and cream, neutral farmhouse fabrics, or even colorful fabric scraps.
How can I keep the tree pieces from becoming floppy?
Add interfacing or thin batting to each fabric section. For larger trees, medium-weight fusible interfacing may be useful on the widest layers. The goal is to provide enough structure to maintain the branch shapes without making the project stiff or difficult to sew.
Can this pattern be turned into a quilt appliqué?
Yes. Instead of constructing every layer as a separate stuffed or interfaced piece, you can simplify the templates and appliqué them directly onto a background fabric. This approach is ideal for quilts, table runners, cushion covers, placemats, and Christmas wall panels.
How can I make the decorative stitches look even?
Use the edge of your presser foot as a guide when machine topstitching. If sewing by hand, lightly mark stitch positions with a removable fabric pen before beginning. Keeping consistent spacing creates the polished decorative outline visible around the layers.
Can I add embellishments to the finished Christmas tree?
Yes, although moderation usually produces the best result. Small buttons, wooden stars, fabric-covered buttons, embroidered details, tiny bells, or fabric ornaments can be added. Make sure any embellishments are securely attached, especially if the decoration will be handled frequently.
Conclusion
The Fabric Christmas Tree Fabric Pattern is a creative way to transform Christmas fabrics and quilting scraps into a festive decoration filled with texture, color, and handmade character. By creating several gradually sized tree sections, reinforcing them with interfacing or batting, adding decorative topstitching, and carefully overlapping the pieces, you can reproduce the dimensional appearance of the tree shown in the reference image.
Throughout this tutorial, you learned how to prepare the fabric pattern, calculate practical dimensions, add seam allowance, choose coordinating Christmas fabrics, construct each tree layer, create the brown trunk, make a dimensional red bow, sew a golden star, and assemble everything into one balanced design. The project can easily be resized or adapted into a wall hanging, appliqué panel, quilt decoration, or seasonal handmade gift.
EASILY FIND THE PDF FOR THIS PATTERN HERE!
The most enjoyable part of this Fabric Christmas Tree Fabric Pattern is the freedom to personalize every layer. Different combinations of plaid, gingham, snowflakes, holly, hearts, polka dots, and solid fabrics can completely change the personality of the finished tree while preserving the same basic construction method. If you make this project, leave your sincere opinion about the tutorial and share your suggestions. It would also be wonderful to know which colors, Christmas fabrics, or decorative details you would choose for your own version of this handmade fabric Christmas tree.