
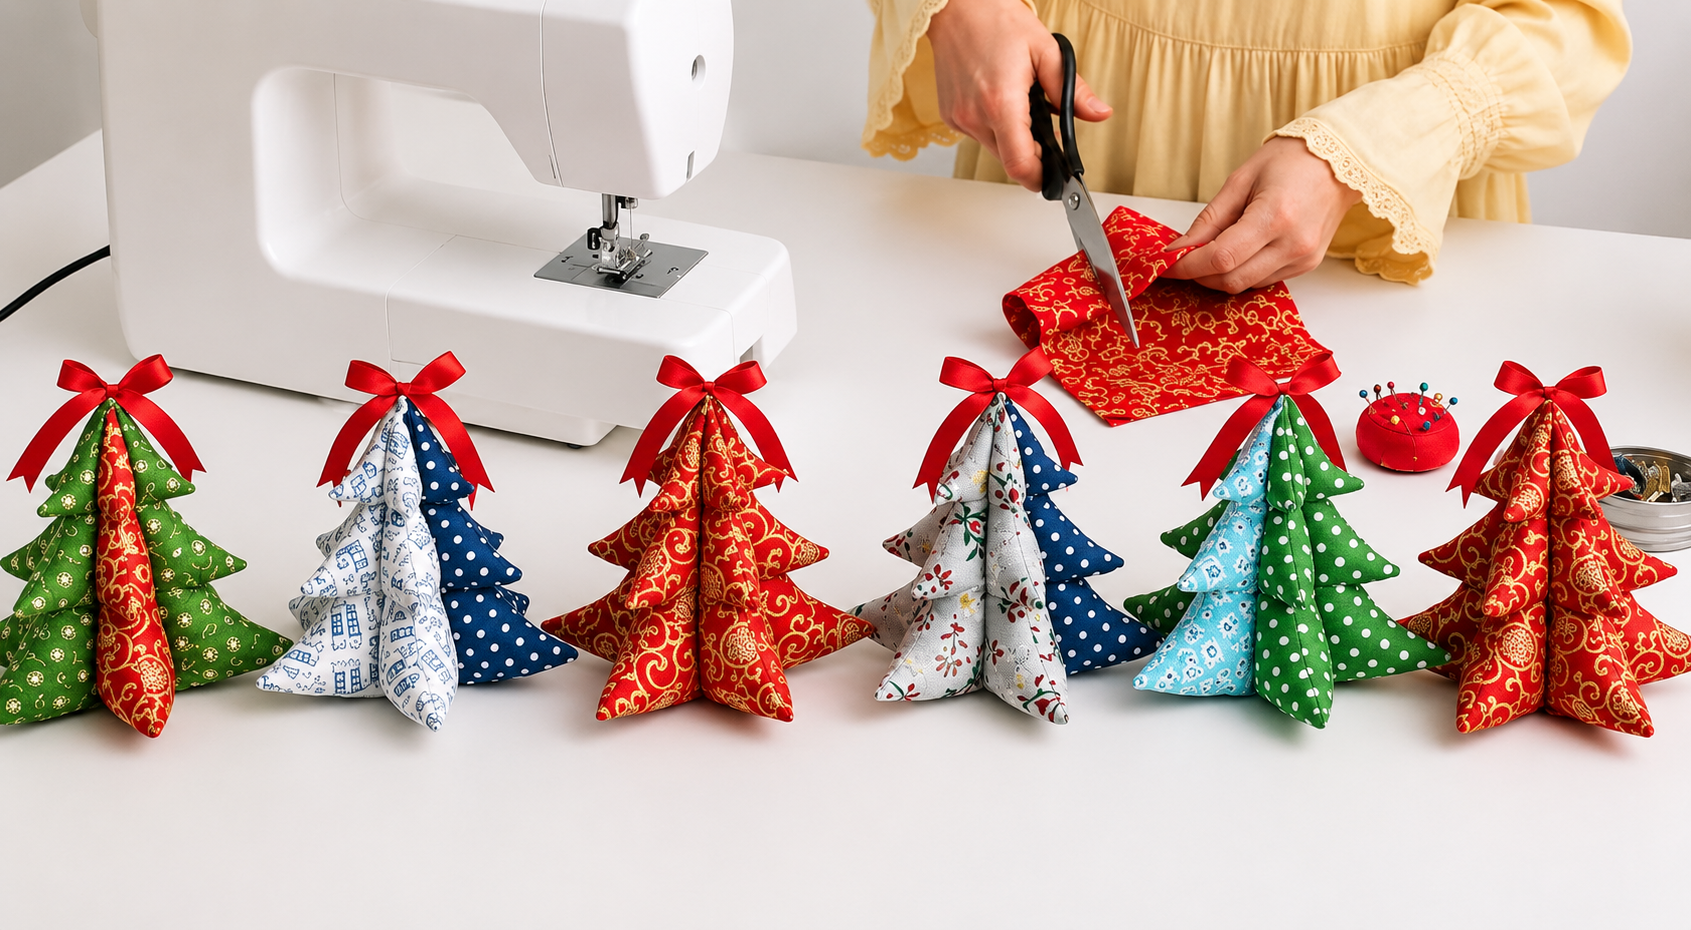
The Christmas tree ornament Pattern is a charming sewing project that transforms simple pieces of fabric into dimensional holiday decorations with a soft, handcrafted appearance. Inspired by the fabric trees shown in the image, this project combines basic sewing techniques, decorative cotton fabrics, careful pressing, and a ribbon bow to create ornaments that can stand on a table, decorate a mantel, become part of a Christmas centerpiece, or even be adapted for hanging on a tree. One of the greatest advantages of this Christmas tree ornament Pattern is that it does not require complicated construction methods, making it approachable for beginners while still being enjoyable for experienced sewists. The design also offers plenty of room for creativity because each section of the tree can be made from a different fabric. Traditional green and red prints create a classic Christmas atmosphere, while blue, white, gold, or country-style fabrics can give the same pattern an entirely different personality. Because the finished piece is relatively small, it is also an excellent way to use leftover cotton fabric from previous sewing or quilting projects.
A handmade Christmas tree ornament Pattern is especially appealing because the finished decoration has texture and dimension that mass-produced ornaments often lack. The trees in the project are created from multiple fabric sections that meet at the center, producing a sculptural shape with several pointed branches around the outside. This construction allows the ornament to look attractive from different angles rather than only from the front. Cotton quilting fabric is an excellent choice because it is easy to cut, press, sew, and shape, while lightweight batting or stuffing can be used when a fuller appearance is desired. Accurate cutting is important, but the project is forgiving enough that tiny differences between sections can actually enhance its handmade character. Choosing coordinating prints is another important part of the process. Fabrics do not need to match perfectly; instead, look for colors that repeat throughout the design, such as red, green, white, navy, gold, or light blue. A contrasting ribbon at the top finishes the ornament and visually connects all the fabric sections.
Before beginning the Christmas tree ornament Pattern, it helps to understand the basic construction. Several identical tree shapes are cut from fabric, paired with right sides together, stitched around the edges, turned right side out, and pressed. These individual units are then positioned together and sewn through the center so they can open into a dimensional tree. Depending on the desired result, the sections may remain lightly structured or receive a small amount of polyester fiberfill before the final assembly. The lower points form a broad base, allowing the decoration to remain upright when carefully balanced on a flat surface. A ribbon bow is attached at the top, adding a festive detail while concealing the meeting point of the fabric pieces. The process is repetitive rather than difficult, which makes it ideal for batch sewing. Once you understand the first ornament, you can efficiently make several more in coordinated colors for Christmas decorating, handmade gifts, craft projects, or seasonal table arrangements.
Materials, Fabric Selection, and Preparing the Pattern
The first step in creating the Christmas tree ornament Pattern is selecting suitable fabric. Medium-light cotton quilting fabric is one of the easiest materials to work with because it holds its shape without becoming excessively bulky at the seams. Consider combining two or three coordinating prints for each tree. For example, one section might feature green fabric with small golden motifs, while another uses red fabric with an elegant holiday design. Mixing prints creates the patchwork-inspired appearance seen in the finished ornaments while keeping every tree visually interesting.
DISCOVER MORE FREE PATTERNS HERE!
You will need fabric, matching or neutral sewing thread, fabric scissors or a rotary cutter, pins or sewing clips, a sewing machine, an iron, a turning tool, and ribbon for the decorative bow. Optional materials include lightweight fusible interfacing, thin batting, or a small amount of polyester fiberfill. Interfacing produces a flatter and slightly firmer ornament, while fiberfill creates a softer three-dimensional effect. Avoid extremely thick materials because several layers will eventually meet along the center seam.
Create a symmetrical paper tree template approximately 15 to 18 cm high, depending on the size of ornament you prefer. Draw a narrow point at the top, three gradually widening branch levels, and a broad lower section that ends in two or more pointed corners. Symmetry is important because all the pieces need to align during assembly. Fold the paper vertically before cutting the shape if necessary; this simple technique ensures both sides of the fabric Christmas tree remain balanced.
Add approximately 0.7 cm to 1 cm of seam allowance around the template if the original drawing does not already contain one. The seam allowance is the narrow area between the stitching line and the raw edge of the fabric. Consistent seam allowances make the finished tree sections much easier to combine. Trace the pattern carefully onto the wrong side of the fabric using a removable fabric marker, tailor’s chalk, or another sewing-safe marking method.
For one dimensional ornament, prepare several matching tree units. A practical version can be created from four finished units, although additional units may be used for a fuller appearance. Each finished unit requires two fabric pieces, so four sections require eight individual tree shapes. Cut accurately around every outline. When working with directional prints, check the direction of the design before cutting so houses, snowflakes, flowers, stripes, or other motifs do not appear upside down after sewing.
Before moving to the sewing machine, arrange the cut pieces on your work surface. Alternating contrasting colors usually gives the Christmas tree ornament Pattern more definition. A red section beside a green section creates strong contrast, while white and blue prints can introduce visual brightness. This preparation stage may seem simple, but thoughtful color placement greatly improves the finished design. Once you are satisfied with the arrangement, pair the pieces with their right sides facing each other and prepare them for stitching.
Sewing and Turning the Individual Christmas Tree Sections
Place two matching tree shapes right sides together, carefully aligning the edges and all the branch points. Pin or clip the layers at several locations so they cannot shift while sewing. Begin stitching near the bottom edge, leaving a turning opening of approximately 3 to 4 cm. Sew slowly around the curves and pointed areas using the seam allowance established in your pattern. A shorter stitch length around tight corners can provide additional control and help preserve the decorative outline.
When approaching an inward corner between two branches, reduce your sewing speed and pivot carefully with the needle lowered into the fabric. At each outward point, sew almost to the tip, pivot, and continue along the next edge. Accuracy at these locations helps create clearly defined branches after turning. You do not need professional-level precision, but smooth stitching will make the handmade Christmas ornament look cleaner and more balanced.
After stitching, trim excess fabric from the seam allowance around the outer points without cutting through the stitches. Make tiny clips into the inward corners, stopping just before the seam. These clips allow the seam allowance to spread when the piece is turned right side out. Carefully grading or trimming bulky areas is especially useful if you are working with slightly heavier cotton. Taking a few extra minutes at this stage can make a noticeable difference in the final shape.
Turn the tree section right side out through the opening. Use a blunt turning tool, knitting needle, chopstick, or the rounded end of another sewing tool to gently push the corners outward. Avoid applying excessive pressure because a sharp tool can puncture the fabric. Shape each branch individually until the silhouette resembles the original Christmas tree ornament Pattern. The points do not need to be razor sharp; slightly rounded points often create an attractive soft-sewn appearance.
Press the finished unit with a warm iron, following the temperature recommendations for your fabric. Fold the raw edges of the opening inward so they follow the existing seam line. If you plan to add a very small amount of filling, insert it before closing the opening. Keep the stuffing light and distribute it evenly, concentrating on the larger lower sections rather than forcing fiber into every narrow point. Excessive stuffing makes the final center assembly unnecessarily difficult.
Close the turning opening using a ladder stitch by hand or a narrow machine stitch close to the edge. Repeat the complete process until all tree units have been sewn, turned, shaped, and pressed. Lay the finished sections together and check that their sizes are reasonably consistent. Small variations are completely acceptable in handmade sewing, but major differences can affect the balance of the ornament. At this stage, you should have several individual fabric trees ready to become one dimensional decoration.
Assembling the Dimensional Christmas Tree Ornament
To assemble the Christmas tree ornament Pattern, stack the completed tree sections directly on top of one another. Align the top point, center line, branch positions, and bottom edge as closely as possible. Pin vertically through the middle to keep everything together. Because you will be sewing through several fabric layers, install a fresh universal sewing-machine needle if your current needle is worn. A reliable needle reduces skipped stitches and helps create a straighter central seam.
Mark a vertical line from the top of the tree to the bottom. Stitch carefully along this central line through every layer. Backstitch briefly at both ends to secure the seam. This single center seam is the key construction detail that transforms flat fabric pieces into a 3D Christmas tree ornament. Sew at a moderate pace because the thickness can change as you cross stuffed or interfaced sections. Do not pull the project through the machine; allow the feed dogs to move the layers naturally.
After completing the center seam, open the fabric sections like the pages of a book. Arrange them evenly around the stitched center so the ornament becomes three-dimensional. If four units were used, distribute the sections at approximately equal intervals. Continue adjusting each panel until the tree stands naturally. The construction is simple, but this shaping step gives the project its recognizable sculptural appearance.
Place the tree on a flat surface and inspect the lower branches. If one side appears heavier, gently reposition the fabric sections. Lightly pressing the center folds may also help them remain evenly spaced. For a freestanding ornament, maintaining balanced lower points is particularly important because those points create the base. A little manipulation by hand is usually enough to correct minor leaning without altering the stitches.
Now prepare the decorative ribbon. Cut a piece of satin, grosgrain, velvet, or another narrow ribbon and tie it into a neat Christmas bow. Red ribbon works beautifully with green, blue, white, and red fabrics because it immediately introduces a traditional holiday accent. However, gold, silver, burgundy, cream, navy, or plaid ribbon can also complement different fabric combinations. Trim the ribbon tails evenly after tying the bow.
Attach the bow securely at the top of the tree using several small hand stitches. Stitch through the center knot rather than the outer loops so the thread remains hidden. If desired, a narrow ribbon loop can be stitched beneath the bow before attachment, transforming the standing decoration into a hanging Christmas tree ornament. Once the ribbon is secured, rotate the tree and make final adjustments to the branches so every fabric section is visible and the overall silhouette feels balanced.
Finishing Ideas, Customization, Care, and Frequently Asked Questions
One of the best characteristics of the Christmas tree ornament Pattern is its flexibility. Once you understand the basic method, you can create an entire collection using different fabric combinations. Traditional red and green prints produce a classic Christmas look, while blue and white fabrics create a winter-inspired style. Rustic beige, burgundy, forest green, and plaid fabrics work beautifully in farmhouse decorating, while gold and cream materials can produce a more elegant appearance.
You can also personalize each ornament with small embellishments. Tiny decorative buttons, embroidered stars, miniature bells, seed beads, or a wooden button placed near the center can provide additional detail. However, moderation is important. The colorful fabric construction is already visually interesting, so too many decorations can hide the shape of the tree. A simple bow is often enough to create a polished DIY Christmas decoration.
Another creative option is varying the size. Small trees can become hanging ornaments or gift embellishments, medium trees can decorate shelves, and larger versions can become centerpiece decorations. When enlarging the pattern, consider adding lightweight interfacing to provide extra structure. If you reduce the design substantially, simplify the branch shapes because very tiny points can be difficult to sew and turn neatly.
Scrap fabric makes this pattern particularly practical. Because each piece is relatively small, leftover quilting cotton can become an attractive decoration instead of remaining unused in a fabric drawer. A scrap fabric Christmas project is also an opportunity to combine sentimental materials from previous sewing projects. Coordinated scraps from a quilt, table runner, stocking, or holiday apron can be transformed into matching ornaments.
To store the decorations after Christmas, avoid crushing them beneath heavy objects. Arrange them loosely in a clean storage container and keep them away from moisture. If the fabric becomes wrinkled, gentle pressing can restore the shape, but protect synthetic ribbons from excessive heat. Proper storage allows a well-made Christmas tree ornament Pattern project to remain attractive for many holiday seasons.
The most important finishing step is simply inspecting your work and making small adjustments. Clip loose threads, straighten the bow, distribute the fabric panels evenly, and reshape any points that became compressed during assembly. Handmade ornaments do not need to look mechanically identical. Slight differences between trees emphasize their handcrafted character and make a coordinated group feel warm, personal, and unique.
FAQ: What fabric is best for a Christmas tree ornament Pattern?
Quilting cotton is one of the most practical choices because it is stable, easy to sew, widely available, and offered in countless Christmas prints. Medium-light cotton also handles multiple layers better than very heavy fabric. Linen blends can create a rustic appearance, while carefully selected lightweight decorative fabrics may provide a more elegant finish.
Do I need batting or stuffing inside the ornament?
No. The Christmas tree ornament Pattern can be constructed without stuffing if you prefer a flatter and more structured design. A small amount of polyester fiberfill gives each section additional volume, while lightweight fusible interfacing can add stability without creating significant thickness. The choice depends mainly on the finished appearance you want.
How many fabric pieces are required for one ornament?
The exact number depends on how full you want the tree to look. If you create four finished tree sections, you will normally cut eight individual fabric shapes because each section contains a front and back. Additional sections can create greater fullness, although too many layers may make the center seam difficult to sew.
Can beginners make this sewing project?
Yes. This easy Christmas sewing project is suitable for confident beginners because most of the construction involves straightforward seams. The areas requiring the most attention are the pointed branches, inward corners, turning process, and central assembly seam. Sewing slowly and clipping the seam allowances carefully makes these steps much easier.
How can I make the tree stand upright?
Make sure the pattern has a sufficiently wide and symmetrical lower section. After sewing the central seam, spread the fabric panels evenly around the ornament. The bottom branch points should touch the surface at balanced positions. If the tree contains stuffing, use only a small amount so the lower portion does not become distorted.
Can this design be used as a hanging Christmas ornament?
Absolutely. Before attaching the bow, sew a loop of ribbon or decorative cord securely into the upper center of the tree. The loop should be long enough to fit comfortably over a Christmas tree branch. Because hanging decorations do not need to balance on their lower points, smaller versions of the pattern are especially suitable for this purpose.
Can I sew the ornaments by hand instead of using a sewing machine?
Yes, although construction will take longer. Use small backstitches for the main seams because they are stronger than simple running stitches. After turning each section, the opening can be closed with an invisible ladder stitch. Hand sewing can actually make the Christmas tree ornament Pattern an enjoyable portable holiday project.
What colors work best for handmade Christmas tree ornaments?
Red and green remain classic choices, but there are no strict rules. Red, navy, light blue, white, gold, forest green, cream, burgundy, and even pastel shades can work beautifully. A useful design principle is to repeat at least one color across several fabric sections so the ornament appears coordinated rather than random.
Can I use fabric scraps from other quilting projects?
Yes, and this is one of the best uses for the pattern. Small scraps are perfect for individual tree sections, especially when they share similar colors. Using leftover fabrics makes each fabric Christmas ornament unique and can help coordinate the decoration with quilts, stockings, table runners, placemats, or other handmade holiday items.
How can I make several ornaments quickly?
Use a batch-sewing method. Trace and cut all pieces first, arrange the color combinations, sew all paired sections, clip all seams, turn every unit, press them together, and finally complete the center assembly. Performing the same operation on several pieces before moving to the next step can be considerably more efficient than finishing one tree at a time.
Conclusion
The Christmas tree ornament Pattern is a versatile handmade project that combines straightforward sewing techniques with creative fabric selection. Throughout this tutorial, you learned how to prepare a symmetrical tree template, add a consistent seam allowance, choose coordinating cotton fabrics, cut the required shapes, stitch individual tree sections, clip corners, turn and press the pieces, and optionally add lightweight stuffing or interfacing.
You also learned how the central seam transforms several flat fabric pieces into a dimensional 3D Christmas tree ornament. By opening and arranging the sections evenly, the project gains the sculptural form that makes these fabric trees so attractive on tables, shelves, mantels, and holiday displays. Adding a contrasting ribbon bow completes the design and gives the tree a recognizable festive finish.
Another important advantage of this Christmas tree ornament Pattern is the freedom to personalize it. You can experiment with traditional red and green prints, winter blues, elegant gold fabrics, farmhouse plaids, or leftover quilting cotton. You can also make different sizes, add a hanging loop, incorporate subtle embellishments, or create an entire coordinated collection for seasonal decorating.
Most importantly, this project demonstrates how simple fabric pieces can become a beautiful Christmas decoration through careful cutting, accurate stitching, pressing, shaping, and thoughtful finishing. Whether you make one ornament or a complete set, the result can bring a warm handmade element to your holiday décor. If you decide to make this Christmas tree ornament Pattern, leave your sincere opinion about the project. I would also love to hear your suggestions, favorite fabric combinations, and ideas for customizing these handmade Christmas trees. Your creative suggestions may inspire new variations and make future sewing projects even more interesting.