
Crochet Car Seat Organizer Pattern is one of the most practical and stylish projects for anyone who loves creating functional handmade accessories. A well-designed Crochet Car Seat Organizer Pattern combines beauty, organization, and durability while offering an enjoyable crochet experience for beginners and experienced makers alike. Whether you want to keep water bottles, notebooks, travel essentials, or children’s accessories neatly organized inside your vehicle, this pattern is a rewarding project that blends creativity with everyday convenience.
Crochet enthusiasts often look for projects that are not only beautiful but also genuinely useful, and this organizer perfectly fits that purpose. Instead of purchasing plastic organizers that rarely match your style, you can crochet a personalized version using your favorite colors, textures, and stitch combinations. Handmade organizers add warmth to the interior of a vehicle while showcasing your crochet skills in a practical way. This project is also an excellent gift idea for family members, friends, or anyone who spends a lot of time driving.
One of the greatest advantages of this Crochet Car Seat Organizer Pattern is its versatility. The design can easily be adapted to different vehicle sizes, pocket arrangements, and storage needs. You can add extra compartments, reinforce the hanging straps, or decorate the organizer with contrasting colors and textured stitches. Throughout this guide, you will learn how to create a sturdy organizer step by step while understanding the crochet techniques that make this project durable, attractive, and highly functional.
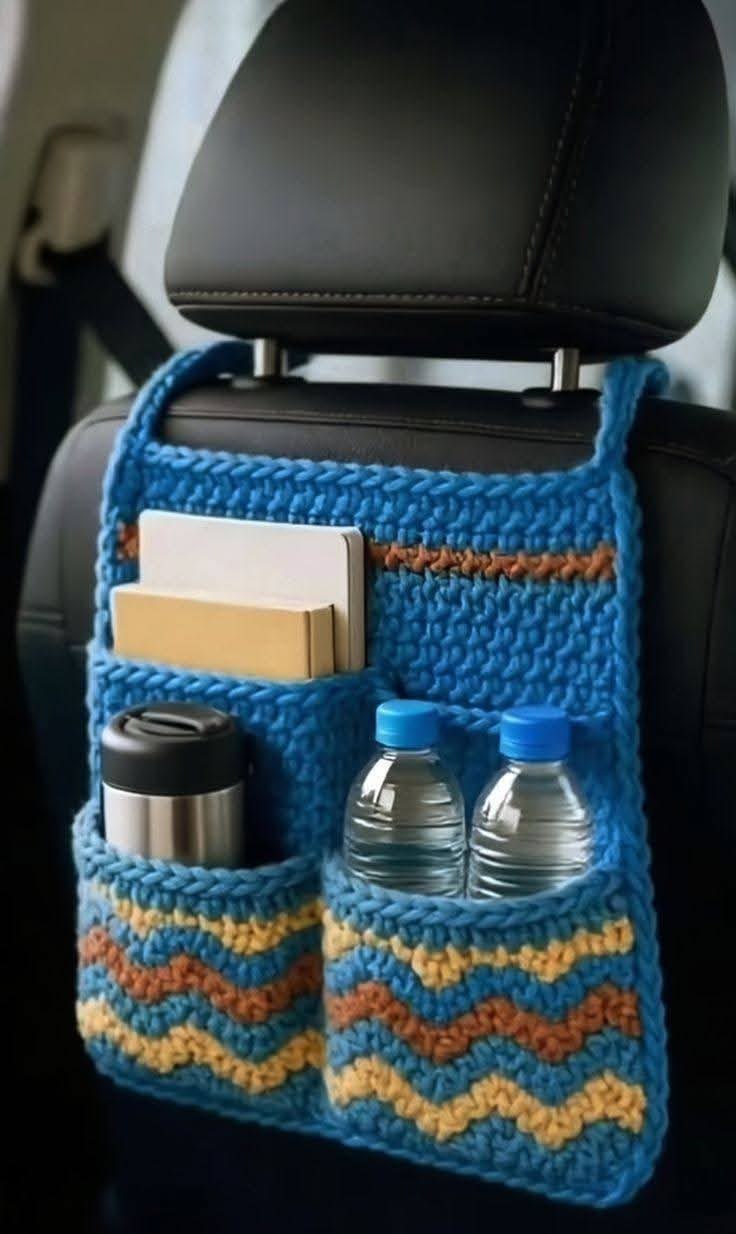
Planning Your Crochet Car Seat Organizer Pattern
Before beginning your project, gather all the necessary materials. Medium-weight cotton yarn is highly recommended because it offers excellent durability, minimal stretching, and easy maintenance. Cotton also keeps the organizer looking neat after frequent use.
DISCOVER MORE FREE PATTERNS HERE!
Choose a crochet hook that matches the yarn weight. Most medium cotton yarns work well with a 4.5 mm to 5.5 mm hook, producing a dense fabric that can safely support everyday items without becoming loose.
Consider the measurements of your car seat before starting. Every vehicle is slightly different, so measuring the width and height of the seat allows you to customize the organizer perfectly instead of relying on fixed dimensions.
Select a color palette that complements your vehicle’s interior. Neutral colors create an elegant appearance, while bright combinations produce a cheerful and modern handmade accessory that stands out beautifully.
Sketch the arrangement of your pockets before crocheting. Decide where bottles, books, tissues, phones, tablets, snacks, or toys will be stored. Careful planning ensures every compartment serves a practical purpose.
Finally, prepare stitch markers, scissors, a tapestry needle, measuring tape, and optional interfacing material if additional reinforcement is desired. Having every tool ready makes the crocheting process smoother and more enjoyable.
Step-by-Step Crochet Instructions
Begin by crocheting a foundation chain equal to the desired width of the organizer. Make sure the chain is not twisted before starting the first row. This foundation determines the final width of the back panel.
Work rows of single crochet (sc) across the entire panel. Single crochet creates a dense and sturdy fabric capable of supporting heavier objects. Continue until the panel reaches the desired height.
Once the main panel is complete, create the hanging straps. Crochet long rectangular strips using single crochet or half double crochet stitches. Fold the ends over and securely sew them to the top of the organizer so they can wrap around the car seat headrest posts.
Now crochet the individual pockets separately. Start with foundation chains matching each pocket width, then crochet upward using single crochet, half double crochet (hdc), or double crochet (dc) depending on the desired texture and flexibility.
For decorative sections, incorporate wave stitches, ripple stitches, or textured rows using front-loop and back-loop techniques. Color changes between rows create attractive horizontal accents while maintaining a clean structure.
Position every completed pocket on the main panel before sewing. Pin them temporarily, verify spacing, then stitch each pocket securely around the sides and bottom using matching yarn, leaving the upper edge open for storage.
Essential Crochet Stitches Used in This Pattern
The foundation chain forms the starting edge of the project. Keeping consistent chain tension helps ensure the organizer remains rectangular without curling along the edges.
The single crochet (sc) stitch is the primary structural stitch used throughout this organizer. It creates a compact fabric that supports bottles, books, and other accessories without excessive stretching.
The half double crochet (hdc) offers slightly more height while maintaining good density. This stitch works well for larger pockets that need flexibility without losing their shape.
The double crochet (dc) stitch is ideal for decorative areas or larger storage compartments where a softer fabric is preferred. It also allows faster progress when working larger sections.
The slip stitch (sl st) is frequently used to join pieces, finish edges, and create smooth transitions. Although small, this stitch provides a clean and professional appearance.
Simple edging techniques such as reverse single crochet or standard single crochet borders reinforce the organizer while giving the finished project a polished and refined look suitable for everyday use.
Tips for Customizing and Finishing Your Crochet Car Seat Organizer Pattern
Personalization makes every Crochet Car Seat Organizer Pattern unique. Experiment with different color combinations, textured stitches, or striped designs to reflect your personal style while maintaining practicality.
Consider reinforcing the back panel by inserting a removable plastic canvas between two crocheted layers. This helps the organizer stay flat even when multiple pockets are fully loaded.
If you frequently travel with children, create specialized pockets for coloring books, crayons, snacks, tissues, and small toys. Organized compartments make long road trips much more enjoyable.
For outdoor enthusiasts, add deeper pockets sized for reusable water bottles, maps, sunglasses, flashlights, or travel accessories. Practical customization increases the organizer’s usefulness for everyday adventures.
After assembling all components, carefully weave in every yarn end using a tapestry needle. Hidden ends improve durability and prevent unraveling after repeated use.
Finally, lightly steam block the organizer if the yarn manufacturer recommends it. Blocking evens the stitches, improves pocket alignment, and gives the entire project a professional handmade appearance.
FAQ
Is this Crochet Car Seat Organizer Pattern suitable for beginners?
Yes. Beginners who are familiar with foundation chains, single crochet, half double crochet, and basic sewing techniques can successfully complete this project by working carefully through each step.
Which yarn works best?
Cotton yarn is generally the best option because it provides durability, minimal stretching, excellent stitch definition, and easy cleaning after regular use.
How many pockets should the organizer have?
There is no fixed number. Most organizers include four to eight pockets, depending on the available space and the intended storage needs.
Can I change the size?
Absolutely. One of the greatest advantages of this Crochet Car Seat Organizer Pattern is its flexibility. Simply adjust the width, height, and pocket dimensions to fit your specific vehicle.
How do I make the organizer stronger?
Use dense stitches such as single crochet, reinforce the straps with extra rows, securely sew all pockets, and optionally insert a removable plastic canvas between layers for additional stability.
Is this organizer washable?
Yes. If made with quality cotton yarn, the organizer can usually be hand washed or machine washed on a gentle cycle, following the care instructions recommended for the selected yarn.
Can I sell organizers made from this pattern?
In most cases, handmade finished products may be sold, especially when using your own craftsmanship and personal modifications. However, always respect any copyright restrictions if following a separately published commercial pattern.
What items can be stored inside?
This organizer is ideal for water bottles, notebooks, tissues, tablets, phones, chargers, snacks, children’s toys, travel accessories, sunglasses, reusable bags, and many other everyday essentials.
Conclusion
Creating a Crochet Car Seat Organizer Pattern is an enjoyable project that combines creativity with everyday functionality. Throughout this guide, you learned how to plan the organizer, choose appropriate materials, crochet a sturdy base, create practical storage pockets, assemble the components securely, and customize the finished piece to match your personal style. Using durable stitches such as single crochet, half double crochet, and double crochet, you can produce a handmade organizer that keeps your vehicle neat while showcasing your crochet skills.
EASILY FIND THE PDF FOR THIS PATTERN HERE!
With thoughtful planning and careful finishing, this project becomes both a beautiful accessory and a highly practical storage solution for daily use. If you enjoyed this tutorial, please leave your honest opinion in the comments and share your suggestions or ideas for future crochet patterns.