
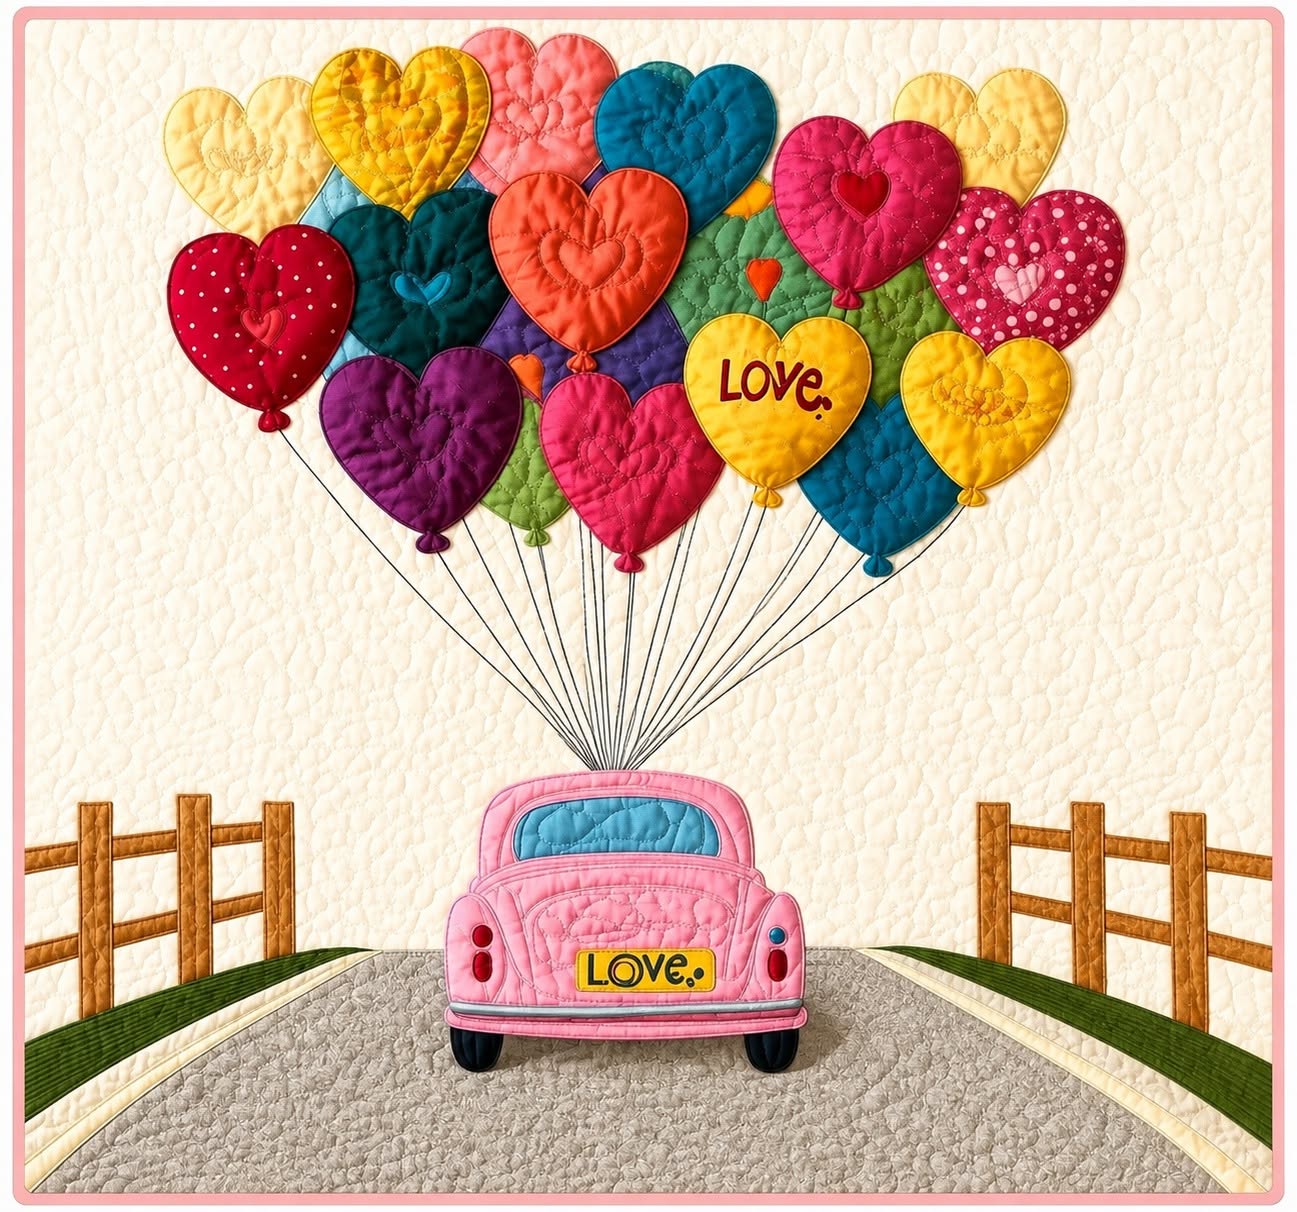
The Love Balloon Bedspread Quilt Pattern is a charming textile project that combines appliqué, quilting, color, and storytelling in one memorable design. Inspired by the image, the composition features a pink car traveling along a country road while a joyful cluster of heart-shaped balloons rises into a soft blue sky. Every section of the quilt contributes to the scene, from the textured clouds and distant landscape to the wooden fences and embroidered balloon strings. This project can be adapted into a bedspread, wall hanging, lap quilt, or decorative panel, depending on the dimensions you choose. Although the finished piece looks detailed, it can be created gradually by dividing the design into simple fabric shapes. With careful preparation and patient stitching, the Love Balloon Bedspread Quilt Pattern becomes an enjoyable project for quilters who appreciate romantic, colorful, and handmade décor.
One of the most attractive qualities of this quilt is its dimensional appearance. The heart balloons are not merely flat shapes placed on the background, because quilting lines, layered fabrics, and optional light padding can give each balloon a soft raised effect. The car can also be enhanced with decorative stitching around the windows, lights, wheels, door lines, and license plate. Different fabric prints add movement without requiring complicated piecing, making the design suitable for using coordinated scraps from your fabric collection. Solid fabrics create a clean and modern finish, while floral, dotted, marbled, and textured materials produce a playful patchwork look. The word “Love” becomes the central theme that connects the vehicle, balloons, colors, and cheerful atmosphere. For that reason, the Love Balloon Bedspread Quilt Pattern works especially well as a meaningful handmade gift for weddings, anniversaries, bedrooms, nurseries, and Valentine-inspired decoration.
Before beginning, it is important to understand that this project is built in layers. First, you prepare the quilt background and divide it into sky, water or distant landscape, road, and side scenery. Next, you create the appliqué pieces, beginning with the larger background elements and continuing toward the smaller foreground details. The car and heart balloons should be positioned only after the general landscape is balanced. Then, the entire quilt top is joined to batting and backing fabric before the final quilting is completed. Beginners can simplify the design by using fewer balloons, plain scenery, and basic outline stitching. More experienced makers can add free-motion quilting, fabric painting, embroidery, trapunto, hand appliqué, and personalized words. The result will still preserve the recognizable character of the Love Balloon Bedspread Quilt Pattern, even when colors, measurements, and decorative details are changed.
Materials and Preparation for the Love Balloon Bedspread Quilt Pattern
Begin by selecting a durable cotton fabric for the foundation of the quilt top. Quilting cotton is usually a practical choice because it is easy to cut, press, layer, and stitch. You will need light blue fabric for the sky, darker blue fabric for the horizon, beige or gray fabric for the road, green and brown pieces for the landscape, and several bright fabrics for the heart balloons. Pink fabric is ideal for reproducing the car shown in the inspiration image, but red, turquoise, yellow, or lavender can also create an attractive result. Choose fabrics with enough contrast so that every element remains visible after quilting.
DISCOVER MORE FREE PATTERNS HERE!
The primary term, Love Balloon Bedspread Quilt Pattern, describes both the decorative theme and the construction plan for the project. “Love Balloon” refers to the group of heart-shaped balloons that forms the main focal point. “Bedspread Quilt” indicates that the design can be enlarged into a functional quilt suitable for covering a bed. “Pattern” refers to the templates, placement guides, measurements, and sewing sequence used to recreate the design. Understanding these terms helps you plan the scale of every piece before cutting your fabric.
Additional supplies include quilt batting, backing fabric, fusible appliqué web, matching thread, contrasting embroidery thread, fabric scissors, a rotary cutter, cutting mat, acrylic ruler, pins, safety pins, and a sewing machine. A removable fabric marker is useful for drawing the road lines, balloon strings, fence details, and quilting guides. You may also use lightweight interfacing behind smaller shapes, such as the car lights and balloon knots. Always test your marker and fusible product on a scrap before applying them to the main fabrics.
Decide on the finished size before creating templates. A wall hanging may measure approximately 24 by 30 inches, while a larger bedspread requires the pattern pieces to be enlarged proportionally. Leave extra fabric around the outer edges for trimming and binding. When enlarging the design, avoid increasing only one section, because the car, balloons, road, and landscape must maintain a balanced relationship. Creating a full-size paper layout can prevent errors and make the placement process much easier.
Wash, dry, and press the fabrics if you expect the finished quilt to be washed regularly. Prewashing helps reduce unexpected shrinking and removes excess dye from strongly colored materials. After pressing, arrange the fabrics together under natural light to confirm that the colors are harmonious. Keep the brightest shades for the heart balloons because they should immediately attract attention. Softer shades can be used in the background so that the foreground remains visually dominant.
Create paper templates for the clouds, hills, road, fences, car body, car window, wheels, lights, license plate, and several heart sizes. Label every template clearly and mark whether it should be cut with or without seam allowance. For raw-edge fusible appliqué, the fabric can be cut close to the template outline. For turned-edge appliqué, add a small allowance around every shape. Store all templates in labeled envelopes so the Love Balloon Bedspread Quilt Pattern can be recreated later.
Building the Landscape and Quilted Background
Start the quilt top by joining the main horizontal background sections. Place the light blue sky at the top, the dark blue horizon below it, and the road section at the bottom. The road should become wider as it approaches the lower edge, creating a sense of perspective. Side strips in green, brown, and patterned fabrics can represent hills, fields, and vegetation. Press each seam carefully to keep the quilt top smooth and stable.
Add white clouds across the sky using simple rounded appliqué shapes. The clouds may be cut as complete silhouettes or assembled from overlapping curved pieces. Position some clouds partially behind the balloon area so they look distant rather than competing with the main design. Secure them with fusible web and finish the edges using a narrow zigzag, blanket stitch, or satin stitch. White or cream thread creates a subtle outline that blends naturally into the scene.
Create the side landscape with irregular green, yellow, brown, and dark blue fabric sections. These pieces do not need to be perfectly symmetrical because natural scenery often looks more interesting when each side is different. Use gentle curves rather than sharp geometric angles unless you want a modern quilt style. Small fabric scraps can suggest fields, flowers, shadows, or distant trees. Keep the center road open because the car will later become the main foreground feature.
The fences help guide the viewer’s eye toward the center of the quilt. Cut narrow brown strips for the vertical posts and horizontal rails. As the fence moves toward the horizon, gradually reduce the width and spacing of the pieces to reinforce perspective. Fuse or pin the strips in place before stitching. A darker brown thread can be used to add wood-grain lines, nail marks, and shadows without requiring extra fabric pieces.
After the appliqué background is complete, layer the quilt top with batting and backing. Smooth the three layers carefully and baste them using safety pins, temporary spray, or long hand stitches. Quilt the sky with soft curves, waves, loops, or cloud-like shapes. Use horizontal lines in the distant blue area and irregular contours in the landscape. The road can be quilted with long lines that follow its direction and strengthen the feeling of movement.
Do not overquilt areas where the balloons and car will be heavily detailed. Dense quilting can make the appliqué difficult to attach or cause the background to become too firm. Instead, leave enough open space for the main shapes while stabilizing the surrounding fabric. Check the quilt frequently for puckering on both the front and back. A smooth foundation will make the next stages of the Love Balloon Bedspread Quilt Pattern much easier.
Creating the Heart Balloons and Pink Car Appliqué
Trace a variety of heart shapes onto the paper side of the fusible web. Include large, medium, and small hearts so the balloon arrangement feels natural and full. Reverse the templates when necessary, especially when using directional fabric prints. Fuse each traced shape to the wrong side of the selected fabric according to the manufacturer’s instructions. Allow the pieces to cool before cutting them accurately along the drawn lines.
Arrange the heart balloons above the car before permanently attaching them. Begin with the largest hearts near the upper and central portions of the bouquet. Fill the spaces with medium and small balloons, allowing some shapes to overlap slightly. Distribute colors across the design instead of grouping identical shades together. Red, pink, coral, yellow, purple, turquoise, green, and dark blue create the joyful appearance associated with the Love Balloon Bedspread Quilt Pattern.
For a dimensional finish, place a thin piece of batting behind selected heart shapes before stitching them to the quilt. Avoid using thick batting because the edges may become bulky. Stitch around each heart with blanket stitch, satin stitch, or a narrow zigzag. Add an inner heart outline using free-motion quilting or hand embroidery. This extra line creates the padded, decorative appearance visible in the inspiration design.
Small fabric triangles or embroidered details can be placed at the bottom of each heart to represent tied balloon ends. Draw the balloon strings with a removable marker before stitching. The lines should begin beneath the hearts and gradually meet behind the car. Use dark gray, black, or brown thread and a straight stitch with a shorter stitch length. Stitch each line separately so the strings remain delicate and easy to follow.
Construct the car from several appliqué pieces rather than cutting it as one complicated shape. Begin with the main body, then add the roof, rear window, bumper, lights, license plate, wheels, and small side details. The car should be centered on the road and large enough to anchor the balloon arrangement. Use darker pink thread to define the doors and body contours. Black, charcoal, and gray fabrics work well for the tires, shadows, and bumper.
Finish the car by adding the word “Love” to the license plate. The letters may be embroidered, appliquéd, written with a permanent fabric pen, or created with machine lettering. Keep the word readable but proportional to the plate. Small highlights on the lights and window can be made with white thread. Press the finished appliqué from the back using a pressing cloth to protect the dimensional stitching.
Quilting, Binding, Customization, and Final Finishing
Once all appliqué elements are attached, inspect the entire quilt for loose edges and incomplete seams. Reinforce narrow sections such as balloon knots, fence rails, car lights, and wheel edges. Remove visible basting stitches and gently erase temporary markings according to the marker instructions. Trim stray threads from both sides of the quilt. This careful inspection improves durability and gives the project a professional appearance.
Add decorative quilting inside the heart balloons to emphasize their individual fabrics. Spirals, small feathers, echoes, loops, and repeated heart outlines are suitable choices. Quilt around the outside of each balloon to create definition and help the raised shapes stand out. The car can receive curved quilting lines that imitate metal panels and reflections. Avoid extremely dense stitching in padded areas because it may flatten the texture.
Square the quilt by trimming the edges with a rotary cutter and ruler. Measure from several points rather than relying on a single corner. Prepare binding strips that coordinate with the landscape or balloon colors. A medium blue, green, pink, or multicolored binding can frame the scene effectively. Join the strips diagonally to reduce bulk and press the binding before attaching it.
Sew the binding to the front of the quilt using a consistent seam allowance. Fold it over the raw edge and secure it on the back by hand or machine. Carefully form neat mitered corners. For a bedspread, machine-finished binding may offer extra strength, while hand-finished binding creates a softer traditional appearance. Add a hanging sleeve only when the piece will also be displayed as wall art.
The Love Balloon Bedspread Quilt Pattern can be personalized in many ways. Replace the word “Love” with a family name, wedding date, child’s name, or short positive message. Change the car to match a favorite vehicle or use colors that coordinate with a bedroom. The balloons can contain embroidered initials, meaningful words, small flowers, dates, or symbols. These adaptations transform the quilt into a unique keepsake without changing its main construction method.
After the quilt is finished, allow it to rest flat for several hours before folding or washing. Follow care methods appropriate for the fabrics, threads, batting, and embellishments used. A gentle wash and low-temperature drying method are usually suitable for cotton quilts, but dimensional or heavily embroidered pieces may benefit from air drying. Store the quilt in a clean, dry place and avoid long-term exposure to direct sunlight.
Frequently Asked Questions About the Love Balloon Bedspread Quilt Pattern
Is the Love Balloon Bedspread Quilt Pattern suitable for beginners?
Yes. Beginners can complete the project by simplifying the landscape, using fusible raw-edge appliqué, and reducing the number of balloons. The quilt is easier to manage when created as a smaller wall hanging before attempting a full bedspread. Basic cutting, straight stitching, and zigzag appliqué skills are enough to produce an attractive first version.
What is the best fabric for this quilt pattern?
Quilting cotton is the most practical option because it is stable, washable, and available in many colors and prints. Cotton blends can also be used, but fabrics with very different weights should be stabilized before they are combined. Avoid extremely stretchy materials unless you have experience working with interfacing.
How many heart balloons should be included?
There is no required number. A small version may contain seven to ten hearts, while a large bedspread can include fifteen or more. An odd number often creates an interesting composition, but balance and color distribution are more important than following a fixed total.
Can the balloons be made with fabric scraps?
Yes. This is an excellent project for using medium and small scraps. Choose pieces large enough to accommodate the heart templates and avoid fabrics that fray excessively. Scraps from previous quilts can also give the project sentimental value.
How can I make the heart balloons look raised?
Place a thin layer of batting behind the hearts before stitching them to the quilt. You can also use a trapunto-inspired method by adding extra batting behind selected shapes. Quilt closely around the outside of each balloon to emphasize the raised appearance.
Should the appliqué be sewn by hand or machine?
Both methods are suitable. Machine appliqué is faster and provides strong edges for a frequently used bedspread. Hand appliqué creates a softer, traditional finish and may be preferred for decorative wall quilts. The choice depends on your available time and desired style.
Can I change the pink car to another color?
Absolutely. The car can be red, yellow, blue, green, lavender, or any color that contrasts with the road and surrounding scenery. You can also choose fabric that resembles the color of a special family vehicle.
What type of quilting design works best in the sky?
Cloud-like curves, flowing waves, loops, gentle swirls, and horizontal lines all work well. The quilting should add texture without overwhelming the heart balloons. Light blue or white thread creates a subtle result, while contrasting thread produces a more decorative finish.
How do I prevent the quilt from puckering?
Press each fabric section before assembly, baste the quilt layers thoroughly, and quilt from the center toward the outer edges. Maintain an even sewing speed and avoid pulling the fabric. Check the backing regularly while quilting to identify folds before they become permanent.
Can this pattern be used for something smaller than a bedspread?
Yes. The design can be adapted into a cushion cover, table runner, baby quilt, tote bag panel, wall hanging, or framed textile artwork. Reduce the number of background details when working on a smaller surface so the design remains clear.
How should I wash the finished quilt?
Use a gentle cycle with mild detergent and cool or lukewarm water when all materials are washable. Strongly colored fabrics should be tested before construction. Air drying or low-temperature drying can help preserve the appliqué, embroidery, and dimensional texture.
Can words be added to the heart balloons?
Yes. Short words such as “Joy,” “Hope,” “Family,” “Dream,” and “Home” can be embroidered or written with a permanent fabric pen. Test the lettering method on scrap fabric before adding it to the finished balloons.
Conclusion
The Love Balloon Bedspread Quilt Pattern combines a scenic quilted background, colorful heart appliqué, dimensional stitching, a charming pink car, and meaningful decorative details. By preparing the fabrics, creating accurate templates, assembling the landscape, arranging the heart balloons, constructing the car, and completing the final quilting and binding, you can transform simple fabric pieces into a beautiful textile scene.
EASILY FIND THE PDF FOR THIS PATTERN HERE!
The pattern is flexible enough for beginners to simplify and for experienced quilters to personalize with advanced embroidery or free-motion quilting. Create your own version with colors and details that reflect your style, then leave your honest opinion and suggestions about the project and the techniques you would like to see explored in future quilt patterns.