
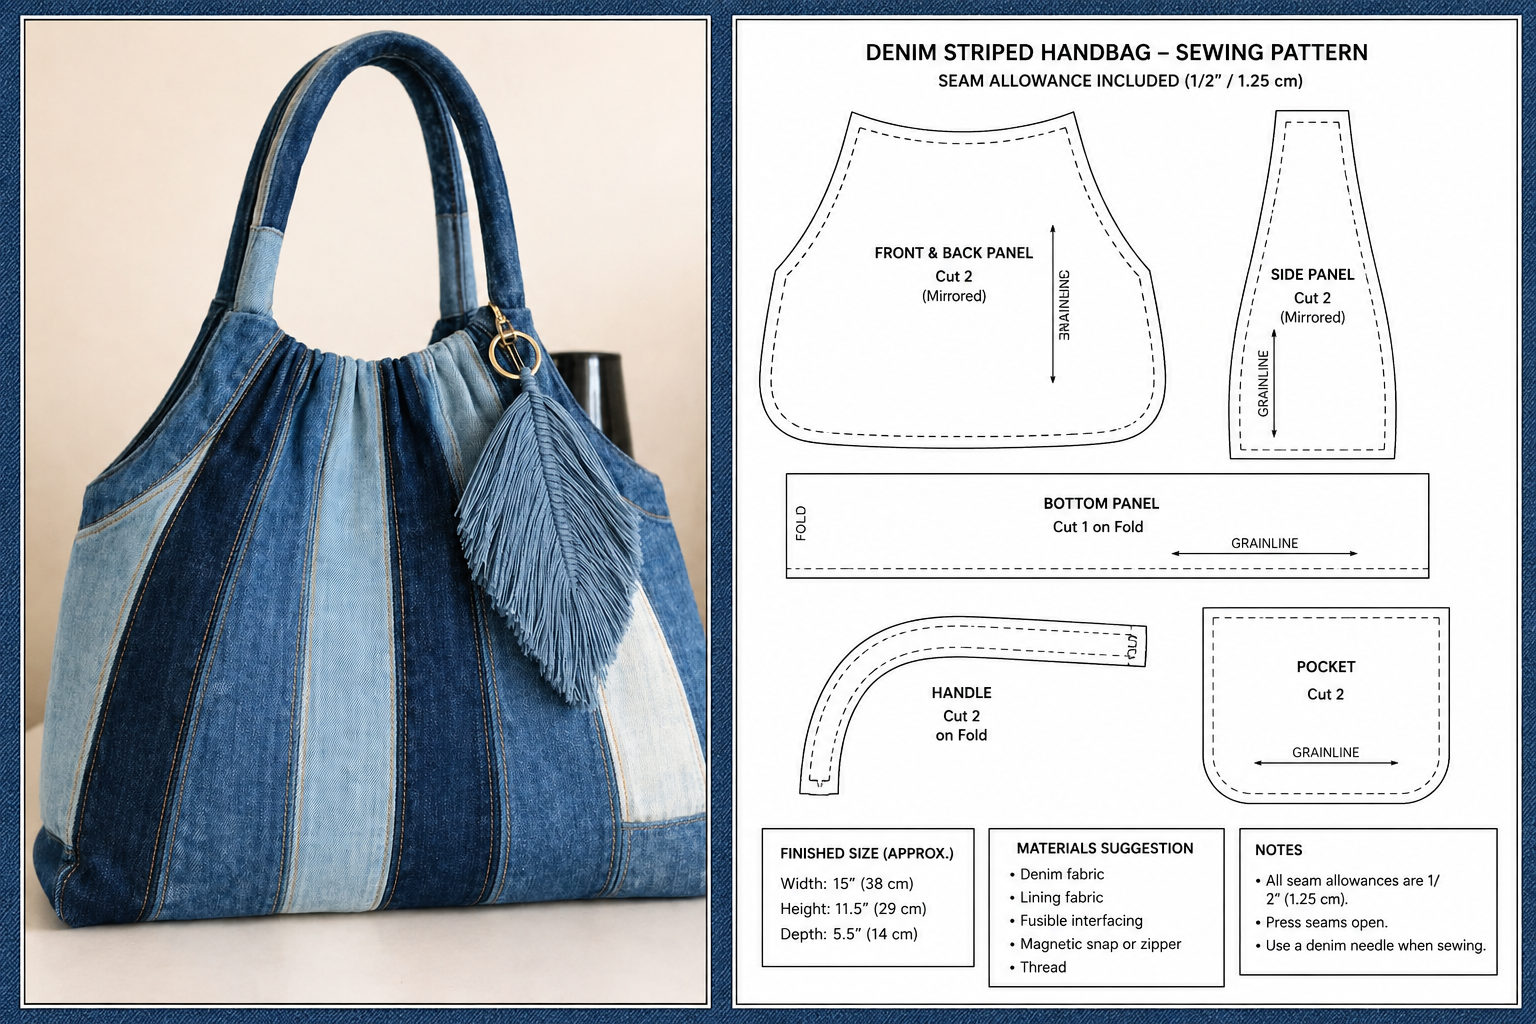
The Striped Denim Shoulder Bag Fabric Pattern is a creative sewing project that transforms different shades of denim into a spacious, stylish, and durable handmade accessory. Inspired by the shoulder bag shown in the photo, this design combines vertical fabric panels, a softly gathered opening, reinforced handles, and a decorative fabric charm. The contrasting denim strips create visual movement while preserving the casual appearance that makes denim bags so popular. This project is an excellent opportunity to reuse jeans, fabric remnants, or coordinated denim purchased especially for sewing. Because the finished bag is both decorative and practical, it can be used for everyday errands, craft supplies, books, personal belongings, or weekend outings. Careful preparation will help you achieve a professional result even when working with recycled materials. Throughout this guide, you will learn how to plan, cut, assemble, reinforce, and finish your own denim shoulder bag.
One of the most attractive characteristics of this project is the combination of light, medium, and dark blue fabric panels. The term striped denim refers to the alternating vertical sections that form the body of the bag rather than a printed stripe on one piece of fabric. Each panel can be made from a different part of an old pair of jeans, allowing you to include seams, fading, pockets, and natural color variations. The term shoulder bag describes a bag with handles long enough to rest comfortably over the shoulder while keeping the contents easy to access. In this design, the handles rise from the curved sides and continue around the upper opening, creating a strong and balanced structure. A well-designed handle is essential because denim can become heavy when the bag is full. Reinforcement, accurate stitching, and a suitable lining will make the finished piece more reliable.
The expression fabric pattern refers to the shapes, measurements, cutting instructions, and construction order used to reproduce the project. A good Striped Denim Shoulder Bag Fabric Pattern should include the main body panels, side sections, base, handles, lining, interfacing, and optional decorative elements. Although exact dimensions can be adjusted, maintaining proportion is important for achieving the rounded silhouette seen in the photograph. The bag should be wider at the base, slightly narrower near the opening, and deep enough to hold everyday items comfortably. Beginners can simplify the project by using fewer panels, while experienced sewists can add pockets, a zipper closure, internal compartments, or decorative topstitching. The step-by-step method below focuses on a practical construction process that can be personalized without changing the essential appearance of the original design.
Materials and Preparation for the Denim Shoulder Bag
Begin by selecting several pieces of denim fabric in coordinated shades. You can use approximately three to five pairs of old jeans, depending on their size and the dimensions of your planned bag. Choose fabric without excessive wear in areas that will support weight. Small faded marks can add character, but very thin or damaged denim should be reserved for decorative details rather than structural panels.
DISCOVER MORE FREE PATTERNS HERE!
You will also need cotton fabric for the lining, medium-weight fusible interfacing, strong polyester thread, sewing clips, fabric scissors, pins, a ruler, tailor’s chalk, and a denim sewing-machine needle. A size 90/14 or 100/16 needle is often appropriate for multiple layers, although the best option depends on the thickness of your material. Use a longer stitch length when topstitching heavy fabric.
Wash and dry all denim before cutting. Prewashing helps prevent unexpected shrinking and removes dirt or finishing products that could interfere with fusible interfacing. After drying, press each piece carefully with steam. Flat, wrinkle-free fabric is easier to measure and produces straighter denim strips.
Decide on the approximate finished size of the bag before drafting the pieces. A practical large shoulder bag may measure around 40 centimeters wide, 32 centimeters high, and 12 to 15 centimeters deep. These measurements are only a starting point. You can create a smaller everyday purse or enlarge the design for a roomy market and travel bag.
Prepare a paper template for one vertical body panel. A useful panel can be approximately 9 centimeters wide at the bottom, 7 centimeters wide at the top, and 34 centimeters high. Add a seam allowance of about 1 centimeter around every edge. The slight taper will help form the softly rounded upper area of the striped bag pattern.
Plan the color arrangement before cutting. Place light, medium, and dark denim pieces beside one another until the contrast feels balanced. Avoid grouping all light strips on one side and all dark strips on the other unless you deliberately want an asymmetrical design. Taking a quick reference photo of the arrangement can help you remember the correct sewing order.
Creating the Striped Denim Shoulder Bag Fabric Pattern
Cut enough tapered panels to form the front and back of the bag. Depending on the chosen width, you may need five to seven panels for each side. For a design similar to the photograph, alternate wider dark sections with narrower light sections. Add one or two pieces made from existing jeans seams to give the project an authentic recycled-denim appearance.
Sew the front panels together with right sides facing. Align the long edges carefully and secure them with sewing clips rather than forcing thick pins through several layers. Stitch using the selected seam allowance, then press the seams open. If the fabric frays heavily, finish the raw edges with a zigzag stitch or overlocker before pressing.
Topstitch on both sides of each joined seam to emphasize the vertical striped effect. Use regular thread for a subtle finish or contrasting gold-brown topstitching thread for a traditional jeans appearance. Keep the stitching lines parallel and evenly spaced. Repeat the same process for the back panel of the denim shoulder bag.
Once all strips have been joined, place the completed front and back pieces on your cutting surface. Use a full-size paper template to trim both sections into identical bag shapes. The lower edge should be broad, while the upper corners should curve inward toward the opening. Cutting the two sections together can improve symmetry, provided the layers are not too thick.
Draft a base panel that matches the width of the lower opening. A gently curved rectangular base approximately 12 to 15 centimeters deep will give the bag enough capacity and allow it to stand more securely. The exact length must correspond to the lower edge of the front and back pieces. Measure carefully along the sewing line rather than only along the raw edge.
Create the handle pattern as a long strip with enough length to fit comfortably over the shoulder. Two finished handles measuring about 55 to 65 centimeters are suitable for many users. Cut four denim handle pieces and two interfacing pieces. You can join different denim remnants to create patchwork handles, but reinforce every join so that the handles remain strong.
Sewing and Finishing the Striped Denim Bag
Fuse interfacing to the wrong side of the front, back, base, and handle pieces. Interfacing gives the fabric shoulder bag greater stability and helps the upper opening retain its shape. Follow the manufacturer’s pressing instructions and use a protective cloth to avoid damaging the denim. Allow each fused piece to cool completely before moving it.
Attach the base to the front body section with right sides together. Match the center of the base to the center of the bag and clip outward toward both ends. Sew slowly around the curve, stopping occasionally with the needle down to reposition the fabric. Attach the opposite side of the base to the back panel in the same manner.
Sew the side seams, carefully matching the vertical panel lines where possible. Trim bulky seam allowances and clip curved areas without cutting through the stitching. Turn the outer bag right side out and inspect the shape. Press the seams using a tailor’s ham or rolled towel to support the curved structure.
Construct the lining with the same general dimensions as the outer body. Before assembling it, add internal pockets for a phone, keys, or small accessories. Sew the lining front, back, and base together, but leave a turning opening of approximately 12 centimeters along the base seam. The lining should fit smoothly without pulling or creating excessive loose fabric.
Prepare each handle by placing two denim pieces right sides together and sewing along the long edges. Turn the handle right side out, press it flat, and add topstitching near both sides. For very thick denim, use a folded construction method rather than turning a narrow tube. Reinforce the areas that will be attached to the bag with an extra layer of interfacing.
Attach the handles securely to the upper side sections, ensuring that both are equal in length and position. To create the gathered appearance shown in the photo, sew two rows of long basting stitches along the upper front and back edges. Pull the bobbin threads gently until the opening reaches the desired width, distribute the gathers evenly, and stitch them permanently before installing the lining.
Insert the outer bag inside the lining with right sides facing. Align the upper opening and handle attachment points, then sew around the complete edge. Pull the bag through the opening left in the lining, close that opening with a narrow machine stitch, and push the lining into place. Finish by topstitching around the upper edge to keep the lining from rolling outward.
A magnetic snap can be installed before the lining is attached, giving the bag a simple and practical closure. A recessed zipper is another option for people who prefer additional security. Decorative details may include a tassel, fabric leaf, key ring, label, or small removable charm. Keep embellishments lightweight so they do not distort the handle area.
The leaf-shaped ornament shown in the inspiration photo can be made from layered denim. Cut two matching leaf shapes, add interfacing, stitch around the perimeter, and turn the piece right side out. Draw a central vein with stitching, then create closely spaced diagonal lines toward the edges. Carefully cut between some stitch lines to create a soft fringed texture.
After completing the construction, inspect all stress points. Sew a small rectangle with an “X” inside it at every handle attachment for additional strength. Remove basting threads, trim loose fibers, and press the finished Striped Denim Shoulder Bag Fabric Pattern project carefully. Avoid flattening the gathered area too aggressively, as its soft texture is part of the design.
Frequently Asked Questions About the Striped Denim Shoulder Bag
What type of denim is best for a handmade shoulder bag? Medium-weight denim is usually the easiest material to sew while still providing good durability. Very heavy denim can create bulky seams, especially where the base, lining, and handles meet. Lightweight denim can also be used, but it should be strengthened with suitable interfacing.
Can this denim bag be made from old jeans? Yes. Recycled jeans are ideal for this denim bag sewing project because they naturally provide different blue shades, visible seams, and attractive faded areas. Avoid severely stretched sections around the knees and thin fabric from worn inner-leg areas when cutting the main structural pieces.
How much denim is needed for the Striped Denim Shoulder Bag Fabric Pattern? The amount depends on the bag size, strip width, and number of colors. Approximately one to one and a half meters of usable denim may be enough for a large bag. When using old jeans, three to five adult-sized pairs generally provide a comfortable selection of panels and handle pieces.
Does a denim shoulder bag need interfacing? Interfacing is strongly recommended. It supports the body, reduces stretching, and gives the finished bag a cleaner silhouette. Medium-weight fusible interfacing works for most denim, while foam stabilizer can be used when a firmer, more structured result is desired.
How can thick denim seams be sewn without breaking the needle? Use a fresh denim needle, strong thread, a longer stitch length, and moderate sewing speed. Flatten bulky seam intersections with a fabric mallet or carefully trim unnecessary seam allowance. A height-compensation tool can help the presser foot move across thick areas without skipped stitches.
What is the recommended seam allowance for this bag? A seam allowance of 1 centimeter is practical for most pieces. Some sewists prefer 1.2 or 1.5 centimeters when working with fabric that frays easily. The most important rule is to use the same allowance consistently so the exterior and lining fit together correctly.
Can the vertical denim strips be different widths? Yes. Different widths can make the bag look more artistic and handcrafted. However, the final front and back panels must still be trimmed to the same overall pattern shape. Arrange varied widths thoughtfully so that the design appears balanced rather than accidental.
How can pockets be added to the bag? Patch pockets, divided slip pockets, and zippered pockets can be sewn onto the lining before it is assembled. An original jeans pocket may also be added to the exterior. Position exterior pockets before joining the main panels or before attaching the base, depending on the pocket style.
Is a zipper necessary at the top? A zipper is optional. A magnetic snap provides quick access and preserves the soft gathered appearance. A recessed zipper is useful when the bag will be used in crowded places or for travel. Drawstring, button-loop, and tie closures are also possible.
Can the shoulder handles be made longer? The handles can be adjusted according to personal preference. Measure an existing bag that feels comfortable and use that measurement as a guide. Remember to include additional length for the sections inserted into or attached to the upper bag area.
How should a handmade denim bag be washed? Gentle hand washing is usually safest, especially when the bag contains interfacing, metal hardware, or decorative fringe. Use cool water and mild detergent, avoid twisting the bag, reshape it while damp, and allow it to air-dry naturally. Always test recycled denim for color transfer before combining very dark and very light pieces.
Is this project suitable for beginners? A confident beginner can complete the bag by working slowly and practicing on denim scraps first. The most challenging areas are the curved base, thick handle seams, gathers, and lining installation. Simplifying the design to five wide strips per side can make the first version easier to assemble.
Conclusion
The Striped Denim Shoulder Bag Fabric Pattern combines sustainable sewing, practical construction, and an attractive patchwork-inspired appearance. In this tutorial, you learned how to select coordinated denim shades, prepare tapered vertical panels, create the striped body, add a reinforced base, construct comfortable handles, sew a fitted lining, gather the upper opening, and finish the project with secure closures and decorative details. The same method can be adapted to different sizes, color combinations, pocket arrangements, and handle lengths, making every finished bag unique.
EASILY FIND THE PDF FOR THIS PATTERN HERE!
This project is especially rewarding because ordinary denim remnants can become a durable accessory with a polished handmade finish. Accurate cutting, consistent seam allowances, careful pressing, and reinforced stress points are the main elements that will help your bag remain beautiful and useful. After making your own denim shoulder bag, leave your sincere opinion about the project and share suggestions for colors, pockets, closures, or decorative elements that could make the pattern even more creative.