
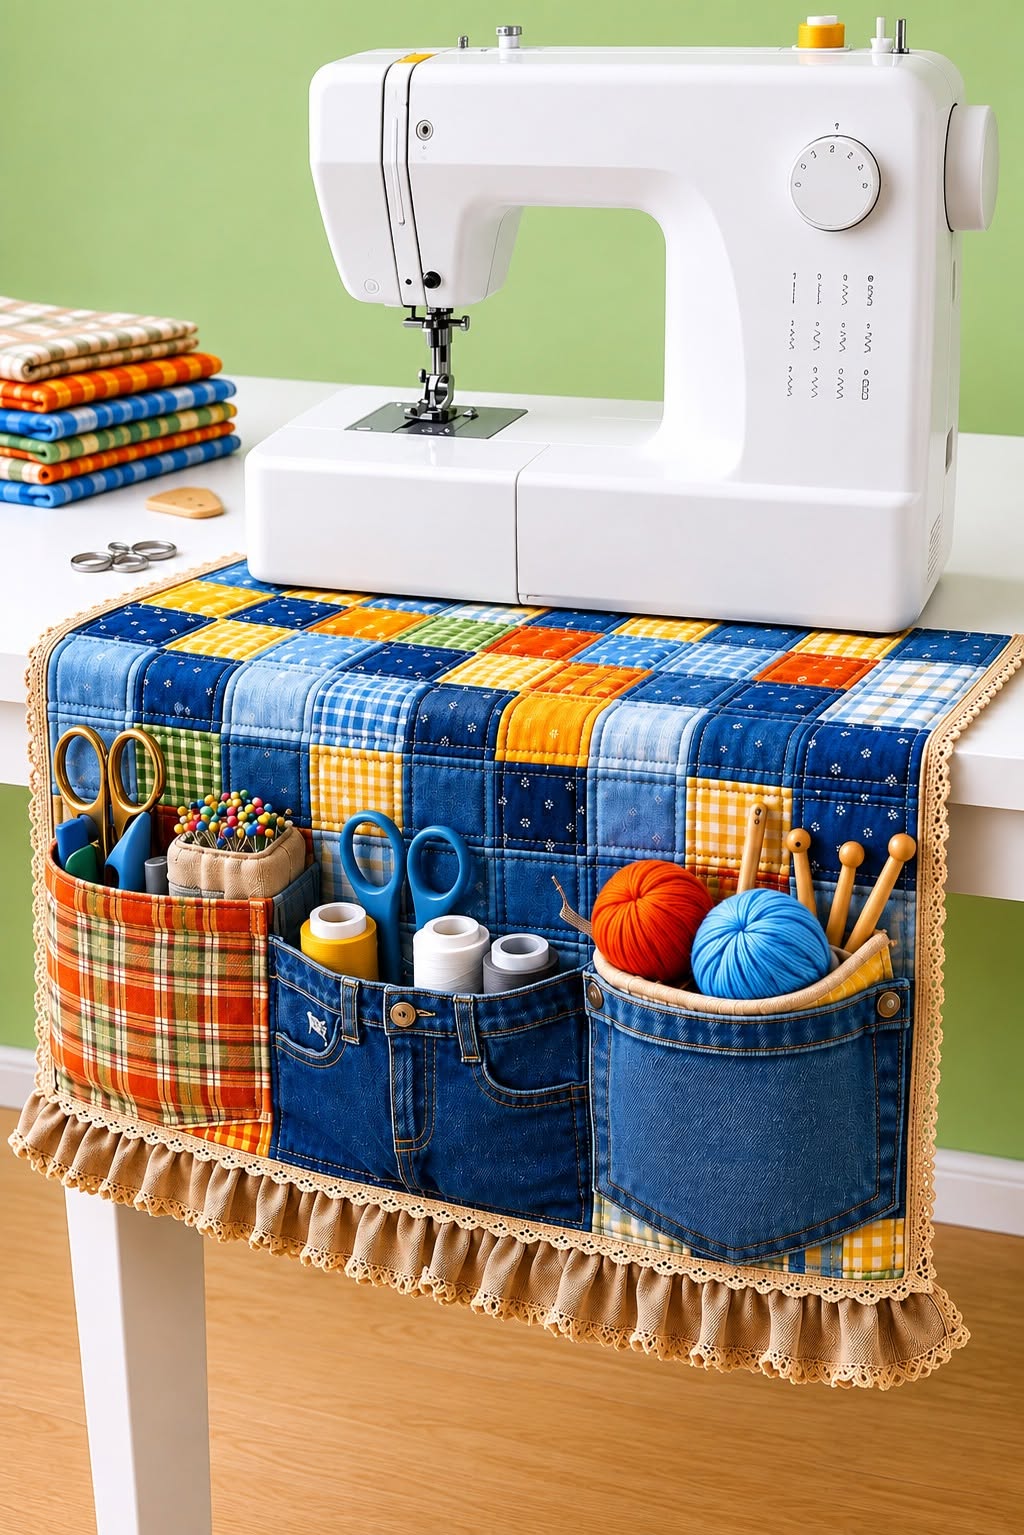
The Patchwork Sewing Organizer with Pockets and Ruffle Fabric Pattern is a practical and decorative project created to keep sewing supplies organized beside a worktable. It combines colorful patchwork blocks, recycled denim pockets, fabric compartments, lace trim, and a soft ruffle along the lower edge. The finished organizer can hold scissors, thread spools, measuring tools, pincushions, knitting needles, crochet hooks, and small fabric pieces. Because it hangs over the edge of a table, frequently used materials remain visible and easy to reach. This design is especially useful in small sewing rooms where drawers and shelves may be limited. It also transforms leftover fabric and old jeans into a beautiful handmade accessory.
One of the best features of this fabric sewing organizer is its flexible construction. You can reproduce the colors shown in the photo by combining blue denim, yellow gingham, orange plaid, light-blue fabric, green checks, and small printed cotton pieces. However, the same pattern can be adapted to match any sewing room, craft corner, or personal decorating style. The organizer may be made wider for a large table or narrower for a compact workstation. Its pockets can also be customized according to the tools you use most often. By planning the layout before sewing, you can create a project that is attractive, balanced, and genuinely useful.
This tutorial explains how to make the Patchwork Sewing Organizer with Pockets and Ruffle Fabric Pattern step by step, from choosing the fabrics to installing the finished piece. The project requires basic straight stitching, simple quilting, pocket construction, and gathering fabric for the ruffle. Beginners can complete it by working slowly and checking the measurements at every stage. More experienced sewists can personalize the organizer with decorative stitching, appliqué, embroidery, or additional compartments. The instructions are designed to help you understand each part of the construction instead of simply copying a finished object. At the end, you will have a durable organizer that brings color, order, and handmade character to your creative space.
Materials and Measurements for the Patchwork Sewing Organizer
Begin by measuring the table where the organizer will be used. Measure the depth of the tabletop, the distance from the front edge to the back, and the desired hanging length. A practical finished size is approximately 24 inches wide by 32 inches long, although these measurements can be changed. Part of the organizer should rest on top of the table, while the pocket section hangs down the front. Add about half an inch around every outer edge for the seam allowance.
DISCOVER MORE FREE PATTERNS HERE!
For the main patchwork section, collect several pieces of medium-weight cotton fabric. Choose coordinating prints such as gingham, plaid, denim-look cotton, stripes, floral patterns, and small geometric designs. The photographed organizer uses mainly blue, yellow, orange, green, and beige. These colors create a cheerful country-style appearance without making the design feel disorganized. Prewash and press all cotton fabrics before cutting so they will not shrink after the project is finished.
You will also need a backing fabric and a layer of batting. The backing may be plain cotton, canvas, twill, or another stable woven material. Thin cotton or polyester batting gives the organizer structure and creates the padded quilted effect visible in the image. Avoid batting that is extremely thick because it may make the organizer difficult to fold over the edge of the table. Cut the backing and batting slightly larger than the completed patchwork panel.
The pockets can be made from old jeans, denim scraps, plaid cotton, canvas, or upholstery-weight fabric. Reusing real jean pockets is an easy way to add personality and durability. You may carefully remove the back pockets from unwanted jeans and sew them directly onto the organizer. Larger rectangular compartments can be made from the legs of the jeans. Recycled denim pockets are excellent for holding scissors, thread, small rulers, and heavier tools.
For the decorative lower edge, prepare a long strip of lightweight cotton or linen for the ruffle fabric trim. The strip should measure approximately one and a half to two times the width of the organizer. A longer strip produces a fuller ruffle, while a shorter strip creates gentle gathers. You may also use lace or narrow crochet trim along the pocket edges and around the outer panel. These details give the project the romantic handmade finish shown in the photograph.
Basic sewing supplies include a sewing machine, universal needle, denim needle, coordinating thread, fabric scissors, rotary cutter, cutting mat, quilting ruler, clips, pins, iron, and ironing board. A removable fabric marker is useful for drawing quilting lines and pocket placement marks. You may also need buttons, bias binding, elastic, and interfacing, depending on your preferred design. Preparing everything before starting will make the construction process faster and more enjoyable.
Cutting and Sewing the Patchwork Base
Decide on the size of the individual patchwork fabric blocks. Squares measuring 4½ inches before sewing are a good choice because they are large enough to display the fabric prints but small enough to create visual variety. You can also combine squares with rectangles for a less formal layout. Cut enough pieces to cover the entire measured panel. Arrange the blocks on a flat surface before joining them.
When arranging the patchwork, distribute the strongest colors evenly. Avoid placing all the dark-blue blocks in one corner or grouping every orange piece together. Mix checks, solids, small prints, and denim-style fabrics to create movement across the panel. Take a photograph of the arrangement before sewing so you can remember the correct order. This simple step prevents confusion when the blocks are moved to the sewing machine.
Sew the blocks into horizontal rows using a consistent quarter-inch seam allowance. Place two pieces with right sides together, align the edges, and stitch carefully. Continue adding blocks until each row is complete. Press the seam allowances of the first row in one direction and those of the second row in the opposite direction. Alternating the pressing direction helps the seams nest together when the rows are joined.
Join the completed rows to form one large patchwork panel. Match the intersections carefully and secure them with pins or clips. Sew slowly over the seam joins to keep the blocks aligned. After every row has been attached, press the entire panel from the wrong side and then lightly from the right side. Accurate pressing is essential for a flat and professional-looking quilted sewing organizer.
Place the backing fabric right side down on a clean surface, position the batting over it, and place the patchwork top right side up. Smooth all three layers to remove wrinkles. Secure the layers with quilting pins, clips, or temporary basting stitches. Quilt along both sides of the patchwork seams or stitch directly in the ditch. A simple square quilting pattern reinforces the panel while preserving the colorful block design.
After quilting, trim the edges so the panel is straight and square. Use a large ruler to check that all corners form right angles. Mark the point where the organizer will fold over the table edge, but do not stitch a permanent fold. The upper section should remain flexible enough to lie smoothly on the tabletop. At this stage, test the panel on the table and confirm that the hanging portion reaches the desired position.
Creating and Attaching the Storage Pockets
Plan the pocket layout before sewing anything permanently. Place the largest pockets near the lower half of the hanging section and smaller pockets above or beside them. Think about the tools each compartment will hold. Deep pockets are suitable for yarn, fabric pieces, knitting needles, or large scissors. Narrow sections are better for marking pens, seam rippers, crochet hooks, and measuring tools.
To make a basic rectangular pocket, cut a fabric piece wider and taller than the desired finished measurement. Fold the upper edge toward the wrong side twice, press it, and topstitch to create a clean opening. Fold the remaining edges inward by approximately half an inch and press them firmly. For greater stability, add lightweight or medium-weight interfacing before finishing the edges. This is particularly helpful when working with thin cotton.
For a roomy pocket, add small pleats at the bottom corners before attaching it to the base. These pleats allow the pocket to expand and hold thicker items. Another option is to cut the pocket wider than its placement area and gather the lower edge slightly. Secure the sides and bottom with two rows of stitching. Reinforced seams are important because sewing tools can be heavier than ordinary decorative objects.
Denim provides excellent strength for the central compartments. Cut a wide denim rectangle, finish the top edge, and divide it into several sections with vertical stitching lines. The divisions can be planned according to the width of thread spools, scissors, or bottles. Add decorative topstitching in a contrasting thread to imitate the appearance of jeans. A reused waistband or small belt loop can also become a holder for a measuring tape.
The plaid pocket shown on the left side of the photograph brings warmth and color to the design. To reproduce this effect, choose an orange, beige, and green check fabric and line it with cotton. A lined pocket maintains its shape and hides the raw seams. You may add a smaller front compartment for chalk, clips, or a compact pincushion. Keep the pocket openings clear so objects can be inserted without catching on decorative trim.
Once all pockets are prepared, position them on the quilted panel and temporarily secure them. Check that the lower ruffle will not cover the pocket openings. Stitch around the sides and bottom of every pocket, leaving the top open. Backstitch at the beginning and end of each seam for reinforcement. After attaching the pockets, place several tools inside them to test the capacity and make adjustments before completing the outer edges.
Adding the Ruffle, Binding, and Final Details
To create the gathered fabric ruffle, join fabric strips until they are long enough to cover the bottom edge of the organizer. Finish the short ends and hem one long edge with a narrow double fold. Sew two parallel rows of long basting stitches along the unfinished edge. Do not backstitch at the ends. Pull the bobbin threads gently to gather the strip until it matches the width of the panel.
Distribute the gathers evenly rather than allowing them to accumulate in only one area. Pin or clip the ruffle to the bottom edge with right sides facing. The decorative side of the ruffle should point toward the main panel during sewing. Stitch it in place using a regular seam length, then remove the visible gathering stitches if necessary. Press the seam toward the organizer while keeping the gathered fabric full and soft.
Lace trim can be added above the ruffle seam to cover the join and provide a polished finish. Similar lace may be placed along the vertical sides or around selected pockets. Choose a trim that is flexible and washable. Heavy decorative lace can pull on lightweight cotton, while very delicate lace may not tolerate frequent use. A medium-width cotton lace usually works well for this type of handmade sewing organizer.
Finish the outer sides and upper edge with bias binding. You can use ready-made binding or create your own from coordinating fabric. Sew the binding to the front, fold it around the raw edge, and stitch it securely from the back or topstitch from the front. Work carefully around the corners to produce neat miters. Binding protects the quilted layers and gives the project a defined outline.
To prevent the organizer from sliding, add a nonslip fabric panel to the part that rests on the tabletop. Another practical option is to place a removable nonslip mat underneath it. Avoid attaching anything that could scratch or damage the table. The weight of the sewing machine may help secure the upper section, but the organizer should never interfere with the machine’s ventilation openings, power cord, pedal connection, or moving parts.
Complete the design with optional decorative details such as buttons, labels, fabric appliqués, or embroidered words. Inspect every seam and trim loose threads. Fill the pockets gradually, placing heavier objects near the center and lighter objects near the outer edges. The finished Patchwork Sewing Organizer with Pockets and Ruffle Fabric Pattern should hang evenly without pulling to one side. Its combination of quilting, denim, pockets, lace, and gathered fabric creates both storage and decoration.
Frequently Asked Questions
What is a patchwork sewing organizer?
A patchwork sewing organizer is a fabric storage accessory made from several pieces of fabric joined together. It usually includes pockets or compartments for sewing tools and may hang from a table, chair, wall, or sewing machine cabinet. Patchwork construction makes it possible to use small scraps while creating an original decorative surface.
What fabric is best for a sewing organizer with pockets?
Medium-weight quilting cotton works well for the patchwork base because it is easy to cut, press, and sew. Denim, canvas, twill, and upholstery cotton are suitable for pockets that will carry heavier tools. A combination of cotton and denim provides a good balance between flexibility and strength.
Can old jeans be used for the pockets?
Yes. Old jeans are ideal for making recycled denim pockets. The original back pockets can be removed and reused, or the denim legs can be cut into custom compartments. Wash the jeans before cutting and use a denim needle when sewing through several thick layers.
How large should the organizer be?
The ideal measurement depends on the table and the number of tools you want to store. A panel approximately 24 inches wide and 32 inches long is a useful starting point. Measure your furniture first and remember that part of the panel must remain on the tabletop while the rest hangs over the front edge.
Does the organizer need batting?
Batting is recommended because it gives the panel structure and highlights the quilted patchwork design. Thin batting is usually better than thick batting for a table organizer. You may replace it with fusible fleece or firm interfacing, but the final texture and flexibility will be different.
How do I keep the pockets from tearing?
Use strong fabric, reinforce the upper corners, and sew two rows of stitching around pockets designed for heavy objects. Bar tacks can also be added at stress points. Avoid filling a small pocket with tools that are too large or heavy for its construction.
How much fabric is needed for the ruffle?
The ruffle strip should generally measure one and a half to two times the width of the organizer. For example, a 24-inch-wide organizer may require a strip between 36 and 48 inches long. Use a longer strip for fuller gathers and a shorter one for a softer, less dramatic effect.
Can the organizer be washed?
It can usually be washed if all fabrics, batting, trims, and threads are washable. Prewash the materials before sewing and remove all tools before cleaning. Hand washing or a gentle machine cycle may help preserve the structure, pockets, lace, and ruffle. Allow the organizer to air-dry whenever possible.
Is this project suitable for beginners?
Yes, especially when the design is simplified. Beginners may start with larger patchwork squares, three basic pockets, and a simple gathered strip. The most important skills are accurate cutting, straight stitching, pressing, and maintaining a consistent seam allowance. The project can become more detailed as confidence grows.
Can the pockets be changed to fit crochet or knitting supplies?
Certainly. Deep compartments can hold yarn balls, while narrow pockets can store crochet hooks or knitting needles. Elastic loops may be added for smaller tools. Customizing the pockets is one of the main advantages of using a fabric organizer pattern instead of purchasing a fixed storage product.
How can I stop the organizer from sliding off the table?
Make sure a generous section rests on the tabletop and distribute the weight evenly across the pockets. Place a nonslip mat underneath the upper panel when necessary. Do not overload only one side, and always keep the organizer clear of the sewing machine’s operational areas.
Conclusion
The Patchwork Sewing Organizer with Pockets and Ruffle Fabric Pattern combines scrap-friendly patchwork, practical storage, recycled denim, quilting, lace, and a gathered fabric finish in one useful project. You learned how to measure the table, select coordinated fabrics, construct the patchwork panel, add batting and backing, create reinforced pockets, gather the ruffle, and finish the organizer with binding.
EASILY FIND THE PDF FOR THIS PATTERN HERE!
Every measurement and compartment can be adapted to your tools and available space, making each version completely personal. This project is an excellent way to organize a sewing area while giving leftover materials a new purpose. Leave your sincere opinion about this pattern and share suggestions for colors, pocket arrangements, or decorative details that could make the organizer even more practical and beautiful.