
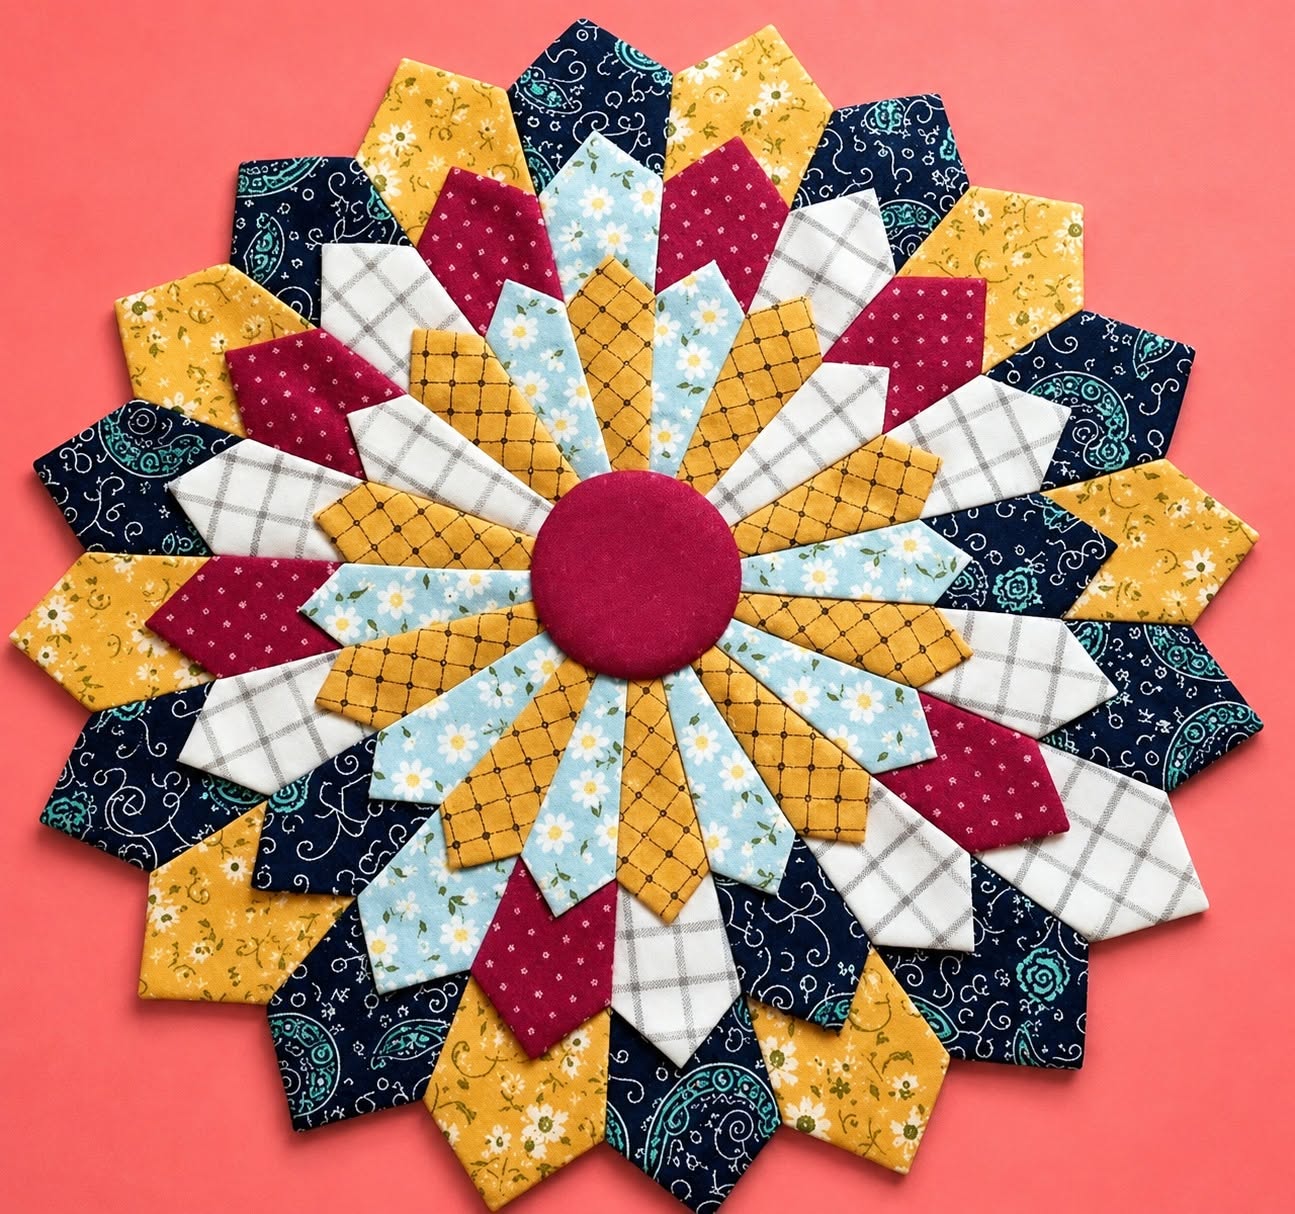
The “Dresden Plate” Quilt Block Pattern is a timeless patchwork design recognized by its beautiful arrangement of fabric blades around a circular center. Inspired by decorative porcelain plates and traditional floral shapes, this block can be used to create quilts, table toppers, wall hangings, cushion covers, and many other handmade projects. The piece shown in the photo has several overlapping layers of pointed blades, creating a full flower with impressive depth and movement. Although the finished design looks complex, it becomes much easier when the work is divided into small, organized stages. With accurate templates, careful cutting, and consistent seams, even a confident beginner can complete this colorful project.
One of the most appealing characteristics of the Dresden Plate quilt block is the opportunity to combine different prints in a balanced composition. The photographed project uses navy blue, mustard yellow, burgundy, pale blue, and white fabrics, producing a warm yet elegant contrast. Floral prints soften the geometric structure, while grids, dots, and paisley patterns add visual interest. You do not need to use exactly the same colors to achieve a beautiful result. Scraps from previous sewing projects can be coordinated by color value, print scale, or theme, making this pattern an excellent choice for reducing fabric waste and creating a truly personal piece.
Before beginning the “Dresden Plate” Quilt Block Pattern, it is important to understand that accuracy influences every stage of construction. Each blade must be cut from the same template, and every seam should use the same allowance so that the units fit together correctly. Pressing is equally important because it helps the blades remain flat and prevents unnecessary bulk between the layers. A test blade made from leftover fabric can help you check the template, seam allowance, and finished size before cutting the entire project. Taking a little extra time during preparation will make the assembly process smoother and produce a cleaner, more professional-looking result.
Materials, Templates, and Fabric Preparation
To make this Dresden Plate quilt block, gather cotton quilting fabrics in at least four or five coordinating colors. The photographed version appears to use approximately five main fabric groups, but you may add more prints for a scrappier effect. Choose fabrics with enough contrast to keep the individual layers visible. Medium-weight quilting cotton is ideal because it is stable, easy to press, and comfortable to sew. Prewashing is optional, but all fabrics should be prepared in the same way to prevent uneven shrinkage later.
DISCOVER MORE FREE PATTERNS HERE!
You will also need a sewing machine, neutral thread, sharp fabric scissors or a rotary cutter, a cutting mat, an acrylic ruler, pins or clips, an iron, and a pressing surface. A turning tool can be helpful when shaping the pointed ends of the blades. For the round center, prepare a circle template made from cardboard or template plastic. Lightweight fusible interfacing or a reusable paper circle may also be used to create a smooth, accurate center.
The most important tool for this project is the Dresden Plate template. Unlike a traditional single-layer plate, the design in the photo contains several sizes of narrow pointed blades. Prepare templates for a large outer blade, a medium blade, and a smaller inner blade. Each template should have the same wedge angle so that the pieces can be arranged evenly around the center. Add your preferred seam allowance—commonly ¼ inch—to both long sides and the wide top edge of every template.
To determine how many blades are needed, create a paper test arrangement before cutting the fabric. A traditional Dresden Plate often contains 20 blades, but the pictured project may use a different quantity within each layered ring. The exact number depends on the angle and width of your template. Place paper copies around a circle until the first and final pieces meet without gaps or overlap. This simple test helps prevent errors and allows you to adjust the shape before using valuable fabric.
After confirming the templates, trace or rotary-cut the blades from the selected fabrics. Organize the colors before cutting so that each ring has a consistent rhythm. For example, the outer layer can alternate navy blue and mustard yellow, while the middle layers can combine burgundy, white, pale blue, and yellow. Cut all pieces with the fabric grain running in the same general direction. Consistent grain placement reduces stretching and helps the finished quilt block pattern lie flat.
Arrange the cut blades on a table before sewing anything together. Begin with the outer pieces and work inward, checking the distribution of colors and prints. Avoid placing too many identical fabrics next to each other unless you intentionally want grouped sections. Take a photograph of the arrangement for reference because the pieces can easily become mixed during sewing. Labeling each ring in a separate container is another simple way to maintain the planned sequence.
Sewing the Pointed Dresden Plate Blades
Begin by creating the pointed top of each blade. Fold one blade in half lengthwise with the right sides of the fabric facing each other and align the wide top edges. Sew across the top using an accurate ¼-inch seam allowance. Backstitching is usually unnecessary because the seam will be enclosed, but use a short stitch length to keep the small seam secure. Repeat this process for every blade in all three sizes.
Trim a small amount from the folded corner without cutting through the stitching. This step reduces bulk and allows the point to turn more neatly. Turn the sewn top right side out and gently push the corner into shape with a turning tool. Avoid using excessive pressure because a sharp tool can damage the fabric. The finished tip should be centered over the seam line and should look crisp without appearing stretched.
Press each blade carefully. First, align the center seam with the folded center line on the back of the blade. Press the seam open or to one side according to your preferred method, making sure the point remains centered. Use the tip of the iron rather than dragging it across the fabric. Pressing downward helps maintain the original dimensions and prevents the bias edges from becoming distorted.
After shaping the blades, join them along their long sides. Place two neighboring blades right sides together and align the pointed ends, lower edges, and side edges. Sew with the same ¼-inch allowance used throughout the project. Add the remaining blades one at a time, constantly checking the color sequence shown in your reference photograph. Keeping the seams consistent is essential for creating a balanced Dresden Plate ring.
Press the joining seams as you complete each group. You may press all seams in one direction or alternate them to reduce bulk. For a layered design, alternating seam directions can make the surface flatter where several units overlap. Assemble the pieces into small groups first, such as sets of four or five, and then join the groups together. This method is easier to control than handling an entire ring from the beginning.
Before closing each ring, place it on a flat surface and check its shape. The joined blades should form an even circular or flower-like arrangement without forming a bowl or creating a large gap. A ring that curves upward may have seams that are slightly too narrow, while excessive spreading may indicate seams that are too wide. Make small corrections before sewing the final seam because adjustments become more difficult after the layers are attached.
Building the Layered Flower Design
Start the final arrangement with the largest blades, which form the foundation of the Dresden Plate quilt block. Place the outer ring on a large neutral background square, on batting, or directly on the surface intended for the finished project. The outer points should be distributed evenly, and the center opening should remain symmetrical. Measure from several outer points to the edge of the background to confirm that the design is centered.
Secure the outer ring with pins, temporary fabric adhesive, or hand-basting stitches. Appliqué the lower edges to the background using a small zigzag stitch, a blanket stitch, or an invisible hand-appliqué stitch. Since other rings will cover much of the inner area, you only need to secure the visible edges and any sections that could lift. Choose thread that blends with the fabrics for a subtle finish or contrasting thread for a decorative outline.
Position the second ring of medium blades over the outer layer. Rotate it so that its points fall between or slightly across the points underneath, creating the overlapping petal effect visible in the photo. Step back and check the distribution before stitching. Each blade should reveal enough of the outer fabrics to preserve the layered appearance. Secure and appliqué this ring using the same method chosen for the first layer.
Add the smaller inner blades next. These pieces should direct the viewer’s attention toward the center and create the dense flower shape that makes this layered Dresden Plate distinctive. Arrange the pale blue, yellow, white, and burgundy pieces in a repeating sequence or a balanced scrappy layout. Adjust individual blades until the spacing looks even. Small changes at this stage can significantly improve the overall symmetry.
To make the circular center, cut a fabric circle larger than the desired finished measurement. Place the fabric right side down over a cardboard or heat-resistant circle template. Run gathering stitches around the seam allowance, pull the thread gently, and press the allowance over the template edge. Allow the fabric to cool before removing the template. This traditional technique creates a smooth circle with a neatly turned edge.
Place the finished circle over the raw inner ends of the smallest blades. In the photographed block, a deep burgundy center creates a strong focal point and coordinates with the burgundy blades. Pin or baste the circle carefully, confirming that it is centered from every direction. Appliqué around the complete edge with small, even stitches. The center circle hides the inner construction and gives the “Dresden Plate” Quilt Block Pattern a polished finish.
Finishing, Quilting, and Creative Variations
Once all layers are attached, press the project gently from the back. Use a pressing cloth if the center or appliqué stitches require protection. Do not apply heavy pressure over the layered seams because this can flatten the dimensional effect or leave impressions on the front. Check for loose points, lifting edges, or skipped sections of stitching. Correcting these details now will improve durability and simplify the quilting stage.
The completed block can be quilted by hand or machine. Stitching around each blade emphasizes the layered construction and helps secure the appliqué. You can also quilt inside selected petals, follow the printed fabric lines, or add gentle curves between the rings. For a simpler finish, use echo quilting around the outside of the flower. The quilting should support the design rather than compete with the colorful fabric arrangement.
To turn the block into a table topper like the project in the photo, layer the completed top with batting and backing fabric. Baste the three layers and quilt around the main shapes. Trim the outer edge into a circle, square, or shape that follows the points of the largest blades. Finish the perimeter with binding or a carefully turned facing. Make sure the final shape has smooth curves and secure corners.
For a wall hanging, add a hanging sleeve to the backing before completing the binding. A single large Dresden Plate block makes an attractive focal point for a sewing room, hallway, or creative workspace. Several smaller plates can also be arranged in rows for a traditional quilt. Changing the scale of the templates allows the same basic method to produce everything from miniature decorations to large bed quilts.
The pattern is also ideal for experimenting with fabric placement. A monochromatic version can use several shades of one color, while a rainbow arrangement can move gradually around each ring. Holiday fabrics can transform the flower into a festive table decoration. Soft pastel prints create a romantic style, and high-contrast solids produce a modern geometric appearance. The structure remains recognizable even when the colors and prints are completely changed.
Save your templates and record the blade count, seam allowance, circle size, and finished measurements after completing the project. These notes will make future versions faster and more predictable. Store the labeled templates in an envelope with a printed photograph or a fabric swatch. A well-organized pattern can be reused for gifts, seasonal decorations, and coordinated home accessories without repeating the planning process.
Frequently Asked Questions About the “Dresden Plate” Quilt Block Pattern
What is a Dresden Plate quilt block?
A Dresden Plate quilt block is a traditional patchwork and appliqué design made from wedge-shaped fabric pieces called blades. The blades are joined or arranged around a circular center, producing a shape that resembles a flower, sunburst, or decorative plate. The pattern can feature rounded, pointed, or flat blade ends.
Is the Dresden Plate pattern suitable for beginners?
Yes, a basic Dresden Plate is suitable for beginners who can sew an accurate seam and follow a template. The layered version shown in the photo requires more pieces and careful positioning, but the individual techniques are still manageable. Making one sample ring before beginning the complete project is highly recommended.
How many blades are used in a Dresden Plate?
Many traditional patterns use 20 blades, but there is no universal number. The quantity depends on the wedge angle and the desired style. Narrow blades require more pieces, while wider blades require fewer. Always test the template with paper pieces to ensure that the blades complete a full circle.
What is the best fabric for a Dresden Plate quilt block?
Quilting cotton is the most practical choice because it is stable, widely available, and easy to cut and press. Fabrics with a similar weight should be used together. Avoid combining very stretchy or extremely heavy materials unless the pattern has been adapted for them.
Why does my Dresden Plate refuse to lie flat?
The most common causes are inconsistent seam allowances, inaccurate templates, stretched bias edges, or incorrect pressing. If the plate forms a bowl, the joined seams may be too narrow. If it spreads or ripples, the seams may be too wide. Check each seam and compare the assembled unit with the original paper layout.
Should the seams be pressed open or to one side?
Both methods can work. Pressing seams open distributes bulk evenly, while pressing them to one side can make the construction faster and more traditional. In a multilayered project, alternating seam directions often helps reduce thickness where the rings overlap.
Can I make this project with fabric scraps?
Yes. The “Dresden Plate” Quilt Block Pattern is an excellent scrap-friendly design because individual blades do not require large pieces of fabric. For a cohesive result, repeat several colors or choose scraps that share a similar theme, value, or print style.
How do I make the center circle smooth?
Cut the fabric with a generous seam allowance and shape it around a firm circle template. Gathering stitches help distribute the fullness evenly. Press the seam allowance over the template, allow it to cool, and remove the template before appliquéing the circle to the block.
Do I need to appliqué every edge of every blade?
The visible outer edges should be secured, especially if the project will be washed or handled frequently. In a layered design, some inner edges are covered by the next ring and do not require decorative stitching. However, each layer should be stable before the following one is added.
Can I resize the Dresden Plate templates?
Yes, but all related templates must be resized by the same percentage. The center circle should also be adjusted to cover the new inner opening. After resizing, create a paper test ring to verify the blade count and final shape before cutting fabric.
Conclusion
The “Dresden Plate” Quilt Block Pattern combines traditional quiltmaking with creative fabric arrangement, making it an enjoyable design for both decorative and practical projects. In this tutorial, you learned how to prepare templates, select coordinated fabrics, cut accurate blades, create pointed ends, assemble the rings, build overlapping layers, make a smooth center circle, and finish the project with appliqué and quilting.
EASILY FIND THE PDF FOR THIS PATTERN HERE!
The most important elements are consistent seam allowances, careful pressing, organized color placement, and patient positioning. By completing each stage gradually, you can reproduce the richly layered flower shown in the photo while adapting the colors, size, and final use to match your own style. Please leave your sincere opinion about this Dresden Plate quilt block, and share any suggestions or creative variations you would enjoy trying in a future project.