
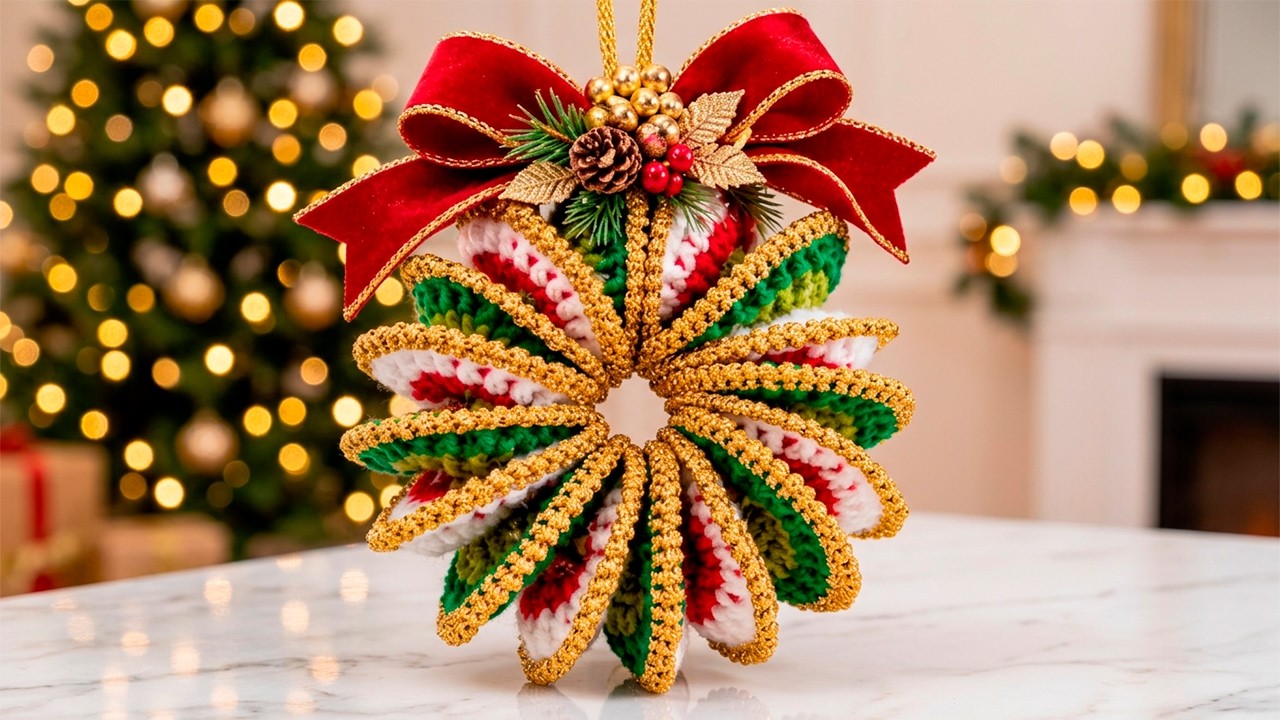
This Spiral crochet Christmas wreath Pattern shows you how to turn twelve small crochet circles into a festive ornament with a pinwheel shape.
The design takes its colors and details from the reference photo, including red and white folds, two shades of green, and a gold edge.
Each circle folds into a half-moon, creating the raised ridges that catch the light around the wreath.
A covered ring supports the folds and keeps the opening in the middle visible.
A red ribbon bow sits above the crochet, with an optional pine sprig and small berries tucked at its center.
The finished wreath is small enough for a Christmas tree and makes a colorful accent on a cabinet knob or wrapped gift.
The word spiral describes the way the folded pieces lean and overlap around the ring.
The individual pieces are made in joined rounds using US crochet terms, so you can check your stitch count after each round.
You’ll begin with two sample circles, one in each color combination, and compare them before making the other ten.
That quick check gives you time to adjust the gold edging or choose a different hook if one color works up tighter.
Once the pieces match, the rest of the project becomes a repeat you can crochet in short sessions.
The assembly instructions show where to place your markers, which part of each fold to sew down, and how to tuck the last fold into the first.
The colors in the photo are a good guide when you’re choosing yarn from your stash.
A bright white round makes the red centers stand out, while a darker green round frames the softer green centers.
Gold yarn brings those two color combinations together, so each folded piece feels like part of the same ornament.
The pattern below uses an 8 cm craft ring and gives you a target measurement for the flat circles.
You can also work the same design in cotton for more defined folds or acrylic for a softer finish.
Keep a ruler handy for the first circle, and leave the bow aside until you’ve checked how the wreath hangs.
1. Gather the Yarn, Ring, and Crochet Supplies
Choose small amounts of worsted-weight yarn in red, white, light green, and dark green. Add a flexible gold yarn or a gold-colored yarn of similar thickness for the edge. A smooth yarn makes it easier to see the tops of the stitches, especially when you’re working the increase rounds. If your metallic yarn is very fine, hold it together with a thin gold or tan yarn and check the result on a sample.
DISCOVER MORE FREE PATTERNS HERE!
Start with a 4 mm crochet hook. You’ll also need a smooth 8 cm craft ring, measured across its outside edge, a blunt yarn needle, scissors, a ruler, and removable stitch markers or short lengths of scrap yarn. For the top, set aside a piece of red ribbon and a gold cord for hanging. A small faux evergreen sprig, lightweight berries, and a miniature pinecone will give the bow a finish similar to the photo.
Read the pattern using these US crochet abbreviations. Ch means chain, sl st means slip stitch, sc means single crochet, and hdc means half double crochet. St means stitch, and sts means stitches. An increase means working two stitches into the same stitch. Instructions in parentheses form a repeat, and the stitch count at the end of each round gives you a checkpoint before you move on.
To make an hdc, yarn over, insert the hook into the indicated stitch, yarn over again, and pull up a loop. Yarn over once more and draw through all three loops. For an sc, insert the hook, yarn over, and pull up a loop. Yarn over again and draw through both loops. The taller half double crochet builds the colored circle, while the shorter single crochet gives the gold border a defined edge.
Aim for a finished sample circle about 6.5–7.5 cm across, including the gold edge. When folded, its straight edge will measure about the same as the circle’s diameter. A slightly smaller or larger sample can still work if all twelve pieces match. Lay the first two folds against the ring to make sure they overlap comfortably before you commit to the full set.
Make six red-and-white circles with red centers and white outer rounds. Make six two-tone green circles with light green centers and dark green outer rounds. Give every circle the same gold border. If the two yarn combinations differ in thickness, make one circle in each and compare them side by side. Adjust the hook for the tighter or looser yarn as needed so the folds have similar reach.
2. Crochet Twelve Circles with Gold Edging
Round 1. With red or light green yarn, make a magic ring, ch 1, and work 8 hdc into the ring. Pull the starting tail to close the center. Join with a sl st in the first hdc. The starting chain does not count as a stitch in any round. If you prefer a chain start, ch 3 and work all eight hdc into the third chain from the hook. Count: 8 sts.
Round 2. Keep the center color attached. Ch 1, then work 2 hdc in each st around, beginning in the same stitch as the join. After the final increase, join with a sl st in the first hdc and fasten off. Check that you’ve worked two stitches into each of the eight stitches from Round 1. Count: 16 sts.
Round 3. Attach white yarn to a red circle or dark green yarn to a light green circle with a sl st in any stitch. Ch 1. Starting in that same stitch, repeat (1 hdc in the next st, 2 hdc in the next st) eight times. Join with a sl st in the first hdc and fasten off. Count: 24 sts.
Round 4. Attach the gold yarn with a sl st in any stitch and ch 1. Starting in the same stitch, repeat (1 sc in each of the next 2 sts, 2 sc in the next st) eight times. Join with a sl st in the first sc, then fasten off. This round adds eight increases to help the border follow the curve. Count: 32 sts.
Weave the starting tail through the back of the first round, reverse direction, and weave it back through several stitches to secure the center. Hide the color-change tails on the back of their matching rounds. Lay the sample flat and look at the gold edge. If it pulls inward even with the correct stitch count, try working the gold round with a slightly larger hook or a looser grip.
Repeat the four rounds until you have 12 matching circles. Fold each circle in half with the backs facing each other, so the right side shows on both faces. Line up the two gold arcs. With the yarn needle and a short length of gold yarn, make a small tack through both layers at the midpoint of the curved edge. The tack keeps each half-moon folded while leaving the gold edge visibly rounded.
3. Assemble the Spiral and Add the Christmas Bow
Wrap the craft ring with dark green yarn, keeping the wraps close together so the ring is covered where it shows between the folds. Secure the starting end by wrapping over it. At the end, thread the yarn through several wraps and tuck the tail under them. Mark the top, right, bottom, and left points, then add two evenly spaced markers between each pair. You’ll have 12 placement points around the ring.
Lay the ring flat and position the first folded circle with one end of its straight folded edge at a marker. The rest of the fold should extend outward over the outside of the ring, with the gold arc visible. Tilt the outer end slightly clockwise. Use matching yarn to stitch through both layers near the inner tip, taking the yarn around the ring on each pass. Make two or three passes and secure them on the back.
Place the next folded piece at the following marker, alternating between red and white and two-tone green. Give it the same clockwise tilt and overlap the neighboring piece just enough to hide part of its gold edge. Clip or loosely tack several pieces in place before sewing them firmly. From the front, look for an even run of gold arcs and a clear opening in the middle.
Continue attaching the pieces around the ring. When you reach the final marker, lift the first fold slightly and tuck the edge of the last piece beneath it. Check that the overlap at this join looks like the overlaps elsewhere. If a fold swings out of position when you lift the wreath, add a discreet stitch between the neighboring folds near their bases to hold the angle.
Tie a length of gold cord around the covered ring at the top and knot its ends to form a hanging loop. Lift the wreath by the cord and check where it settles. If the opening looks pulled to one side, slide the cord slightly or adjust the folds near the top. Once the wreath hangs evenly, tuck the cord knot behind the crochet where the bow will sit.
Tie a red ribbon bow and secure its center around the ring with a few firm stitches or a short piece of matching yarn. Arrange the loops so they frame the top of the wreath and let the tails fall to the sides. For the look in the photo, add a small faux pine sprig, a berry cluster, or a lightweight pinecone at the center. Hang the wreath again to check how the added weight affects the bow and folds.
4. Keep the Folds Even and Adapt the Wreath Size
If the center opening looks crowded, check how far the inner tips extend past the edge of the ring. A tip that projects into the opening can be moved closer to its marker and stitched down again. It helps to adjust one or two folds at a time. After each change, look at the wreath from the front to see whether the spacing around the opening has improved.
If the spiral is hard to see, compare the angles of the outer ends. A single fold pointing straight out can interrupt the pinwheel effect. Loosen its anchor stitches and tilt it to match the pieces beside it. You can also increase the overlap slightly around the entire ring, leaving enough of every colored section visible for the alternating red and green to read clearly.
If a gold edge ripples on the flat circle, first count Round 4 and confirm you have 32 stitches. A missed repeat or an extra increase can make one section flare. If the count is right and the whole edge still waves, work that round a little more snugly or try a slightly smaller hook. Compare the finished sample with your other color before repeating the change across the set.
For a larger crochet wreath, the simplest adjustment is to use a larger ring and make extra pairs of circles. Start by laying a few finished folds around the new ring to see how much room each one occupies once overlapped. Mark the full ring using that spacing, and adjust to an even number of positions so the two color combinations continue alternating through the join.
For a smaller Christmas ornament, make sample circles with a lighter yarn and a hook that suits it. Set them on the smaller ring before deciding how many to make. A narrow ribbon and a simple gold hanging cord can keep the center of the design visible at this scale. If you want to make a set, crochet all the centers first, then add the outer rounds and borders in batches.
To store the wreath after the holidays, lay it flat in a shallow box with enough room for the bow and gold ridges. If the yarn needs cleaning, spot-clean it according to its care instructions and let the wreath dry flat. When you take it out again, smooth the ribbon tails and gently fan the folds back into position before hanging it.
Frequently Asked Questions
Is this spiral crochet Christmas wreath suitable for beginners? Yes. The crochet uses two basic stitches, hdc and sc, plus chains, slip stitches, and increases. The assembly takes more patience than the stitching. Work the two sample circles first, and use markers or clips to test the layout before sewing the folds in place.
Are the circles crocheted in a continuous spiral? The circles are worked in joined rounds. The spiral appears when you fold the circles and arrange them at a consistent angle around the ring. You can angle the pieces clockwise as described or tilt every piece counterclockwise for a mirrored design.
Can I make the gold edge without metallic yarn? Yes. Mustard, antique gold, or warm honey-colored yarn gives the border a similar contrast. Choose a smooth yarn of comparable thickness and work the sample border first. Gold ribbon can add a little shine to the finished ornament if you prefer the feel of regular yarn while crocheting.
Can I use a metal ring or a plastic ring? Either can work if it holds its shape and is easy to wrap. Measure across the outside and aim for 8 cm for the twelve-piece version. A wrapped metal ring gives the needle a base for the anchoring stitches, while a lightweight plastic ring can help the wreath hang comfortably on a tree branch.
How do I make the wreath fuller without hiding the opening? Increase the overlap toward the outside of the wreath while keeping the attachment points evenly spaced. Avoid moving the inner tips toward the middle. You can also choose a slightly loftier yarn for the colored rounds, provided the folded pieces still sit neatly against the ring.
Why does my wreath look uneven when I hang it? Check the hanging cord first. It should sit above the center of the ring, with the bow balanced around it. If the ring hangs straight but the folds look uneven, compare the anchors on the left and right sides. Moving one loose fold back to its marker often restores the shape.
Conclusion
This Spiral crochet Christmas wreath Pattern starts with twelve crochet circles in two color combinations. The single crochet gold edging outlines each fold, and the angled arrangement on the covered ring creates the pinwheel shape.
A gold hanging loop and a red bow finish the ornament, with room for a small pine sprig or berries if you want to echo the reference photo. If you try the pattern, please leave your honest opinion and suggestions. I’d like to hear how the folds came together and what colors or finishing details you chose.