
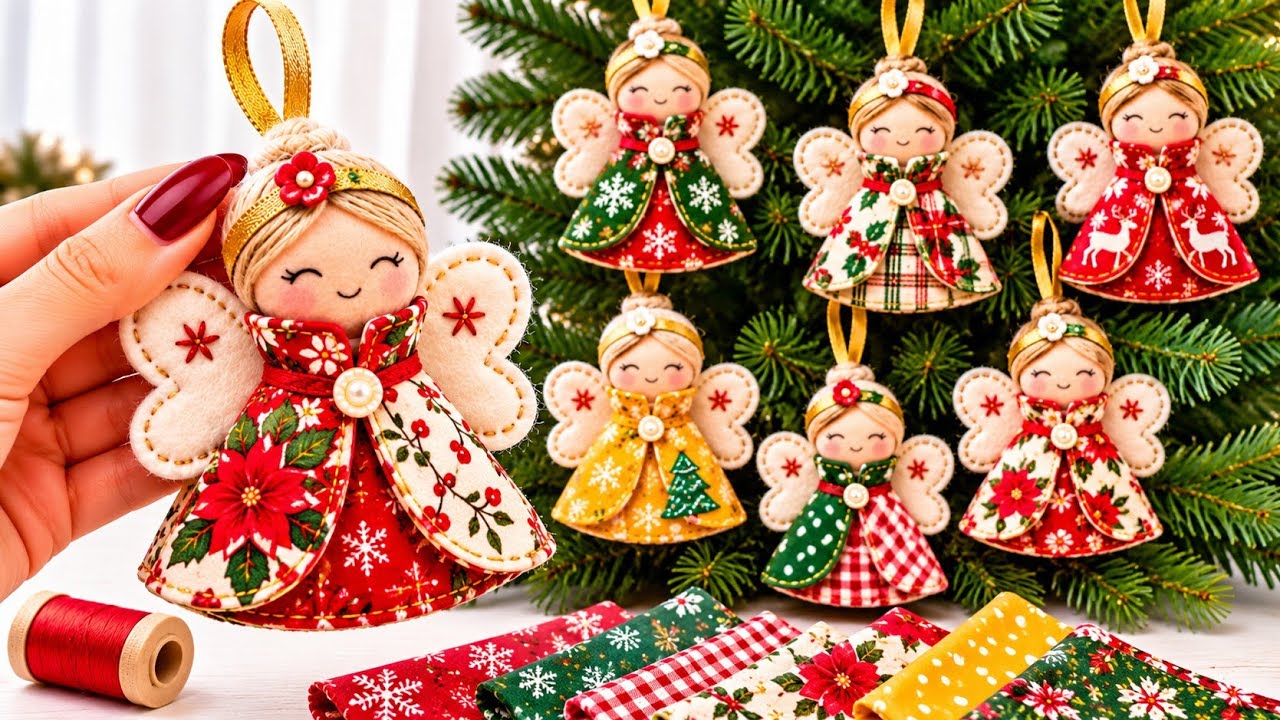
These Christmas ornaments in the shape of angels bring together the details that make the angels in the photo so charming.
Each one has a softly padded felt face, swept yarn hair, and a pair of cream wings outlined in gold thread.
A flared dress shows off small holiday prints, while two rounded fabric panels frame the skirt.
A pearl-style button at the front and a gold ribbon loop at the top finish the ornament.
This photo-inspired sewing pattern shows you how to draw the pieces from measurements and assemble them in order.
The finished angel measures approximately 11 cm tall, excluding the hanging loop, depending on how far you overlap the head and dress.
The most enjoyable part of making these fabric angel ornaments is choosing which scraps to put together.
For the look of the angel held in the photo, start with a red snowflake print for the dress and cream poinsettia fabric for the panels.
For a second version, layer dark green cotton over red gingham and add a tiny ivory flower to the gold headband.
Keep the face and wings in solid felt so the embroidery stays visible next to the busy prints.
Small motifs work especially well because you can fit a whole snowflake, berry sprig, or little reindeer inside a single panel.
Lay the fabrics next to each other before cutting and see which combination gives the dress, wings, and face each a clearly defined outline.
You can make the entire handmade Christmas angel with a needle and thread or sew the cotton pieces by machine.
The felt calls for simple hand stitches, and the face needs only two curved eyes, a small smile, and a few short stitches for lashes.
The wings are sewn as one piece across the back, which helps keep both sides level when the angel hangs.
The skirt panels are shaped individually so their curved edges frame a wedge of holiday fabric down the center.
Make one complete ornament first and use it to check the spacing of the face, the amount of skirt showing, and the balance of the hanging loop.
Once you like those proportions, keep your paper templates nearby so you can cut a coordinated set from different prints.
Gather Materials and Draw the Angel Ornament Pattern
Choose the fabrics and trims. For one angel, gather peach or beige felt for the head, cream felt for the wings, and two holiday quilting cotton scraps about 15 × 15 cm each. You’ll also need a small piece of cotton for the lining, a pinch of polyester fiberfill, a little tan yarn, sewing thread, black and red embroidery floss, and gold or honey-colored floss. Set aside 14 cm of narrow gold ribbon for the hanger, another 7–8 cm for the headband, and a small pearl-style button for the dress.
DISCOVER MORE FREE PATTERNS HERE!
Draw the head. Trace a 4.5 cm circle onto card stock to make a reusable template. Cut two circles from the face-colored felt. On the front circle, lightly mark the center and sketch a hairline across the upper third. Leave the lower part open for the eyes and smile. Felt edges stay exposed in this design, so the head template already represents the cut size.
Draw the flared dress. Start with a vertical centerline 7 cm long. Center a 2.5 cm neckline across the top and an 8.5 cm hem across the bottom. Connect the neckline ends to the hem ends with sloping sides, then curve the hem gently upward toward each corner while keeping its lowest point at the centerline. Draw this as the finished shape and add a 0.6 cm seam allowance around it. Cut one dress front from your main print and one matching back from cotton.
Shape the two skirt panels. Trace the finished dress onto another sheet of paper and use each side as a guide. On the left half, begin near the center of the neckline, follow the outer slope, then round the bottom so the panel ends about 0.4 cm above the dress hem. Curve the inner edge upward so it comes close to the center at the neck and opens away toward the hem. Mirror this shape for the right panel. Add 0.6 cm seam allowance to both. Cut one left panel and one right panel from accent fabric, plus a matching lining for each.
Draw the felt wings. Make a folded paper template by drawing one wing from a folded edge. Give it a rounded upper lobe, a shallow inward dip, and a smaller rounded lower lobe, like the side of a butterfly. Unfold the template to check that the wings measure about 10 cm across and 5.5 cm high, with a center bridge about 2 cm high. Cut two full wing shapes from cream felt. The exposed felt edges can be stitched without adding a seam allowance.
Check the paper layout before cutting all your fabric. Put the dress on the table and overlap the head by approximately 0.5 cm at the neckline. Slide the wing template underneath until the upper lobes peek out beside the lower half of the head. Lay the panel templates over the skirt and check for a visible strip of the main fabric between them. This quick arrangement is also a good time to position your fabric templates over favorite motifs before cutting.
Sew the Face, Yarn Hair, and Embroidered Felt Wings
Embroider the face while the felt is flat. Use two strands of black embroidery floss and work each closed eye as a shallow arch made of short backstitches. Place the eyes around the middle of the face, leaving about 1 cm between their inner ends. Add one or two tiny lashes at the outside of each eye. Stitch a small U-shaped smile below them. To get the rosy cheeks in the photo, use two small pink embroidery accents or lightly dab on a little dry fabric pastel.
Give the head a soft, even shape. Place the two felt circles together with the embroidered face outward. Sew around the edge with a small blanket stitch or evenly spaced whipstitches. Leave a 1.5 cm opening near the crown. Tuck in a thin layer of fiberfill, spreading it toward the edges with a blunt tool. Use just enough to round the face slightly and keep the bottom soft enough to sew onto the neckline.
Secure the gold hanging loop. Fold the 14 cm ribbon in half and tuck both raw ends about 1 cm into the opening at the crown. Check that the ribbon lies flat and is centered above the face. Sew through both felt layers and both ribbon ends several times, then finish closing the opening. Hold the head by the loop briefly to make sure the ribbon sits straight before adding the yarn hair.
Arrange the yarn in two swept sections. Cut several tan yarn strands about 8 cm long. Lay half of them diagonally across one side of the forehead and the rest across the other side, adjusting the part until both eyes are visible. Tack the strands down with matching sewing thread along the crown and the outer edges of the head. Trim any excess behind the felt circle. For the small topknot seen in the reference photo, coil a short strand of yarn and stitch it just below the hanging loop.
Add the gold headband and flower. Drape a narrow strip of gold trim across the hair above the eyebrows. Fold the ends toward the back and secure them with small hand stitches. Add a tiny red or ivory felt flower off-center on the band. A few yellow stitches in the flower center echo the pearl and gold details on the dress. Keep the flower clear of the hanger so the loop can swing freely.
Embroider and sew the wings. Work a small six-point embroidered star on each side of the front wing shape. For each star, make three straight stitches that cross at the same center. Then stack the two cream felt pieces and sew through both layers with a gold running stitch about 0.3 cm from the edge. Take shorter stitches around the inward curves to follow the shape smoothly. The layered felt gives the wings enough body to show behind the dress without stuffing.
Assemble the Layered Dress and Finish the Hanging Angel
Sew and turn the dress. Place the dress front and back right sides together. Stitch around the sides, neckline, and curved hem using the 0.6 cm seam allowance, leaving a 2.5 cm opening on one side. Trim bulk from the upper corners and clip small notches into the curved hem allowance, stopping short of the seam. Turn the dress right side out, roll the seam edges gently between your fingers, and press it flat. Fold the opening edges inward and close them with ladder stitch.
Finish both overlay panels. Pair each accent panel with its matching lining, right sides together. Sew around each panel with a 0.6 cm seam allowance, leaving a gap of about 2 cm along the straightest part of the edge. Trim the allowances around the rounded tips, turn the panels, and press them flat. Fold the opening edges inward. Sew about 0.2 cm from the edge all the way around each panel to close the gaps and add the visible topstitching shown in the photo.
Arrange the fabric layers and sew them down. Place the panels on the dress front with their neckline ends close together and their lower edges framing the center print. Leave a narrow border of the dress visible around the rounded tips. Hand-stitch through the panel tops and dress neckline to hold the layers together. Add a discreet tack near each outer edge so the panels stay in position while keeping the slightly lifted look along the inner curves.
Create the small collar and pearl accent. Use a narrow folded strip of accent cotton or soft ribbon to cover the panel joins at the neckline. Arrange the ends so they angle upward slightly on either side, giving the impression of a collar. Stitch the trim in place, then sew a pearl-style button just below it where the two panels nearly meet. Put the button high enough that the open wedge of patterned fabric remains visible below.
Attach the face and wings. Overlap the bottom of the felt head and the dress neckline by about 0.5 cm. With matching thread, sew the back layer of the head to the dress using several small stitches, keeping them away from the embroidered face. Center the wings behind the dress with the upper lobes visible to either side. Stitch the center bridge securely to the back of the dress. A couple of small stitches on each side of the bridge help keep the wings from swiveling.
Check the ornament on a branch or hook. Hang the angel by its ribbon and look at it from the front and side. If one wing seems higher, adjust the center bridge while the ornament hangs, then secure it with a fresh tack. If the dress hem curls forward, press the cotton lightly from the back before hanging it again, keeping the iron clear of the felt, yarn, and trim. For a matching set, repeat the same shape and vary the fabrics with red gingham, green polka dots, plaid, or gold snowflake prints.
Frequently Asked Questions About Fabric Angel Christmas Ornaments
Can I sew these Christmas angel ornaments entirely by hand? Yes. Use a small backstitch for the cotton seams because it holds the layers together when you turn them. Close the turning openings with ladder stitch. For the outline around the skirt panels, use short running stitches in a thread color that works with the print. A hand-sewn finish fits the embroidered wings and face.
What is the best fabric for a small angel ornament? Quilting cotton works well for the flared skirt and overlays because it holds a pressed edge and comes in many small-scale prints. Use felt for the head and wings so you can embroider them before joining the layers. If your cotton is particularly thin, use a slightly firmer cotton lining to give the dress more body.
Can I make the angel larger or smaller? Yes. Resize the finished outlines of the head, wings, dress, and panels by the same percentage, then add the cotton seam allowance after resizing. If you make a miniature angel, keep the facial stitches short and embroider a decorative knot at the neckline in place of the button. Small changes like those keep the details in proportion.
How do I keep the wing embroidery even on both sides? Before stitching, fold the paper wing template in half and mark the center of the star on one side. Transfer that position to the opposite wing by measuring the same distance from the fold and upper edge. Mark both points lightly on the felt. Embroider the stars before layering the wings so the thread ends are hidden inside.
Why does my fabric angel lean to one side when I hang it? First, check that both ribbon ends meet at the center of the crown. Next, check that the wings extend equally on either side of the dress and that the button sits near the center. With the ornament hanging, pin the wings at the position that balances it. Take the angel down and sew the wing bridge in that position.
How should I store handmade felt angels after Christmas? Lay them flat in a shallow box with plain tissue paper between layers. Arrange the hanging loops above the heads so the ribbons stay smooth, and leave a little room around the yarn hair and pearl buttons. A dry storage spot helps protect the felt and cotton until you’re ready to hang them again.
Conclusion
With this Christmas ornaments in the shape of angels Pattern, you can turn a few pieces of felt, festive cotton scraps, and ribbon into a coordinated set of tree decorations. You’ve learned to draft the templates, embroider the face and wings, shape the layered dress, and secure the hanger so the finished angel hangs evenly.
The same pieces can make a classic poinsettia angel, a green-and-gingham version, or a whole set in gold and cream. If you try the pattern, please leave an honest opinion about how it came together and share any suggestions for improving the instructions or personalizing the design.