
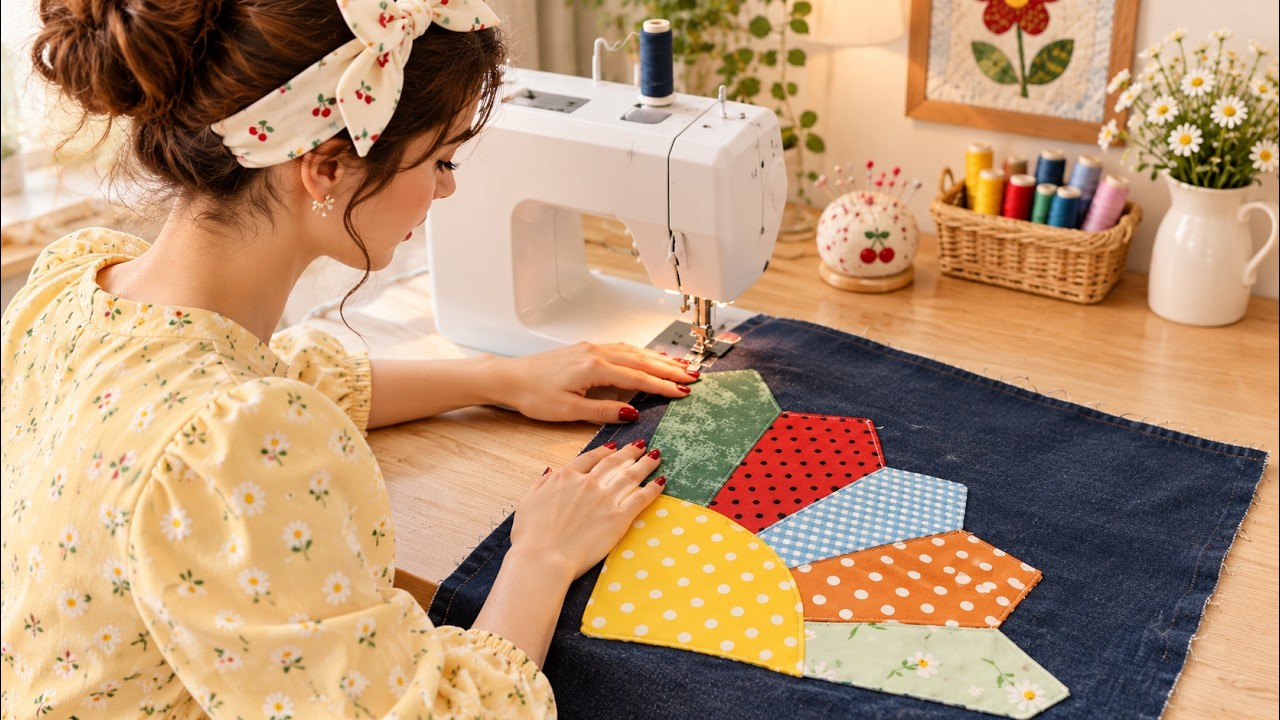
The Rug or cushion cover made from fabric scraps Pattern turns five printed cotton remnants into a colorful fan on dark denim.
The photo pairs green, red, blue gingham, orange polka dots, and pale floral fabric with a sunny yellow center.
Each blade widens toward the outside, giving even a small scrap enough room to show off its print.
A few clipped corners create the angular outline you can see around the fan.
The yellow center covers the narrow ends and gives the five prints a common starting point.
You can recreate that arrangement with fabrics from your own scrap basket and draft the shapes with a ruler and protractor.
The same fabric scrap appliqué works for a 40 × 40 cm cushion cover or a 45 × 60 cm small rug.
For the cushion, the decorated denim becomes the front, and two overlapping back panels form an envelope opening.
For the rug, the denim becomes the top of a flat quilted sandwich with a bound edge.
Choose your project before cutting so the fan fills the right amount of space.
The cushion instructions use a 1 cm seam allowance, and the rug is trimmed to its finished size before binding.
These are working dimensions for this tutorial, based on the layout in the photo.
You’ll start with a paper template, arrange the prints, and stitch each blade before attaching the yellow center.
The method is raw-edge appliqué, which means the fabric shapes are cut to their finished outlines and secured with stitching around the edges.
Lightweight paper-backed fusible web holds the pieces in place while you sew.
A narrow zigzag helps keep the cut edges tidy, especially where the cushion will be handled or the rug will be washed.
The photo’s color order gives you a starting point, and you can preview your own arrangement before pressing anything in place.
Once the fan is sewn, the remaining steps depend on whether you want an envelope back or a bound mat.
1. Choose Your Fabrics and Cut the Denim Base
Start with dark woven denim that lies flat when pressed. For a cushion cover, medium-weight denim gives the front some body while staying manageable at the seams. For a rug, choose a firm denim that your machine can stitch through comfortably once the backing, batting, and binding are added. A flat section of an old pair of jeans works if it’s large enough and free of bulky seams or worn-through areas.
DISCOVER MORE FREE PATTERNS HERE!
Gather five quilting cotton scraps for the fan blades and one for the center. For a layout inspired by the photo, use green, red dots, blue gingham, orange dots, and a pale green floral, then add yellow polka dots at the base. If your prints are busy, set a quiet one beside each bold one so the individual blades are easy to see against the denim.
For the 40 × 40 cm envelope cushion cover, cut one denim front 42 × 42 cm. Cut two back panels 42 cm wide × 29 cm high from sturdy woven cotton or lightweight denim. The back measurements include room for two 1 cm folds at each opening edge. Have a 40 × 40 cm cushion insert ready so you can check the fit when the cover is finished.
For the 45 × 60 cm rug, cut the denim top 49 × 64 cm. Cut low-loft cotton batting and a sturdy woven backing, such as cotton canvas, 51 × 66 cm each. Those extra centimeters give you room to square up after quilting. For the binding, prepare 3 cm-wide straight-grain cotton strips joined into a length of at least 230 cm.
Gather paper, a ruler, a protractor, a compass or a pencil and string, scissors, an iron, all-purpose polyester thread, and lightweight paper-backed fusible web. A 90/14 denim needle is a starting point for medium-weight denim. Test it on a small stack that matches the project layers. For the rug, a walking foot can help feed the denim, batting, and backing together.
Wash and dry the denim, the appliqué scraps, and the back fabric using the care method you plan to use later, then press them flat. Check dark denim and vivid red scraps for dye transfer before placing them beside pale prints. While the fabrics are on the table, check that there’s enough of each chosen scrap to cut a whole blade in the direction you want the print to run.
2. Draft the Five-Blade Fabric Fan and Arrange the Prints
Draw a right angle on paper and mark its corner as the fan pivot. Put the center of your protractor at that point. Mark 18°, 36°, 54°, and 72°, then draw a line from the pivot through each mark. Together with the two outside lines of the right angle, those four lines give you five equal spaces for the blades.
Measure out from the pivot along all six lines. Mark each at 17 cm for the cushion fan or 23 cm for the rug fan. Connect neighboring marks with straight lines across the ends of the blades. To get the clipped tips seen in the photo, mark about 1 cm along each side of each outside corner and join those two marks with a short diagonal. Use the same cut on both corners of each blade for a consistent outline.
Trace one blade onto separate paper to make a reusable appliqué template. You can leave the narrow end pointed or trim it straight across 2 cm from the pivot to reduce bulk. The center piece will cover that area. Draft the center as a quarter circle with a 7 cm radius for the cushion or a 9 cm radius for the rug. Its two straight edges follow the outside lines of the fan.
Trace five blades and one center onto the paper side of the fusible web. These are the final outlines, so the shapes need no seam allowance. Rough-cut around each tracing, fuse it to the wrong side of its chosen scrap using the product’s heat and pressing directions, and let it cool. Cut on the traced lines, then peel away the paper when you’re ready to arrange the pieces.
Lay the denim right side up and position the fan pivot toward the lower left so the blades open up and to the right, as in the photo. For the cushion, keep the entire motif at least 3 cm inside the raw edges. For the rug, mark the planned 45 × 60 cm trim rectangle inside the oversized top and keep the motif at least 3 cm inside that rectangle. Shift the layout until the outer blades have room to show their clipped tips.
Place the blades in order with their long sides just touching, then set the yellow quarter circle over their narrow ends. If the gingham looks crooked, rotate the paper template on the fabric before cutting that piece so the checks follow the direction you prefer. Once you’re happy with the layout, take a quick reference photo or mark the pivot and blade positions with a removable fabric marker.
3. Stitch the Appliqué and Assemble the Envelope Cushion Cover
Lift the yellow center off the layout and fuse the five blades to the denim. Press in small sections, lifting and setting down the iron to keep the pieces from shifting. Let the panel cool flat. Check the tips and the long joins between blades before bringing the panel to the machine, since a lifted corner is easier to fix while the pieces are still flat on the ironing surface.
Practice the machine appliqué stitch on a spare cotton shape fused to a denim offcut. A zigzag about 2 mm wide and 1 mm long is a starting point. Adjust it so one side of the stitch lands on the cotton and the other just catches the denim. At the join between adjacent blades, center the zigzag over the meeting line so it catches both fabrics. If the denim puckers on your sample, try a slightly longer stitch or a layer of tear-away stabilizer.
Stitch the exposed outline and each join from just inside the area the yellow center will cover. Slow down as you reach a clipped corner, lower the needle into the fabric, lift the presser foot, and turn the work a little at a time. Once the blades are secured, fuse the yellow quarter circle in place and zigzag around its entire outline, including the two straight sides. Remove any tear-away stabilizer before assembling the project.
For the envelope cushion back, choose one 42 cm edge on each back panel. Fold that edge 1 cm to the wrong side, press, then fold it another 1 cm and press again. Straight-stitch close to the inner fold. Lay the denim front face up. Put both back panels on top, right sides down, with their raw outer edges aligned with the front and their hemmed edges overlapping across the middle by about 12 cm.
Clip all four sides and sew around the square with a 1 cm seam allowance. Backstitch where the hemmed panel edges meet the side seams because those spots take extra strain when you insert the pillow. Trim the corner allowances diagonally, leaving a little fabric outside the stitching. Finish the raw seam allowances with a zigzag or serger if your denim frays easily.
Turn the cover through the envelope opening and gently push out the corners with a blunt point turner. Press the perimeter, then slip in the cushion insert by bending it slightly and fitting the far corners first. Smooth the denim across the front. If the back gapes, check that the finished hems are overlapping and that neither back panel has folded inward around the insert.
4. Quilt and Bind the Denim Rug
Lay the rug backing wrong side up on a flat surface. Smooth the batting over it, then center the appliquéd denim top right side up. Baste through all three layers with curved safety pins so the backing stays flat when you move the project. Check the underside before quilting, especially if you shifted the mat while pinning.
Quilt a line just outside the patchwork fan to echo its outline. Then add quilting in the open denim using parallel lines or a series of larger outlines. Work from the center area toward the edges and smooth the layers as you go. Follow the batting’s stated maximum quilting distance across the whole mat, including beneath the fan. Add quilting beside the blade joins if that area needs more stitching to meet the spacing.
Lay the quilted panel flat and remark a 45 × 60 cm rectangle. Check that the corners are square and that the denim margin around the fan looks balanced. Trim through all three layers along the marked rectangle. If an edge shifts while you handle it, baste the layers together about 3 mm from the raw edge so they stay aligned under the binding.
Join the 3 cm binding strips end to end with diagonal seams and press the joins open. Press both long raw edges toward the center, then fold the binding in half lengthwise. Open one fold, align its raw edge with the front edge of the rug, and stitch along the crease, approximately 0.75 cm in from the edge. Leave the first few centimeters loose so you can join the ends after sewing around the mat.
At each corner, stop stitching about 0.75 cm before the edge. Fold the strip up and away at a 45-degree angle, then fold it down with the strip’s raw edge aligned to the next side. Start sewing at the new edge. When you return to the starting side, trim the two tails so they overlap by 3 cm, join them diagonally, and sew the remaining gap. Wrap the folded binding to the back so it covers the first seam, miter the corners, and hand-stitch the fold down or topstitch it by machine.
Press the finished rug flat and check that the binding is caught securely on both sides. Feel along the edges for any ridges where several layers meet. When placing the denim scrap rug on a hard floor, use a nonslip rug pad sized to sit underneath the mat. The finished size works well where you want a small accent and have room for all four edges to lie flat.
Frequently Asked Questions
Can I make this pattern from old jeans? Yes. Look for a broad, flat section with enough intact fabric for the base. A single pant leg may be too narrow. You can join flat panels with a 1 cm seam allowance, press the seam open, and trim the pieced denim to the cutting size. Position any join away from the thickest part of the fan, where the blades meet under the yellow center.
How do I keep the fabric scraps from fraying? Use tightly woven cotton, fuse it all the way to the cut edges, and sew around the shapes with a narrow zigzag. Test the stitch on a scrap first. If you can lift the cotton edge easily with a fingernail after sewing, move your stitch slightly closer to the edge or adjust the width so the needle catches both sides of it.
Can I sew the fan without fusible web? Yes. Hand-baste the blades to the denim a few millimeters inside the edges, then zigzag around them. Remove any visible basting afterward. You can also use turned-edge appliqué for the cushion. Add a 0.6 cm turning allowance around each shape, press the allowances to the wrong side, and stitch the folded edges down. The fan tips will look slightly softer with a turned edge.
How do I resize the fan for a different cushion or rug? Keep the five 18-degree blades and change their length. To preserve the proportions, make the center radius roughly 40 percent of the blade length. For example, with 20 cm blades, use an 8 cm center radius. Lay the paper pieces on your base and check the border space before cutting fabric.
How should I wash the finished project? Remove the insert before washing the cushion cover. Use a gentle cycle with cool water if the denim, scraps, batting, and fusible web allow it. Reshape the rug while damp and let it dry flat. Press wrinkled areas from the back with a temperature suited to the materials you used.
Conclusion
The Rug or cushion cover made from fabric scraps Pattern brings together five cotton prints, a yellow quarter-circle center, and a dark denim background. You’ve learned how to draft the fan, clip the blade tips, and secure the raw edges with machine appliqué.
EASILY FIND THE FREE VIDEO FOR THIS PATTERN HERE!
The same design can become a 40 × 40 cm envelope cushion cover or a 45 × 60 cm quilted rug, depending on how you finish the back and edges. If you try it, leave an honest opinion and any suggestions. Which scraps did you use, and which step would you like to see explained in more detail?