
The Christmas cottage made from fabric scraps Pattern turns small pieces of fabric into charming holiday ornaments.
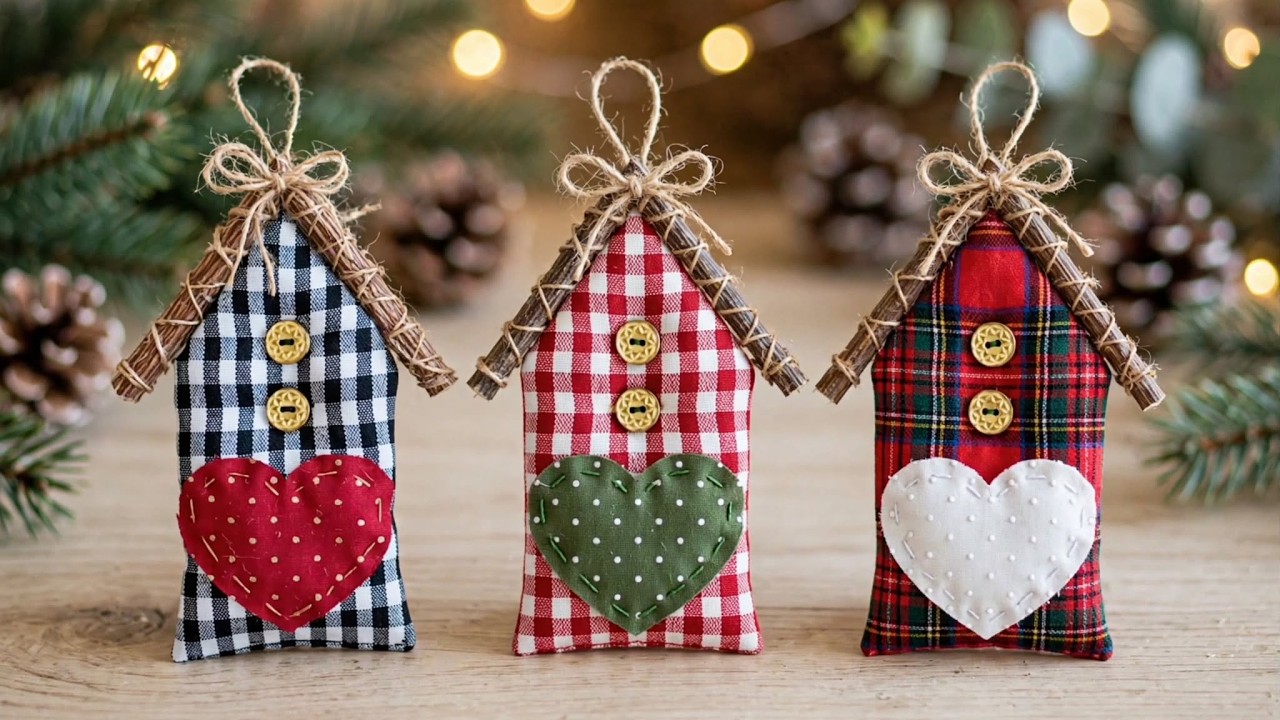
Inspired by the photo, these cottages feature checked or plaid bodies, stitched hearts, gold-colored buttons, and rustic twig roofs.
A simple twine loop makes each little house easy to hang on a Christmas tree or decorative branch.
The combination of woven cotton, visible stitches, and natural materials gives the project its welcoming handmade character.
You can make one cottage as a thoughtful gift or sew a coordinated collection using your favorite seasonal scraps.
This tutorial explains how to create a similar ornament, with suggested measurements in centimeters and practical sewing instructions.
One of the pleasures of scrap fabric sewing is finding a purpose for pieces left over from other projects.
Black-and-white gingham, red checks, and traditional tartan all work beautifully for the cottage bodies shown in the reference.
Smaller scraps become contrasting hearts, while short lengths of jute twine add texture around the roof and hanging loop.
Because the houses share a simple outline, you can change their colors without changing the basic construction method.
The finished ornaments have lightly padded bodies, so they are soft and dimensional rather than completely flat.
Their rustic appearance also welcomes small variations, making careful construction more useful than trying to achieve absolute uniformity.
This Christmas cottage made from fabric scraps Pattern uses a paper template that you can draw at home.
The measurements below are a suggested interpretation of the photograph, since a picture cannot establish the original dimensions or hidden construction.
You will prepare the fabric, attach the decorative details, sew and stuff the house, and finish with the twig roof.
The tutorial uses familiar techniques, including running stitch, backstitch, and ladder stitch, with explanations as each becomes useful.
Read through the steps before cutting, especially the instructions for seam allowances and the placement of the hanging loop.
With a little preparation, you can create a small fabric cottage that feels personal, festive, and ready to display.
1. Choose Your Materials and Draw the Cottage Pattern
Begin with tightly woven quilting cotton for the front and back of your cottage. For one ornament, two fabric pieces measuring approximately 15 × 22 cm each should provide enough room for the suggested template. Choose a contrasting cotton scrap for the heart, plus polyester fiberfill, sewing thread, embroidery floss, two decorative buttons, jute twine, and slender, clean, dry twigs.
DISCOVER MORE FREE PATTERNS HERE!
The reference photograph offers three attractive color combinations: black-and-white gingham with a red heart, red-and-white gingham with a green heart, and red tartan with a white heart. Select small-scale prints so their patterns remain recognizable on the narrow house. For a coordinated set of handmade Christmas ornaments, repeat the same button finish and twine color across all three cottages.
Draw the finished house outline on paper before adding a seam allowance. Make the body 9 cm wide, with straight walls rising 11 cm from the base. Mark a roof peak centered 6 cm above the wall tops, producing a total height of 17 cm. Connect the upper wall corners to the peak to create the familiar five-sided cottage silhouette.
Add a 0.7 cm seam allowance around the entire outline, including the sloping roof edges and the bottom. Cut out this larger shape as your fabric-cutting template. Keep the original outline visible on the paper because it represents the sewing line. Mark a 4 cm turning opening along one straight side, positioned where it will be easy to close after stuffing.
Draw a separate heart approximately 7 cm wide and 6 cm tall. This heart will have exposed decorative edges, so it does not need a turning allowance. Cut one heart from cotton backed with lightweight fusible interfacing, or use felt for an easier, low-fraying alternative. The cotton option more closely echoes the patterned hearts visible in the photograph.
Prepare your fabrics according to their care needs, then press them flat before cutting. If a scrap has a loose weave, add lightweight interfacing to support it. Check that the twigs are free from sharp points, loose bark, and dampness. These cottages are intended as decorative fabric ornaments; small buttons, twig pieces, and hanging cords make them unsuitable as toys.
2. Cut the Fabric and Stitch the Heart and Buttons
Place the house template on your front fabric and align its center with the fabric design. Straight gingham lines help the finished cottage look balanced, while centered tartan creates a pleasing arrangement of color. Trace the cutting outline and transfer the sewing line lightly to the wrong side. Cut one front and one back, keeping their outlines identical.
Lay the cottage front right side up and position the heart on its lower half. Keep the heart entirely inside the finished house outline, with its point approximately 1.5 cm above the bottom sewing line. Leave enough space above the heart for two vertically arranged buttons. Pin or baste the heart in place, checking the arrangement before you begin stitching.
For a cotton heart, lightweight fusible web can help hold the appliqué flat. Follow the product’s pressing directions and protect your ironing surface. Fusible web supports placement, but stitching gives the edge a more dependable finish. If you prefer the slightly irregular, homespun look in the photograph, leave the heart edge exposed and accept that cotton may develop a little fraying.
Sew around the heart with two strands of embroidery floss and a running stitch. Bring the needle up through the fabric, move forward approximately 0.3–0.4 cm, and take it down again. Repeat with roughly even spaces, working about 0.4 cm inside the heart’s edge. Ease around the rounded lobes and take a shorter stitch at the bottom point.
Attach the two buttons above the heart, leaving visible space between them. Buttons approximately 1–1.2 cm wide suit this suggested cottage size. Sew through each button several times and secure the thread on the wrong side of the front panel. Attaching them now keeps the thread ends inside the ornament and makes the process easier than sewing through a stuffed body.
Review the front before assembling the house. Make sure the heart lies flat, the buttons are secure, and no decorative stitching extends into the seam allowance. Remove temporary basting that will remain visible. This is also the best moment to add an optional embroidered initial or date to the back panel, keeping it away from the edges and turning opening.
3. Sew, Turn, and Lightly Stuff the Cottage Body
Cut a piece of jute twine approximately 20 cm long for the hanging loop. Fold it in half and knot the two cut ends together. On the right side of the front panel, place the loop facing down toward the cottage body, with the knotted ends extending into the seam allowance at the roof peak. Baste securely across the twine near the sewing line.
Place the back panel over the front with right sides together, enclosing the loop between the layers. Pin around the outline and confirm that the loose part of the loop remains clear of the stitching path. Match the roof peak, wall corners, and lower corners carefully. Keep the marked turning opening visible so you do not accidentally sew it closed.
Sew along the marked line with a short machine straight stitch, leaving the turning opening unstitched. Backstitch at both ends of the opening and reinforce the roof peak where the twine is caught. For hand sewing, use backstitch: bring the needle up ahead, insert it backward at the previous stitch’s end, and emerge farther along the seam to form a continuous line.
Trim excess seam allowance at the roof peak and lower corners without cutting through the stitches. At each junction where a wall meets a sloping roof edge, make a small clip toward the seam so the fabric can spread after turning. Work cautiously, especially near the twine attachment. Leave enough fabric around the reinforced peak to support the hanging loop.
Turn the cottage right side out through the opening. Use a blunt turning tool to ease out the corners and roof peak gently. Smooth the seams with your fingers, then press carefully if your materials allow. Add small pieces of polyester fiberfill, starting with the roof and corners. Aim for an even, lightly padded shape that preserves the cottage’s tall, narrow outline.
Fold the opening’s seam allowances inward and close it with ladder stitch. Take a small stitch through one folded edge, cross to the opposite fold, and repeat, drawing the thread gently to bring the edges together. Secure and bury the thread end. Tug the hanging loop lightly to check its attachment before proceeding with the heavier roof decorations.
4. Add the Rustic Twig Roof and Finish Your Ornament
Measure each finished roof slope before preparing the twigs. For the suggested cottage dimensions, roof pieces around 8–9 cm long should create a modest overhang beyond the upper wall corners. The actual length will depend on stuffing and seam placement, so fit the pieces directly against your ornament. Keep the roof proportional rather than relying on an exact twig measurement.
To resemble the photograph, gather several thin twigs into one narrow bundle for each roof slope. Bind each bundle at intervals with jute twine, wrapping firmly enough to hold the pieces together. Trim protruding ends and arrange the two bundles as an inverted V above the fabric roof. Check that both sides have similar thickness and balanced overhangs.
Attach the twig bundles with strong thread or thin twine, making several small couching stitches around each bundle and through the fabric beneath it. Couching means holding a thicker material against the surface with smaller stitches that pass over it. Anchor the bundles near their upper ends, centers, and lower ends, taking care to keep the hanging loop free.
A small amount of craft adhesive may help prevent the twigs from shifting, provided it is suitable for both fabric and wood. Follow its directions and let it cure fully before handling the ornament. Use stitching as the main support wherever practical. If using hot glue, apply it carefully and sparingly so it does not soak through the cotton or leave visible hardened patches.
Tie a small jute bow at the roof peak, just below the hanging loop. Trim the tails so they frame the upper cottage without covering the buttons. Inspect the completed Christmas cottage made from fabric scraps Pattern project from the front and back. Secure loose threads, check the roof attachments, and hang it briefly to confirm that its weight is balanced.
Make additional cottages by repeating the template with different fabrics and heart colors. Their handmade character comes from the combination of consistent proportions and varied materials. Display them on sturdy branches, garlands, or gift packages, away from flames and heat sources. Store the ornaments dry in a shallow container, cushioning the twig roofs so they remain intact between holiday seasons.
Frequently Asked Questions
Can a beginner make this Christmas cottage made from fabric scraps Pattern?
Yes. The main body uses straight seams, and the heart requires only a simple decorative running stitch. Beginners may find felt easier than cotton for the heart because its edges do not fray. Take extra care when positioning the hanging loop and clipping the corners, and complete one cottage before cutting materials for an entire set.
What is the finished size of the cottage?
The suggested paper outline produces a fabric body approximately 9 cm wide and 17 cm tall before stuffing changes its shape slightly. The twig roof extends beyond the fabric, and the loop adds hanging height. These are tutorial measurements developed from the photograph’s proportions, rather than measurements taken from the original ornaments.
Does the cutting template include a seam allowance?
The first outline represents the finished sewing line. You must add 0.7 cm around it to create the cutting template. The exposed-edge heart does not need an added seam allowance. Label both paper pieces clearly so you do not accidentally add the house allowance twice or cut the body directly on its finished outline.
Can I make the entire ornament without a sewing machine?
Yes. Use small backstitches around the cottage body, reinforce the hanging loop with several additional stitches, and close the stuffing opening with ladder stitch. Running stitch works well for the decorative heart. Hand sewing takes longer, but it gives you good control over the narrow roof peak and fits the rustic appearance of the finished ornament.
How can I stop the cotton heart from fraying?
Choose tightly woven cotton, support it with lightweight interfacing, and stitch securely around the edge. A closely spaced machine zigzag can provide more edge coverage than running stitch. Felt is another option if you want a clean exposed edge. A raw-edge cotton heart may still develop slight fraying with handling, which suits a deliberately rustic finish.
What can I use instead of natural twigs?
Try narrow felt strips, fabric-covered cord, or small smooth craft sticks cut to suit the roof. Lightweight alternatives may be preferable for delicate branches. Whatever material you choose, test its weight and attachment before displaying the ornament. The roof should frame the fabric cottage without pulling the body out of shape or overwhelming its decorative details.
Why does my cottage look round instead of house-shaped?
Too much stuffing can push out the side seams and soften the roof angles. Remove a little fiberfill and redistribute the remaining filling in small amounts. Keep the center lightly padded and support the roof peak without packing it tightly. If the cottage still looks uneven, check that its seams followed the original outline consistently.
How should I clean and store the finished ornament?
Dust it gently with a soft brush or dry cloth. Avoid soaking a completed cottage with natural twigs, jute, and attached decorations. If spot cleaning becomes necessary, test a hidden area first and let it dry thoroughly. Store it away from moisture and direct sunlight, with enough space around the roof to avoid crushing the twig bundles.
Conclusion
The Christmas cottage made from fabric scraps Pattern combines a simple sewn house with a contrasting appliqué heart, decorative buttons, and a rustic twig roof. You have learned how to draw the template, add the seam allowance, prepare and decorate the fabric, secure the hanging loop, sew and stuff the body, and attach the finishing details. Changing the prints and heart colors lets you create a coordinated collection while making thoughtful use of small fabric leftovers.
EASILY FIND THE FREE VIDEO FOR THIS PATTERN HERE!
Start with one cottage to find the level of padding and roof texture you prefer, then use that experience to guide the rest of your set. Each ornament can carry its own personality through fabric choices and small handmade details. Please leave your honest opinion about the project and share your suggestions for colors, embellishments, or improvements you would enjoy trying.