
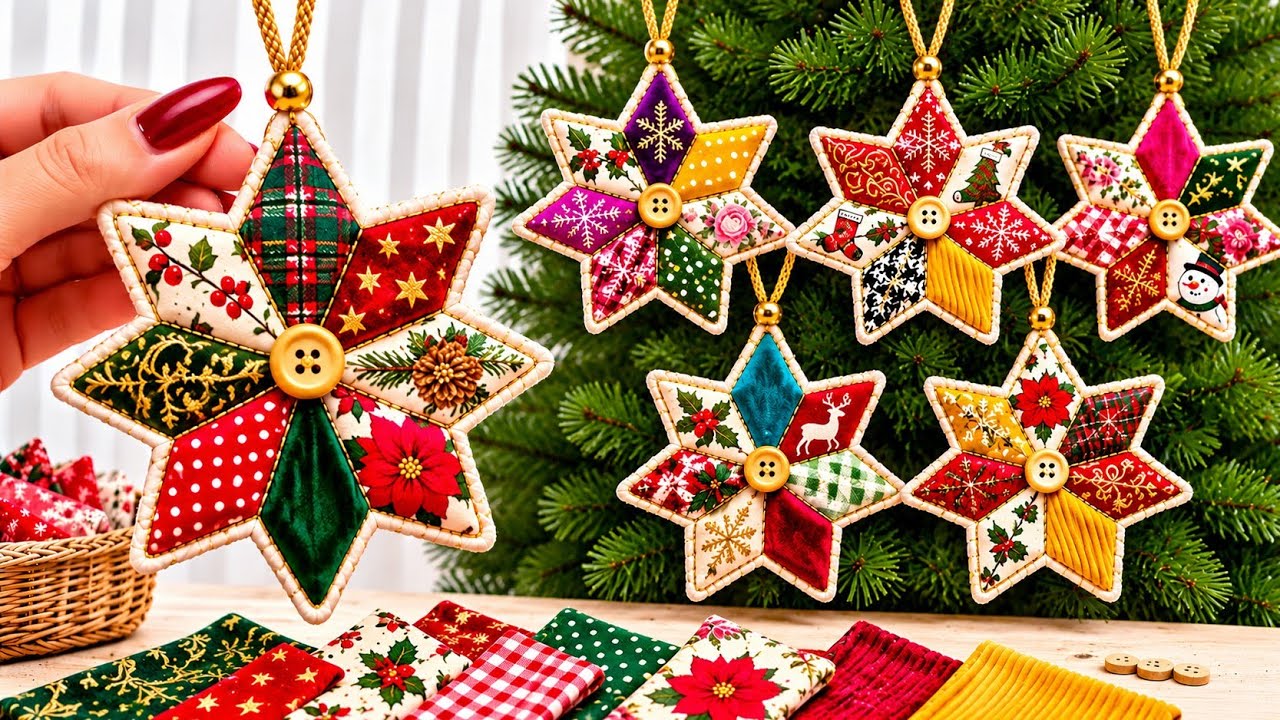
The Star shaped Christmas ornaments Pattern brings together colorful fabric scraps, neat patchwork seams, and a cheerful button center.
Inspired by the ornaments in the photo, this project features pointed fabric sections arranged around a central meeting point.
Christmas prints, cream edging, and a gold hanging loop give each finished star a warm, handmade appearance.
The combination of plaid, holly, snowflakes, florals, and solid fabrics makes even small scraps feel special.
You can coordinate every section carefully or mix contrasting prints for a lively, traditional Christmas decoration.
This tutorial explains how to create an eight-point version inspired by the large ornament shown on the left.
Making patchwork Christmas ornaments is a satisfying way to practice accurate cutting and small-scale sewing.
Each star begins with eight identical diamond-shaped pieces that join to form the decorative front.
A fabric backing and a thin layer of batting give the ornament enough structure to hang attractively.
The cream outline is created here with a narrow exposed backing border and decorative stitching for an approachable finish.
A securely sewn button covers the central intersection, while a folded cord creates the hanging loop.
All measurements are given in centimeters, and the instructions use familiar American sewing terminology.
This Star shaped Christmas ornaments Pattern produces a star approximately 17 cm across, depending on your cutting and finishing accuracy.
The dimensions below are a suggested construction size because exact measurements cannot be determined from the photograph alone.
Choose lightweight quilting cotton for your first ornament so the seams remain manageable at the center.
Once you understand the assembly, you can experiment with velvet accents, textured cotton, or carefully selected corduroy.
Work slowly, press each seam as you go, and check the arrangement before joining the next section.
The result is a reusable holiday decoration that highlights the fabrics and details you enjoy most.
1. Choose Materials and Draw the Diamond Template
Gather your supplies. For one ornament, prepare eight quilting cotton scraps approximately 7 × 11 cm each, a 22 × 22 cm square of cream backing fabric, and a similarly sized piece of thin batting. You will also need coordinating thread, cream embroidery floss, a hand-sewing needle, fabric scissors, a ruler, a fabric marking tool, and a sewing machine if you prefer machine piecing. Set aside a button approximately 1.8–2.2 cm wide and about 24 cm of decorative hanging cord.
DISCOVER MORE FREE PATTERNS HERE!
Understand the patchwork shape. The large star in the reference image has eight points. For this version, each point is made from a diamond with two 45-degree angles and two 135-degree angles. Eight narrow, 45-degree corners meet at the center because eight multiplied by 45 equals 360 degrees. This geometry is what allows the pieces to form a flat star. Avoid replacing the diamonds with ordinary squares or wider diamonds, which will change the construction.
Draw the finished diamond first. On firm paper, draw a line 4.5 cm long. At one endpoint, use a protractor to draw another 4.5 cm line at a 45-degree angle to the first. Complete the diamond by drawing parallel opposite sides, each also 4.5 cm long. The finished shape will have a long diagonal of approximately 8.3 cm. Mark one narrow corner “CENTER” and the opposite narrow corner “OUTER POINT” to make the assembly easier to follow.
Add the seam allowance. Draw a second outline 0.6 cm outside every side of the finished diamond, measuring perpendicular to each edge. Extend the new lines until they intersect at the corners. The inner outline is the seam line, and the outer outline is the cutting line. Cut out the paper template on the outer line. Keep the original seam-line drawing visible so you can transfer the corner positions accurately onto your fabric pieces.
Select a balanced color arrangement. For a look similar to the photograph, combine deep red, forest green, cream, and touches of gold. A plaid diamond looks especially effective beside a small floral or snowflake print. Alternate light and dark fabrics so the individual points remain easy to see. The phrase Star shaped Christmas ornaments Pattern describes the complete project; patchwork refers specifically to the method of joining separate fabric pieces to create the decorative surface.
Prepare fabrics before cutting. Press every scrap flat and check that the fabric does not stretch excessively or shed heavily. If you prewash your fabrics, dry and press them before tracing the template. Place a favorite printed motif near the middle of a diamond, allowing space for the seams around it. This selective placement is called fussy cutting. Keep bulky embellishments away from the center, where eight seam allowances will eventually meet.
2. Cut and Piece the Eight-Point Star Front
Cut eight matching diamonds. Trace the cutting outline onto the wrong side of each chosen fabric and cut carefully. Transfer the finished seam-line corners, especially the center corner, using a removable fabric marker. For a first attempt, marking all four seam lines can help you maintain accuracy. Lay the eight diamonds right side up in a circle, with their marked center corners touching. Take a quick reference photo so the arrangement is easy to restore during sewing.
Join the diamonds into pairs. Place two neighboring diamonds right sides together, matching the edges that run from the center toward an inward valley of the star. Sew on the marked seam line with a 0.6 cm seam allowance. At the center end, stop precisely at the marked center intersection; do not sew through the seam allowance beyond that point. Repeat to create four pairs. A short stitch length, approximately 2 mm, helps hold these small seams securely.
Press each pair carefully. Set the stitches with the iron, then press the seam allowances open where practical to reduce bulk. Lift and lower the iron instead of sliding it across the fabric, because diagonal edges can stretch. Return each pair to the original arrangement and check that the prints face the intended direction. The outline should begin to resemble four pointed units arranged around a common center. Correct any reversed piece before continuing.
Build two star halves. Join two neighboring pairs to make a four-diamond half, then repeat with the remaining pairs. Match the marked center points and keep the existing seam allowances clear of the new stitching. Sew accurately along the marked line, stopping at the center intersection where required. Press gently after each join. Each half should lie flat, with four outer points and a straight joining edge running across the middle.
Join the two halves. Place the halves right sides together and align the long central seam, matching the center intersection first. Pin through the marked meeting point, then secure the remaining seam. Sew across the joining line, keeping the loose seam allowances from folding into a lump. Open the star and inspect the center. If a small tuck appears, remove a few stitches locally and resew that section before adding the backing.
Check the finished patchwork front. The star should lie reasonably flat without a raised central peak or deep ripples. A small central mismatch can be covered by the decorative button, but the button should not be used to hide a hole or an unsecured seam. Press the front from the wrong side and trim stray threads. The finished seam-line outline should measure approximately 16.6 cm from one outer point to the opposite point.
3. Add Batting, Backing, and the Cream Border
Prepare the batting layer. Place the patchwork front right side up over thin batting and temporarily secure the layers with pins or hand basting. Trace the star’s finished outer seam line onto the batting using the fabric seam-line markings as a guide. Cut the batting approximately 0.2 cm inside that outline. This slight reduction keeps excess batting out of the turned edges. Use a thin batting rather than loose stuffing for the flatter appearance shown in the photo.
Turn the patchwork edges under. Fold the front’s outer seam allowances to the wrong side along the marked seam lines. Use a small paper pressing guide if helpful. At each inward valley, clip the seam allowance toward the intersection, stopping just short of the seam line so you do not cut through it. Fold the outer points neatly and remove only excess allowance that prevents a clean fold. Hand baste the turned edges to hold the star shape.
Cut the visible cream backing. Place the prepared star front over the cream fabric, leaving enough fabric around every point. Trace the folded star outline, then draw a second star outline 0.3 cm outside it to establish the finished cream border. Add another 0.6 cm beyond that second outline for the backing’s turning allowance. Cut on the outermost line. This produces a backing that will remain slightly visible around the patchwork after its edges are folded under.
Assemble the flat ornament. Fold and press the cream backing allowance to the wrong side along its finished outline, clipping the inward valleys carefully. Place the backing wrong side up, position the trimmed batting on it, and set the patchwork front right side up on top. The wrong sides of the front and backing face each other, with batting enclosed between them. Adjust the layers until a narrow cream border shows evenly around the star, then baste securely.
Insert the hanging loop. Fold the decorative cord in half and place its two cut ends between the front and backing at one upper point. Leave approximately 2 cm of each end inside the ornament. Secure the ends to the backing allowance with several strong stitches before closing that area. The loop should emerge from the point without pulling it sideways. If you want a gold bead like the reference image, thread it onto the loop before securing the cord ends.
Stitch the perimeter. Sew the folded patchwork edge to the cream backing with small slip stitches or a narrow machine topstitch, catching the backing securely. Then work a decorative blanket stitch around the cream perimeter using embroidery floss. Blanket stitch creates evenly spaced stitches connected by a thread running along the edge. Keep the stitches shallow and consistent so they decorate the border without distorting the points. Remove the temporary basting after the layers are fully secured.
4. Finish the Button Center and Refine the Details
Add light quilting for definition. To emphasize the separate fabric diamonds, sew through the layers close to selected patchwork seams. This is a simple form of quilting, which holds the front, batting, and backing together. You can use small hand stitches or carefully placed machine stitching. Begin away from the thickest center area if your machine struggles with bulk. A few neat quilting lines are enough for an ornament this size.
Sew on the center button. Position the button over the central intersection and check its placement from several angles. Use doubled sewing thread and stitch through the ornament’s layers, passing through the button holes several times. Keep the tension firm enough to secure the button without drawing the entire star into a deep pucker. Knot the thread on the back and bury the tail between the layers. For a button-free version, use a securely sewn fabric circle.
Refine the points and border. Inspect each outer point and inward valley for loose stitches, visible raw edges, or uneven folds. Close small gaps with matching thread and adjust decorative stitches that pull too tightly. A wooden point turner can help arrange a folded corner gently, but avoid pushing with sharp scissors. Give the ornament a light final press using a pressing cloth. Keep the iron away from plastic buttons, synthetic cord, and heat-sensitive beads.
Adapt the fabric choices thoughtfully. Quilting cotton is the easiest option for this Star shaped Christmas ornaments Pattern, but a single velvet or corduroy diamond can introduce texture. Cut directional fabrics with the pile or ribs facing consistently. If a fabric is much thicker than the others, test the seam first and consider a lighter alternative. The most attractive result comes from a balanced combination of color, print scale, and manageable fabric thickness.
Check the ornament before displaying it. Hold it by the loop and confirm that it hangs with the chosen point upright. Gently check the cord attachment and center button for movement. These ornaments are decorative items, so keep detachable buttons and beads away from young children and pets. Display the finished stars on a tree, garland, or wrapped gift. Leave enough space around each ornament for its points and contrasting fabrics to remain visible.
Care for your handmade stars. Blot small marks with a barely damp cloth and let the ornament dry completely before storing it. Avoid soaking embellished ornaments unless all materials have been tested for washing. Store the stars flat in a dry container, with tissue between them if the buttons might catch neighboring fabrics. Save the paper diamond template and record your fabric choices. Reusing the same template makes it easier to create a coordinated collection next season.
Frequently Asked Questions
Can a beginner make this Star shaped Christmas ornaments Pattern?
Yes, although joining eight diamond points requires more care than a basic square patchwork block. Marking the seam lines, sewing slowly, and pressing after each join make the process easier. Try one practice front using ordinary cotton scraps before cutting treasured seasonal fabrics.
Does the pattern include seam allowances?
The finished diamond is drawn first, and then a 0.6 cm seam allowance is added around every side. Cut on the outer outline and sew on the inner outline. The cream backing is measured separately after the patchwork front has been assembled and its edges turned under.
Why does the center of my star form a bump?
A raised center usually indicates inaccurate angles, inconsistent seam allowances, stretched fabric, or trapped seam allowances. Check that all eight center angles are 45 degrees and that the stitching meets the marked intersections. Pressing can settle mild bulk, but a pronounced bump generally requires correcting a seam.
Can I make the ornament without a sewing machine?
Yes. Join the diamonds with small backstitches along the marked seam lines, then press as directed. Hand sewing works particularly well for attaching the prepared front to the backing and adding the blanket stitch border. Secure the hanging cord with several strong stitches regardless of your piecing method.
How can I make a smaller or larger star?
Redraw the diamond with longer or shorter sides while keeping the 45-degree and 135-degree angles unchanged. Then add the same chosen seam allowance around the new finished shape. Changing the finished template first is more accurate than enlarging a cutting template that already includes seam allowances.
Is stuffing necessary?
No. Thin batting gives this version a lightly padded, relatively flat finish. Loose stuffing would produce a different shape and would require a construction method that fully encloses it. For a very slim ornament, use a suitable thin felt interlining and test whether the layers remain easy to stitch.
Can I reproduce the six-point stars visible in the background?
Those stars require a different diamond template. A six-point arrangement uses 60-degree center angles, since six multiplied by 60 equals 360 degrees. Do not simply remove two diamonds from this eight-point pattern; the remaining pieces would leave a gap and would not create the same flat construction.
Conclusion
The Star shaped Christmas ornaments Pattern teaches you how to draft a diamond template, arrange festive fabric scraps, piece an eight-point star, and finish it with batting, a cream border, decorative stitching, and a button center. Accurate angles and careful seam placement create the structure, while your fabric choices give each ornament its personality.
Start with one star, refine the details, and use the same template to build a matching holiday collection. Please leave your honest opinion about this tutorial and share any suggestions for making the instructions even clearer. Which fabric combination would you choose for your own handmade Christmas star ornaments?