
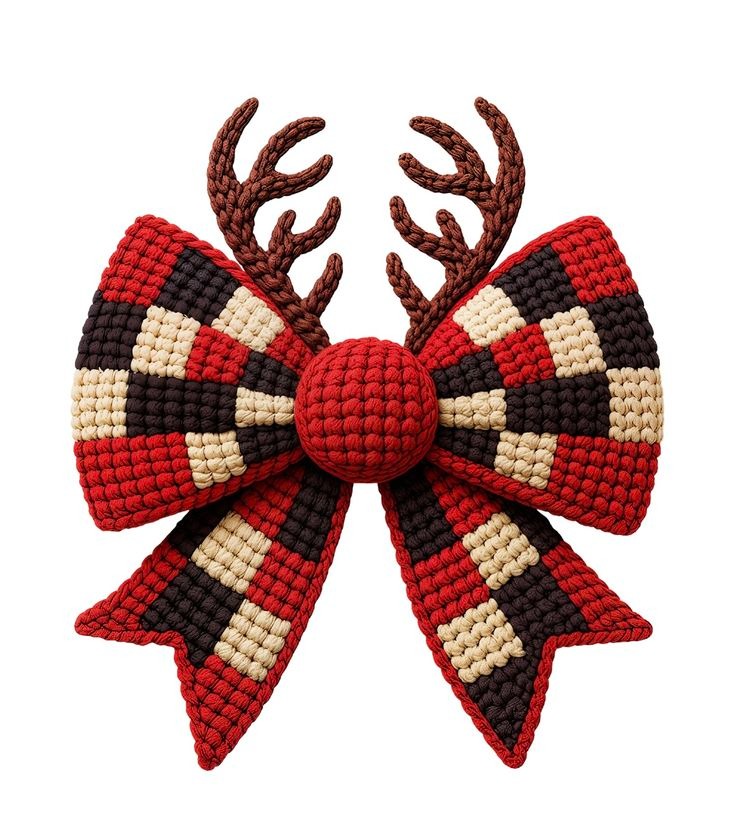
A Crochet bow with a plaid pattern and a reindeer theme Pattern combines festive colorwork with the playful shape of woodland antlers.
The reference features generous bow loops, two pointed tails, a rounded red center, and branching brown antlers.
Red, charcoal, and cream blocks give the fabric a cheerful plaid-inspired crochet pattern.
Dense stitches help the individual pieces hold their shape while keeping the surface soft and textured.
This project makes a decorative accent for an indoor wreath, a seasonal wall display, or a reusable gift wrap.
The instructions below explain how to create an original interpretation using US crochet terms and straightforward assembly methods.
The appeal of this crochet reindeer bow comes from the balance between its separate components.
The checked fabric provides the main color pattern, while the antlers establish the reindeer theme without requiring an entire animal face.
A padded red center brings the pieces together and echoes the familiar appearance of a festive reindeer nose.
You will crochet a rectangular bow panel, make two shaped tails, and assemble two antlers from narrow brown cords.
Each component is worked separately so you can check its dimensions and adjust its placement before sewing.
Although the construction is approachable, the multiple yarn changes make this project most suitable for a confident beginner or intermediate crocheter.
This Crochet bow with a plaid pattern and a reindeer theme Pattern is a photo-inspired design rather than a verified reconstruction of the pictured item.
A photograph cannot reveal the original stitch counts, hidden seams, yarn weight, or internal support.
The written version uses single crochet, block colorwork, simple decreases, and a small stuffed center to suggest the same overall style.
Its color arrangement creates a checked effect; it does not reproduce the interwoven stripes of traditional woven tartan.
All measurements are given in centimeters, and the finished size will depend on your yarn, hook, and tension.
Read through the complete instructions before starting, especially the colorwork directions and the assembly sequence.
1. Gather Materials and Understand the US Crochet Stitch Key
Choose your yarn and tools. Use medium-weight, category 4 yarn in red, charcoal or black, cream, and brown. Start with approximately 100 g red, 60 g charcoal, 40 g cream, and 30 g brown, allowing extra for swatching and differences between yarn brands. Choose smooth yarn with good stitch definition. You will also need a 3.5–4 mm crochet hook, a tapestry needle, scissors, stitch markers, a measuring tape, and a small amount of polyester fiberfill.
DISCOVER MORE FREE PATTERNS HERE!
Check the fabric before committing to a hook. An approximate working gauge is 18 sc and 20 rows = 10 × 10 cm, measured before edging. Crochet a swatch large enough to measure its center accurately. The fabric should feel firm but remain flexible enough to gather. At this gauge, the main panel measures approximately 26.5 × 15 cm before assembly. The finished decoration will be larger once the tails and antlers are attached.
Learn the basic abbreviations. This pattern uses ch = chain, sc = single crochet, sl st = slip stitch, st/sts = stitch/stitches, and RS/WS = right side/wrong side. To make a single crochet, insert the hook into the indicated stitch, yarn over, and pull up a loop; yarn over again and pull through both loops. A slip stitch pulls the new loop directly through the loop already on the hook.
Understand increases and decreases. An inc means working two single crochet stitches into one stitch. A sc2tog joins two stitches: insert the hook into the first stitch and pull up a loop, insert it into the next stitch and pull up another loop, then yarn over and pull through all three loops. An MR, or magic ring, creates an adjustable starting loop. Numbers in parentheses show the stitch count after a row or round.
Follow the turning and color-change rules. For all flat pieces, ch 1 and turn after each row unless instructed otherwise. The turning chain never counts as a stitch. Change colors on the final pull-through of the stitch before the new color begins. Use separate small bobbins for the color blocks, crossing the outgoing and incoming strands on the wrong side at each boundary. Leave enough slack to prevent puckering, but avoid loose loops.
Plan the checked colorwork. Use R for red, D for dark charcoal, and C for cream. Each square contains six stitches across and six rows vertically. Because crochet stitches are not perfectly square, the blocks may appear slightly rectangular. The term plaid pattern describes the visual effect here: repeated contrasting blocks arranged across the bow. The reindeer theme comes from the brown antlers and rounded red center rather than from a stitched animal motif.
2. Crochet the Checked Bow Panel and Shape the Loops
Start the main rectangle. With red, ch 49. Row 1: sc in the second chain from the hook and in each remaining chain, following the first color sequence below for a total of 48 sc. Work into one consistent part of each foundation chain so the starting edge stays even. Place a marker on the right side after completing the first row; this will help you keep all yarn crossings on the back.
Work the first band of blocks. The color order, viewed from the right side from left to right, is R6, D6, C6, D6, R6, D6, C6, D6. Repeat this arrangement for Rows 1–6, keeping each color stacked above itself. When working from the opposite edge after turning, encounter the colors in reverse order. Follow the existing blocks rather than restarting the same written sequence from whichever edge holds your hook.
Complete the alternating bands. For Rows 7–12, use D6, C6, R6, D6, D6, C6, R6, D6, viewed from the right side. The adjacent dark blocks form one twelve-stitch dark area in the middle. Work Rows 13–18 like Rows 1–6, Rows 19–24 like Rows 7–12, and Rows 25–30 like Rows 1–6. Every row contains 48 sc. Fasten off after Row 30, leaving a generous sewing tail.
Finish the panel edges. Weave in the colorwork ends on the wrong side, securing them through several stitches of the matching color. With red and the right side facing, work one round of sc around the rectangle. Work one sc into each stitch along the top and bottom, approximately one sc per row end along the sides, and three sc at each corner. Adjust side-edge spacing if necessary so the border lies flat.
Create the bow silhouette. Lay the rectangle horizontally with the right side facing forward. Gather the middle of its width into three or four small accordion folds, bringing the top and bottom edges toward one another at the center. The left and right halves become the bow wings. Wrap matching yarn firmly around the gathered center several times, then stitch through the folds to secure them. Keep both wings approximately equal in size.
Refine the loops before assembly. Fan out the outer edges and gently shape the upper and lower corners until the panel resembles a wide bow. This method produces folded, solid wings rather than hollow tubular loops. For slightly more dimension, ease the outer edges forward while keeping the center tightly gathered. Check that the red border remains visible and that no colorwork strands show on the front. Set the bow aside while making the tails.
3. Make Two Checked Tails with Forked Ends
Begin the first tail at its attachment edge. With your starting color, ch 19. Row 1: sc in the second chain from the hook and across, changing colors to establish three six-stitch blocks (18 sc). Work Rows 1–6 in R6, D6, C6, viewed from the right side. As with the main panel, reverse the working order when approaching from the opposite edge so the blocks remain vertically aligned.
Extend the checked fabric. Work Rows 7–12 in D6, C6, R6, then Rows 13–18 in C6, R6, D6. Work Rows 19–24 like Rows 1–6. Maintain 18 sc in every row. At the suggested gauge, the rectangular section measures approximately 10 × 12 cm. Keep the top edge straight because it will sit behind the bow center, and leave the bottom edge available for the forked shaping.
Shape the first lower point. After Row 24, work across only the first nine stitches, using the colors established beneath them. Point Row 1: sc 7, sc2tog (8 sts). Ch 1 and turn. Point Row 2: sc2tog, sc 6 (7 sts). Continue decreasing at the same inner edge: Row 3, sc 5, sc2tog (6); Row 4, sc2tog, sc 4 (5); Row 5, sc 3, sc2tog (4); Row 6, sc2tog, sc 2 (3). Fasten off.
Make the matching lower point. With the right side facing, join yarn at the inner edge of the nine unworked stitches from Row 24. Point Row 1: sc2tog, sc 7 (8 sts). Row 2: sc 6, sc2tog (7 sts). Row 3: sc2tog, sc 5 (6); Row 4: sc 4, sc2tog (5); Row 5: sc2tog, sc 3 (4); Row 6: sc 2, sc2tog (3). Ch 1 and turn between rows. These mirrored decreases open a central notch.
Edge and duplicate the tail. With red, sc around the complete tail outline, placing three sc around each outer tip and working a sc2tog across the deepest part of the notch. Distribute the remaining edging stitches evenly so the fabric stays flat. Make a second tail using the same instructions. For a different checked arrangement, exchange red and cream throughout the second tail while retaining the dark blocks in their original positions.
Attach both tails securely. Position the straight top edges behind the gathered bow center, overlapping them slightly. Angle one tail downward to the left and the other downward to the right. Sew each top edge through several rows of the bow’s gathered fabric, keeping the stitches hidden on the back. Lift the bow by its center to check the balance. Adjust the tail angles before adding more securing stitches.
4. Crochet the Reindeer Antlers, Add the Red Center, and Finish
Make the antler cords. With brown yarn, ch to the desired length, then sl st in the second chain from the hook and each chain back to the beginning. Fasten off with a sewing tail. Make two main stems approximately 14–16 cm long, plus three branches per stem measuring approximately 4, 5, and 6 cm. Measure the finished cords rather than relying on a fixed chain count, because slip stitches can noticeably shorten a foundation chain.
Build two mirrored antlers. Arrange each main stem in a gentle outward curve on a flat surface. Place its three branches along the upper portion, with the longest branch lowest and the shortest branch near the top. Overlap each branch base with the stem and sew them together securely. For firmer antlers, make duplicate cords and stitch matching cords back to back. The resulting antlers will be a simplified interpretation of the branching shapes in the photo.
Crochet the rounded red center. Work in continuous rounds and mark the first stitch. Round 1: 6 sc in MR (6). Round 2: inc around (12). Round 3: [sc 1, inc] six times (18). Round 4: [sc 2, inc] six times (24). Round 5: [sc 3, inc] six times (30). Rounds 6–8: sc around (30 each). Round 9: [sc 3, sc2tog] six times (24). Round 10: [sc 2, sc2tog] six times (18). Fasten off, leaving a long sewing tail.
Assemble the center and antlers. Add a modest amount of fiberfill to the red dome, leaving its open back available for sewing. Position the antler bases behind the upper center of the bow and stitch them firmly into the gathered fabric. Place the stuffed red center over the front gathering and sew around its opening, catching the bow fabric beneath it. Add stuffing before the final stitches if needed, then secure and bury the yarn end.
Finish the decoration for its intended display. Sew a sturdy hanging loop to the back if you plan to use the bow as a wall or wreath accent. Attach the loop through the central gathering so the weight is supported by several layers of fabric. For upright display, lightly stiffen only the antlers with a product suitable for your yarn, following its instructions. Without support, the antlers may bend or lean; this is normal for narrow crochet cords.
Check the completed crochet bow. Examine every attachment, trim only securely woven ends, and shape the wings and tails with your hands. Spot-clean when possible and allow the bow to dry flat. This Crochet bow with a plaid pattern and a reindeer theme Pattern creates a decorative item with sewn components and stuffing, so keep it away from unsupervised young children and pets. Record your yarn, hook, and finished measurements if you would like to make a matching set.
Frequently Asked Questions
Is this crochet reindeer bow suitable for beginners?
A confident beginner can approach it one component at a time. The basic stitches are simple, but managing several color bobbins and keeping the blocks aligned takes practice. Make a small eighteen-stitch checked swatch before starting the full bow if colorwork is new to you.
Does the pattern reproduce the photograph exactly?
No. It provides an original construction inspired by the photograph’s visible features. The panel shape, checked arrangement, antler construction, and finished dimensions may differ from the original item. The photo alone does not establish an exact underlying pattern.
What is the difference between checked crochet and traditional plaid?
Checked crochet uses blocks of contrasting colors. Traditional plaid usually includes intersecting stripes of different widths, sometimes with blended-looking crossing areas. This project uses plaid-inspired checks to suggest the reference’s bold red, dark, and cream color arrangement.
Why do my color blocks shift when I turn the work?
The written sequences describe the appearance from the right side. After turning, you approach those blocks from the opposite direction. Work each color above its matching block, reversing the working order when necessary. Counting six stitches per block helps catch mistakes early.
How can I prevent holes between the colors?
Cross the old and new yarn strands on the wrong side whenever you change colors. Make the change during the final pull-through of the preceding stitch, then gently adjust both strands. Pulling too tightly causes puckering; leaving excessive slack creates gaps.
Can I use cotton yarn instead of acrylic?
Yes. Cotton can provide clear stitch definition and a firm fabric, although it may produce a heavier decoration. Acrylic is often lighter and springier. Make a swatch with your chosen yarn and check that the fabric gathers comfortably without becoming bulky.
Why are my antlers floppy?
Narrow crochet cords naturally bend. Use a smaller hook for the antlers, sew duplicate cords together, or apply an appropriate fabric stiffener according to its instructions. For the simplest display, arrange the bow against a wall or wreath that supports the antlers from behind.
How do I make the bow larger or smaller?
Change yarn weight and hook size together for the easiest overall adjustment. To alter the checked panel itself, keep its width divisible by six and its height in six-row bands. Changes to the panel may also require proportionate adjustments to the tails, center, and antlers.
Can I wash the finished bow?
Follow the care instructions for the yarn, stuffing, and any stiffener used. Spot-cleaning usually preserves the shape best. If the materials allow washing, handle the bow gently, avoid wringing it, reshape the pieces, and let everything dry fully before hanging it again.
Conclusion
This Crochet bow with a plaid pattern and a reindeer theme Pattern explains how to combine checked single crochet fabric, a gathered bow panel, forked tails, branching brown antlers, and a padded red center. By following the US crochet stitch key, maintaining consistent color blocks, and securing each component carefully, you can create a festive decoration with a recognizable reindeer theme.
EASILY FIND THE FREE PDF FOR THIS PATTERN HERE!
Take your time with the color changes and final placement, since those details have a strong effect on the finished appearance. Please leave your honest opinion about the project and share your suggestions, favorite color combinations, or ideas for improving the instructions. Your feedback can help make future crochet tutorials clearer and more enjoyable.