
The Santa Claus with Cocoa Fabric Appliqué Pattern brings together a cheerful Santa face, a flowing white beard, and a little mug of cocoa in one festive fabric design.
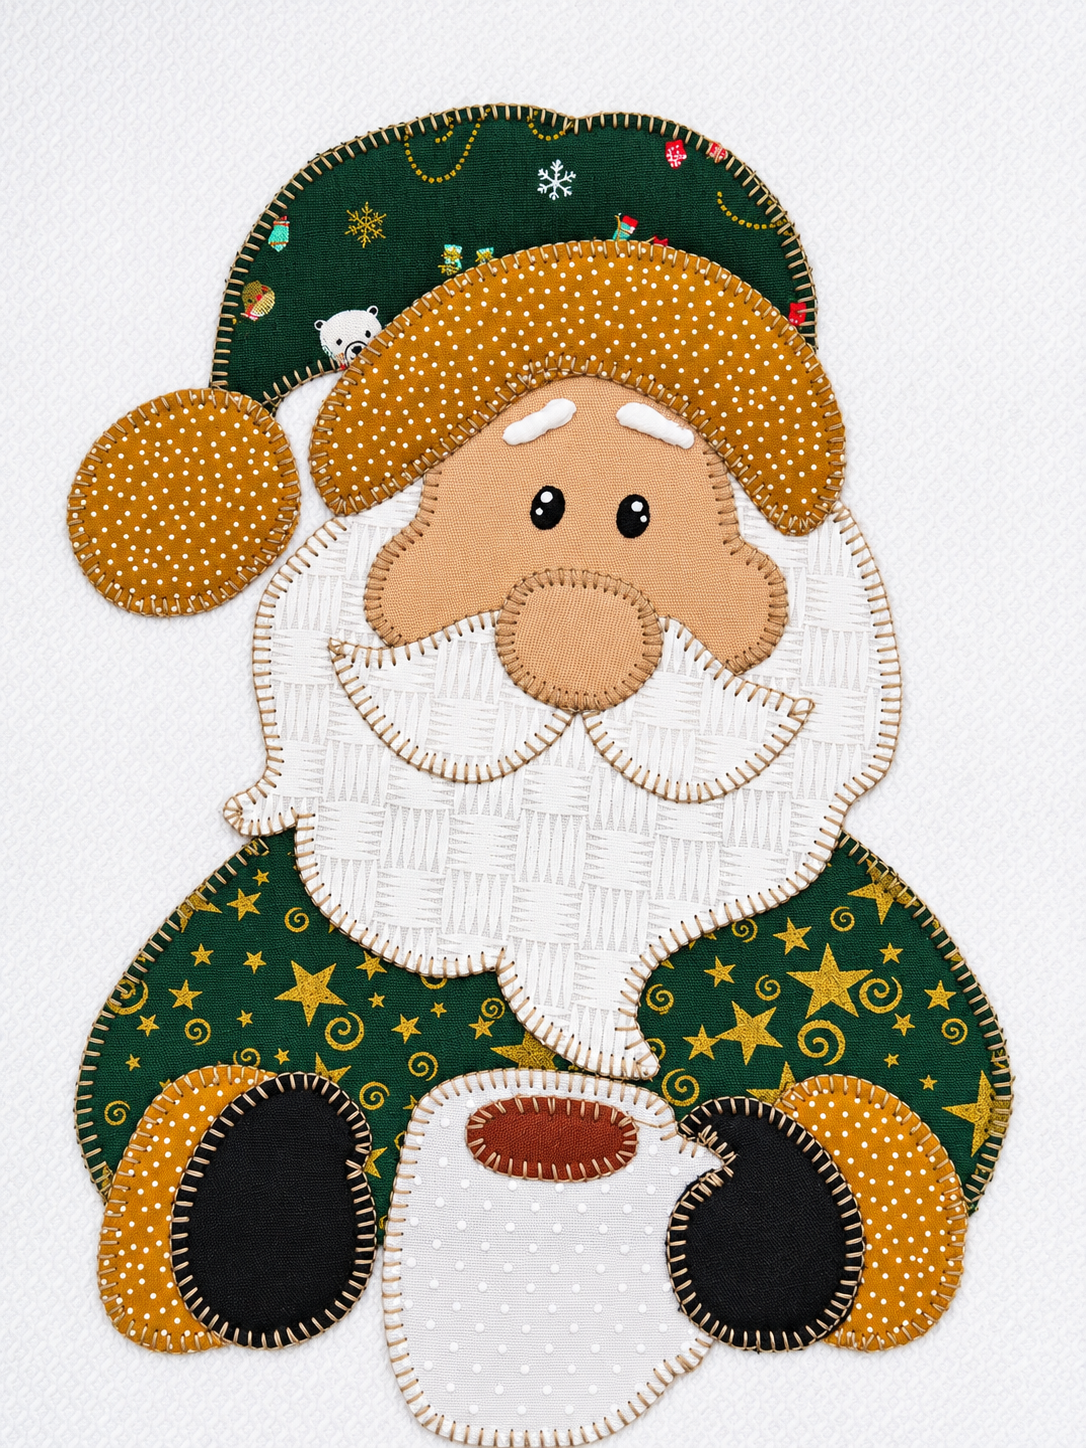
Inspired by the reference photo, this project features a dark green hat, mustard gold trim, black mittens, and a green coat scattered with golden stars.
Visible blanket stitches outline the individual shapes and give the decoration its welcoming, handmade character.
The white background helps the patterned fabrics stand out while keeping the overall composition soft and balanced.
You can use this design on a wall hanging, decorative pillow cover, fabric gift bag, or seasonal quilt block.
This tutorial explains how to plan the shapes, prepare the fabric, arrange the layers, and stitch the appliqué securely.
The phrase fabric appliqué describes a sewing technique in which smaller fabric shapes are attached to a larger background to create a picture or decorative motif.
In this project, the Santa Claus pattern is assembled from separate pieces rather than sewn as a stuffed figure.
The cocoa mug, rounded nose, curved mustache, and oversized hat trim give the design its recognizable personality.
A raw-edge appliqué method works especially well because the cut edges remain visible beneath decorative stitching.
Lightweight fusible web helps hold those shapes in position while you sew, making the arrangement easier to manage.
The instructions below use centimeters throughout and explain practical sewing methods suitable for a home sewing setup.
Before starting, remember that a photograph shows the appearance of a finished project but does not establish its original measurements or hidden construction.
The dimensions in this tutorial are suggested planning measurements for creating a similar decoration, rather than a verified reproduction of the original pattern.
A finished Santa approximately 28 cm wide and 38 cm tall fits comfortably on a background measuring about 36 × 46 cm.
You can adjust that size to suit your chosen surface, provided all the pattern pieces are enlarged or reduced together.
Take time to prepare a paper layout first, especially around the face, beard, and hands holding the mug.
That preparation makes the Santa Claus with Cocoa Fabric Appliqué Pattern easier to assemble and helps preserve the friendly expression shown in the photo.
1. Gather Materials and Plan the Santa Claus Fabric Appliqué
Choose lightweight quilting cotton for most of the design. You will need dark green Christmas fabric for the hat, green fabric with gold stars for the coat, mustard gold dotted fabric for the hat trim and cuffs, peach fabric for the face and nose, and white patterned fabric for the beard and mustache. Add white fabric for the mug, brown fabric for the cocoa, and black fabric for the mittens. Small scraps are sufficient for the eyebrows and eyes.
DISCOVER MORE FREE PATTERNS HERE!
Prepare a background approximately 36 × 46 cm, leaving enough space around the suggested 28 × 38 cm Santa for finishing. Gather lightweight paper-backed fusible web, coordinating sewing thread, tan embroidery floss, fabric scissors, paper scissors, an iron, a pressing cloth, and a hand-sewing needle. A removable fabric marker and embroidery hoop can also help. If you plan to machine stitch, use an appropriate needle for your fabric and test the stitch on scraps first.
Study the reference image before drawing. Santa’s hat curves toward the left and ends in a large round gold pom-pom. The broad gold brim frames the top of his face, while the white beard spreads outward before tapering into a curved lower point. His green shoulders sit behind the beard. At the bottom, gold cuffs and black mittens flank a white mug with a brown oval representing cocoa.
Draw a full-size arrangement on paper within a 28 × 38 cm guide rectangle. Suggested starting sizes are approximately 24 × 12 cm for the hat, 21 × 9 cm for the curved brim, 13 × 11 cm for the face, and 20 × 18 cm for the beard. Allow roughly 28 × 15 cm for the coat silhouette. These dimensions describe bounding rectangles; draw curved shapes inside them and adjust their proportions together.
Add the smaller pieces to your layout. Try a 7 cm diameter pom-pom, a 5 cm diameter nose, two mustache halves around 8 × 5 cm each, and a mug approximately 10 × 11 cm. Each gold cuff can occupy about 8 × 9 cm, with a black mitten around 6 × 8 cm layered over it. Sketch two small oval eyes and short curved eyebrows, checking that the face looks balanced.
Trace each visible shape onto a separate paper template and label it with its fabric color and placement. Add about 0.5 cm of hidden overlap wherever one piece must tuck beneath another. For this raw-edge method, exposed edges are cut to their final outline and do not need a turned seam allowance. Assemble the paper pieces before cutting fabric to confirm that the beard, coat, cuffs, and mug meet without accidental gaps.
2. Trace, Fuse, and Cut the Pattern Pieces
Prewash washable cotton fabrics if the finished item will be laundered, then dry and press them flat. This helps reduce uneven shrinkage after assembly. Keep heavily textured or delicate embellishment materials separate and follow their care instructions. The Santa Claus with Cocoa Fabric Appliqué Pattern looks particularly effective when the white beard and white mug have different subtle prints, allowing both shapes to remain visible against the pale background.
Trace the templates onto the paper side of your fusible web according to the manufacturer’s instructions. Many paper-backed products require reversed templates so that the fabric shapes face the correct direction after application. This matters for the hat, whose pom-pom hangs to the viewer’s left in the reference. Mark the intended front view on your master drawing, then check the tracing method before preparing every piece.
Rough-cut the traced fusible shapes, leaving a little material outside each outline. Place the adhesive side against the wrong side of the selected fabric and press as directed for that product. Allow the pieces to cool before handling them. Cut precisely along the traced lines using sharp scissors, preserving the smooth curves around the cheeks, brim, mittens, and beard. Keep the backing paper attached until you are ready to arrange each piece.
Prepare the white mustache as two separate curved shapes that meet beneath the nose. Each half should sweep outward and slightly upward toward the cheek, with a rounded lower edge. Cut the nose separately so it can cover the inner ends of both mustache pieces. This layering creates the appearance in the reference without requiring stuffing. For a washable flat appliqué, keeping the facial pieces thin also makes pressing and stitching easier.
Make the mug from a rounded white shape with a slightly narrower lower section. Add a small white projection or separate handle shape at its upper right, allowing the right mitten to overlap part of it. Cut a brown oval approximately 5 × 2.5 cm for the cocoa surface. The brown shape is decorative fabric, so the completed appliqué is intended as an image of a mug rather than a functional cup.
Keep the cut pieces grouped by assembly area: hat, face, beard, coat, hands, and mug. Before removing the backing papers, compare the pieces with your master drawing once more. Check that the gold cuffs remain visible outside the black mittens and that the brim is wide enough to cover the upper face edge. Correcting a paper template or trimming a loose piece is much easier than adjusting fabric after final fusing.
3. Arrange the Layers and Sew the Decorative Edges
Place the background right side up on a flat pressing surface and mark its center lightly. Arrange the coat near the lower portion of the design, then position the green hat above it. Add the beard over the upper coat, followed by the peach face over the upper beard. Temporarily position the gold brim across the hat and face. Keep everything unfused while you assess the complete arrangement.
Position the gold pom-pom at the left end of the hat. Place the gold cuffs near the lower coat edges, then add the mug between them and the black mittens over the cuffs. The mittens should overlap the mug sides slightly, suggesting that Santa is holding it. Add the two mustache halves, nose, eyebrows, eyes, and cocoa oval. Check that Santa’s expression remains centered beneath the curved brim.
Photograph the loose layout for reference, then remove the smaller foreground pieces carefully. Fuse and stitch in stages, beginning with the background layers. Secure the coat and green hat first, followed by the beard, face, and gold brim where they overlap those shapes. Position the pom-pom after the hat tail is secured. Keep the unattached paper templates nearby so you can restore the intended placement at each stage.
Use blanket stitch to reproduce the visible edging in the photograph. Bring the needle up a short distance inside the fabric shape, insert it near the edge, and bring it up again while catching the working thread beneath the needle. Pull gently so the connecting thread rests along the cut edge. Practice on a scrap first, aiming for stitches approximately 0.3–0.4 cm apart with a similar depth.
Use one or two strands of tan embroidery floss for a lighter outline, or test a thicker combination if you prefer a more pronounced handmade finish. Work shorter stitches around tight curves, particularly the nose, pom-pom, and mitten tips. Avoid pulling hard enough to gather the background. If machine sewing, a blanket stitch or narrow zigzag can secure the edges; test its width, length, and tension before stitching the project.
Finish the foreground layers in order: cuffs, mug, mittens, cocoa oval, mustache, nose, and facial details. Stitch any edge that will be covered before attaching the piece above it. For example, secure the mustache halves before placing the nose over their inner ends. Examine the design after each stage, smoothing the background gently and checking that every visible raw edge receives an even, secure outline.
4. Add Facial Details and Finish the Christmas Appliqué
The face gives the Santa Claus with Cocoa Fabric Appliqué Pattern its personality. Use small black fabric ovals or satin-stitched embroidery for the eyes. Position them above and slightly to either side of the round nose, following your paper layout. Add a tiny white embroidered highlight to each eye. Embroidered details avoid loose buttons or beads and create a smooth finish that suits a fabric panel.
Shape the eyebrows from small white fabric pieces or build them with white embroidery stitches. In the reference, they are short, softly curved, and angled slightly toward the center. Keep them separate from the gold hat brim so they remain recognizable. If using tiny fabric shapes, secure them with small stitches rather than relying on adhesive alone. Stand back occasionally to assess the expression from a normal viewing distance.
Review the color balance before finishing. The green hat and coat should frame the white beard, while the mustard gold trim connects the pom-pom, brim, and cuffs. The peach nose needs enough contrast to stand out against the mustache. Subtle white-on-white prints help distinguish the beard and mug without introducing another strong color. Preserving these relationships captures the warm appearance of the photograph even when your fabric prints differ.
Inspect the entire appliqué for lifting edges, missed stitches, visible placement marks, and loose thread ends. Secure thread tails on the reverse side and remove markings using the method recommended for your marker. Press gently from the back with a protective cloth, taking care around embroidery and textured details. Follow the fusible product’s instructions rather than applying extra heat in an attempt to correct an unsecured edge.
Finish the background according to its intended use. For a simple wall hanging, layer the decorated panel with thin batting and backing, quilt the background lightly, and bind the outer edge. For a pillow cover, complete the appliqué before assembling the cover so the reverse side remains accessible during stitching. Keep the decoration clear of the final seam allowance. The same approach works for a fabric gift bag or larger quilt block.
Care for the finished item according to its least washable component. When all materials permit laundering, use a gentle wash and reshape the piece while drying. Press from the reverse if needed. The finished Christmas fabric appliqué is a decorative textile; ordinary quilting cotton and fusible web do not make it heat resistant. Display it where the layered shapes and visible stitching can be enjoyed without exposing it to hot cookware.
Frequently Asked Questions
Is the Santa Claus with Cocoa Fabric Appliqué Pattern suitable for beginners?
Yes, provided you work slowly and practice the edging stitch first. The design uses recognizable shapes, but the number of layers requires attention. A paper arrangement, labeled templates, and staged assembly make it easier to manage. Beginners can embroider the smallest facial details instead of cutting tiny fabric pieces.
Does this tutorial include a full-size printable pattern?
This written tutorial provides suggested dimensions and instructions for drafting the shapes. It does not include a verified, full-size printable template. Use the measurements as a starting point, then check the complete paper arrangement before cutting fabric. The reference photograph does not establish the original project’s exact size.
Do I need to add seam allowances to the appliqué pieces?
The exposed edges in this raw-edge appliqué method do not require a turned seam allowance. Cut them to the intended finished outline. Add approximately 0.5 cm only where a piece needs to extend underneath another shape. Leave the background’s finishing allowance appropriate to your chosen pillow, panel, or bag construction.
Can I make the project without fusible web?
Yes. Use careful hand basting or an appropriate temporary fabric adhesive to hold the shapes in position while stitching. Unfused cotton edges may fray more during handling, so keep the pieces flat and avoid excessive repositioning. Secure every shape with stitching, and test your chosen method on scraps before assembling the face.
What is the difference between blanket stitch and running stitch?
Blanket stitch forms a connected line along an edge with short stitches extending inward, making it useful for outlining appliqué. Running stitch travels in and out of the fabric in a dashed line. Running stitch can add decoration, but it does not enclose the cut edge in the same way.
How can I prevent puckering around the shapes?
Press the background before starting, use lightweight materials, and keep hand-stitch tension relaxed. Test machine stitching on a comparable fabric sandwich and use suitable stabilizer if necessary. Avoid stretching the background while arranging the design. A hoop can help with hand embroidery, but it should hold the fabric evenly without distorting it.
Can I change the size or colors?
Yes. Resize every template by the same percentage, then check the smaller details before cutting. Very small versions may work better with embroidered eyes and eyebrows. Red and cream fabrics can create another festive palette, while green and mustard gold stay closer to the reference. Maintain enough contrast between overlapping pieces.
Can this design be used on a frequently washed item?
It can, if you choose washable fabrics, compatible fusible web, and securely stitched details. Frequent laundering may soften or fray raw edges over time. For an item that needs regular washing, test a sample first and consider a narrow zigzag around the shapes for more continuous edge coverage.
Conclusion
The Santa Claus with Cocoa Fabric Appliqué Pattern combines simple fabric shapes with thoughtful layering to create a cheerful Christmas decoration. You have learned how to plan a proportional paper layout, choose contrasting fabrics, prepare fusible-backed pieces, assemble the design from back to front, and outline the edges with blanket stitch. The finishing details—the curved eyebrows, bright eyes, round nose, and cocoa-filled mug—bring the character together.
EASILY FIND THE FREE PDF FOR THIS PATTERN HERE!
Adapt the completed appliqué to a wall hanging, pillow cover, gift bag, or quilt block that suits your holiday decorating. Take your time with the paper layout and stitching, and enjoy choosing fabrics that make the project feel personal. Please leave your honest opinion about the tutorial and share any suggestions, color ideas, or construction tips that could help other makers.