
The Gnome-shaped Christmas ornaments made of felt Pattern brings together soft textures, cheerful details, and the warmth of handmade holiday decorating.
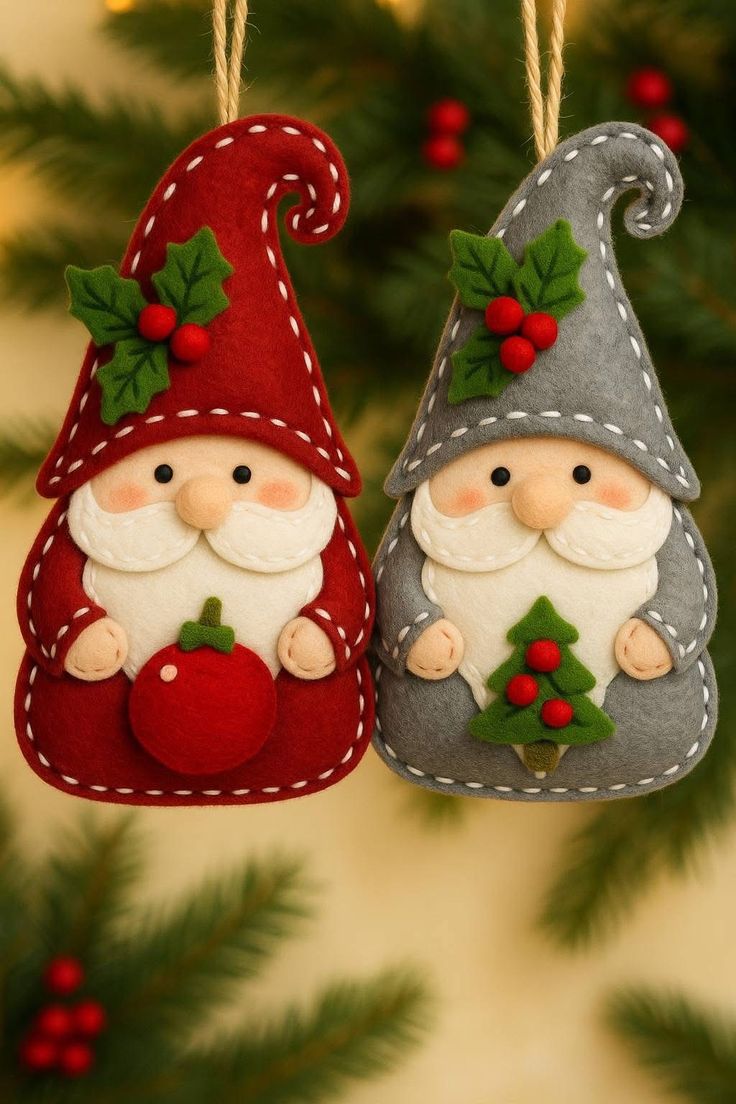
Inspired by the photograph, this tutorial explains how to create two coordinating felt gnomes with curled hats and rounded bodies.
One gnome wears deep red and holds a little Christmas bauble, while the other wears gray and carries a miniature felt tree.
Both designs feature cream beards, rounded noses, tiny hands, and green holly leaves accented with red berries.
Their visible white stitching gives each ornament a cozy finish that looks especially lovely against evergreen branches.
With careful cutting and a few basic embroidery stitches, you can make your own interpretation of these charming decorations.
This felt Christmas ornament pattern uses hand sewing, layered appliqué, and a small amount of stuffing to create gentle dimension.
The suggested measurements below produce an ornament approximately 19–20 cm tall and 10–11 cm wide, excluding its hanging loop.
Because the photograph does not include a measured template, these dimensions are practical starting points rather than an exact reproduction.
You will draw simple paper pattern pieces, check their proportions together, and adjust them before cutting your felt.
The curled hat is the most distinctive feature, while the beard and accessories help give each gnome its own personality.
Beginners can work slowly through the steps, and experienced stitchers can personalize the colors and embroidered details.
Throughout this Gnome-shaped Christmas ornaments made of felt Pattern, the focus is on clear construction and a balanced finished appearance.
You do not need a sewing machine because the main seams can be completed with running stitch or blanket stitch.
Felt edges do not normally require hemming, making the small decorative pieces easier to handle than woven fabric shapes.
Choose red, gray, cream, peach, and green felt to capture the photograph’s festive palette and soft character.
Prepare one ornament first so you can evaluate its proportions before cutting a matching set or experimenting with different accessories.
The following instructions take you from gathering materials to securing the hanging loop and completing the final finishing checks.
1. Gather Materials and Draw Your Felt Gnome Pattern
Choose your felt and thread. For each ornament, prepare a piece of red or gray felt approximately 25 × 30 cm, plus smaller pieces in cream, peach, dark green, and bright green. You will also need red felt for the berries and bauble, brown or olive felt for the tree trunk, polyester fiberfill, embroidery floss, a hand-sewing needle, scissors, paper, and a removable fabric marker. Medium-weight craft felt or a wool-blend felt works well for this hand-sewn Christmas decoration.
DISCOVER MORE FREE PATTERNS HERE!
Draw the rounded body. On paper, sketch a shape approximately 11 cm wide and 12 cm tall, with a gently curved top, rounded sides, and a broad curved base. This forms the lower coat section beneath the hat. Cut two matching pieces from your chosen coat color. These measurements include a narrow stitching margin: sew approximately 0.3 cm inside the edge, without adding a conventional turned seam allowance.
Create the curled hat template. Draw a hat approximately 11.5 cm wide at its curved lower edge and 11 cm tall. Taper the sides upward, then bend the upper section into a broad hook resembling the hats in the photograph. Keep the curled tip at least 1.5–2 cm wide so it can be cut and sewn comfortably. Cut two matching hat pieces, ensuring that their edges align when placed together.
Prepare the face and beard pieces. Draw one peach oval approximately 6 × 4 cm for the face and one cream beard approximately 7 × 7 cm. Give the beard a rounded upper edge and a softly tapered bottom. Cut two curved cream mustache pieces, each approximately 3.5 × 2 cm. For the nose, cut a peach circle approximately 2.5 cm across; for the hands, cut two peach ovals approximately 2 × 2.5 cm.
Plan the decorative appliqués. For the red gnome, draw a round bauble approximately 4.5 cm across, with a small green cap and short stem. For the gray gnome, draw a small Christmas tree approximately 4 cm wide and 5 cm tall, plus a narrow trunk. Each hat needs three holly leaves approximately 2.5–3 cm long. Use small red felt circles for flat berries, or gather slightly larger circles into padded berries for a raised finish.
Check the complete arrangement before sewing. Lay the paper pieces together on your work surface, overlapping the hat above the face and the beard below it. Position the hands beside the chosen accessory, leaving the outer body seam clear. This dry arrangement helps you understand felt appliqué, which means attaching smaller decorative shapes onto a larger fabric foundation. Adjust the templates now, especially if the face looks crowded or the hat overwhelms the body.
2. Build the Face, Beard, Hands, and Front Decorations
Mark and embroider the eyes. Place the peach face on the front body piece, with its upper edge positioned where the hat will overlap it. Mark two eyes approximately 1.8–2 cm apart, checking that the nose will fit between and below them. Use black embroidery floss to make two small satin-stitched ovals. Embroidered eyes provide a similar expression to the photograph without requiring separate beads.
Attach the face and beard in layers. Sew the face to the front body with tiny matching stitches around its edge. Position the beard so its upper portion overlaps the bottom of the face while leaving the eyes visible. Attach the beard using small running stitches near its perimeter. Keep its bottom above the body seam so you can close the ornament later without stitching through unnecessary layers.
Shape the rounded nose. Sew a running stitch approximately 0.3 cm inside the peach nose circle, leaving long thread tails. Pull the thread gently to gather the circle into a shallow cup, add a tiny amount of fiberfill, and tighten the opening. Secure it with several stitches. Sew the nose firmly between the eyes and beard, keeping it centered so it becomes the main focal point of the felt gnome face.
Add the curved mustache and soft cheeks. Place the two cream mustache pieces beneath the nose, with their inner ends tucked slightly behind it. Their outer ends should curve toward the sides of the beard. Stitch around their edges with cream floss, adding a tiny wisp of stuffing if desired before closing. For rosy cheeks, use a small patch of pink embroidery or test a very light application of fabric-safe color on a felt scrap first.
Make and position the little hands. To give each peach oval a rounded appearance, run a gathering stitch around its edge, add a small pinch of stuffing, and draw the thread inward. Flatten the gathered back and secure it. Add a short curved stitch on the front to suggest a thumb. Sew the hands to the body beside the beard, leaving enough space between them for the bauble or Christmas tree.
Attach the chosen front accessory. For the red gnome, sew the green bauble stem and cap first, then position the red circle below them. Stitch most of the circle down, add a little stuffing, and close the opening; a tiny cream stitch can suggest reflected light. For the gray gnome, attach the trunk before the green tree, then add three small red berries. Sew each detail to the front body only.
3. Sew the Body and Decorate the Curled Christmas Hat
Understand the main hand stitches. A running stitch consists of evenly spaced straight stitches made by passing the needle up and down through the felt. A blanket stitch wraps around the cut edge, with the needle passing through a thread loop before tightening. Small whipstitches are useful for securing hidden attachments. Use two or three strands of embroidery floss, adjusting the thickness after testing on scrap felt.
Join the body pieces. Place the decorated front over the matching plain back, with their finished sides facing outward. Align the edges and secure them with clips or pins. Sew around the body approximately 0.3 cm from the edge, leaving a 3 cm opening near the top where the hat will cover it. White running stitches resemble the photograph’s decorative edging; keep them short and consistent so the layers remain securely joined.
Stuff the body lightly. Insert small tufts of fiberfill through the opening, distributing them into the lower corners and along the sides. Aim for a softly padded ornament rather than a tightly packed toy. Too much stuffing can stretch the seams and distort the appliqué. Once the body lies evenly, close the opening with matching stitches and secure the thread ends between the felt layers.
Embroider the holly leaves. Cut the green leaves with gently pointed edges, avoiding very narrow tips that might tear during stitching. Use dark green floss to embroider a central vein and two or three short side veins on each leaf. Arrange three leaves on one side of the front hat piece. Attach them through their centers and bases, allowing a little natural lift at the outer edges.
Add the red berry cluster. For raised berries, cut red circles approximately 1.2–1.5 cm across, gather their edges, and add a tiny amount of stuffing. Secure each gathered circle, then stitch it onto the leaf cluster. Three berries closely grouped together create the appearance shown in the photograph. Keep their attachment stitches hidden beneath them, and check that each berry stays in place when gently handled.
Assemble the curled hat. Place the decorated hat front over its matching back, with both finished sides facing outward. Sew around the perimeter with white floss, leaving a small opening along the lower edge. Add a very thin layer of stuffing to the broad hat section; the narrow curl can remain mostly flat. Close the opening carefully, preserving the open space inside the hook and the smooth outline of the curled tip.
4. Assemble, Finish, and Personalize Your Felt Christmas Gnomes
Position the hat over the face. Place the completed hat across the upper face so its lower edge sits just above the eyes. Overlap the body by approximately 1.5–2 cm, adjusting until the face looks balanced. Pin the pieces together and check that the beard, nose, and hands remain visible. This overlap connects the separate hat and body while creating the layered appearance central to the Gnome-shaped Christmas ornaments made of felt Pattern.
Secure the hat to the body. Use small matching stitches along the front overlap, catching the body beneath the hat without pulling the face out of shape. Turn the ornament over and stitch the back hat layer to the back body as well. These attachment stitches can sit beneath the hat’s decorative white edging. Reinforce the outer ends of the overlap, where the wider brim might otherwise lift away from the body.
Attach a reliable hanging loop. Cut approximately 20 cm of cotton cord or twine and bring its ends together to form a loop. On the back of the ornament, stitch both ends securely onto the broad upper hat section, below the delicate curl. Cover the ends with a small matching felt patch and sew around it. Hang the ornament briefly to check its balance before making the final reinforcement stitches.
Refine the visible details. Trim stray fibers with small scissors and check that the white embroidery follows the ornament’s outline smoothly. Adjust any loose mustache edges, flatten twisted leaves, and inspect the nose and berries. The photograph’s appeal comes partly from its handmade texture, so slight variations are welcome. A consistent stitch size and a balanced arrangement matter more than making every individual stitch identical.
Create the coordinating pair. Repeat the construction with gray felt if your first gnome is red, or reverse that order. Use the same body, face, beard, and hat templates to keep the pair visually connected. Change the front accessory from a bauble to a tree, and vary the angle of the holly leaves slightly. This makes a coordinated set while preserving the character of each DIY felt Christmas ornament.
Care for the finished decorations. Treat these gnomes as decorative ornaments and keep small attached components away from young children and pets. Remove dust gently with a soft brush, and spot-clean cautiously after testing the felt and thread for color transfer. Avoid soaking the stuffed pieces. Store them flat in a dry container, with tissue between ornaments to protect the raised noses, berries, and curled hats.
Frequently Asked Questions
What type of felt is best for this project?
A medium-weight wool-blend felt is a good choice because it usually holds small shapes well and gives the ornament a soft finish. Craft felt can also work, especially for a first attempt. Choose felt that cuts cleanly and does not stretch excessively when you pull a stitch through it.
Can beginners make these felt gnome Christmas ornaments?
Yes. The project uses simple shapes and basic hand stitches, although the small accessories require patience. Start with the body and face before attempting the curled hat. Practice running stitch, blanket stitch, and gathering on scraps so you can control thread tension without distorting your ornament.
Do I need to add seam allowance to the pattern pieces?
The suggested dimensions already allow for stitching approximately 0.3 cm inside the cut edges. Because this project uses exposed felt edges, the seams are not turned inside out. If you enlarge or redraw the pieces, preserve enough space between the stitching line and cut edge to prevent tearing.
How can I make the hat curl neatly?
Draw a broad, rounded hook and avoid a very thin tip. Cut both hat layers accurately, align them before sewing, and use smaller stitches around the tight curve. Minimal stuffing helps the curl remain clear. If the inner opening disappears, widen it on the paper template before cutting another set.
Can I make the ornament without stuffing?
Yes. Leave the body and hat flat, and use flat appliqué circles for the nose and berries. You can also keep the body lightly padded while leaving the accessories flat. The result will have less dimension than the photograph, but it will still retain the recognizable gnome silhouette.
How do I resize the Gnome-shaped Christmas ornaments made of felt Pattern?
Enlarge or reduce all paper templates by the same percentage to maintain their proportions. For example, scaling to 125% makes a 20 cm ornament approximately 25 cm tall. Keep in mind that very small versions are harder to sew, and narrow hat curls may need widening even when other pieces are reduced proportionally.
Why does my ornament look uneven after stuffing?
Uneven shapes usually result from large clumps of filling, excessive stuffing, or inconsistent seam tension. Use tiny tufts and distribute them gradually. Before closing the opening, place the ornament flat and check both sides. Remove excess filling if the body bulges or the decorative stitching begins to pull apart.
Can I replace the hand sewing with glue?
Fabric adhesive can help position some flat appliqués, provided it is suitable for your felt and used according to its instructions. However, sewing gives you better control over the visible edging and hanging-loop attachment. For this design, secure the structural seams, loop, nose, and raised decorations with thread.
Conclusion
The Gnome-shaped Christmas ornaments made of felt Pattern combines simple templates, layered felt appliqué, decorative hand stitching, and light stuffing to create a festive pair inspired by the photograph. By preparing the shapes carefully, building the face in layers, decorating the curled hats, and reinforcing the hanging loops, you can complete both the red bauble gnome and the gray Christmas tree gnome.
EASILY FIND THE FREE PDF FOR THIS PATTERN HERE!
Take your time with the small details and enjoy choosing colors that suit your holiday decorations. Please leave your honest opinion about this tutorial and share any suggestions for improving the instructions or personalizing the finished gnomes. Which version would you make first: the red gnome with the bauble or the gray gnome with the little tree?