
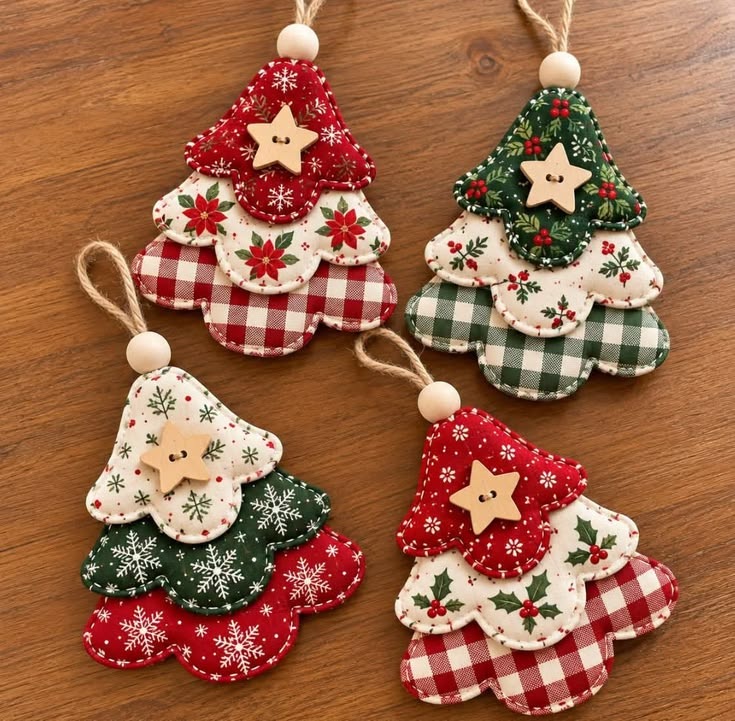
The Tree shaped Christmas ornament made with layers of fabric Pattern brings together festive cotton prints, softly padded shapes, and a simple wooden star.
Inspired by the ornaments in the photograph, this project features three overlapping fabric sections that form a charming Christmas tree.
Each section has rounded branches and a curved lower edge, giving the decoration a soft, welcoming appearance.
Red, green, and cream fabrics create the traditional holiday palette, while gingham adds a cozy farmhouse touch.
A natural twine loop and a pale wooden bead complete the top without overpowering the fabric details.
This tutorial explains how to create a similar ornament, from drawing the templates to securing the final hanging loop.
Making a layered fabric Christmas tree ornament is an enjoyable way to turn small pieces of fabric into something useful and decorative.
You can sew one ornament for your own tree or prepare a coordinated collection for thoughtful handmade gifts.
The individual sections are small enough to handle comfortably, and the construction uses familiar sewing techniques.
These include sewing with right sides together, clipping curves, turning fabric, and closing openings with a ladder stitch.
All project measurements below are in centimeters, and the sewing instructions use terminology common in the United States.
Because the photograph does not include a scale or original templates, the suggested dimensions provide an adaptable interpretation of the design.
The appeal of this fabric Christmas ornament pattern comes from the balance between shape, texture, and carefully chosen prints.
You do not need elaborate embroidery or complicated patchwork to create an attractive finished decoration.
Instead, the three padded sections provide dimension, and their overlapping edges establish the recognizable tree silhouette.
Small snowflakes, holly sprigs, poinsettias, and checks work especially well because their designs remain visible on compact pieces.
In the instructions that follow, you will learn how to prepare materials, draft matching templates, sew smooth curves, and assemble the ornament.
You will also find practical answers about stuffing, hand sewing, hanging loops, and storing your finished Christmas decorations.
1. Choose Fabrics and Prepare Your Sewing Supplies
Start with three coordinating quilting cotton fabrics for each ornament. Choose one print for the smallest upper section, another for the middle section, and a third for the largest lower section. The photograph shows several successful combinations, including red snowflakes over cream florals and red gingham, or dark green holiday prints over cream holly and green checks.
DISCOVER MORE FREE PATTERNS HERE!
For one ornament, set aside two fabric squares approximately 18 × 18 cm for each section, giving you six squares altogether. These are generous working pieces for the suggested templates rather than final cutting dimensions. You will also need polyester fiberfill, all-purpose sewing thread, a hand-sewing needle, scissors, pins or clips, a marking pencil, and paper for drafting.
Prepare approximately 25–30 cm of natural twine, one unfinished wooden bead around 1.5–2 cm wide, and a wooden star button approximately 2–3 cm across. Check that the bead hole can accommodate two strands of your chosen twine before beginning. A blunt threading needle or bead threader can help pull the folded cord through the opening.
Use a sewing machine with a needle suitable for lightweight woven cotton, such as a size 80/12 universal needle. A straight stitch around 2–2.5 mm long is a useful starting point. Keep a turning tool nearby, preferably one with a rounded tip, so you can shape the fabric curves without puncturing the seams.
Press the cotton before tracing or cutting. If you prewash your fabric, wash all three fabrics using compatible care settings and dry them before pressing. Flattening wrinkles helps the paired pieces match accurately, especially around the rounded branch ends. If the print has an obvious direction, identify which edge should face upward on the finished tree.
The phrase Tree shaped Christmas ornament made with layers of fabric Pattern describes three parts of this project: its tree silhouette, its overlapping fabric construction, and the templates used to cut the pieces. Here, each visible layer is a separate lightly stuffed unit. The sections are joined after sewing, allowing their curved edges to remain distinct.
2. Draw the Three Templates and Cut the Fabric
Draw the largest section first, using a finished outline approximately 14 cm wide and 10 cm high. Create a centered upper point, gently sloping shoulders, and a rounded branch extending to each side. Shape the lower edge into three connected lobes, with the center lobe reaching slightly farther down than the side lobes. Keep every transition smooth.
For symmetry, fold your paper vertically and draw half the shape against the fold. Cut along the outline, then unfold the paper to reveal a balanced template. Avoid narrow indentations between the lobes because tight inward curves are harder to turn neatly. The result should resemble a soft, rounded tree section rather than a sharp triangular Christmas tree.
Make the middle section approximately 11.5 cm wide and 9 cm high, and the upper section approximately 9 cm wide and 8 cm high, measured along their finished outlines. Repeat the same general shape while adjusting the proportions to look balanced. These measurements are suggested drafting dimensions; they are not measurements taken from the photographed ornaments.
Arrange the paper templates with the smallest section on top and the largest at the bottom. Overlap neighboring sections by approximately 3–4 cm, then adjust until the side branches and rounded lower edges remain visible. The stacked fabric body should be roughly 17–19 cm tall, depending on your overlap. Mark the vertical center of each template to guide assembly.
Once the shapes look right, add a 0.7 cm seam allowance around every finished outline. Keep the original line as the stitching guide and use the outer line for cutting. Label each paper template with its section name, center mark, and “Cut 2.” The seam allowance sits outside the stated finished dimensions.
Place two matching fabric pieces right sides together for each section and trace the corresponding template. Cut both layers along the outer cutting line, producing six fabric pieces in total. Mark a turning opening approximately 3 cm long on a relatively gentle side curve of each pair. Avoid positioning the opening at a tip or deep indentation.
3. Sew, Turn, and Lightly Stuff Each Section
Pin each fabric pair together, matching the edges without stretching them. Sew along the marked stitching line, leaving the designated turning opening unsewn. Backstitch at the beginning and end to secure the seam. When approaching a curve, slow down and guide the fabric gradually so the stitch line follows the rounded shape evenly.
At a change in direction, stop with the needle down, raise the presser foot, and reposition the fabric slightly before continuing. Avoid creating sharp corners where the design calls for gentle curves. Repeat the process for the upper, middle, and lower sections, keeping the fabric pairs separate until all three have been sewn.
Trim bulky seam allowances around the outward curves, leaving enough fabric to protect the stitching. Cut small notches from the allowance along convex curves and make careful clips into the inward curves between lobes. Stop short of the stitch line. These adjustments help the seam allowance spread or compress when the piece is turned right side out.
Turn each section through its opening. Use your fingers and a blunt turning tool to ease out the rounded branches and lower lobes. Do not force a tool against the fabric. Smooth the seams, then press the empty pieces gently using a heat setting appropriate for cotton. Fold the opening allowances inward along the original stitching line.
Add small pinches of polyester fiberfill, distributing them first into the branch ends and lower lobes. Continue until the section feels softly padded while remaining fairly flat. The ornaments in the photograph have gentle dimension rather than a tightly stuffed pillow shape. Too much filling can make the sections difficult to overlap and may distort their curved edges.
Close each opening with a ladadder stitch, also commonly called an invisible closing stitch. Take small alternating stitches through the folded edges, drawing the thread gently until the opening closes. Secure the thread and bury the tail inside the section. If desired, add a subtle running stitch near the perimeter for a decorative finish similar to the visible edging in the photograph.
4. Assemble the Tree and Add the Finishing Details
Place the largest section on your work surface with its right side facing up. Center the middle section over it, covering the upper portion while leaving the lower branches visible. Position the smallest section on top in the same way. Align their center marks, then step back briefly to check that the overall tree appears balanced.
Pin or clip the arrangement carefully. Join the middle section to the lower section with several small hand stitches through their overlapping area. Then attach the upper section to the middle section. Work mainly through the back fabric and seam areas where possible, keeping the stitches discreet. Secure more than one point so the layers cannot swing apart easily.
For a neat hanging assembly, fold the twine in half and pass both loose ends down through the wooden bead, leaving the fold above it as the hanging loop. Adjust the loop to approximately 7–9 cm long. Tie the two loose ends together below the bead, creating a firm knot that prevents the bead from slipping downward.
Position the knot behind the pointed top of the smallest fabric section, with the bead resting just above the fabric. Stitch around the twine below the knot several times using strong thread, catching the back fabric securely. Make additional anchoring stitches nearby to distribute the load. Conceal the knot behind the upper section and trim excess twine only after checking the attachment.
Center the wooden star button on the front of the upper section, as shown in the photograph. Sew through its holes several times, keeping the tension firm without compressing the stuffing excessively. Secure the thread on the back. Because the bead and button are small detachable components, display the ornament as a decoration out of reach of young children and pets.
Lift the ornament by its loop and check that it hangs straight. Adjust any loose assembly stitches, redistribute stuffing gently if needed, and remove stray threads. Repeat the Tree shaped Christmas ornament made with layers of fabric Pattern with different fabric placements to create a coordinated collection. Reusing the same templates helps the ornaments retain consistent proportions while each combination looks individual.
Frequently Asked Questions
Can I make this layered fabric Christmas tree ornament entirely by hand?
Yes. Replace the machine stitching with small, even backstitches along the marked seam line. Backstitch provides a secure seam for the stuffed sections. Leave the same turning openings, clip the curves carefully, and close the openings with ladder stitch. Hand sewing takes longer, but the construction sequence remains the same.
What fabric works best for this project?
Lightweight or medium-weight quilting cotton is a practical choice because it presses well and holds curved seams clearly. Choose small-scale prints so the designs remain recognizable on the upper section. Thick upholstery fabric can create bulky seams, while very stretchy fabrics may distort during sewing and stuffing.
Are the template measurements exact copies of the ornaments in the photo?
No. The photograph provides a visual reference but does not reveal exact dimensions, seam allowances, or hidden construction details. The measurements in this tutorial are suggested dimensions for creating a similar ornament. Make a sample from spare fabric first if you want to refine the proportions before cutting special holiday prints.
How much stuffing should I put inside each section?
Use enough fiberfill to soften the shape and gently lift the fabric surface. The section should still bend slightly and lie comfortably over the one beneath it. If the seams look stretched, the branches curl, or the stacked pieces become difficult to secure, remove some filling before closing the opening.
Why do the curved edges look puckered after turning?
Puckering can result from uneven stitching, insufficient clipping, excessive seam bulk, or too much stuffing. Before filling the sections, inspect the curves and carefully adjust the seam allowances where necessary. Smooth the edges and press them gently. Never clip through the stitching, because doing so can create a weak spot or hole.
Can I use batting instead of loose fiberfill?
Yes, thin batting can create a flatter ornament. Cut one batting piece for each section slightly inside the finished seam outline, then insert and smooth it after turning. It may take extra care to position batting inside the rounded lobes. Loose fiberfill is easier to distribute when you want softly padded branch ends.
How can I keep the layers from shifting?
Attach the sections at several concealed points across each overlap instead of relying on one central stitch. Check both sides of the ornament while sewing so you do not accidentally pull the front fabric into a visible dent. Secure thread ends carefully, then hang the ornament briefly to test the arrangement.
Can I change the colors or make a larger version?
Absolutely. Try cream and gold, soft pink and green, or blue and silver prints while retaining enough contrast between neighboring sections. To enlarge the ornament, scale all three finished outlines by the same percentage, then add the seam allowance afterward. Larger sections may require additional attachment stitches and a stronger hanging cord.
How should I clean and store the finished ornament?
Spot-clean the fabric gently with a slightly damp cloth and let it dry thoroughly. Avoid soaking wooden embellishments or pressing them with an iron. Store the ornament flat in a dry container, with light tissue between decorations if needed. Keep heavy items off the padded sections so their rounded shapes are preserved.
Conclusion
The Tree shaped Christmas ornament made with layers of fabric Pattern combines three softly padded fabric sections, a twine hanger, a wooden bead, and a star button into a festive handmade decoration. You have learned how to select coordinating prints, draft curved templates, add seam allowances, sew and turn each section, distribute stuffing, and assemble the layers securely. With a little attention to symmetry and fabric placement, you can create a whole collection inspired by the photograph.
EASILY FIND THE FREE PDF FOR THIS PATTERN HERE!
Choose your favorite Christmas fabrics and enjoy giving each ornament its own personality. Please leave your honest opinion about this tutorial and share your suggestions for different colors, finishing details, or future sewing projects. Your feedback can help make upcoming tutorials clearer and more useful for other makers.