
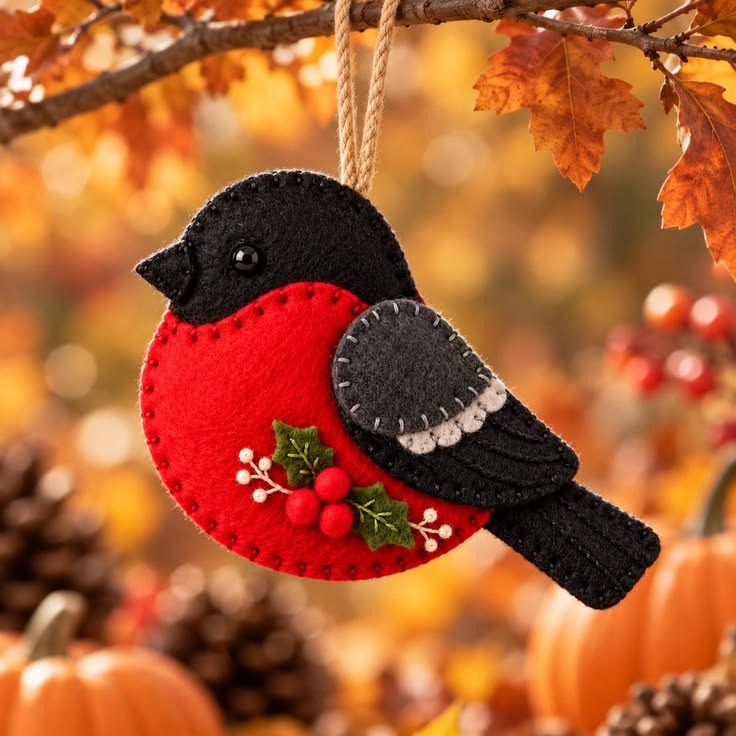
The Felt bird ornament Pattern is a charming handmade sewing project that combines soft felt, delicate embroidery, and beautiful seasonal colors to create a decorative bird full of personality. Inspired by the traditional appearance of a winter bullfinch, this ornament features a bright red breast, a black head and tail, layered gray wings, and small embroidered details that make the finished piece especially attractive. Whether you enjoy creating handmade Christmas decorations or simply love working with felt, this project offers a wonderful opportunity to practice basic hand-sewing techniques while producing something unique. The combination of vibrant red, deep black, and subtle gray creates an elegant contrast that works beautifully with rustic, woodland, and holiday-inspired decorations. Best of all, this DIY felt bird ornament can be made using affordable materials and simple tools that many sewing enthusiasts already have at home.
One of the most appealing qualities of this Felt bird ornament Pattern is its versatility. The finished bird can hang from a Christmas tree, decorate a seasonal wreath, become part of a handmade garland, or add a cozy touch to a window or wall display. Its design is particularly attractive because of the layered construction, which gives the ornament a dimensional appearance without requiring complicated sewing techniques. The small green holly leaves, red berries, and embroidered white floral accents on the bird’s breast create a festive arrangement that complements the overall design. Although the ornament looks detailed, each element can be completed separately before the final assembly, making the process manageable even for beginners. With a little patience and careful stitching, you can create a beautiful handmade felt bird decoration that looks professionally finished while retaining the warmth and charm of traditional handcrafting.
Creating your own Felt bird ornament Pattern is also an enjoyable way to explore the creative possibilities of felt fabric. Unlike many woven fabrics, felt does not fray easily along its cut edges, making it particularly suitable for small decorative projects with curved shapes and intricate details. This characteristic allows you to use decorative blanket stitches around the bird’s body, attach embroidered wings, and create tiny leaves without worrying about unfinished fabric edges. You can also personalize the ornament by changing its colors, adjusting its size, or adding different embellishments to suit your decorating style. In this complete tutorial, you will learn how to prepare the materials, create the pattern pieces, assemble the bird’s body, embroider its decorative elements, and finish the hanging ornament. Every step is explained using sewing techniques familiar to crafters in the United States, with measurements provided in centimeters for accurate cutting and assembly.
Materials and Supplies for the Felt Bird Ornament Pattern
The first step in making this Felt bird ornament Pattern is selecting suitable felt fabric. For the ornament shown in the reference image, choose bright red felt for the rounded breast, black felt for the head, back, beak, and tail, and charcoal-gray felt for the upper wing. You will also need small pieces of green felt for the holly leaves and cream-colored felt for the decorative feather edging beneath the wing. Wool-blend felt is an excellent choice because it offers a soft texture, holds its shape well, and is easy to sew by hand. Good-quality polyester craft felt can also work, particularly for beginners looking for an economical option. Felt approximately 1–2 mm thick is suitable for most of the pieces, while very thick felt may make the small details more difficult to assemble.
DISCOVER MORE FREE PATTERNS HERE!
In addition to the felt, gather embroidery floss in black, red, gray, cream, white, and green. Matching thread will help secure the main fabric pieces discreetly, while contrasting embroidery floss creates the decorative stitching visible around the bird’s body and wings. A small black bead or a black safety eye can be used for the eye, although an embroidered eye is a practical alternative. You will also need polyester fiberfill for lightly stuffing the ornament, natural jute twine or cotton cord for the hanging loop, and a hand-sewing needle suitable for embroidery. Sharp embroidery scissors are particularly useful for cutting the curved outlines and small leaf shapes. Keep a few sewing pins or clips nearby to hold the layers together while stitching.
For a finished ornament approximately 14 cm wide and 11 cm tall, including the tail but excluding the hanging loop, prepare a paper template that establishes the overall silhouette. Draw a rounded bird body with a gently curved breast, a compact head, a pointed beak, and an elongated tail extending toward the lower right side. The main rounded body can measure approximately 9 cm across and 8.5 cm tall, while the visible tail extends another 4–5 cm. These dimensions are suggested proportions inspired by the photograph rather than measurements taken from an original manufacturer pattern. You can adjust them to create a smaller ornament for a Christmas tree or a larger decoration for a wreath. Consistent proportions are more important than following an exact size.
Prepare the individual pattern pieces before cutting the felt. You will need two complete black bird silhouettes, one red breast overlay, one black head overlay if you want additional dimension, one small black beak detail if it is not incorporated into the silhouette, two charcoal-gray wing pieces, and two smaller black lower-wing pieces. Cut two or three tiny cream feather details, depending on how you want to create the scalloped wing border. For the holly decoration, prepare two small green leaves approximately 1.5–2 cm long and several tiny red circles for the berries. If you prefer dimensional berries, small red felt balls can replace the circles. Each component should be proportionate to the bird’s body so that the final arrangement remains balanced.
When transferring your felt bird sewing pattern onto the fabric, use a washable fabric marker, tailor’s chalk, or a fine pencil on the reverse side of the felt. Trace each piece carefully and cut directly along the marked outline. Since this project uses exposed decorative edges rather than traditional turned seams, you do not need to add a conventional seam allowance to the outer pattern pieces. However, where the red breast overlaps the black body, allow approximately 0.3–0.5 cm of overlap to provide enough space for secure stitching. Keep the curves smooth and avoid cutting jagged edges, especially around the head and tail. Accurate cutting makes the subsequent hand-sewing process easier and produces a cleaner, more professional-looking ornament.
Before beginning the assembly, arrange all the felt pieces on a flat surface to preview the finished design. Position the red breast over the black body so that the upper edge forms a gentle curve beneath the bird’s head. Place the charcoal-gray wing over the black lower-wing piece and check that the feather-like details remain visible. Arrange the holly leaves and berries near the lower center of the red breast, leaving enough space around them for the decorative white embroidery. This preparation stage is an important part of the Felt bird ornament Pattern because it allows you to adjust the placement of each detail before permanently attaching anything. Take a photograph of your arrangement if you would like a visual reference while sewing.
How to Cut, Layer, and Sew the Felt Bird Body
Begin assembling the Felt bird ornament Pattern by preparing the front silhouette. Place one black bird-shaped felt piece on your work surface, with the head pointing toward the left and the tail extending toward the right. Position the red breast overlay on top, aligning its lower curve with the rounded body and placing its upper edge beneath the black head area. The photograph shows a broad red breast occupying much of the lower body, so keep this section generous rather than making it too narrow. Secure the red felt temporarily with small pins or a few removable basting stitches. Check that the beak, head, back, and tail remain clearly visible in black. The overlapping colors should create the distinctive appearance of a red-breasted woodland bird.
Use red embroidery floss to attach the red breast to the black silhouette with a small blanket stitch or whipstitch. For a traditional handmade appearance, a blanket stitch is particularly effective because it adds visible texture along the fabric edge. Bring the needle up through the felt near the edge, pass it through the fabric again, and catch the working thread beneath the needle to form a small loop. Continue around the curved breast, keeping the stitches approximately 0.3–0.4 cm apart. Use a consistent thread tension so that the felt lies flat without puckering. Around the upper breast curve, small black or red stitches can emphasize the boundary between the black head and red body. The result should resemble the neat decorative stitching visible in the reference photograph.
Next, refine the bird’s head and beak. If you prepared a separate black head overlay, position it over the upper portion of the silhouette so that its curved lower edge slightly overlaps the red breast. Stitch around the head using black embroidery floss, following the rounded outline with evenly spaced blanket stitches. The beak should be short and pointed, projecting toward the left. If it was included in the main silhouette, reinforce its edges with a few small stitches; otherwise, attach the separate beak piece securely. Avoid making the beak excessively large, since the reference design has a compact, natural-looking shape. This combination of a rounded head and small pointed beak helps give the handmade felt bird ornament its recognizable woodland character.
Add the eye after the head is securely attached. The eye should sit slightly forward of the center of the head, above the red breast and behind the beak. For a bead eye, pass strong black thread through the bead several times and secure it firmly on the reverse side. A tiny white embroidered highlight can create the appearance of reflected light. If the ornament may be handled by young children, avoid beads or other detachable embellishments and embroider the eye instead. A simple satin stitch or several closely spaced straight stitches can create a small rounded eye. Whichever method you choose, keep the eye proportionate to the head. This tiny detail is essential because it gives the bird a gentle expression and makes the finished Felt bird ornament Pattern appear more lifelike.
Now prepare the black lower-wing section, which extends diagonally across the side of the bird toward the tail. Cut a tapered shape with a broad upper portion and a narrower lower end. Attach it to the red and black body using black embroidery floss, leaving enough space above it for the charcoal-gray upper wing. To imitate feather texture, embroider several gently curved lines following the direction of the wing. Use a backstitch or stem stitch to create these lines, beginning near the upper wing area and extending toward the pointed end. The stitches should be subtle but visible against the black felt. This decorative embroidery adds depth and helps distinguish the wing from the tail, even though both sections use the same dark fabric.
Before closing the ornament, prepare the second black silhouette as the backing. Place the decorated front over the backing piece and check that all outer edges align correctly. Cut approximately 18–22 cm of natural twine and fold it in half to create a hanging loop. Insert the two loose ends between the felt layers near the top of the bird’s back, then secure them with several strong stitches. Begin joining the front and back using black or matching embroidery floss and a blanket stitch around the outer edge. Leave an opening approximately 3 cm long along the lower body. Insert small amounts of polyester fiberfill, distributing it gently through the rounded body while keeping the head and tail relatively flat. Once the bird has a softly padded appearance, close the opening with matching stitches and reinforce the hanging loop.
Creating the Wings, Holly Leaves, and Embroidered Details
The layered wing is one of the most distinctive features of this Felt bird ornament Pattern. To reproduce the appearance shown in the photograph, use a charcoal-gray upper-wing piece with a rounded top and gently tapered lower edge. Position it over the black lower wing so that the dark feather section remains visible beneath it. The gray wing should cover the upper central portion of the bird’s side without hiding the entire red breast. Before attaching it, embroider small cream or light-gray blanket stitches around its edge. This contrast makes the wing stand out against the black felt and creates the handcrafted texture that gives the ornament its character. Keep the stitches evenly spaced, especially around the curved upper edge.
Create the scalloped feather trim beneath the gray wing using small cream-colored felt pieces. Cut a narrow strip with several rounded scallops along one edge, or make individual oval-shaped pieces approximately 0.6–0.8 cm long. Position the cream felt beneath the lower edge of the gray wing so that the rounded tips remain visible. Secure the trim to the underside of the gray wing with tiny stitches or a small amount of fabric adhesive suitable for felt. Hand-sewing is preferable when you want the ornament to remain flexible and durable. Once the cream feather trim is attached, sew the gray wing onto the bird using small stitches around its perimeter. This layered arrangement creates a beautiful transition between the gray upper wing and the black embroidered flight feathers.
The holly decoration provides the festive finishing touch that makes this Christmas felt bird ornament especially suitable for seasonal displays. Cut two small green felt leaves with pointed tips and gently notched edges. Position them diagonally on the red breast, near the lower center of the body, with their stems facing one another. Use green embroidery floss to attach each leaf along its central vein, allowing the outer edges to remain slightly raised for a natural dimensional effect. Add a few short diagonal stitches branching outward from the center to imitate leaf veins. For extra texture, use two shades of green thread. The resulting leaves should resemble the small holly foliage visible in the reference photograph without overwhelming the bird’s bright red breast.
Next, create the red berry cluster. The photograph features several rounded red berries arranged between the green leaves. For a similar appearance, make three small felt balls approximately 0.7–0.9 cm in diameter, or use layered circles of red felt with a small amount of stuffing. Position the berries close together, overlapping the leaf stems slightly. Attach each berry securely with matching red thread, passing the needle through the center or underside of the felt ball and into the bird’s breast. If using flat circles, sew around their edges with small stitches and add a tiny amount of fiberfill beneath them to create dimension. The berry cluster should remain compact and symmetrical enough to look intentional while preserving the organic appearance of natural holly.
To create the delicate white floral accents, use white or cream embroidery floss and a fine embroidery needle. The reference design includes small branching stems with rounded white tips extending outward from the holly arrangement. Begin by stitching several thin stems using a backstitch or stem stitch, radiating from beneath the red berries toward the surrounding breast area. Add tiny French knots at the ends of the stems to represent miniature blossoms or decorative seed clusters. A French knot is made by bringing the needle through the felt, wrapping the thread around the needle once or twice, and inserting the needle back into the fabric close to the original entry point. Keep the knots small and consistent so that they complement the holly rather than competing with it.
After attaching the decorative elements, inspect the entire bird and make any necessary adjustments. The gray wing should sit neatly above the black feather section, the red breast should remain smooth, and the holly arrangement should appear centered within the available space. If the wing edges lift excessively, secure them with a few additional stitches. If the bird looks unevenly stuffed, gently redistribute the fiberfill by pressing the ornament between your fingers. Trim any loose threads carefully without cutting the decorative embroidery. Check that the hanging loop is firmly attached and that the ornament hangs in a balanced position. These finishing details are essential for achieving a polished Felt bird ornament Pattern that looks attractive from different angles and remains durable during seasonal use.
Finishing, Displaying, and Personalizing Your Felt Bird Ornament
Once the main sewing and embroidery are complete, take a few minutes to refine the outer edges of the Felt bird ornament Pattern. Examine the blanket stitching around the head, breast, body, and tail to ensure that the spacing is consistent. If any stitches appear loose, reinforce them with matching embroidery floss. Gently smooth the felt with your fingers and reshape the rounded body if necessary. Avoid applying excessive heat directly to synthetic felt, since high temperatures can damage or melt the fibers. If the felt has become slightly flattened during sewing, use a soft brush to restore its texture. The finished bird should have a rounded red breast, a clearly defined black head, layered wings, and a gently tapered tail.
The hanging loop is both a functional and decorative element of this handmade Christmas ornament. Natural jute twine creates a rustic appearance that complements the woodland theme, while cotton cord offers a softer alternative. A loop approximately 8–10 cm long is suitable for most Christmas tree branches, although you can adjust it according to your display needs. To help the ornament hang upright, position the attachment point slightly behind the top of the head, near the upper back. Test the balance by holding the loop before permanently finishing the final stitches. If the bird tilts too far forward or backward, adjust the loop position or redistribute the stuffing. A balanced hanging position makes the ornament look more natural and ensures that the decorative side remains visible.
There are many creative ways to personalize this Felt bird ornament Pattern while preserving its recognizable design. For a traditional Christmas style, keep the red, black, and gray palette and emphasize the holly decoration with bright red berries. For a winter woodland theme, replace the red breast with soft cream or pale blue felt and use silver or white embroidery floss for the decorative details. You could also create a collection of birds in different colors, including warm brown, golden yellow, forest green, or muted pink. Another option is to embroider a small initial or year on the back of the ornament, turning it into a personalized keepsake. These variations allow you to adapt the same basic pattern to different decorating styles and occasions.
The finished bird can be displayed in several ways beyond a traditional Christmas tree. Attach it to a wreath made from evergreen branches, pinecones, and natural ribbons for a rustic holiday decoration. Hang several birds at different heights from a decorative branch to create a woodland-inspired wall arrangement. You can also incorporate the ornament into a handmade garland with felt leaves, stars, and berries. For a seasonal centerpiece, position the bird near artificial greenery and decorative pinecones, making sure it remains away from open flames or heat sources. Because the ornament is lightweight, it is especially convenient for hanging displays where heavier decorations might be difficult to support. Its soft texture also complements fabric-based holiday decorations.
Proper care will help preserve your DIY felt bird ornament for many seasons. When the holidays are over, gently remove any surface dust using a soft brush or lint roller. Avoid soaking the ornament in water, especially if it contains fiberfill, glued details, or natural twine. If necessary, carefully spot-clean a small area with a lightly dampened cloth and allow it to air-dry completely. Store the bird in a clean, dry container, preferably wrapped in acid-free tissue paper to protect the embroidery and dimensional berries. Avoid placing heavy objects on top of it, since pressure can flatten the stuffing and distort the wings. With careful storage, your handmade decoration can become a treasured part of your seasonal collection.
Completing the Felt bird ornament Pattern is a rewarding experience because it combines simple sewing techniques with creative decorative details. Throughout the project, you practice accurate pattern cutting, layering felt, blanket stitching, basic embroidery, light stuffing, and attaching a hanging loop. These skills can also be applied to other handmade felt projects, including woodland animals, Christmas ornaments, decorative appliqués, and personalized gifts. If you are a beginner, consider making a practice bird using inexpensive felt before cutting your favorite materials. More experienced crafters may enjoy experimenting with additional feather embroidery or more intricate floral decorations. Regardless of your skill level, the finished ornament demonstrates how thoughtful color choices and small handmade details can transform simple felt pieces into a beautiful decorative creation.
Frequently Asked Questions About the Felt Bird Ornament Pattern
1. Is the Felt bird ornament Pattern suitable for beginners?
Yes. This Felt bird ornament Pattern is suitable for beginners who have basic familiarity with hand-sewing. The project uses straightforward techniques such as cutting felt, blanket stitching, attaching appliqué pieces, and adding simple embroidery. Beginners may find the small holly leaves and decorative feather details slightly challenging, but these elements can be simplified without changing the overall appearance of the bird. Working slowly and preparing all the pieces before assembly will make the process easier.
2. What type of felt is best for making a bird ornament?
Wool-blend felt is often preferred for decorative ornaments because it has a soft texture, holds its shape well, and provides a refined appearance. Polyester craft felt is another suitable option, especially for beginners or larger projects. Choose felt approximately 1–2 mm thick so that the pieces are easy to cut and stitch. Very thin felt may stretch or lose its shape, while excessively thick felt can make detailed embroidery difficult.
3. How large should the finished felt bird ornament be?
The suggested felt bird pattern produces an ornament approximately 14 cm wide and 11 cm tall, excluding the hanging loop. However, you can enlarge or reduce the paper templates to suit your preferences. Smaller ornaments work well on Christmas trees, while larger versions are ideal for wreaths, wall decorations, or seasonal displays. When resizing the pattern, adjust the wings, holly leaves, and berries proportionally.
4. Do I need a sewing machine to complete this project?
No. The entire Felt bird ornament Pattern can be completed by hand. In fact, hand-sewing is particularly suitable for this design because it allows greater control over the curved edges, small embellishments, and decorative stitches. A sewing machine is optional and generally unnecessary for an ornament of this size.
5. What stitches are used in this felt bird sewing tutorial?
The primary stitch is the blanket stitch, which is used to finish the exposed felt edges. Other useful techniques include the backstitch for feather lines, the stem stitch for decorative branches, the straight stitch for leaf veins, and the French knot for tiny white floral accents. These stitches are commonly used in American embroidery and felt appliqué projects.
6. Can I make the ornament without stuffing?
Yes. If you prefer a flatter decoration, you can omit the polyester fiberfill and sew the front and back felt silhouettes directly together. A flat ornament is particularly useful for garlands, gift tags, or decorative wall panels. However, a small amount of stuffing gives the bird the soft, rounded appearance visible in the reference image.
7. How can I make the holly berries look three-dimensional?
You can use miniature felt balls or create small padded circles from red felt. For the padded version, cut two tiny circles, sew them together around the edges, and insert a small amount of fiberfill before closing the opening. Attach the finished berries securely to the bird’s breast. Using slightly different berry sizes can make the arrangement appear more natural.
8. Can I use fabric glue instead of sewing?
Fabric glue can help position small decorations, but sewing is generally recommended for the main construction. Hand stitches provide a flexible, durable finish and contribute to the traditional handmade appearance of the Felt bird ornament Pattern. If you use glue for tiny embellishments, choose a product specifically suitable for felt and allow it to dry completely according to the manufacturer’s instructions.
9. How long does it take to make one felt bird ornament?
Most crafters can complete a bird ornament in approximately two to four hours, depending on their experience and the amount of decorative embroidery included. Beginners may need additional time to prepare the pattern pieces and practice the blanket stitch. Making several ornaments together can become more efficient because the cutting and preparation steps can be completed in batches.
10. Can these felt bird ornaments be given as handmade gifts?
Absolutely. A handmade felt bird ornament makes a thoughtful gift for friends, family members, teachers, and anyone who appreciates traditional crafts. You can personalize the ornament with different colors, embroidered initials, or a meaningful date. For an attractive presentation, place the finished bird in a small gift box with tissue paper and a handwritten note describing the handmade details.
11. Is this ornament safe for children to make?
Older children may enjoy making a simplified version with appropriate adult supervision. However, sharp needles, scissors, beads, and small decorative components require care. For projects intended for young children, use embroidered eyes instead of detachable beads and avoid small loose embellishments. The completed ornament is intended as a decoration rather than a toy.
12. How can I make several matching ornaments for Christmas decorations?
Prepare a reusable paper or cardstock template and cut multiple sets of felt pieces before beginning the sewing process. Organize the materials by color and assemble the ornaments in stages. For example, attach all the red breast pieces first, then complete the wings, followed by the embroidery and final assembly. This method helps maintain consistent proportions and decorative placement throughout the collection.
13. Can I sell ornaments made from this tutorial?
You can create your own handmade bird ornaments using the techniques described in this tutorial. If you plan to sell finished items, make sure your templates, branding, and decorative designs are original or appropriately licensed. Handmade ornaments can be customized with different colors and embellishments to create distinctive products for seasonal craft collections.
14. How do I keep the felt edges neat and professional-looking?
Use sharp scissors, cut slowly around curved areas, and maintain consistent spacing between your blanket stitches. Avoid pulling the embroidery floss too tightly, as this can distort the felt. Matching the thread color to the fabric creates a subtle finish, while contrasting thread emphasizes the decorative stitching. Taking time to refine the edges is one of the easiest ways to improve the final appearance of your Felt bird ornament Pattern.
Conclusion: Create a Beautiful Handmade Felt Bird Ornament
The Felt bird ornament Pattern is a delightful project that demonstrates how simple materials and traditional sewing techniques can be transformed into an elegant seasonal decoration. By following this tutorial, you have learned how to choose appropriate felt fabrics, prepare proportionate pattern pieces, construct a layered bird silhouette, attach the red breast and black head, and create decorative wings with embroidered feather details. You have also discovered how to make green holly leaves, dimensional red berries, delicate white floral embroidery, and a secure hanging loop. Each of these techniques contributes to the finished ornament’s beautiful texture and handcrafted character.
Beyond the practical sewing instructions, this project encourages creativity and personal expression. You can preserve the classic red, black, and gray design shown in the reference image or experiment with different colors and decorative arrangements to create a collection of unique birds. Whether displayed on a Christmas tree, incorporated into a woodland wreath, or given as a thoughtful handmade gift, this DIY felt bird ornament brings warmth and charm to seasonal decorating. The skills developed through this project can also inspire future felt appliqué and embroidery creations.
EASILY FIND THE FREE PDF FOR THIS PATTERN HERE!
Now that you know how to complete the Felt bird ornament Pattern, I would love to hear about your experience. Please leave your honest opinion in the comments and share your suggestions for improving or personalizing this project. Which colors would you choose for your bird, and what other felt ornament designs would you like to learn? Your ideas and feedback can help inspire new creative tutorials and encourage other sewing enthusiasts to explore the wonderful world of handmade felt decorations.