
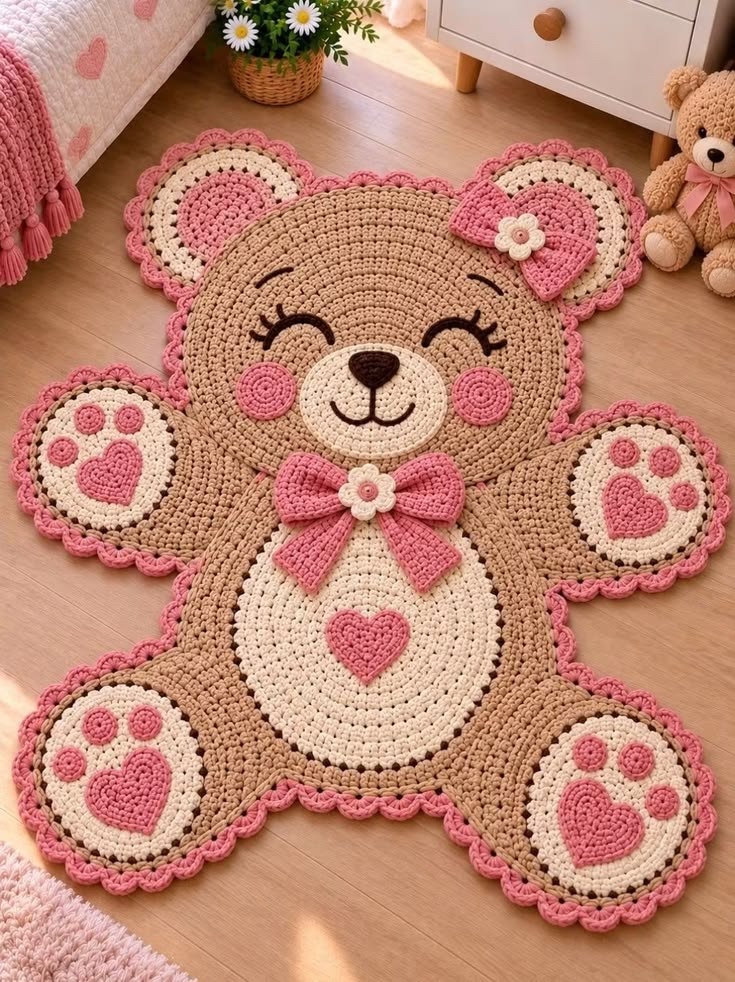
The Crochet rug in the shape of a little bear Pattern is a charming handmade project that combines creativity, comfort, and playful decoration. Featuring an adorable teddy bear with rounded ears, a smiling face, delicate pink cheeks, and heart-shaped paw details, this crochet rug can transform an ordinary room into a warm and welcoming space. The combination of soft beige, cream, and dusty pink yarn creates a gentle appearance that works beautifully in nurseries, children’s bedrooms, and cozy reading corners. Unlike traditional rectangular rugs, this teddy bear crochet rug uses several connected shapes to create a recognizable animal silhouette. The project also offers an opportunity to practice circular crochet, shaping techniques, decorative appliqués, and finishing methods. With patience and careful attention to stitch placement, crocheters can create a personalized decorative rug inspired by the beautiful teddy bear design.
One of the most appealing features of this Crochet rug in the shape of a little bear Pattern is its combination of practical construction and decorative details. The main body consists of a large rounded bear shape, while smaller circular and oval sections create the ears, arms, feet, and belly. A cream-colored muzzle, embroidered eyelashes, and a dark brown nose give the bear its friendly expression. Pink crochet hearts decorate the belly and paws, while a beautiful bow adds a finishing touch beneath the face. The outer scalloped border creates a soft, decorative outline that emphasizes the handmade character of the rug. Although the finished design looks elaborate, the construction becomes much easier when each section is completed separately. By understanding how to increase stitches evenly and assemble crocheted pieces securely, beginners with some basic crochet experience can gradually build this delightful project.
Creating a handmade crochet bear rug also provides an excellent opportunity to explore different yarn textures, color combinations, and finishing techniques. Cotton cord is particularly suitable for decorative rugs because it produces clearly defined stitches and offers a firm structure. Soft cotton-blend yarn can also work well, provided that the finished fabric is sufficiently dense and durable. This tutorial uses US crochet terminology, including single crochet, half double crochet, double crochet, slip stitch, and chain stitches. The instructions describe a practical, original construction inspired by the reference image rather than an exact stitch-for-stitch reproduction, since precise stitch counts cannot be determined from a photograph alone. The pattern can be adjusted to create a larger or smaller rug depending on the yarn thickness, crochet hook, and desired dimensions. Throughout the tutorial, you will learn how to construct the bear’s body, crochet its decorative features, assemble the individual pieces, and maintain the finished rug.
Materials, Crochet Abbreviations, and Preparation for the Teddy Bear Rug
Before beginning the Crochet rug in the shape of a little bear Pattern, gather all the necessary supplies and organize your working area. For a medium-sized decorative rug, choose approximately 1,500–2,200 meters of cotton cord or sturdy cotton-blend yarn, depending on thickness and finished dimensions. Use beige yarn for the bear’s main body, cream yarn for the belly and muzzle, dusty pink yarn for the decorative details, and dark brown yarn for the nose and facial embroidery. A crochet hook between 5.0 mm and 7.0 mm is a reasonable starting point for suitable medium-weight rug cord, but always match the hook to the yarn and test the fabric. You will also need stitch markers, scissors, a measuring tape, a large yarn needle, and a washable non-slip rug backing or other appropriate anti-slip solution.
DISCOVER MORE FREE PATTERNS HERE!
The finished size of your crochet teddy bear floor mat depends on your yarn, hook, and tension. As an example, this tutorial targets a rug approximately 90–110 cm tall and 75–95 cm wide, including the ears, paws, and decorative edging. These dimensions are estimates rather than guaranteed measurements. The central body should remain relatively flat, while the ears and paws extend outward to form the teddy bear silhouette. To obtain consistent results, crochet a small circular swatch before beginning the full project. Measure its diameter and check whether the stitches lie smoothly without curling or excessive rippling. If the fabric becomes too stiff, try a slightly larger hook. If the stitches are loose and leave large gaps, use a smaller hook.
Understanding the US crochet stitch abbreviations is essential for following the instructions correctly. The abbreviation ch means chain, sl st means slip stitch, sc means single crochet, hdc means half double crochet, and dc means double crochet. The abbreviation inc means increase, usually by working two stitches into the same stitch, while dec means decrease by combining two stitches into one. The abbreviation st refers to a stitch, sts means stitches, rnd means round, and BLO means back loop only. A magic ring (MR) creates an adjustable center for circular crochet. When the instructions mention repeating a sequence, work that sequence evenly around the indicated round.
The single crochet stitch (sc) is particularly useful for this project because it creates a compact, durable fabric. To make a single crochet, insert the hook into the next stitch, yarn over, and pull up a loop. Yarn over again and pull through both loops on the hook. For a half double crochet (hdc), yarn over before inserting the hook, pull up a loop, then yarn over and pull through all three loops. A double crochet (dc) begins with a yarn over, followed by inserting the hook, pulling up a loop, and completing two successive pull-through movements. These stitches can be combined to produce the rounded surfaces and decorative scallops that characterize the teddy bear design.
For the circular pieces, this tutorial uses a simple increasing method. Begin with a magic ring containing six single crochet stitches. In the following round, work two single crochet stitches into every stitch to obtain twelve stitches. Continue increasing by six stitches per round while distributing the increases evenly. This creates a circular base that can be expanded to the desired size. However, different yarns and stitch heights may require adjustments. If the circle begins forming a bowl, additional increases may be necessary. If it becomes wavy, reduce the number of increases. Maintaining a flat surface is especially important for a crochet rug pattern, because raised or uneven sections may become uncomfortable or create a tripping hazard.
Before crocheting the complete rug, decide how the individual sections will overlap. The bear’s head and torso can be constructed as a large joined foundation, with the ears positioned behind the upper head and the arms and feet attached along the sides. The cream belly appliqué sits on the lower center of the body, while the muzzle, cheeks, eyes, and nose are placed on the head. Pink hearts decorate the belly and four paws, and two bows provide additional visual interest. Arrange the colors and components on a flat surface before sewing anything permanently. This preparation helps maintain symmetry and prevents the finished little bear crochet rug from appearing uneven.
Step-by-Step Instructions for Crocheting the Bear’s Body, Head, Ears, and Paws
Begin the Crochet rug in the shape of a little bear Pattern by making the central body using beige yarn. For a clearly defined silhouette, construct the head and torso as two overlapping circular or slightly oval panels. Start the head with a magic ring and work six single crochet stitches into the center. Continue increasing evenly using the following sequence: Round 1: 6 sc; Round 2: 2 sc in each stitch (12); Round 3: (1 sc, inc) repeated six times (18); Round 4: (2 sc, inc) repeated six times (24); Round 5: (3 sc, inc) repeated six times (30); and Round 6: (4 sc, inc) repeated six times (36). Continue the same six-increase progression until the head measures approximately 45–50 cm across, adjusting increases as needed to keep it flat.
Next, create the torso using the same circular technique, but shape it into a slightly elongated oval if desired. To make an oval foundation, begin with a chain of approximately 16 stitches, then work single crochet stitches along one side of the chain and continue around the opposite side. Place additional stitches at both ends to form rounded curves. On subsequent rounds, distribute increases around the curved ends while maintaining straighter sides. Continue until the torso measures approximately 40–45 cm wide and 45–50 cm tall. Lay the head over the upper portion of the torso, overlapping the pieces by approximately 10–15 cm. Secure them temporarily with stitch markers, then sew them together using matching yarn and a strong, flat joining seam.
The teddy bear’s ears are one of the most recognizable features of this cute crochet bear rug pattern. Make two matching ears using cream and pink yarn, with beige incorporated around the outer edge. Begin each ear with a magic ring and six single crochet stitches in cream. Increase evenly until the circle measures approximately 17–20 cm across. Change to pink yarn and crochet several additional rounds to create a contrasting inner ear. Work a final beige section around the outside, shaping the ear into a rounded semicircle if necessary. Add a decorative pink scalloped edge around the exposed curve. Position the ears behind the upper sides of the head, making sure they extend outward evenly. Sew them securely to the underside of the head panel.
To make the arms, crochet two elongated beige oval panels approximately 18–22 cm wide and 30–35 cm long. Begin with a foundation chain, work around both sides, and increase at the curved ends until each piece reaches the desired dimensions. The arms should extend diagonally outward from the upper sides of the torso, just below the head. For the paws, crochet two smaller circular panels using cream yarn, approximately 16–19 cm across. Add a pink heart-shaped appliqué and three small pink toe pads to each paw. Attach the completed paw circles to the ends of the arms. Keep all seams flat and secure, particularly where the paws overlap the arm panels, so the finished rug remains comfortable underfoot.
The feet follow a similar method but should be larger than the hands to create the seated teddy bear appearance. Crochet two beige oval panels approximately 25–30 cm wide and 28–33 cm long. Use evenly spaced increases around the curved edges to maintain a smooth shape. Add cream-colored circular paw pads to the center of each foot, followed by pink hearts and three smaller circular toe details. Position the feet at the lower corners of the torso, allowing them to angle slightly outward. This arrangement creates the familiar teddy bear silhouette shown in the reference image. Sew the feet securely beneath the lower body and check that both sides are balanced before continuing.
After joining the main body sections, add the decorative pink border. A simple crochet scalloped edging can be made by working one round of single crochet around the exposed outer perimeter, followed by a round of shell stitches. For a basic shell, work five double crochet stitches into one stitch, skip two stitches, work one single crochet into the next stitch, and skip two more stitches before repeating. Adjust the spacing at curves and joins so the border lies flat. On tighter curves, use smaller shells or fewer skipped stitches. Around broad curves, the full five-double-crochet shell creates a decorative ruffled effect. Work carefully around the ears, arms, and feet, ensuring the edging follows the entire silhouette without creating bulky ridges.
Creating the Bear’s Face, Heart Appliqués, Belly, and Decorative Bows
The facial features give the Crochet rug in the shape of a little bear Pattern its adorable personality. Begin by crocheting a cream-colored oval muzzle approximately 18–22 cm wide and 13–16 cm tall. Use a short foundation chain and work around both sides, adding increases at the rounded ends until the piece reaches the desired dimensions. Place the muzzle in the lower central area of the head, leaving enough room above it for the eyes and eyebrows. Sew it securely using cream yarn and small, evenly spaced stitches. For the nose, crochet a small dark brown triangle or rounded triangular shape. Position it near the top of the muzzle and embroider a short vertical line downward, followed by two curved lines to form the smiling mouth.
The bear’s eyes can be created entirely with dark brown yarn, avoiding hard plastic pieces that might be uncomfortable on a rug. Use a yarn needle to embroider two gently curved closed eyes approximately 8–10 cm apart, depending on the head’s final dimensions. Add three short eyelashes at the outer edge of each eye to reproduce the sleepy, friendly expression. Embroider small curved eyebrows above the eyes if desired. For the rosy cheeks, crochet two pink circles approximately 7–9 cm in diameter. Start with six single crochet stitches in a magic ring and increase evenly until each circle reaches the correct size. Position one cheek on each side of the muzzle and sew both pieces flat against the head.
The cream-colored belly is another important feature of this teddy bear crochet rug tutorial. Crochet a large oval approximately 28–34 cm wide and 33–40 cm tall using cream yarn. Begin with a foundation chain of approximately 18 stitches and work around both sides. Continue adding increases around the curved ends until the oval reaches the desired size. A contrasting round of dark brown slip stitches or small decorative stitches can be added near the outer edge to imitate the outlined effect visible in the reference design. Center the belly on the lower torso, ensuring it sits between the arms and above the feet. Sew it securely using cream yarn, keeping the fabric smooth and free from wrinkles.
To create the crochet heart appliqués, begin with a magic ring and work the following sequence into the ring: ch 3, 3 tr, 3 dc, ch 1, 1 tr, ch 1, 3 dc, 3 tr, ch 3, and sl st into the ring. Pull the ring closed to form a small heart. Here, tr means treble crochet in US terminology: yarn over twice, insert the hook, pull up a loop, and complete three successive yarn-over pull-through-two movements. This simple heart can be enlarged by crocheting additional rounds around its perimeter, placing increases near the upper curves and lower point. Make one medium heart for the belly and four smaller hearts for the paw pads. Use matching pink yarn to sew each heart securely into place.
The decorative bow beneath the bear’s face adds an elegant finishing touch. To make the main bow, crochet a rectangular panel approximately 24 cm wide and 10 cm tall using pink yarn. Begin with a foundation chain and work rows of single crochet or half double crochet until the rectangle reaches the desired height. Fasten off and weave in the ends. Pinch the rectangle at its center to create two rounded bow loops, then wrap matching yarn around the middle several times to hold the shape. Crochet two tapered ribbon tails approximately 6–8 cm wide and 12–15 cm long. Attach them behind the bow and position the finished decoration just below the muzzle, where the head overlaps the torso.
For additional decoration, crochet small cream flowers with pink centers. Begin each flower with a magic ring and six single crochet stitches. Close the ring, then create five or six petals by working small groups of chain stitches and double crochet stitches into the appropriate base stitches. For a five-petal version, start with five single crochet stitches instead, then work (sl st, ch 2, 2 dc, ch 2, sl st) into each base stitch. Fasten off and weave in the ends. Attach one flower to the center of the large neck bow and another to a smaller pink bow positioned on one ear. These floral details give the handmade teddy bear rug a delicate appearance and coordinate beautifully with the heart appliqués.
Assembling, Finishing, Cleaning, and Customizing Your Crochet Bear Rug
Once all the individual sections are complete, arrange the entire Crochet rug in the shape of a little bear Pattern on a clean, flat surface. Begin with the head and torso, then position the ears, arms, and feet. Make sure the bear looks symmetrical when viewed from above. Use stitch markers or removable clips to hold the pieces in place. Check that the decorative details are centered and that the arms and feet extend outward at similar angles. Before sewing, gently flatten each piece with your hands to remove any twisting. If necessary, lightly block the individual sections according to the yarn manufacturer’s instructions. This preparation helps the completed rug maintain its intended shape.
For secure assembly, use a large yarn needle and matching yarn to join the overlapping pieces. A whip stitch works well for attaching flat crochet panels, while a mattress stitch can create a less visible seam in certain areas. Insert the needle through corresponding stitches on both pieces and pull the yarn snugly without puckering the fabric. Work slowly around curves and corners, especially where the arms connect to the torso. Reinforce areas that may experience frequent movement, such as the feet and ears. Avoid leaving loose loops or long yarn strands on the underside. The finished crochet bear floor rug should feel like one connected piece rather than several loosely attached decorations.
After assembling the body, inspect the outer scalloped border and adjust any uneven areas. If the edging curls upward, it may contain too few stitches or be worked too tightly. If it forms excessive waves, the border may contain too many stitches. Carefully undo and rework the affected sections when necessary. Use a yarn needle to weave in every loose end through several stitches on the underside, changing direction to improve security. Trim excess yarn only after the ends are properly secured. Because this rug includes raised decorative elements, inspect the hearts, flowers, bows, and facial details to ensure they are firmly attached. For a floor rug, keep these embellishments as flat as practical to reduce the risk of catching a foot.
Adding a non-slip rug backing is highly recommended, especially if the rug will be placed on tile, laminate, or hardwood flooring. Choose a backing material designed for the specific floor surface and compatible with the yarn. Cut the backing to follow the teddy bear silhouette, leaving a small margin inside the crochet edge. Attach it according to the backing manufacturer’s instructions, or use a separate properly sized non-slip rug pad. Avoid improvised adhesives that may damage the floor or stiffen the crocheted fabric. Check that the rug lies flat and does not slide when gently tested. In children’s rooms, keep the rug away from cribs and other areas where loose bedding or floor accessories may create hazards.
Cleaning and maintenance will help preserve the appearance of your crochet rug in the shape of a little bear. Cotton rugs may be washable, but always follow the care instructions for the particular yarn and backing. For routine maintenance, gently shake out loose dust and remove surface debris using a suitable vacuum setting without a rotating brush that could catch the stitches. Spot-clean small stains with a mild detergent and cool water. If the entire rug requires washing, test a small section first and support the fabric to prevent stretching. Dry the rug completely on a flat surface, reshaping the ears, arms, and feet while damp. Avoid hanging a heavy wet crochet rug because the weight of the water can distort the stitches.
One of the greatest advantages of this Crochet rug in the shape of a little bear Pattern is its versatility. For a classic teddy bear appearance, use warm beige, cream, and soft pink yarn. For a neutral nursery, consider ivory, oatmeal, and light brown. A pastel version could feature lavender, pale blue, or mint green accents. You can also personalize the rug by changing the heart colors, adjusting the bow size, or embroidering a small initial on the belly. To create a larger rug, increase the dimensions of the main panels proportionally and enlarge the decorative appliqués. For a smaller decorative mat, reduce the number of rounds while maintaining balanced proportions. Whatever color combination you choose, the most important goal is to preserve the friendly bear silhouette and create a well-finished handmade piece.
Frequently Asked Questions About the Crochet Rug in the Shape of a Little Bear Pattern
Is the Crochet rug in the shape of a little bear Pattern suitable for beginners?
This project is most suitable for confident beginners or intermediate crocheters who already understand basic stitches, circular increases, and simple sewing techniques. The individual components are relatively straightforward, but assembling the complete bear requires patience and attention to proportion. Beginners can practice by making the smaller circles, hearts, and ears before attempting the larger body panels. Working slowly and checking measurements regularly will make the project easier to complete successfully.
What type of yarn is best for a teddy bear crochet rug?
Cotton cord and sturdy cotton-blend yarn are excellent choices for a crochet teddy bear rug because they provide structure and clearly defined stitches. A medium-weight rug cord is generally easier to control than very thick rope. The yarn should produce a dense but flexible fabric that feels comfortable underfoot. Avoid extremely delicate yarns or loosely twisted fibers that may wear quickly when used as floor coverings.
How much yarn is needed to crochet a teddy bear rug?
The required quantity depends on the yarn thickness, stitch tension, and finished dimensions. A medium-sized bear rug may require approximately 1,500–2,200 meters of suitable yarn, although this is only a planning estimate. The large beige sections usually consume the greatest amount, followed by the cream belly and paw pads. Pink and brown yarn are used primarily for decorative details. Purchasing a little extra yarn from the same dye lot can help prevent color inconsistencies.
How long does it take to complete the crochet bear rug?
The time required varies according to experience and working speed. An intermediate crocheter might complete the project in approximately 15–30 hours, while a beginner may need considerably longer. The body panels generally require the most crocheting time, while the smaller appliqués and decorative details are quicker to make. Assembly and finishing should not be rushed because these steps strongly influence the appearance and durability of the finished rug.
Can I make the crochet bear rug larger or smaller?
Yes. The little bear crochet rug pattern can be resized by changing the yarn thickness, hook size, and number of rounds. For a larger rug, continue increasing the main circles and ovals while maintaining flat surfaces. Enlarge the ears, paws, belly, and facial details proportionally. For a smaller version, stop increasing earlier and use a finer yarn. Always measure the components before sewing them together to maintain a balanced teddy bear shape.
How do I prevent my crochet rug from curling?
Curling usually occurs when the stitch count, yarn tension, or hook size does not suit the shape being created. If a circular panel curls upward, it may need more increases or a slightly larger hook. If it becomes excessively wavy, it may contain too many increases. Work a test circle and adjust your stitch distribution before making the larger panels. Gentle blocking can improve minor irregularities, but it cannot reliably correct major stitch-count problems.
Can I wash a handmade crochet teddy bear rug in a washing machine?
Machine washing depends on the yarn, construction, and backing material. Some cotton yarns tolerate gentle machine washing, while others require hand washing. Decorative appliqués and attached bows may also be affected by agitation. Always check the yarn label and backing instructions before washing. If machine washing is permitted, use a gentle cycle and a suitable laundry bag when practical. Dry the rug flat and reshape it carefully.
Is this crochet rug safe for a baby’s nursery?
A crochet bear rug can be used as a decorative floor accessory in a nursery when appropriate safety precautions are followed. It should not be placed inside a crib or used as an infant sleep surface. Make sure all appliqués are securely attached, avoid detachable buttons or small ornaments, and use suitable non-slip backing. Keep the rug away from areas where it could interfere with walking or create a tripping hazard. Babies should not be left unattended on a rug with loose or raised embellishments.
How can I make the hearts and bows look more professional?
Consistent yarn tension is essential for creating neat crochet heart appliqués and decorative bows. Use the same yarn weight for matching pieces and count stitches carefully to maintain symmetry. Gently shape each appliqué before attaching it to the rug. For the bow, make sure both loops are approximately equal in size and that the center wrap is secure. Sewing the decorations with matching yarn also helps create a clean, polished appearance.
Can I use this pattern to make a wall hanging instead of a floor rug?
Yes. The teddy bear design can be adapted into a decorative wall hanging by using lighter yarn and reducing the overall dimensions. A wall hanging does not require non-slip backing, but it may benefit from a lightweight fabric backing or hidden support to maintain its shape. Because the piece will not experience foot traffic, you can also experiment with softer yarns and more dimensional decorations. The same construction principles apply to the head, torso, ears, paws, and facial features.
Conclusion: Creating a Beautiful Handmade Crochet Teddy Bear Rug
The Crochet rug in the shape of a little bear Pattern is a delightful project that brings together practical crochet skills and creative decoration. Throughout this tutorial, you learned how to select suitable yarn, understand essential US crochet stitches, create circular and oval panels, shape the teddy bear’s body, and crochet its ears, arms, and feet. You also discovered how to make the cream-colored belly, embroidered facial features, pink heart appliqués, decorative bows, and scalloped edging. By carefully joining the individual sections and finishing the underside, you can create a charming handmade rug inspired by the teddy bear in the reference image.
Beyond its decorative appeal, this handmade crochet bear rug offers many opportunities for personalization. Different yarn colors, sizes, and appliqué arrangements can produce a unique piece for a nursery, bedroom, or cozy living space. The techniques practiced in this project can also be applied to other animal-shaped rugs and decorative crochet designs. Remember that accurate measurements, consistent tension, secure seams, and suitable non-slip protection are important for achieving a beautiful and practical result.
EASILY FIND THE FREE PDF FOR THIS PATTERN HERE!
Have you ever made a teddy bear crochet rug, or would this be your first attempt? We would love to hear your sincere opinion about this Crochet rug in the shape of a little bear Pattern. Share which part of the tutorial you found most useful, what colors you would choose, and any suggestions you have for improving the design or instructions. Your honest feedback and creative ideas can help inspire other crochet enthusiasts to explore new handmade projects with confidence.