
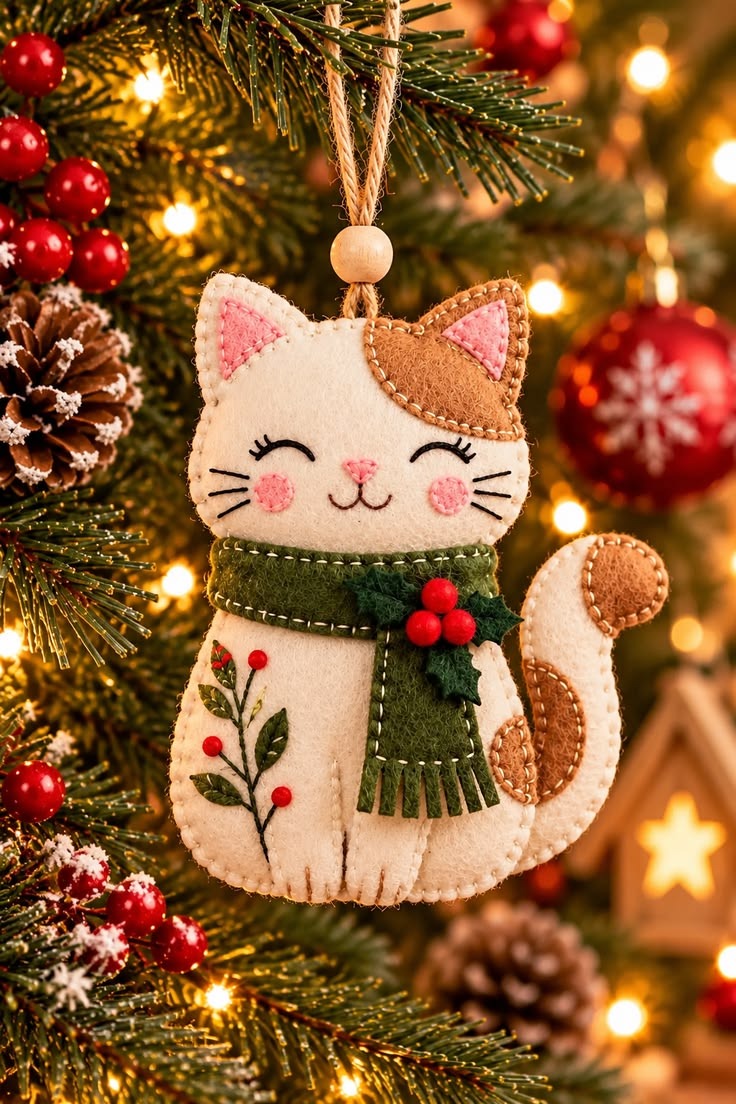
The Felt Cat Christmas Ornament Pattern is a delightful handmade Christmas decoration that combines the warmth of felt fabric, delicate embroidery, and charming seasonal details. This adorable project features a smiling cream-colored cat with pink ears, rosy cheeks, a beautifully curved tail, and a cozy green scarf decorated with holly leaves and red berries. Its soft appearance and carefully stitched details make it a wonderful addition to any Christmas tree. Whether you enjoy creating handmade holiday decorations or are searching for a meaningful gift idea, this felt cat ornament offers a creative way to celebrate the season. The design is especially appealing because it combines traditional Christmas colors with a playful animal character. With patience, basic sewing supplies, and a few simple techniques, you can recreate this festive decoration at home.
Making a handmade felt Christmas ornament is an enjoyable activity for beginners and experienced crafters alike. Felt is particularly suitable for decorative sewing projects because it is easy to cut, holds its shape, and does not fray along the edges. Unlike many woven fabrics, felt allows you to create small decorative pieces without complicated finishing techniques. The Felt Cat Christmas Ornament Pattern uses basic hand embroidery, blanket stitching, and light stuffing to produce a soft three-dimensional appearance. The combination of cream felt, warm brown patches, green accessories, and tiny red embellishments creates a balanced Christmas-inspired design. Although the finished ornament looks detailed, the construction becomes manageable when the project is divided into individual steps. This tutorial explains how to prepare the pattern, assemble the cat, embroider its features, and finish the decoration.
One of the most enjoyable aspects of this DIY felt cat Christmas decoration is the opportunity to personalize every detail. You can change the cat’s colors, experiment with different scarf fabrics, or replace the embroidered botanical decoration with a tiny Christmas flower. The ornament shown in the reference image has a friendly expression, gently closed eyes, a small pink nose, and decorative stitching that gives it a handcrafted appearance. Its hanging cord and wooden bead provide a rustic finishing touch that complements the traditional Christmas setting. The finished decoration can be displayed on a Christmas tree, attached to a wrapped present, or included in a collection of handmade seasonal ornaments. In the following instructions, you will learn how to create a similar design using accessible materials and practical sewing techniques commonly used by American crafters.
1. Materials and Preparing the Felt Cat Christmas Ornament Pattern
The first step in making your Felt Cat Christmas Ornament Pattern is gathering the materials needed to reproduce the design. Choose good-quality craft felt that is firm enough to hold decorative shapes but soft enough for hand sewing. Wool-blend felt is an excellent option because it has a pleasant texture and generally maintains its appearance well. Polyester craft felt can also work, particularly for beginners who want an affordable material. For the main cat, select cream or ivory felt. You will also need caramel-brown felt for the decorative patches, pink felt for the ears and cheeks, and several shades of green for the scarf and holly leaves.
DISCOVER MORE FREE PATTERNS HERE!
Materials needed for this project:
- Cream or ivory felt for the cat’s body and head
- Caramel-brown felt for the forehead patch and tail details
- Light pink felt for the inner ears and cheeks
- Olive-green felt for the scarf
- Dark-green felt for the holly leaves
- Small red felt circles or securely stitched red embellishments
- Black, brown, cream, pink, and green embroidery floss
- Polyester fiberfill for light stuffing
- Hand-sewing needles and embroidery needles
- Sharp fabric scissors
- Fabric marking pencil or washable fabric marker
- Paper, pencil, and ruler for preparing the pattern
- Embroidery hoop, optional
- Natural jute cord or cotton twine for hanging
- One wooden bead with a hole large enough for the cord
- Fabric clips or sewing pins
Before cutting the fabric, prepare a paper template for the felt cat sewing pattern. Since the reference image does not include an exact printable template or dimensions, the measurements in this tutorial are suggested proportions for recreating a similar ornament. Aim for a finished cat approximately 16 cm tall and 13 cm wide, including the curved tail but excluding the hanging cord. Draw a rounded sitting cat body approximately 10 cm wide and 9 cm tall, with a gently flattened bottom. Create a separate rounded cat head approximately 10.5 cm wide and 8 cm tall, including two pointed ears. The head should overlap the upper part of the body, creating the characteristic compact appearance shown in the photograph.
Next, prepare the smaller pattern pieces. Draw two pink inner-ear triangles approximately 2 cm tall, a curved brown forehead patch that follows the upper-right side of the cat’s face, and a curled tail approximately 4 cm wide and 9 cm tall. The tail should curve upward and outward, with a rounded tip and enough width for a narrow stuffing channel. For the scarf, prepare a horizontal band approximately 11 cm long and 2.5 cm wide, plus a hanging section approximately 3 cm wide and 6 cm long. You can adjust these pieces after checking how they fit against the body. Remember that these are approximate dimensions, not measurements taken directly from the photograph.
Once your paper templates are ready, transfer them carefully onto the appropriate felt colors. Cut two matching pieces for the head, two for the body, and two for the tail. You will also need the decorative patches, ear inserts, scarf pieces, holly leaves, and small circles for the cheeks and berries. Because felt does not fray, many decorative shapes can be cut directly to their finished size. For stuffed pieces, however, leave enough room around the edges for stitching. A seam allowance of approximately 0.3 cm works well when using a blanket stitch. Keep your scissors perpendicular to the fabric so that the edges remain smooth and consistent.
Organize all the pieces before beginning the embroidery. Place the front body on your work surface, position the head above it, and arrange the tail along the right side. Check that the tail curves upward naturally and that its rounded tip remains visible beside the cat’s face and scarf. Place the pink inner ears and brown forehead patch onto the head to confirm their positions. The brown patch should cover part of the upper-right forehead and extend toward the right ear without hiding the cat’s expression. This preparation stage is important because small adjustments are much easier before any pieces are permanently attached.
Finally, prepare your embroidery threads and decide which stitches you will use. The Felt Cat Christmas Ornament Pattern primarily requires blanket stitch, backstitch, running stitch, satin stitch, and a few decorative straight stitches. A blanket stitch finishes the outer edges while creating the visible handmade border. Backstitch is useful for the eyes, whiskers, mouth, and decorative plant stems. Satin stitch fills small shapes such as the nose, while running stitch adds decorative lines to the scarf. Practice these techniques on a scrap of felt if you are new to embroidery. Using two or three strands of embroidery floss generally provides a delicate finish without making the details appear too heavy.
2. Sewing the Cat’s Head, Facial Features, and Body
Begin assembling the felt cat Christmas ornament by decorating the front head piece. Position the pink inner-ear shapes inside the pointed ears, leaving a visible cream border around each one. Secure them with small stitches using pink or cream embroidery floss. A simple running stitch works, but a tiny blanket stitch can create a more decorative edge. Next, place the caramel-brown forehead patch on the upper-right portion of the face. Follow the rounded contour shown in the reference image and attach the patch with evenly spaced cream-colored stitches. Keep the fabric flat while sewing so that the decorative pieces do not wrinkle or pull against the felt.
The cat’s expression is one of the most important details in the Felt Cat Christmas Ornament Pattern. Use a washable fabric marker to sketch two gently curved, closed eyes near the center of the face. Each eye should resemble a relaxed upward arch, with a few short eyelashes extending from the outer edges. Embroider the curved lines using black embroidery floss and a small backstitch. Add two or three short straight stitches to create the eyelashes. Try to keep both eyes balanced, but do not worry about achieving perfect symmetry. Slight variations in hand embroidery often give handmade ornaments their distinctive personality and warmth.
Continue by creating the nose, mouth, cheeks, and whiskers. Position a small pink triangular nose between the eyes, slightly below their centerline. Fill the triangle with satin stitch, keeping the stitches close together for a smooth appearance. Use brown embroidery floss to stitch two small curved lines extending downward from the nose, forming a gentle smiling mouth. Add a small pink circle to each cheek and secure it with tiny stitches around the edges. You can also fill the cheeks with pink embroidery floss if you prefer a fully embroidered finish. Complete the face with three short black whiskers on each side, arranged in a slightly fanned pattern.
After finishing the facial embroidery, assemble the cat’s head. Place the decorated front head piece over the matching back piece, with the wrong sides facing each other. If you want the ears to have a slightly raised appearance, add a very small amount of fiberfill inside each ear before closing the surrounding edges. Begin blanket stitching around the head using cream embroidery floss. Keep the stitches approximately 0.3 cm apart and maintain a consistent distance from the fabric edge. Leave a small opening along the lower portion of the head, then insert polyester fiberfill in small amounts. The goal is to create a softly padded head rather than a firm stuffed toy.
Next, prepare the cat’s body. Before joining the front and back pieces, embroider the decorative botanical design visible on the lower-left side of the reference ornament. Use dark-brown embroidery floss to create a gently curved branch extending upward from the lower body. Add several small green leaves along the stem using satin stitches or individually cut felt leaf shapes. Embroider a few tiny red berries with French knots or attach small red felt circles using secure hand stitches. Keep the arrangement delicate so that it complements the cat’s face without overwhelming the design. Add subtle stitched lines near the bottom of the body to suggest the cat’s front paws.
To finish this stage, place the decorated body front over the matching back piece and begin sewing around the edges with cream embroidery floss. Leave an opening near the upper portion for stuffing and attaching the head. Add fiberfill gradually, spreading it evenly into the rounded lower corners. Avoid excessive stuffing because the ornament should remain lightweight enough to hang comfortably from a Christmas tree branch. Once the body is softly filled, position the finished head over its upper edge. Use small, secure stitches to attach the head to the body, hiding the joining stitches beneath the area where the scarf will sit. Check that the cat remains centered and that the head is securely connected before moving on.
3. Creating the Curved Tail and Decorative Christmas Scarf
The curved tail gives the Felt Cat Christmas Ornament Pattern its recognizable silhouette. Begin by placing the two cream-colored tail pieces together, with the wrong sides facing inward. Before sewing them together, attach the caramel-brown decorative patches to the front tail piece. The reference image shows a rounded brown patch near the upper tip and additional brown markings along the lower curve. Cut these patches from felt and attach them using small cream-colored blanket stitches. Arrange the patches to follow the tail’s natural curve. This creates a playful calico-inspired appearance that complements the brown forehead patch.
Once the decorative patches are attached, begin sewing the tail pieces together with a blanket stitch. Work carefully around the rounded tip and the narrow inner curve, using smaller stitches where the shape changes direction. Leave the lower end open so that you can add stuffing. Insert small portions of polyester fiberfill, using the blunt end of a wooden tool if necessary to guide the stuffing into the curved tip. Do not pack the tail too tightly because excessive filling can distort the shape. When the tail is evenly padded, position its base behind the cat’s right side and secure it with several strong stitches. Make sure the tail remains visible beside the body and curves upward as shown in the photograph.
The green scarf is another defining feature of this handmade felt cat Christmas ornament. Cut the horizontal scarf band from olive-green felt and wrap it gently around the lower portion of the cat’s head, where the head meets the body. The scarf should cover the joining seam while leaving the cat’s embroidered face fully visible. Adjust the length until the band sits comfortably around the neck area. Attach it using small green stitches along the edges, keeping the fabric smooth and flat. Add a decorative running stitch in cream embroidery floss along the upper and lower edges to reproduce the handcrafted finish shown in the reference image.
Create the hanging section of the scarf from a separate rectangular piece of olive-green felt. Position it vertically on the cat’s right side, allowing it to extend downward over the upper body. In the reference image, this scarf section has a straight lower edge decorated with several short fringes. To recreate this appearance, make small, evenly spaced cuts along the bottom of the felt, approximately 1 cm deep. Leave enough uncut fabric above the fringe to maintain the scarf’s strength. Add cream-colored running stitches along the sides and lower portion of the scarf. Attach the upper end beneath the horizontal scarf band so that the pieces appear naturally connected.
For the Christmas decoration, cut two or three small holly leaves from dark-green felt. Give each leaf a pointed shape with slightly irregular edges to resemble natural holly foliage. Position the leaves near the right side of the scarf, where the horizontal and vertical sections overlap. Secure them with tiny green stitches through their centers. Add three small red felt berries, arranging them in a compact triangular cluster. Stitch each berry firmly to the scarf, especially if the ornament will be handled frequently. The contrast between the dark-green leaves and bright-red berries creates the festive detail that makes the design especially suitable for Christmas decorating.
After attaching the scarf decorations, inspect the entire ornament for loose threads, uneven stitching, or areas that need additional support. The tail should remain firmly attached, the scarf should lie smoothly against the body, and the decorative berries should not shift when touched. If the head appears too heavy or the ornament tilts to one side, redistribute a little stuffing or adjust the position of the tail. You can also add a few hidden stitches between the scarf and the body to stabilize the design. These finishing adjustments help the Felt Cat Christmas Ornament Pattern maintain its shape during seasonal display and storage.
4. Adding the Hanging Loop and Finishing the Christmas Ornament
The final construction step is adding a secure hanging loop to your Felt Cat Christmas Ornament Pattern. Cut a piece of natural jute cord or cotton twine approximately 25 cm long. Fold the cord in half to create a loop and determine how far you want the ornament to hang below the Christmas tree branch. The reference design uses a rustic natural-colored cord with a small wooden bead positioned above the cat’s head. This simple combination complements the soft felt textures and traditional Christmas colors. If you prefer a different appearance, you can use green cotton cord or a narrow fabric ribbon instead.
To attach the hanging loop, bring the two loose ends of the folded cord together and insert them into the upper center of the ornament, between the head’s front and back layers if that seam is still accessible. If the head is already completely closed, use a sturdy needle to sew the cord securely to the back near the top center. Reinforce the attachment with several stitches and a firm knot. Avoid relying on glue alone because a stitched connection is generally more dependable for a hanging ornament. Make sure the cord is centered so that the cat hangs upright rather than leaning toward the tail.
Slide a small wooden bead over the folded loop, allowing it to rest just above the cat’s head. Choose a bead with a smooth surface and a hole wide enough for the selected cord. The bead should move easily along the twine without damaging the fibers. If necessary, tie a small knot above the bead to hold it in place. This detail is optional, but it closely resembles the ornament in the reference photograph. It also adds a natural decorative accent that works beautifully with wooden ornaments, pinecones, and warm Christmas lights.
Once the hanging loop is attached, examine the ornament from the front and back. Check that all blanket stitches are secure and that no stuffing is visible between the seams. Gently smooth the felt with your fingers and trim any stray threads with small embroidery scissors. If the scarf fringe appears uneven, carefully trim the ends so that they hang at similar lengths. Avoid pulling loose fibers aggressively because this can distort the felt surface. For a neat finish, use a lint roller or soft brush to remove small pieces of thread and fabric dust.
Your finished DIY felt cat ornament can now become part of your Christmas decorating collection. Hang it on a sturdy branch where the embroidered face and curved tail remain clearly visible. The cream felt looks particularly attractive against dark-green Christmas foliage, while the red berries and green scarf coordinate naturally with traditional holiday decorations. You can also use the ornament as a decorative gift topper by tying the hanging loop around a ribbon on a wrapped present. For a handmade Christmas display, consider creating several cats in different felt colors while keeping the same basic pattern and construction method.
Proper storage will help preserve your Felt Cat Christmas Ornament Pattern for future holiday seasons. After Christmas, remove the ornament carefully from the tree and inspect it for dust or loose stitching. Store it in a clean, dry box, preferably wrapped in acid-free tissue paper or placed inside a soft fabric pouch. Avoid compressing the ornament beneath heavy decorations because this can flatten the stuffing and bend the tail. Keep it away from moisture and prolonged direct sunlight to reduce the risk of discoloration. With careful handling, your handmade felt cat can remain a cherished part of your seasonal decorations for many years.
Frequently Asked Questions About the Felt Cat Christmas Ornament Pattern
Is the Felt Cat Christmas Ornament Pattern suitable for beginners?
Yes. This project is suitable for patient beginners who are comfortable learning basic hand-sewing techniques. The main construction involves cutting felt shapes, attaching decorative pieces, embroidering facial features, and sewing the edges with a blanket stitch. The curved tail and small embroidery details require extra attention, but they do not involve advanced sewing equipment. Beginners may find it helpful to practice the stitches on scrap felt before starting the actual ornament.
What type of felt works best for handmade Christmas ornaments?
Wool-blend felt is an excellent choice because it is durable, easy to stitch, and has a soft, attractive texture. Good-quality polyester craft felt is another practical option, particularly for beginners or larger holiday crafting projects. Choose felt that is thick enough to maintain the shape of the ears and decorative patches without becoming difficult to sew. Very thin felt may stretch or lose its shape when stuffed.
Can I make this felt cat Christmas ornament without a sewing machine?
Absolutely. The Felt Cat Christmas Ornament Pattern is designed for hand sewing, and the visible stitching is an important part of its charm. A blanket stitch creates the decorative outer border, while backstitch and satin stitch form the facial features. Hand sewing also provides greater control when working with small pieces, curved edges, and delicate felt decorations.
What is the recommended finished size for this ornament?
A practical finished size is approximately 16 cm tall and 13 cm wide, including the curved tail. These measurements are suggested for recreating the proportions of the reference image rather than exact dimensions from an existing template. You can enlarge the pattern to create a decorative wall hanging or reduce it for a smaller Christmas tree ornament. When resizing, remember to adjust the embroidery details and seam allowances accordingly.
How much stuffing should I use inside the felt cat?
Use just enough polyester fiberfill to create a gently rounded appearance. The head and body should feel soft rather than tightly packed. Excessive stuffing can stretch the stitches, distort the shape, and make the ornament too heavy for smaller Christmas tree branches. Insert the filling gradually and distribute it evenly before closing the seams.
Can I change the colors of the Felt Cat Christmas Ornament Pattern?
Yes. One of the advantages of this felt Christmas sewing project is its flexibility. You can create a gray cat with white markings, a ginger cat with cream patches, or a black cat with a red scarf. The scarf can also be made in burgundy, forest green, or other seasonal colors. Keep the facial embroidery contrasting enough to remain visible against the selected felt.
How can I make the embroidered face look neat and symmetrical?
Begin by marking the eye positions with a washable fabric marker. Use small, consistent backstitches and compare both sides frequently while sewing. The nose should sit near the center of the face, with the mouth directly beneath it. For the whiskers, make light guide marks before stitching. A small embroidery hoop can help keep the felt stable, although it is not essential for this project.
What can I use instead of small red beads for the holly berries?
Small red felt circles are an excellent alternative because they maintain the soft textile appearance of the ornament. You can also create berries using French knots with red embroidery floss. These stitched alternatives are especially useful when you want to avoid loose decorative components. If the ornament will be displayed around young children or pets, securely stitched felt and embroidery details are preferable to detachable beads.
How long does it take to complete a felt cat Christmas ornament?
The completion time depends on your sewing experience and the amount of embroidery detail you include. A beginner may need approximately three to five hours to prepare the templates, cut the felt, embroider the decorations, and assemble the ornament. More experienced crafters may complete the project in two to three hours. Working slowly usually produces cleaner stitching and more consistent decorative details.
Can I wash a handmade felt Christmas ornament?
Handmade felt ornaments are generally better suited to gentle spot cleaning than full washing. If the ornament becomes dusty, use a soft brush or lint roller. For a small stain, carefully dab the affected area with a slightly damp cloth, testing an inconspicuous area first. Avoid soaking the ornament because water can affect the stuffing, embroidery, and shape of certain felt materials. Always allow it to dry completely before storage.
Can this pattern be used to make handmade Christmas gifts?
Yes. A handmade felt cat Christmas ornament makes a thoughtful seasonal gift for cat lovers, friends, family members, and people who appreciate handcrafted decorations. You can personalize each ornament by changing the cat’s markings, selecting different scarf colors, or embroidering a small initial on the back. For gift presentation, place the ornament in a small decorative box with tissue paper to protect the stitching.
How can I make several ornaments with the same pattern?
Prepare reusable templates from sturdy cardstock and organize the felt pieces by color. Cut multiple sets of heads, bodies, tails, and scarf sections before beginning the embroidery. Working in small batches can make the process more efficient while keeping the finished ornaments consistent. You can still give each cat a unique personality by changing the facial expression, patch placement, or decorative embroidery.
Conclusion
The Felt Cat Christmas Ornament Pattern is a charming project that brings together simple sewing techniques, decorative embroidery, and traditional Christmas details. Throughout this tutorial, you learned how to select suitable felt materials, prepare a cat-shaped template, cut the individual pieces, and embroider the smiling face. You also discovered how to assemble the softly stuffed head and body, create the curved decorative tail, and make a green scarf with holly leaves and red berries. Finally, you learned how to attach a secure hanging loop, add a wooden bead, and care for the completed ornament.
What makes this DIY felt Christmas ornament especially appealing is the freedom to personalize the design. Each handmade cat can feature different colors, embroidery details, and accessories while preserving the recognizable shape of the original project. Whether you create one ornament for your own Christmas tree or several as meaningful handmade gifts, the process offers a relaxing opportunity to enjoy traditional crafting techniques.
EASILY FIND THE FREE PDF FOR THIS PATTERN HERE!
We would love to hear your sincere opinion about this Felt Cat Christmas Ornament Pattern! Did you enjoy the design? Would you choose the traditional cream, brown, and green colors, or would you create your cat in a different combination? Share your honest feedback, creative ideas, and suggestions for improving the tutorial. Your experiences and recommendations can inspire other craft enthusiasts to create their own beautiful handmade Christmas decorations.