
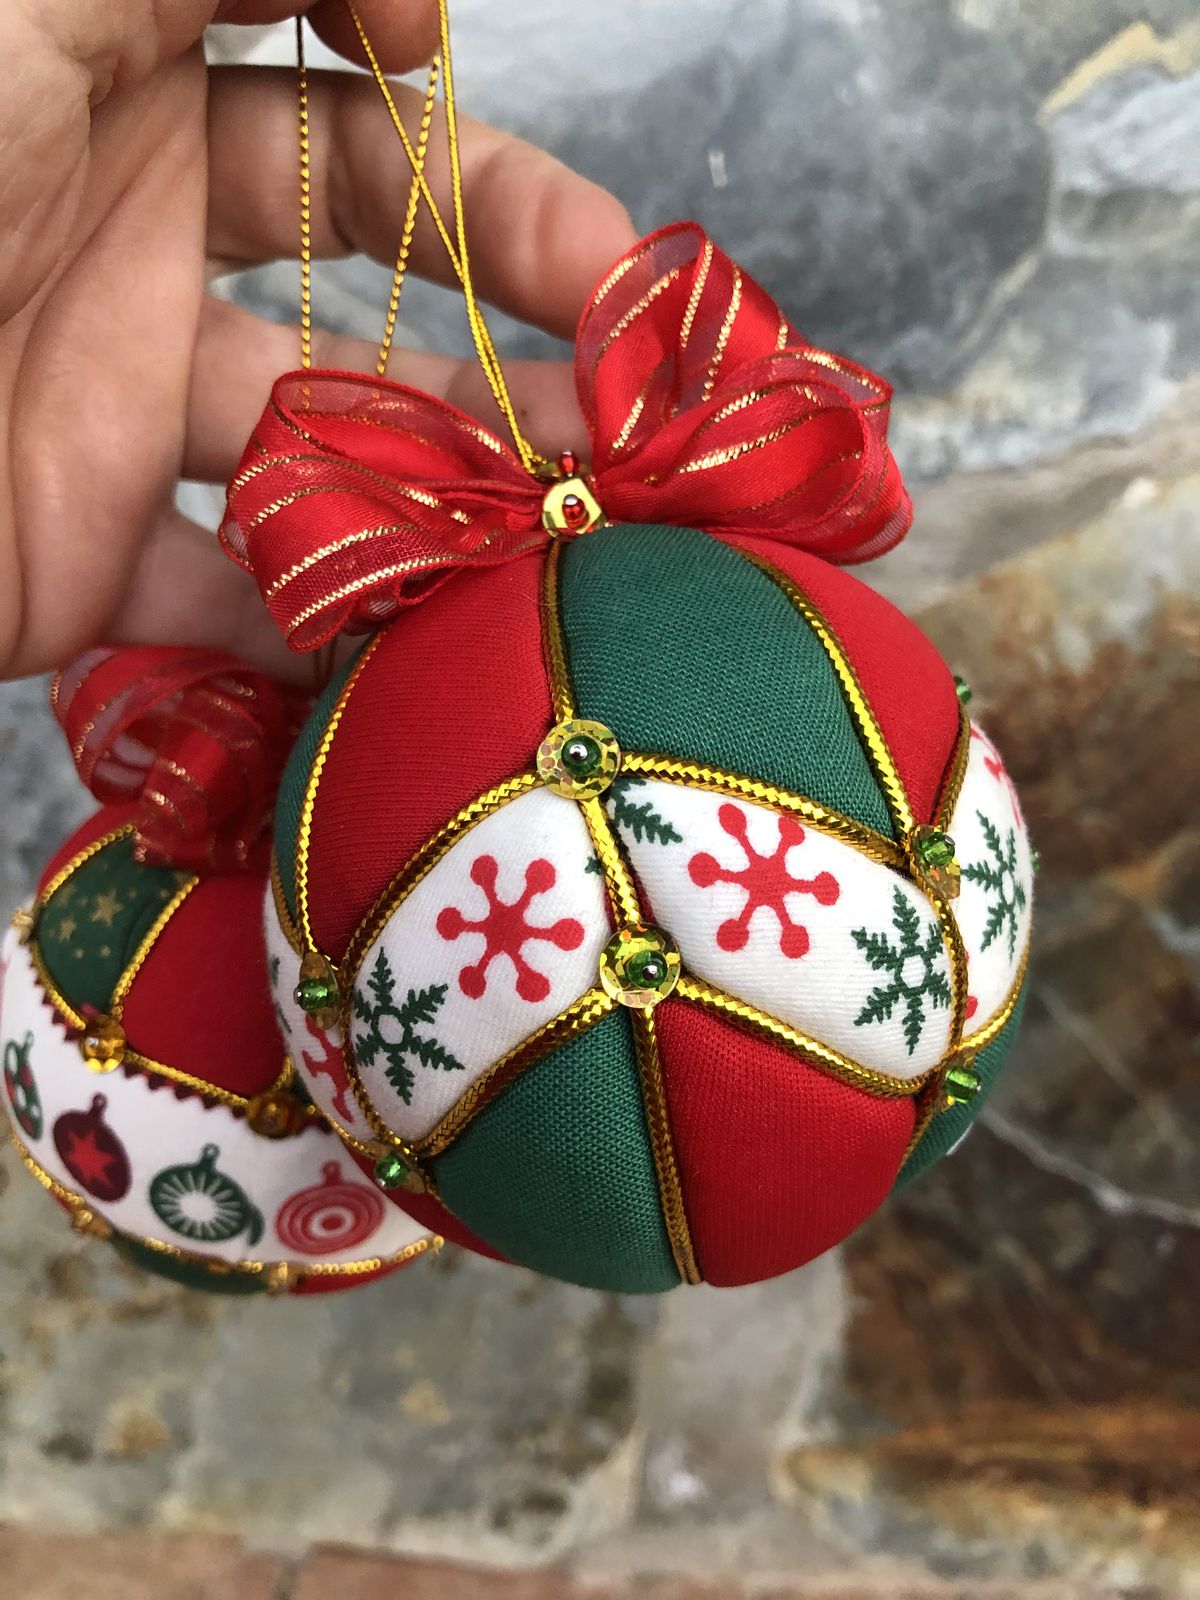
The Fabric Christmas ornament in the shape of a ball Pattern is a beautiful handmade decoration that combines traditional Christmas colors, elegant fabric textures, and delicate decorative details. Creating your own fabric Christmas ornaments is a wonderful way to bring warmth and personality to your holiday decorations while exploring a creative sewing project. The ornament featured in this tutorial showcases a rounded shape made with alternating red, green, and white fabric sections, decorated with golden trim, sparkling beads, and a festive ribbon bow. Its combination of colors and textures creates a classic Christmas appearance that works beautifully on Christmas trees, decorative garlands, and holiday displays. Whether you are an experienced crafter or someone discovering the joy of handmade decorations, this project offers an enjoyable opportunity to create something special. With a little patience and careful attention to detail, you can transform simple fabric scraps into an elegant Christmas ornament that looks professionally finished.
One of the most appealing features of this Fabric Christmas ornament in the shape of a ball Pattern is its versatility. The design can be adapted to different fabric combinations, decorative ribbons, and ornament sizes, allowing each finished piece to reflect your personal style. Traditional Christmas colors such as deep red, forest green, white, and metallic gold create a timeless holiday look, while softer colors can produce a more modern decoration. The ornament shown in the reference image uses curved fabric panels arranged around a spherical base, with gold cords emphasizing the seams and small embellishments highlighting the intersections. A large red ribbon bow completes the decoration, adding volume and elegance to the top of the ornament. Although the finished design appears intricate, the construction can be divided into manageable steps that make the project accessible to beginners with basic hand-sewing skills. Understanding how the fabric pieces fit together is the key to achieving a balanced and attractive result.
Making handmade Christmas ball ornaments is also an excellent way to use leftover fabrics from quilting, patchwork, and other sewing projects. Small pieces of cotton fabric, festive prints, and decorative trims can be combined to create coordinated sets of Christmas decorations without requiring large amounts of material. These ornaments can become thoughtful handmade gifts, personalized holiday keepsakes, or beautiful additions to a seasonal craft collection. The project is especially satisfying because each stage brings a visible transformation, beginning with simple fabric shapes and gradually developing into a rounded decorative ornament. By selecting quality materials, measuring carefully, and using reliable sewing techniques, you can create ornaments that remain attractive throughout many holiday seasons. This complete tutorial explains the materials, pattern preparation, fabric assembly, decorative finishing, and practical techniques needed to recreate the style shown in the photograph. Follow each stage carefully to complete your own Fabric Christmas ornament in the shape of a ball Pattern with confidence.
Materials and Tools Needed for the Fabric Christmas Ornament in the Shape of a Ball Pattern
Before beginning your Fabric Christmas ornament in the shape of a ball Pattern, gather all the materials and organize your sewing area. A well-prepared workspace makes it easier to cut accurate fabric shapes, arrange the colors, and attach decorative elements without losing small pieces. For a finished ornament measuring approximately 10 cm in diameter, you will need red cotton fabric, green cotton fabric, and white Christmas-print fabric featuring snowflakes or other seasonal motifs. Choose lightweight or medium-weight woven fabrics that can conform smoothly to a curved surface. Quilting cotton is particularly suitable because it is easy to cut, press, and sew. Avoid very thick fabrics, since bulky seams can make the rounded ornament difficult to assemble neatly.
DISCOVER MORE FREE PATTERNS HERE!
The main supplies for this DIY fabric Christmas ball ornament include a 10 cm foam craft ball, approximately 25 × 25 cm of red fabric, 25 × 25 cm of green fabric, and 20 × 20 cm of white patterned fabric. You will also need approximately 2 m of narrow gold decorative cord, 50 cm of wired red ribbon with gold edging, small decorative beads or sequins, matching sewing thread, a hand-sewing needle, fabric scissors, pins, a measuring tape, and a fabric marking pencil. A low-temperature glue gun or fabric-compatible craft adhesive can help secure the trims, although hand stitching provides additional durability. A thin gold hanging cord measuring approximately 25 cm will be used to create the ornament’s suspension loop. The exact quantities may vary depending on your chosen pattern arrangement and the amount of decorative trim.
For this particular design, a foam ball covered with fabric is a practical construction method because it provides a consistent spherical shape while allowing curved fabric pieces to be attached around the surface. The reference ornament has a padded, segmented appearance, so the foam base can be covered with a very thin layer of polyester batting before the fabric is applied. This creates a softer finish and helps the ornament resemble a traditional padded Christmas decoration. Choose a smooth foam ball without dents or irregularities, as imperfections may remain visible through the fabric. If you prefer a slightly firmer appearance, omit the batting and apply the fabric directly to the foam. Both approaches can produce attractive results when the pieces are fitted carefully.
Selecting the correct decorative ribbon is another important part of creating a Christmas fabric ball ornament with a bow. The ornament in the photograph features a large red bow made from semi-transparent ribbon with narrow gold stripes. Wired organza ribbon is an excellent option because it holds its loops and creates a full decorative shape. A ribbon approximately 3.5 to 4 cm wide is suitable for a 10 cm ornament. If the ribbon is too narrow, the bow may appear undersized, while excessively wide ribbon can overwhelm the ball. The gold cord should be flexible enough to follow the curved panel edges without lifting away from the surface. Metallic braided cord or narrow decorative piping can both work well for this purpose.
Small embellishments add an elegant finishing touch to the handmade fabric Christmas ornament pattern. Green and gold beads, sequins, or rhinestone-style decorations can be positioned at the points where the fabric panels meet. These details help conceal minor irregularities in the trim and create a more polished appearance. Select lightweight embellishments that will not pull on the fabric or distort the ornament’s shape. For decorations intended for homes with small children or pets, consider securely stitched fabric accents instead of loose beads. Decorative elements should be firmly attached, especially when the ornaments will be stored and reused every year. Keeping the embellishments relatively small also allows the colorful fabric panels to remain the main visual feature.
Finally, prepare the basic sewing tools that will help you achieve accurate results. Sharp fabric scissors are essential for cutting smooth curved edges, while small embroidery scissors are useful for trimming threads and decorative cord. A flexible measuring tape makes it easier to measure around the spherical base, and a disappearing fabric marker helps identify the center and edges of each panel. Use fine sewing pins to temporarily position the fabric, but remove them or replace them with permanent attachments before finishing. A thimble may be helpful when hand stitching through several fabric layers. Having all these supplies within reach will make the Fabric Christmas ornament in the shape of a ball Pattern easier to complete from beginning to end.
Preparing the Fabric Pattern and Cutting the Christmas Ball Panels
The first construction stage involves preparing the fabric Christmas ball pattern pieces. For the 10 cm foam ball used in this tutorial, the circumference is approximately 31.4 cm. A convenient starting design uses eight elongated curved panels arranged vertically around the ball, running from the top attachment point toward the bottom. Each panel should have a rounded, leaf-like shape that is wider in the middle and tapers toward both ends. This arrangement creates the segmented appearance visible in the reference image. The fabric sections can be alternated between solid red, solid green, and white Christmas prints to produce a balanced decorative pattern. Because the photograph shows a decorative arrangement rather than a complete construction template, the measurements provided here are a practical adaptation for recreating its appearance.
To create a reusable Christmas ornament sewing template, draw a vertical centerline measuring approximately 15.7 cm on a sheet of paper. This length corresponds to the distance along the surface of a 10 cm ball from the top pole to the bottom pole. Mark the midpoint of the line and draw a gently curved outline that reaches approximately 2.0 cm to either side of the centerline at its widest point. The finished panel should therefore measure about 4.0 cm across the middle, tapering smoothly toward narrow points at both ends. Add a seam or turning allowance of approximately 0.7 cm around the shape when cutting the fabric. These dimensions are starting measurements rather than a guaranteed exact fit, since fabric thickness and the way the panels are attached can affect the final coverage.
Before cutting all the fabric, test the paper template directly against the foam ball. Place the template vertically on the surface, with one pointed end at the top and the other at the bottom. The widest section should rest around the center of the ball without excessive wrinkling. Cut eight paper copies if you want to preview the entire arrangement, and position them side by side around the ball. Their edges should meet with minimal overlapping or gaps. If the panels are too wide, reduce the center width slightly; if the foam remains exposed, increase the width or adjust the curves. This fitting stage is particularly important because a spherical surface requires more precision than a flat fabric project. Taking a few extra minutes to refine the template will improve the appearance of the finished quilted-style Christmas ball ornament.
Once the pattern fits properly, prepare the fabric for cutting. Press the red, green, and white fabrics with an iron according to their care instructions, removing wrinkles that could affect the accuracy of the pieces. Place the paper template on the wrong side of each fabric and trace around it using a fabric marking pencil. For a traditional eight-panel ornament, cut three red panels, three green panels, and two white Christmas-print panels. Arrange the colors around the ball so that the white sections are separated by red and green pieces. If the fabric has a directional design, such as snowflakes or hanging ornaments, pay attention to the orientation before cutting. Keeping the printed motifs aligned consistently will make the final decoration appear more intentional and professionally designed.
For a smooth finish, consider adding a small amount of lightweight fusible interfacing to the wrong side of thin fabrics before cutting. Interfacing helps prevent stretching and reduces the risk of fraying along the curved edges. However, avoid heavy interfacing, as it can make the panels too stiff to follow the shape of the foam ball. Another option is to cut the panels from fabric backed with a thin fusible web if you plan to attach them using adhesive rather than stitching. When using fusible products, always follow the manufacturer’s temperature instructions and never apply a hot iron directly to the foam ball. Prepare all fabric components on a separate ironing surface before assembly. This careful preparation supports the clean lines associated with a high-quality fabric-covered Christmas ornament.
After cutting the panels, arrange them in the intended sequence on your worktable. For example, begin with red, followed by green, white, red, green, white, red, and green. This combination creates a festive distribution of colors similar to the ornament shown in the photograph. Mark the top end of each piece on the wrong side so that you can maintain the correct orientation during assembly. If you want a slightly padded appearance, cut matching thin batting pieces using the finished panel outline without the additional allowance. Place the batting beneath each fabric panel during installation. At this stage, the main components of your Fabric Christmas ornament in the shape of a ball Pattern are ready, and you can begin transforming them into a decorative Christmas ball.
Step-by-Step Assembly of the Fabric Christmas Ball Ornament
Begin assembling your fabric Christmas ball ornament by identifying the top and bottom poles of the foam sphere. Use a fabric marker to place a small dot at each pole, then divide the circumference into eight equal sections around the middle. For a 10 cm ball, each section occupies approximately 3.9 cm along the equator. Draw light guide lines connecting the top and bottom points through these marks, creating eight curved vertical sections around the sphere. These guidelines will help you position the fabric panels evenly and maintain a symmetrical design. Work slowly during this stage, because accurately placed sections are essential for achieving the rounded, segmented appearance of the ornament.
Place the first red fabric panel along one marked section, positioning its narrow ends at the top and bottom poles. If you are using batting, place the matching batting piece beneath the fabric before attaching it. Turn the fabric’s raw edges underneath by approximately 0.7 cm, adjusting the folds so that the visible panel follows the marked guide lines. Use a small amount of fabric-compatible adhesive or low-temperature craft glue to secure the panel gradually, beginning at the center and working toward the ends. Smooth the fabric gently with your fingers to remove wrinkles, but avoid pulling it so tightly that the shape becomes distorted. The goal is to create a softly rounded surface with clean, curved edges.
Continue covering the foam ball with the remaining fabric sections, following your chosen color sequence. Position each new panel beside the previous one so that the folded edges meet neatly without leaving visible foam. Apply adhesive in small areas rather than coating the entire ball at once, which allows you to adjust the placement before the adhesive sets. When working with the white printed panels, keep the snowflake motifs centered whenever possible. The photograph features white sections that create a striking contrast against the solid red and green fabrics. By maintaining this contrast throughout the arrangement, your Christmas patchwork ball ornament will have a festive appearance that closely resembles the inspiration.
As you approach the final panels, check the alignment around the entire sphere. The fabric sections should meet evenly at the top and bottom, and the widest areas should form a continuous arrangement around the center. If one panel overlaps too much, gently lift the unattached edge and adjust the fold. Small variations can be corrected by slightly changing the width of the remaining panels. Once all eight pieces are attached, inspect the ball from several angles to make sure the shape remains symmetrical. Allow the adhesive to cure completely according to its instructions before applying decorative trim. This prevents the fabric from shifting while you work on the finishing details.
The next step is adding the distinctive gold decorative trim that outlines the fabric sections. Begin at the top of the ornament and place a narrow gold cord along the curved seam between two adjacent panels. Follow the seam carefully, securing the cord with tiny amounts of adhesive or discreet hand stitches where practical. Continue toward the bottom of the ball, keeping the cord smooth and evenly tensioned. Repeat this process along every panel boundary. The metallic lines create the geometric effect visible in the reference ornament and help define the curved fabric sections. Avoid stretching the cord tightly, since excessive tension may pull the fabric edges inward or cause the trim to lift at the ends.
After all the gold trim has been attached, examine the ornament for exposed fabric edges, uneven intersections, or loose threads. Make small corrections before moving on to the decorative details. The top and bottom intersections may contain several layers of folded fabric, so cover these areas with a small fabric circle or decorative cap if necessary. If you prefer a more traditional hand-sewn construction, small hidden stitches can reinforce the folded edges before the trim is attached. The completed sphere should feel secure, balanced, and smooth, with clearly defined red, green, and white sections. At this point, the central structure of your Fabric Christmas ornament in the shape of a ball Pattern is complete, and the remaining steps will focus on the ribbon bow, beads, and hanging loop.
Decorating the Christmas Ball with Gold Trim, Beads, and a Festive Ribbon Bow
Decorative details give the Fabric Christmas ornament in the shape of a ball Pattern its distinctive holiday character. The ornament in the photograph features small green and gold embellishments positioned at selected intersections of the decorative cord. To recreate this effect, choose lightweight beads or sequins that coordinate with the fabric colors. Place a small decorative piece at several seam intersections, concentrating on the visible front and sides of the ornament. Use strong sewing thread to attach embellishments to the fabric wherever possible, or secure them with a small amount of suitable craft adhesive. Avoid adding too many decorations, since the combination of printed fabric and gold trim already creates a detailed visual pattern. A few carefully positioned accents will provide sparkle without overwhelming the design.
The large red ribbon bow is one of the most recognizable features of this Christmas ball ornament with ribbon. Cut approximately 45 to 50 cm of red wired organza ribbon with gold edging. Create two large loops measuring approximately 8 to 10 cm across, then fold the remaining ribbon into additional smaller loops if you want a fuller bow. Gather the ribbon at the center and secure it with strong thread or thin floral wire. Adjust the loops until the bow looks symmetrical, allowing the gold-edged ribbon to curve naturally. If using floral wire, twist it securely and cover the ends so that no sharp points remain exposed. The finished bow should be large enough to complement the ornament while remaining lightweight.
To attach the bow, identify the top pole of the ornament where the fabric sections meet. Apply a small amount of adhesive to the underside of the bow’s center and press it gently against the top of the ball. For a more durable attachment, stitch the bow to a small fabric or felt anchor patch that has been secured over the top intersection. Hold the bow in position until the adhesive has set, then arrange the loops to create a full, decorative appearance. The reference ornament uses a generous bow that extends outward beyond the width of the upper fabric sections. This proportion creates an elegant holiday style and draws attention to the top of the decoration. A small gold bead or decorative center can be added to conceal the gathering stitches.
Creating a secure hanging loop for a fabric Christmas ornament is essential if the finished ball will be displayed on a Christmas tree. Cut approximately 25 cm of thin metallic gold cord and fold it in half to form a loop. Tie the two loose ends together with a firm knot, leaving a finished loop approximately 10 to 12 cm long. Attach the knotted ends to a sturdy fabric anchor at the top of the ornament, preferably beneath the ribbon bow. For a foam-based ornament, a dedicated ornament hanger with a broad anchoring surface can also be used, provided it is suitable for foam and firmly secured. Test the hanging loop by gently lifting the ornament over a soft surface before placing it on a tree branch. The attachment should support the ornament without pulling the bow or fabric out of position.
Once the hanging loop is attached, make the final decorative adjustments. Spread the bow loops evenly, check that the gold trim remains secure, and remove any visible adhesive strands or loose threads. Rotate the ornament slowly to inspect the placement of the colored panels and decorative beads. If one area appears less detailed than the others, add a small coordinating embellishment to create visual balance. The goal is not perfect uniformity but a harmonious handmade appearance. The finished handmade Christmas fabric ball should showcase the beautiful contrast between red and green cotton, festive white printed fabric, sparkling gold trim, and the soft texture of the ribbon. These details give the ornament the charming appearance of a traditional handcrafted Christmas decoration.
To preserve your completed Fabric Christmas ornament in the shape of a ball Pattern, store it carefully after the holiday season. Wrap the ornament in acid-free tissue paper or soft cotton fabric, and place it in a sturdy storage box where it will not be crushed. Avoid storing the decoration in damp environments, since moisture may damage the fabric, adhesive, or metallic embellishments. If the ornament becomes dusty, clean it gently with a soft, dry brush rather than soaking it in water. You can also create matching ornaments in different sizes or color combinations to decorate an entire Christmas tree. With careful construction and proper storage, these handmade fabric decorations can become treasured holiday keepsakes that bring warmth and festive charm to your home year after year.
Frequently Asked Questions About the Fabric Christmas Ornament in the Shape of a Ball Pattern
1. Is the Fabric Christmas ornament in the shape of a ball Pattern suitable for beginners?
Yes. This project is suitable for beginners who have basic experience cutting fabric and handling simple craft materials. The foam-ball construction method eliminates the need to sew a complicated spherical fabric shell. Beginners should focus on preparing accurate templates, folding the fabric edges neatly, and attaching the panels gradually. The decorative trim also helps conceal small imperfections along the panel boundaries. Taking your time during the cutting and assembly stages will make the project easier and improve the finished appearance.
2. What is the best fabric for making Christmas ball ornaments?
Medium-weight quilting cotton is one of the best choices for fabric Christmas ball ornaments because it is easy to cut, press, and shape. Cotton fabrics also come in a wide variety of Christmas prints, including snowflakes, stars, ornaments, and traditional holiday patterns. Lightweight cotton blends can work well, but very stretchy or slippery fabrics may be more difficult to position accurately. For the design shown in the photograph, combining solid red and green cotton with white Christmas-print fabric creates a beautiful contrast.
3. Can I make this Christmas ornament without a sewing machine?
Absolutely. This DIY Christmas fabric ornament can be completed entirely by hand. The fabric panels are folded and attached around a foam base, while decorative elements can be secured using small hand stitches or appropriate craft adhesive. A sewing machine is not necessary for the main construction. Hand sewing is especially useful when attaching small beads, reinforcing the ribbon bow, or securing the hanging loop.
4. How can I make the fabric panels fit smoothly around the ball?
The most important technique is testing the paper template before cutting the final fabric pieces. A spherical surface requires curved panels that are narrow at the ends and wider in the middle. Make sure each panel follows the shape of the ball without excessive stretching. Lightweight fabrics are easier to smooth over curved surfaces, and a thin layer of batting can soften minor irregularities. Attach each section gradually, working from the center toward the top and bottom.
5. Can I use fabric scraps to create this ornament?
Yes. Using fabric scraps is one of the greatest advantages of this scrap fabric Christmas ornament project. Small pieces left over from quilting, patchwork, and holiday sewing projects can be transformed into attractive decorations. Select fabrics with similar thicknesses so that the finished panels remain even. You can also coordinate the colors with existing Christmas decorations or use different prints to create a unique collection of ornaments.
6. What size should I make my handmade Christmas ball ornament?
A 10 cm diameter ornament is a convenient starting size because it provides enough space for the decorative fabric sections, gold trim, and ribbon bow. Smaller ornaments measuring approximately 6 to 8 cm are suitable for compact Christmas trees, while larger ornaments measuring 12 to 15 cm can be used as decorative accents. When changing the ball size, adjust the panel template and ribbon proportions accordingly. Always test the pattern on the chosen ball before cutting all the fabric.
7. How do I keep the gold trim from coming loose?
Use a flexible decorative cord and attach it carefully along the folded panel boundaries. Small amounts of fabric-compatible adhesive can help hold the trim in position, while discreet stitches provide additional reinforcement. Avoid pulling the cord too tightly, especially around the curved areas. Allow the adhesive to cure completely before handling or hanging the ornament. Properly secured trim will help the Christmas ball decoration maintain its attractive appearance over time.
8. Can I wash handmade fabric Christmas ornaments?
Washing is generally not recommended for ornaments constructed with foam bases, decorative adhesives, metallic cord, and beads. Water may loosen the embellishments or affect the shape of the fabric covering. Instead, use a soft brush or dry cloth to remove dust. If a small stain appears, test a gentle spot-cleaning method on an inconspicuous area, avoiding excessive moisture. Store the ornaments in a dry, protected location to reduce the need for cleaning.
9. How long does it take to complete one fabric Christmas ornament?
The time required depends on your experience and the amount of decorative detail. A beginner may need approximately two to four hours to prepare the template, cut the fabric, cover the ball, and attach the embellishments. Experienced crafters may complete a similar ornament more quickly. Additional drying or curing time may be necessary when using adhesive. Preparing several sets of fabric panels in advance can make the process more efficient when creating multiple ornaments.
10. Can I customize this pattern for other holidays or decorative themes?
Yes. The Fabric Christmas ornament in the shape of a ball Pattern can easily be adapted to different themes. Pastel fabrics and floral prints create beautiful spring decorations, while cream and gold fabrics produce elegant ornaments for weddings or special celebrations. You can also replace the traditional Christmas bow with lace, satin ribbon, or other decorative materials. The basic spherical construction remains the same, making this a versatile craft technique for many occasions.
11. How can I make the ornament look more professional?
A professional-looking finish begins with accurate measurements and careful fabric preparation. Press the fabric before cutting, test the template against the foam ball, and maintain consistent folded edges. Keep the gold trim centered over the panel boundaries and use embellishments sparingly. A well-shaped bow and a neatly concealed hanging-loop attachment also make a significant difference. Finally, inspect the ornament from every angle and correct loose threads or uneven decorative details before displaying it.
12. Are these handmade Christmas ornaments suitable for gifts?
Yes. Handmade fabric Christmas ornaments make thoughtful gifts for friends, family members, teachers, and craft enthusiasts. You can personalize them by choosing favorite colors, coordinating fabrics, or adding a small embroidered initial to one of the panels before assembly. Presenting the ornament in a decorative box with tissue paper helps protect the ribbon and embellishments. A handmade ornament can become a meaningful keepsake that is enjoyed during many future Christmas celebrations.
Conclusion: Create Your Own Beautiful Fabric Christmas Ball Ornament
The Fabric Christmas ornament in the shape of a ball Pattern is a delightful project that combines creativity, traditional holiday colors, and accessible sewing techniques. Throughout this tutorial, you learned how to select suitable fabrics, prepare curved panel templates, cover a spherical base, attach decorative gold trim, and complete the ornament with beads, a festive ribbon bow, and a secure hanging loop. Each stage contributes to the finished appearance, transforming simple materials into an elegant handmade Christmas decoration.
One of the most rewarding aspects of this project is the freedom to personalize the design. By experimenting with different fabric prints, ribbon textures, and decorative accents, you can create a collection of handmade Christmas ball ornaments that complements your holiday decorating style. Whether you prefer classic red and green combinations or more contemporary colors, the same basic construction method can be adapted to produce beautiful results.
This DIY fabric Christmas ornament pattern also provides a wonderful opportunity to practice precise fabric cutting, curved-edge finishing, and decorative embellishment techniques. The skills developed during this project can be applied to many other sewing and patchwork decorations, making it a valuable addition to your crafting experience. With patience and attention to detail, even beginners can achieve a charming ornament that looks beautiful on a Christmas tree or as part of a festive display.
EASILY FIND THE FREE PDF FOR THIS PATTERN HERE!
Now it is your turn to bring this Fabric Christmas ornament in the shape of a ball Pattern to life. Choose your favorite Christmas fabrics, prepare your materials, and enjoy the process of creating a decoration with your own hands. We would love to hear your sincere opinion about this tutorial! Share your experience, tell us which fabric colors you would choose, and leave your suggestions for improving the project or exploring new Christmas ornament designs. Your honest feedback and creative ideas are always welcome and can inspire even more beautiful handmade holiday decorations.