
The Fabric Christmas flower Pattern is a beautiful and creative sewing project that transforms colorful fabric scraps into an elegant, three-dimensional Christmas decoration. Inspired by the traditional colors of the holiday season, this handmade flower combines pointed fabric petals, layered textures, and festive prints to create an eye-catching ornament. Its unique design resembles a blooming Christmas flower with multiple layers of petals arranged in a circular formation. Red, green, plaid, and holly-patterned fabrics work together to give the decoration a warm, cheerful appearance. Whether displayed as a holiday centerpiece, used as a decorative accent, or incorporated into a handmade Christmas arrangement, this project adds personality to seasonal decorating. One of the most appealing aspects of this DIY fabric Christmas flower is that it can be customized using different cotton fabrics, making every finished piece unique.
Creating a Fabric Christmas flower Pattern is also an enjoyable way to explore basic sewing techniques while producing something that looks detailed and sophisticated. Although the finished flower features numerous pointed petals, the construction process becomes much easier when divided into manageable steps. Each petal is made separately, lightly stuffed, and carefully attached to a circular fabric base to create a layered floral arrangement. The combination of different petal sizes helps establish depth and dimension, while alternating fabric patterns creates visual movement throughout the design. This project is particularly suitable for people who enjoy Christmas crafts, patchwork projects, and handmade fabric decorations. With a little patience and attention to detail, even someone with limited sewing experience can complete an attractive holiday flower using common sewing supplies and straightforward construction methods.
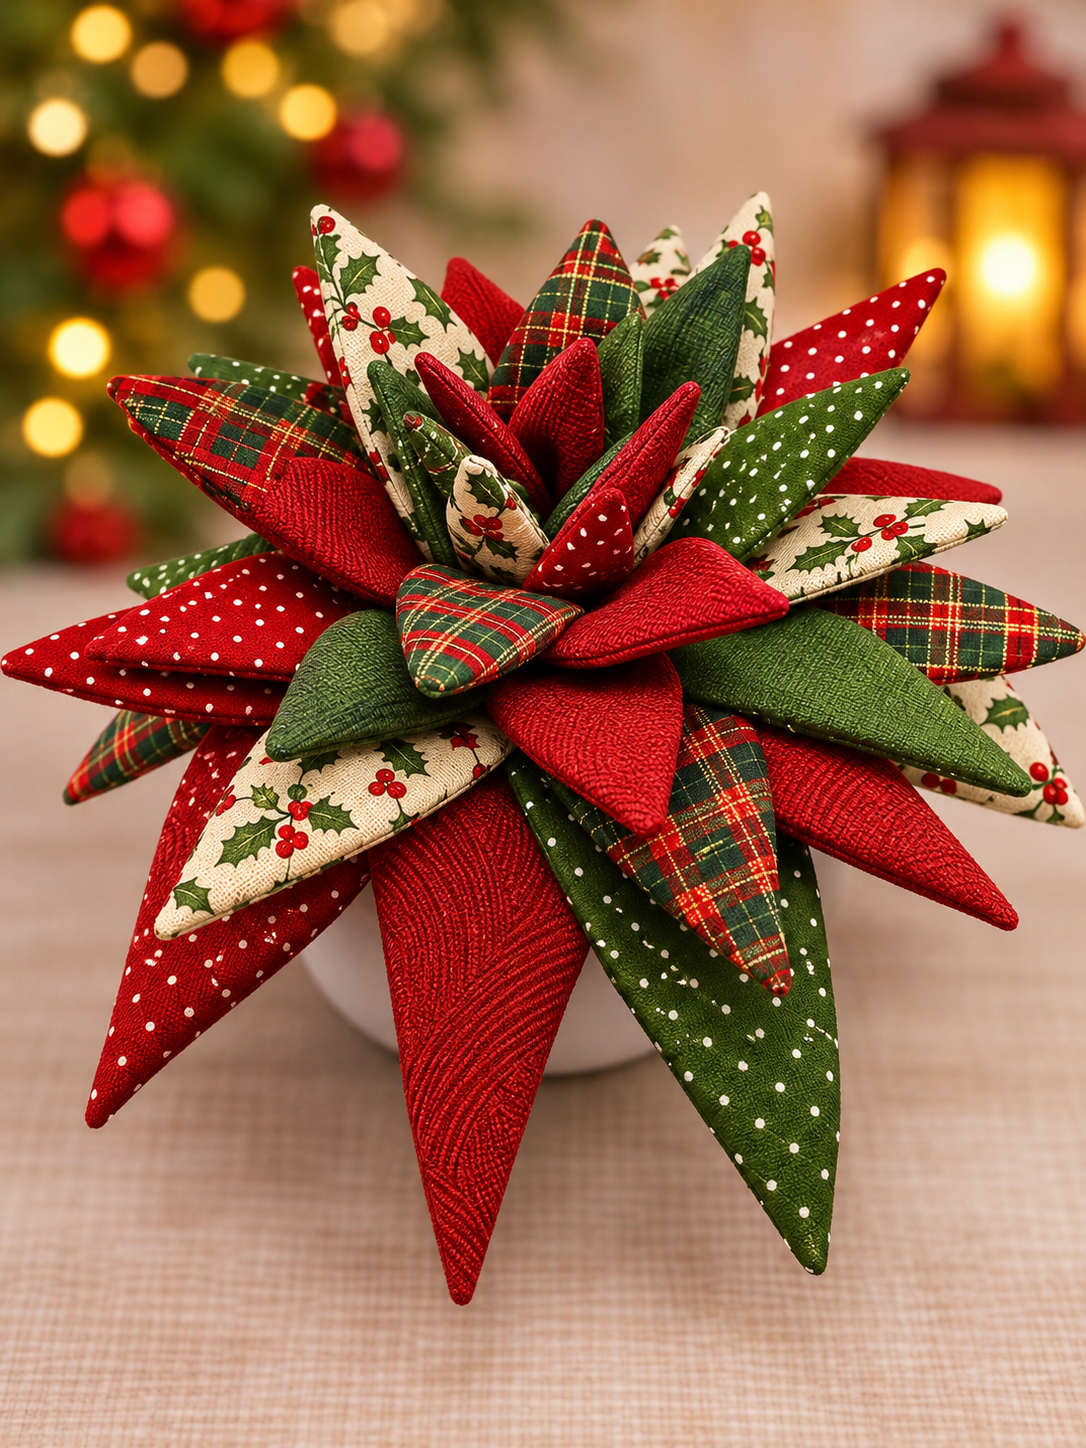
Another wonderful feature of this handmade Christmas fabric flower is its versatility. The finished decoration can be placed in a small decorative container, displayed on a holiday table, attached to a wreath, or incorporated into a larger seasonal arrangement. The flower shown in the reference image features elongated, pointed petals arranged in several overlapping layers, with larger petals surrounding smaller ones toward the center. Rich red fabrics, deep green cotton, traditional Christmas plaid, and cream-colored holly prints create a balanced and festive composition. Recreating this appearance requires careful fabric selection, consistent petal shapes, and thoughtful assembly. In this complete tutorial, you will learn how to prepare the materials, create a reusable petal template, sew and stuff the individual petals, assemble the layered flower, and finish the decoration professionally. The instructions use familiar American sewing techniques, with measurements provided in centimeters for accurate cutting and construction.
Materials and Fabric Preparation for the Fabric Christmas Flower Pattern
The first step in creating the Fabric Christmas flower Pattern is gathering the necessary materials. Choose good-quality quilting cotton because it is easy to cut, sew, press, and shape. Cotton fabric also holds its structure well when combined with lightweight stuffing. For a flower similar to the reference image, select at least five coordinating Christmas fabrics: solid red, solid green, red fabric with white polka dots, green fabric with white polka dots, traditional red-and-green plaid, and cream fabric decorated with holly leaves. You can use additional patterns to introduce variety, but keeping the colors within a coordinated Christmas palette will help the finished flower look balanced.
DISCOVER MORE FREE PATTERNS HERE!
Prepare approximately 25 cm × 35 cm of each main fabric, although the exact amount depends on the number and size of petals you decide to make. You will also need polyester fiberfill, matching polyester sewing thread, a hand-sewing needle, fabric scissors, sewing clips or pins, a fabric marking pencil, a ruler, cardboard or sturdy paper for templates, and a sewing machine. A point turner or blunt wooden stick is useful for shaping the narrow petal tips. For the flower base, prepare a piece of sturdy felt or cotton fabric reinforced with interfacing. If you plan to display the finished decoration in a container, you may also need a wooden dowel, floral foam, or a small decorative bowl.
Before cutting the fabric, wash and dry it according to the manufacturer’s care instructions if you expect the finished decoration to be washable. Prewashing helps minimize unexpected shrinkage and removes some manufacturing finishes. After drying, press each fabric with an iron to eliminate wrinkles and make cutting more accurate. Smooth fabric is particularly important for this project because the pointed petals should be symmetrical. When using printed cotton, pay attention to the direction of the design. Plaid lines and holly motifs can be positioned intentionally so the decorative patterns remain visible on the finished petals.
The next preparation task is determining the flower’s approximate dimensions. For this tutorial, the finished decoration will measure approximately 28–32 cm across, depending on how the petals are arranged and how tightly they are gathered around the center. The flower will have three main layers of pointed petals, with an optional additional inner layer for a fuller appearance. The outer petals should be the longest, while the inner petals should gradually decrease in size. This variation creates the rounded, dimensional structure visible in the photograph. The measurements provided are a practical reconstruction of the pictured design rather than dimensions taken from an original manufacturer-issued pattern.
Create three elongated petal templates using sturdy paper or cardboard. Each template should resemble a narrow leaf with a pointed tip and a slightly rounded or straight bottom edge. The widest section should be located near the lower third of the petal, gradually tapering toward the pointed end. Use the following approximate finished dimensions as your guide: large petals measuring 14 cm long and 6 cm wide, medium petals measuring 11 cm long and 5 cm wide, and small petals measuring 8 cm long and 4 cm wide. Add a 0.7 cm seam allowance around the sides and pointed end of each template. The bottom edge will remain open during sewing, so extend the cutting template by approximately 1 cm at the base to provide extra fabric for gathering and attachment.
Finally, organize your fabrics before cutting. A useful arrangement is to distribute red, green, plaid, and holly fabrics evenly among the three petal sizes. For example, large petals can feature alternating solid red, green polka dots, and Christmas plaid. Medium petals can incorporate cream holly fabric, red polka dots, and textured green cotton. Small petals can use contrasting red and green fabrics to create a bright central cluster. Planning the color distribution in advance makes the assembly process smoother and prevents too many identical petals from appearing beside one another. This preparation is an important part of achieving a professional-looking Christmas fabric flower decoration.
How to Cut, Sew, and Shape the Pointed Fabric Petals
Begin constructing the Fabric Christmas flower Pattern by cutting the individual petals. For a full decoration similar to the reference image, prepare approximately 12 large petals, 12 medium petals, and 10 small petals. These quantities can be adjusted depending on the fullness you want. Each petal requires two matching fabric pieces, one for the front and one for the back. Place the fabric right sides together, position the appropriate template on top, and trace around it using a removable fabric marker. Cut carefully along the marked cutting line, making sure both layers remain aligned. Repeat until all 34 pairs of petal pieces have been prepared.
Once the pieces are cut, begin sewing the large petals. Keep each pair with right sides facing inward and secure the edges using sewing clips or pins. Starting at one side of the open base, sew along the curved edge toward the pointed tip using a 0.7 cm seam allowance. Pivot carefully at the point, then continue sewing down the opposite side until you reach the other end of the base. Leave the entire bottom edge open for turning and stuffing. Backstitch at the beginning and end of the seam to prevent the stitching from unraveling. Repeat this process for all large petals before moving on to the medium and small pieces.
After sewing, trim the seam allowances near the pointed ends to reduce excess bulk. Be careful not to cut through the stitching. For narrow points, remove a small triangle of seam allowance close to the tip while leaving enough fabric to maintain a secure seam. If the sides of the petal have noticeable curves, make small clips in the seam allowance where necessary. Turn each petal right side out through the open base. Use a point turner or blunt wooden stick to gently push out the tip without damaging the fabric. Take your time with this step because well-defined points contribute significantly to the flower’s finished appearance.
Press the petals lightly after turning, using an iron temperature appropriate for the fabric. Avoid flattening the pointed tips excessively or stretching the fabric along the seams. The goal is to smooth the stitched edges and establish the petal shape before stuffing. If you want a more structured decoration, you can use lightweight fusible interfacing on one side of each petal before sewing. However, interfacing is optional when using medium-weight quilting cotton and polyester fiberfill. The photograph shows softly rounded petals that maintain their pointed shapes, so a combination of cotton fabric and light stuffing is an appropriate method for reproducing that effect.
Next, add a small amount of polyester fiberfill to each petal. Begin by inserting a tiny portion of stuffing into the pointed tip, using a blunt tool to distribute it gently. Continue adding small amounts until the petal becomes softly rounded. Avoid overstuffing, as too much filling can make the petals rigid and difficult to arrange. Large petals should be fuller near the center and base, while medium and small petals should remain slightly softer to allow close layering. The goal is to create a padded, leaf-like shape that retains its dimension without looking excessively inflated. Leave approximately 1–1.5 cm near the open base relatively free of stuffing for easier attachment.
To finish each petal, fold the raw edges of the opening inward by approximately 0.7 cm. Use a few hand stitches to secure the opening, or run a gathering stitch across the bottom and pull it gently to narrow the base. A gathered base works especially well for this three-dimensional fabric flower pattern because it allows the petals to overlap naturally. Do not close the base into a bulky knot. Instead, flatten or gather it enough to make attachment to the flower center manageable. Continue until every petal has been sewn, turned, stuffed, and secured. Arrange the completed pieces by size so they are ready for assembly.
Assembling the Layered Christmas Fabric Flower Step by Step
The assembly stage transforms the individual fabric pieces into the recognizable Fabric Christmas flower Pattern. Begin by creating a sturdy circular foundation that will support the layered petals. Cut two circles approximately 10 cm in diameter from felt or reinforced cotton fabric. If using cotton, add a layer of firm interfacing between the circles to prevent the base from bending under the weight of the petals. Sew or stitch the circles together around their edges. Mark the center and draw three concentric guide circles with approximate diameters of 8 cm, 5.5 cm, and 3 cm. These guidelines will help you position the petals evenly as you build the flower.
Start with the largest petals, which form the outer layer. Position the 12 large petals around the outer guide circle, with their pointed ends extending outward and their gathered bases facing the center. Arrange them in a radial pattern, similar to the rays of a sun. Alternate the fabric colors and prints to create an attractive composition. Allow neighboring petals to overlap slightly at their bases while keeping their pointed ends visible. Before sewing anything permanently, place all the large petals around the circle and adjust their angles. This dry arrangement helps you determine the spacing and overall shape of the flower.
Once you are satisfied with the arrangement, secure the large petals to the foundation. Use a strong hand-sewing needle and matching thread to stitch through each gathered petal base and the supporting circle. Make several small, firm stitches to ensure the petals remain attached. Work around the entire circle, attaching one petal at a time. Keep the stitches concentrated near the center so they will be concealed by the following layers. If desired, reinforce the attachment points with additional stitches. Although fabric glue can assist with temporary positioning, stitching provides a more durable result, especially when the decoration will be stored and reused during future Christmas seasons.
After completing the outer layer, position the 12 medium petals along the second guide circle. Rotate this layer slightly so the medium petals sit between the larger ones rather than directly above them. This staggered arrangement is essential for creating the lush, overlapping appearance of the flower in the reference image. Continue alternating the Christmas prints, making sure the cream holly fabrics and red plaid pieces remain visible. Attach each medium petal securely through its gathered base and the foundation, catching the underlying petal bases when appropriate. As you work, gently lift and angle the medium petals to create a natural three-dimensional effect.
The final main layer consists of the 10 small petals. Position them around the innermost guide circle, directing their pointed ends upward and slightly inward. This orientation creates the compact central cluster that gives the handmade fabric Christmas flower its distinctive appearance. Unlike the outer petals, which spread widely, the smaller petals should stand closer together. Arrange contrasting red and green pieces around the center, with occasional printed petals for additional visual interest. Sew each small petal securely into place, keeping the gathered bases close together. If a small opening remains in the center, fill it with a miniature padded fabric bud or a few additional tiny petals.
Once all the petals are attached, inspect the flower from above and from the sides. Gently separate overlapping petals to ensure that the different fabrics remain visible. Adjust any pieces that appear too flat, crowded, or uneven. The finished decoration should have a rounded, layered appearance with pointed petals radiating outward in different directions. If you notice gaps, add one or two extra small or medium petals to fill them. You can also use a few hidden hand stitches to hold selected petals at an upward angle. The most important goal is to maintain a balanced shape while preserving the soft, handmade character of the Christmas fabric flower centerpiece.
Finishing, Decorating, and Displaying Your Fabric Christmas Flower Pattern
With the flower fully assembled, the final stage of the Fabric Christmas flower Pattern focuses on finishing the back and preparing the decoration for display. Examine the circular foundation and make sure all petal bases are securely attached. Cut another circle of felt or coordinating cotton fabric approximately 10 cm in diameter to cover the visible stitching on the underside. If using cotton, turn the raw edge inward by approximately 0.7 cm before attaching it. Position the backing over the foundation and hand-sew around the perimeter using a small slip stitch. This creates a clean finish and helps protect the attachment stitches from wear.
If you want to display the flower as a tabletop centerpiece, prepare a small decorative bowl or container that complements the Christmas colors. A simple white ceramic container works particularly well because it allows the bright red and green petals to remain the focal point. Place a piece of floral foam or another stable support inside the container. For a raised display, securely attach a wooden dowel to the underside of the flower using a stitched fabric sleeve or reinforced mounting pocket, then anchor the dowel in the foam. Alternatively, the flower can rest directly on a shallow bowl without a stem. Choose the method that provides the best balance and stability for your particular arrangement.
Another attractive option is turning the Fabric Christmas flower Pattern into a wall or door decoration. To do this, attach a fabric hanging loop to the back of the circular foundation before sewing on the final backing piece. Cut a strip of sturdy cotton fabric approximately 4 cm wide and 18 cm long, fold it lengthwise, and sew along the long edge. Turn it right side out, press it flat, and fold it into a loop. Stitch both ends securely to the upper back portion of the flower. Because the decoration has several padded layers, make sure the hanging loop is strong enough to support its weight. A lightweight wall hook can then hold the finished flower.
For a more traditional Christmas appearance, consider adding small decorative accents that complement the fabric patterns. Tiny fabric-covered buttons, embroidered details, or a miniature padded center can enhance the design without overwhelming the petals. You can also incorporate subtle gold thread into selected seams for a festive finish. However, the flower shown in the reference image relies primarily on the visual richness of its fabric combinations rather than additional embellishments. Keeping the decoration simple allows the plaid, holly prints, polka dots, and textured solid fabrics to create their own decorative effect.
Proper care will help preserve the appearance of your DIY Christmas fabric decoration for many holiday seasons. Because the petals contain polyester fiberfill and the layers are attached to a central foundation, gentle spot cleaning is usually preferable to machine washing. Use a slightly damp cloth to remove dust or small marks, and allow the decoration to dry completely before storing it. Avoid placing the flower near open flames, hot light bulbs, or other heat sources. When Christmas is over, store the decoration in a roomy box with acid-free tissue paper between delicate areas if needed. Avoid compressing the petals for long periods, as excessive pressure can distort their shapes.
The completed Fabric Christmas flower Pattern can also inspire several creative variations. For a rustic farmhouse Christmas theme, use cream, burgundy, sage green, and natural linen fabrics. For a modern holiday arrangement, combine white, silver-gray, and deep forest green. You can also create smaller flowers by reducing the template dimensions and using fewer petals. Miniature versions make attractive package toppers, wreath accents, and decorative ornaments. Larger versions can become statement centerpieces for holiday tables. Once you understand the basic construction method, the possibilities for adapting this layered fabric flower are extensive, making it a rewarding project for anyone who enjoys seasonal sewing and handmade decorations.
Frequently Asked Questions About the Fabric Christmas Flower Pattern
1. Is the Fabric Christmas flower Pattern suitable for beginners?
Yes. This project is suitable for motivated beginners who are comfortable with basic sewing techniques. The individual petals require straightforward stitching, turning, and stuffing. The most time-consuming part is assembling the layers evenly. Beginners can simplify the project by making fewer petals or using only two sizes before attempting a fuller three-layer version.
2. What is the best fabric for making a Christmas fabric flower?
Quilting cotton is one of the most practical choices because it is easy to handle, comes in many Christmas prints, and maintains its shape when lightly stuffed. Medium-weight cotton is particularly suitable for creating pointed petals. You can also experiment with cotton-linen blends, but very thick or slippery fabrics may be more difficult to sew accurately.
3. How many petals are needed for a full Christmas fabric flower?
For the approximate 28–32 cm flower described in this tutorial, use 34 petals: 12 large, 12 medium, and 10 small. The exact number depends on the width of the petals, their placement, and the desired fullness. You can add or remove a few petals to adjust the finished appearance.
4. Can I make the Fabric Christmas flower Pattern without a sewing machine?
Absolutely. Every petal can be sewn by hand using a small backstitch for strength. After turning and stuffing, close the bases with hand stitches and attach them to the foundation. Hand sewing takes longer than machine sewing, but it gives you excellent control over the shape and positioning of each petal.
5. What type of stuffing should I use inside the fabric petals?
Polyester fiberfill is a practical option because it is lightweight, flexible, and easy to distribute inside narrow fabric shapes. Use small amounts at a time to prevent lumps. The petals should feel softly padded rather than tightly packed. Excessive stuffing can make the flower bulky and reduce the natural overlapping effect.
6. How can I make the pointed petals look more professional?
Accurate cutting, consistent seam allowances, and careful trimming are essential. Trim excess fabric near the pointed tips before turning, then use a blunt point turner to shape them gently. Light pressing also improves the appearance of the seams. Avoid pushing too forcefully, which can damage the stitching or create holes at the tips.
7. Can I use leftover fabric scraps for this Christmas sewing project?
Yes. This scrap fabric Christmas craft is an excellent way to use leftover quilting cotton from previous projects. The petals are relatively small, so you do not need large continuous pieces of fabric. Combining coordinated scraps also creates the varied patchwork appearance that makes the finished flower visually interesting.
8. How can I make the flower stand upright in a decorative container?
Use a sturdy wooden dowel attached to a reinforced fabric pocket on the back of the flower. Insert the dowel into floral foam placed inside a stable container. Make sure the flower’s weight is supported properly and that the container is wide or heavy enough to prevent tipping. A shallow bowl can also support the flower directly without requiring a stem.
9. Can this fabric Christmas flower be used outdoors?
The project is primarily intended for indoor decoration. Ordinary quilting cotton and polyester stuffing can absorb moisture, fade in strong sunlight, and become damaged by prolonged exposure to outdoor conditions. If you want to display the flower on a covered porch, protect it from rain and humidity and bring it indoors during unfavorable weather.
10. How long does it take to complete the Fabric Christmas flower Pattern?
The estimated completion time is approximately four to seven hours, depending on sewing experience, the number of petals, and the chosen finishing method. Cutting and sewing the individual petals usually takes the most time. Working in batches can make the process more efficient, especially when preparing several flowers for Christmas decorations.
11. Can I change the colors of the flower for other occasions?
Certainly. Although the Fabric Christmas flower Pattern is designed around traditional holiday colors, the same construction technique can be adapted for other celebrations. Pink and cream fabrics create a romantic floral decoration, while yellow and orange fabrics work beautifully for autumn arrangements. Pastel fabrics can also be used for spring and Easter decorations.
12. How should I store the finished Christmas fabric flower?
Store the flower in a clean, dry container that provides enough space for the padded petals. Avoid stacking heavy decorations on top of it. A sturdy storage box lined with tissue paper can help preserve the flower’s shape. Keep the container away from moisture, direct sunlight, and extreme temperatures to maintain the fabric colors and stuffing.
13. What should I do if my fabric flower looks uneven?
First, check the spacing between the outer petals. If one area looks heavier, gently reposition the nearby petals and secure them with a few hidden stitches. You can also add a small petal to fill an empty space. Unevenness often comes from inconsistent gathering or overlapping, so adjusting the attachment points can significantly improve the finished shape.
14. Can I make a smaller version for Christmas tree ornaments?
Yes. Reduce the petal templates proportionally and use approximately six to eight petals per layer. Choose lightweight cotton and add only a small amount of stuffing to keep the ornament from becoming too heavy. Attach a secure hanging loop to the back, and the miniature flower can become a charming handmade Christmas tree decoration.
15. Is this project a good idea for handmade Christmas gifts?
A handmade fabric Christmas flower can make a thoughtful seasonal gift, especially for someone who appreciates sewing, quilting, and personalized home decorations. You can select fabric colors that match the recipient’s decorating style and present the flower in a small decorative container. Its reusable construction also makes it a lasting alternative to disposable seasonal decorations.
Conclusion: Create a Beautiful Handmade Christmas Flower
The Fabric Christmas flower Pattern combines traditional Christmas colors, creative fabric selection, and accessible sewing techniques to produce an elegant three-dimensional holiday decoration. Throughout this tutorial, you learned how to choose coordinating cotton fabrics, prepare pointed petal templates, cut and sew individual pieces, add soft stuffing, and assemble multiple layers into a full floral arrangement. You also explored several finishing and display options, including tabletop centerpieces, wall decorations, and smaller holiday ornaments.
One of the greatest advantages of this project is its flexibility. By adjusting the petal sizes, changing the number of layers, or experimenting with different fabric combinations, you can create a decoration that reflects your personal style. Whether you prefer traditional red and green Christmas prints or a softer, more contemporary color palette, the same basic sewing method can produce beautiful results. This DIY Fabric Christmas flower Pattern is also an opportunity to enjoy the creative process of handmade holiday decorating. Each petal adds texture, color, and dimension, gradually transforming simple fabric pieces into a decorative flower that can be enjoyed year after year.
EASILY FIND THE FREE PDF FOR THIS PATTERN HERE!
We would love to hear your sincere opinion about this Fabric Christmas flower Pattern! What did you think of the design and the step-by-step instructions? Would you choose traditional Christmas colors or experiment with a different combination of fabrics? Share your honest feedback, creative ideas, and suggestions for improving this project. Your experiences and recommendations can help inspire other sewing enthusiasts to create their own beautiful handmade Christmas decorations.