
The Christmas tree-shaped coasters Pattern is a delightful sewing project that combines festive creativity, practical functionality, and the timeless charm of handmade Christmas decorations. These beautiful fabric coasters bring warmth and personality to holiday tables while protecting furniture from everyday moisture and minor spills. Inspired by traditional Christmas colors and cheerful seasonal prints, this project features layered fabric pieces arranged in the recognizable shape of a Christmas tree. The combination of red, green, cream, and patterned cotton fabrics creates an attractive design that complements both traditional and modern holiday decorating styles. Whether you are preparing handmade gifts, decorating your dining room, or exploring new sewing techniques, these Christmas tree fabric coasters offer a satisfying project that can be completed with basic sewing supplies and a little patience.
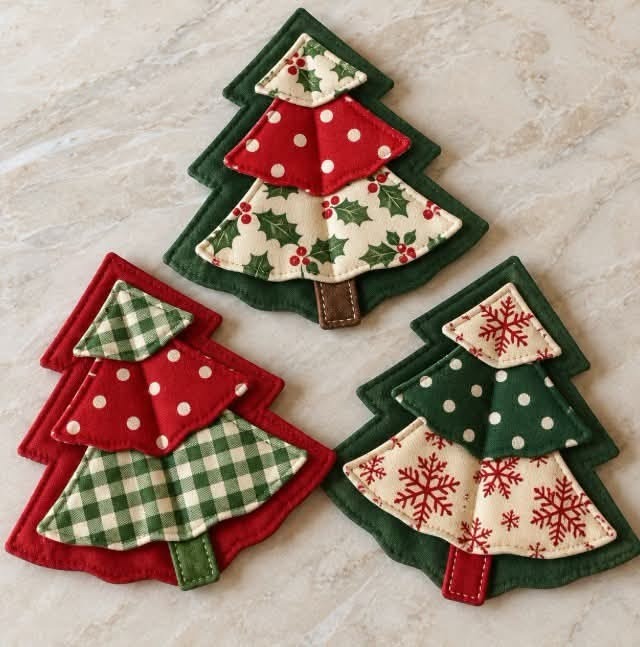
One of the most appealing characteristics of this Christmas tree-shaped coasters Pattern is its layered construction, which creates the appearance of overlapping branches without requiring complicated patchwork techniques. As shown in the reference image, each coaster features a solid-colored Christmas tree silhouette decorated with three curved fabric sections, a small contrasting trunk, and carefully stitched edges. The different fabric patterns, including polka dots, gingham checks, holly leaves, and snowflakes, add visual interest while maintaining a coordinated Christmas theme. These details make the finished coasters look decorative and professionally finished, even when sewn using beginner-friendly methods. By following the instructions carefully, you can recreate the same charming layered effect and customize the colors to match your personal holiday style.
Creating DIY Christmas coasters is also an excellent opportunity to practice useful sewing skills while making something meaningful for your home. Unlike larger quilting projects that require extensive fabric preparation, these small accessories can be assembled using fabric scraps, making them economical and convenient for anyone who enjoys creative sewing. Cotton fabric is particularly suitable because it is easy to cut, press, stitch, and coordinate with other seasonal materials. The project also introduces essential techniques such as tracing templates, working with curved edges, attaching appliqué pieces, and adding lightweight batting for structure. Throughout this tutorial, you will learn how to prepare the materials, construct the Christmas tree silhouette, assemble the decorative fabric layers, and finish the coasters with neat stitching. The result is a beautiful collection of handmade Christmas tree coasters that can become part of your holiday traditions.
Materials and Fabric Preparation for the Christmas Tree-Shaped Coasters Pattern
Before beginning your Christmas tree-shaped coasters Pattern, gather the materials needed to create a durable and attractive finished piece. For three coasters similar to those shown in the photograph, prepare approximately 25 × 35 cm each of red and dark green cotton fabric, along with several smaller pieces of coordinating Christmas prints. Choose fabrics featuring traditional holiday patterns such as snowflakes, holly leaves, polka dots, and gingham checks. You will also need lightweight cotton batting, matching sewing thread, fabric scissors or a rotary cutter, a sewing machine, pins or fabric clips, a washable fabric marker, and an iron. Optional supplies include lightweight fusible interfacing, embroidery thread, and a small ruler for checking measurements. Prewashing cotton fabric is recommended when the finished coasters may be laundered, since it helps reduce unexpected shrinkage.
DISCOVER MORE FREE PATTERNS HERE!
The Christmas tree coaster template determines the final shape and proportions of the project. For a practical coaster, begin with a tree silhouette measuring approximately 15 cm wide and 16 cm tall, excluding the small trunk. Draw a pointed top, two gently stepped branch sections, and a broad curved lower edge. The reference design has a softly rounded appearance rather than sharp geometric branches, making it particularly suitable for decorative appliqué. Add a rectangular trunk measuring approximately 2.5 cm wide and 3.5 cm tall, with part of the trunk hidden behind the tree. These measurements are suggested dimensions for recreating the pictured style rather than measurements taken directly from the photograph. You may enlarge the template slightly if you prefer a more generous surface for mugs.
To create a reusable fabric Christmas tree pattern, draw the complete silhouette on sturdy paper or thin cardboard. Fold the paper vertically before drawing one side of the tree, then cut through both layers to produce a symmetrical shape. Open the paper and inspect the outline, adjusting the curves until both sides look balanced. Make a second template for the decorative branches, dividing the tree into three overlapping sections. The upper section should resemble a small triangular canopy with a softly curved bottom. The middle section should be wider, while the bottom section should form the broadest curved branch. Keep the proportions visually similar to the reference image so that the finished coaster maintains its recognizable Christmas tree appearance.
Choosing the right fabric combination is essential for attractive Christmas patchwork coasters. A dark green background works beautifully with cream holly prints and red polka dots, while a red background creates a striking contrast with green gingham fabric. Another attractive combination uses green polka dots with cream snowflake prints, as demonstrated in the photograph. Select medium-weight quilting cotton because it is stable, comfortable to handle, and available in many holiday designs. Avoid extremely thick decorative fabrics, as several overlapping layers can make the finished coaster bulky. If you are using fabric scraps, press them thoroughly before cutting so that the template pieces remain accurate. Consistent fabric preparation helps prevent puckering and uneven edges during assembly.
The batting gives the quilted Christmas coasters their soft structure and helps create a slightly padded appearance. Lightweight cotton batting is a suitable option because it provides cushioning without making the coaster excessively thick. Cut the batting slightly smaller than the finished tree silhouette to reduce bulk around the outer edges. If your fabric is particularly lightweight, fusible interfacing can be applied to the wrong side of the decorative pieces to improve stability. Keep in mind that ordinary cotton batting and interfacing do not make a coaster heatproof. These coasters are intended for mugs and cups at normal serving temperatures, not for hot cookware or dishes removed directly from an oven.
Once your materials are prepared, organize the pieces for each coaster separately. For every tree, you will need two full-size silhouette pieces for the front and back, one lightweight batting piece, three decorative branch pieces, and two small trunk pieces if using a turned fabric trunk. Use a consistent 0.7 cm seam allowance for the outer construction, and include any necessary turning allowance when cutting the decorative branch pieces. Arrange the selected fabrics on your work surface before sewing to confirm that the colors complement one another. This preparation stage is especially helpful when creating several Christmas tree-shaped fabric coasters, since it keeps the construction process organized and ensures that each finished piece has a coordinated appearance.
Step-by-Step Instructions for Cutting and Sewing the Christmas Tree Coasters
Begin constructing the Christmas tree-shaped coasters Pattern by transferring the main silhouette template onto the wrong side of your chosen cotton fabric. Cut two matching tree shapes for each coaster, adding the planned 0.7 cm seam allowance around the paper template if the template represents the finished outline. Cut one batting piece using the finished silhouette outline, trimming it slightly smaller around the edges. For a traditional Christmas color scheme, use dark green fabric for the first coaster, red fabric for the second, and another shade of green for the third. This creates a coordinated set while allowing each coaster to have its own personality. Keep the fabric pieces flat and aligned to prevent distortion during the next steps.
Next, prepare the small rectangular trunk that extends from the bottom of the tree. Cut two fabric rectangles approximately 4 × 5 cm, including seam allowances, for each trunk. Place the rectangles right sides together and sew along the two long sides and one short end using a 0.7 cm seam allowance. Trim the corners carefully, turn the trunk right side out, and press it flat. Topstitch close to the edges if you want a more defined finish. Brown fabric creates the appearance of a natural tree trunk, while green or red fabric offers a more decorative variation. Position the unfinished end of the trunk at the bottom center of the tree silhouette, with the finished end pointing toward the tree’s interior before the outer seam is sewn.
To construct the main coaster body, place the front tree fabric right side up and position the prepared trunk with its raw edge aligned to the bottom edge, keeping the trunk’s finished end inside the silhouette. Lay the backing fabric right side down over the front piece, carefully matching all outer edges. Place the batting on the wrong side of one fabric layer, ensuring it remains inside the seam allowance. Pin or clip the layers together, paying particular attention to the pointed top and stepped branches. Sew around the tree using a 0.7 cm seam allowance, leaving a turning opening of approximately 4 cm along a relatively straight section. Backstitch at the beginning and end of the seam to secure the stitches.
After sewing the outer shape, trim excess fabric from the corners and clip the seam allowances around inward curves. Be careful not to cut through the stitching. Turn the handmade fabric coaster right side out through the opening, gently pushing out the pointed top and branch corners with a blunt turning tool. Avoid using sharp scissors for this step because they can damage the fabric. Roll the outer seams gently between your fingers so the tree silhouette lies flat. Press the coaster with a warm iron, using a pressing cloth when necessary. Fold the raw edges of the turning opening inward and secure them with clips. Topstitch approximately 0.3 cm from the outer edge, closing the opening and creating the neat stitched border visible in the reference image.
Now prepare the decorative fabric branches that give the layered Christmas tree coasters their distinctive appearance. Cut the upper, middle, and lower branch sections from contrasting Christmas fabrics. For each decorative section, cut a matching backing piece, place the two pieces right sides together, and stitch around the perimeter, leaving a small opening for turning. Trim the seam allowances, clip the curves where necessary, turn each piece right side out, and press carefully. Close the openings with small hand stitches or by incorporating them into the final topstitching. This turned-edge technique creates smooth, finished branch shapes without exposed raw fabric. It also produces the slightly raised appearance of the decorative layers shown in the photograph.
Arrange the three finished branch sections on the front of the tree, beginning with the broad lower section and working upward. The lower branch should sit just above the bottom edge of the main silhouette, leaving a narrow strip of background fabric visible. Position the middle section so that it overlaps the upper part of the lower branch, then place the smallest section near the pointed top. Pin the sections carefully, checking that the overall design looks balanced. Secure each decorative piece with topstitching approximately 0.3 cm from its edge, sewing the lower section first and the upper section last. For the closest resemblance to the photograph, stitch around the visible perimeter of each branch, creating a layered appliqué effect with clearly defined curved edges.
Decorative Finishing Techniques and Creative Christmas Fabric Combinations
The decorative finishing stage transforms a simple Christmas tree-shaped coasters Pattern into a charming handmade accessory. Once the appliqué branches are attached, inspect the stitching around every layer to ensure that the fabric lies flat and that no loose edges remain. The reference image features visible stitching along the curved branch edges, which gives the coasters a handcrafted, lightly quilted appearance. You can recreate this detail using straight machine stitching in a matching or slightly contrasting thread color. A stitch length of approximately 2.5 mm works well for most quilting cotton fabrics. Sew slowly around the curves and pivot carefully at corners, keeping the needle lowered whenever you need to reposition the fabric.
One of the most enjoyable aspects of making Christmas fabric coasters is experimenting with color combinations. Traditional red and green fabrics create an unmistakable holiday atmosphere, especially when paired with cream prints and small white details. For a vintage-inspired look, combine muted forest green, burgundy, and ivory fabrics featuring delicate holly patterns. A farmhouse-style version might feature red gingham, natural linen-colored cotton, and dark green checks. If you prefer contemporary holiday decorations, consider dusty blue, silver-gray, and white fabrics with subtle snowflake motifs. Regardless of the chosen palette, maintain enough contrast between the background tree and decorative branches so that the layered construction remains visible.
Decorative stitching can enhance the appearance of quilted Christmas tree coasters without making the project unnecessarily complicated. Straight topstitching is ideal for beginners because it is easy to control and produces a clean finish. More experienced sewists may prefer a narrow zigzag stitch or a decorative machine stitch around selected branch edges. If your sewing machine includes embroidery-style stitches, test them on a scrap of the same fabric before applying them to the coaster. Keep decorative stitching relatively flat so that mugs can rest securely on the finished surface. Avoid large beads, raised buttons, or bulky embellishments in the central area, as these can interfere with the coaster’s practical function.
The small trunk is another detail that contributes to the overall charm of the DIY Christmas tree coaster pattern. In the photograph, the trunks are made from contrasting fabric in brown, green, and red, giving each tree a slightly different appearance. You can reproduce this variation by selecting trunk fabrics that complement the decorative branches. A brown trunk creates a natural woodland style, while a red trunk coordinates beautifully with snowflake prints. For additional definition, sew one or two straight lines of topstitching along the trunk before attaching it to the main tree. Make sure the trunk is securely enclosed in the bottom seam so that it remains attached during regular handling and washing.
For an especially polished finish, examine the outer silhouette after all decorative pieces have been attached. The tree should maintain a recognizable pointed top, gently stepped branches, and a smooth curved bottom edge. If the outer stitching looks uneven, carefully correct any loose sections before completing the project. Press the finished coaster lightly from the back, taking care not to flatten the decorative layers excessively. A pressing cloth helps protect printed cotton fabrics and prevents unwanted shine. Allow the coaster to cool completely on a flat surface before using it. This final pressing stage helps the Christmas sewing project retain its shape and gives the finished piece a tidy, professional appearance.
When creating a coordinated set, consider varying the arrangement of the decorative fabrics rather than making every coaster identical. One tree might feature a holly-print lower branch, a red polka-dot middle branch, and a small holly-print top. Another could combine green gingham with red polka dots, while a third uses cream snowflakes and dark green patterned cotton. This approach closely reflects the three designs in the reference photograph. Although each coaster looks different, the shared silhouette and consistent stitching create a harmonious collection. These handmade Christmas coasters can be displayed together on a holiday table, arranged beside a coffee station, or packaged as a thoughtful seasonal gift.
Practical Uses, Care Instructions, and Helpful Sewing Tips for Christmas Tree Coasters
The completed Christmas tree-shaped coasters Pattern offers more than an attractive seasonal decoration. These fabric coasters provide a convenient resting place for coffee mugs, tea cups, and other everyday drinkware while adding a festive touch to the table. Their soft construction helps reduce direct contact between cups and delicate furniture surfaces, although absorbency and moisture protection depend on the materials used. For everyday beverages, cotton fabric and cotton batting are practical choices because they are washable and relatively easy to maintain. If condensation is a major concern, consider using a more absorbent inner layer and testing the finished coaster before placing it on moisture-sensitive furniture.
These Christmas tree coasters are particularly suitable for holiday gatherings, family breakfasts, and seasonal coffee tables. Place one beside each dinner setting to introduce a handmade decorative element without overwhelming the table arrangement. They also work beautifully as part of a hot chocolate station, where guests can enjoy the festive shapes and cheerful fabric patterns. For a coordinated presentation, combine the coasters with fabric napkins, quilted placemats, or a simple Christmas table runner made from similar prints. Using related colors throughout the table creates a welcoming atmosphere and makes even a small handmade project feel like an intentional part of the overall holiday décor.
Another appealing use for the Christmas tree-shaped coasters Pattern is creating personalized handmade gifts. A set of three or four coasters can be tied together with a cotton ribbon and presented as a small seasonal gift for friends, relatives, neighbors, or coworkers. You might select fabrics that reflect the recipient’s favorite colors or coordinate with their existing Christmas decorations. Because each coaster requires relatively small fabric pieces, making several sets is an efficient way to use leftover materials from larger quilting projects. Add a simple handmade label or care instruction card if desired. Thoughtful packaging can make these practical accessories feel especially personal while keeping the focus on the craftsmanship.
Proper cleaning helps preserve the appearance of fabric Christmas coasters throughout the holiday season. If the materials are washable, gently hand-wash the coasters in cool or lukewarm water with a mild detergent. Avoid aggressive scrubbing, particularly around the decorative appliqué layers. Rinse thoroughly and press excess water out with a clean towel rather than twisting the fabric. Reshape the tree silhouette while damp and allow it to air-dry flat. If the fabrics and batting tolerate ironing, press the coaster lightly after drying to restore its smooth appearance. Always consider the care requirements of the specific fabrics, thread, batting, and any interfacing used during construction.
Beginners making easy Christmas sewing projects may encounter a few common challenges, especially when working with curved fabric edges. Uneven seams can usually be prevented by cutting accurately, using a consistent seam allowance, and sewing slowly around the branches. If the coaster appears bulky at the corners, trim the seam allowances carefully before turning. Puckering around decorative pieces may indicate that the fabric was not pressed sufficiently or that the layers shifted during stitching. Use pins, fabric clips, or temporary basting stitches to stabilize the pieces before sewing. Practicing on scrap fabric is a useful way to become comfortable with the curves before assembling the final coaster.
Once you become familiar with the construction process, the Christmas tree-shaped coasters Pattern can be adapted for additional holiday projects. Slightly enlarged versions can serve as decorative mug rugs, while smaller versions may become fabric ornaments when fitted with a hanging loop. You can also experiment with reversible designs, using a different Christmas print on each side, although raised appliqué is best reserved for the decorative face. Another option is to create matching sets in several color palettes for different rooms or gift recipients. These variations demonstrate how a simple fabric tree silhouette can become the foundation for numerous creative sewing ideas while preserving the cozy character of the original design.
Frequently Asked Questions About the Christmas Tree-Shaped Coasters Pattern
1. Is the Christmas tree-shaped coasters Pattern suitable for beginners?
Yes. This project is suitable for beginners who are familiar with basic straight stitching and are willing to practice sewing around gentle curves. The construction involves cutting fabric shapes, assembling a padded base, turning stitched pieces right side out, and attaching decorative appliqué layers. Beginners can simplify the project by using fewer decorative sections or selecting fabrics that are easy to handle. Taking time to press the pieces and pin them accurately will make the sewing process much easier.
2. What is the best fabric for making Christmas tree coasters?
Medium-weight quilting cotton is one of the best choices for this project. It is easy to cut, press, and sew, and it comes in a wide variety of Christmas-themed prints. Cotton also provides a comfortable fabric surface for everyday drinkware. Avoid stretchy fabrics and extremely thick materials because they can make the layered construction more difficult to control. For a coordinated appearance, choose prints with similar fabric weights.
3. What size should the finished Christmas tree coasters be?
A practical starting size is approximately 15 cm wide and 16 cm tall, excluding the trunk. This provides enough room for many standard coffee mugs while preserving the decorative Christmas tree silhouette. You can increase the dimensions for larger mugs or reduce them for smaller cups. Always check the diameter of the intended drinkware before finalizing your template, since the narrow upper portion of the tree does not provide the same usable area as the wider base.
4. Do I need a sewing machine to make these Christmas coasters?
A sewing machine is helpful because it makes the construction faster and produces consistent stitching, but it is not essential. You can sew the entire project by hand using a small backstitch for structural seams and a neat running stitch or slip stitch for selected finishing details. Hand sewing requires more time, especially when attaching the decorative branch layers. However, it can produce an attractive handmade result when the stitches are evenly spaced and securely fastened.
5. Can I use fabric scraps for the Christmas tree-shaped coasters Pattern?
Absolutely. This project is an excellent way to use leftover quilting cotton from previous sewing projects. The decorative branches are relatively small, making them suitable for fabric scraps that may be too small for larger patchwork designs. Choose scraps with compatible weights and colors to maintain a balanced appearance. Before cutting, inspect the fabric for damage, wrinkles, or excessive stretching.
6. What type of batting should I use inside the coasters?
Lightweight cotton batting is a practical choice because it adds softness without excessive thickness. A thin cotton batting layer helps the coaster retain its shape while allowing the fabric to remain flexible. Polyester batting can also be used for coasters intended for ordinary cool or moderately warm drinkware, but its heat tolerance varies. Neither option should be treated as a substitute for certified heat-resistant materials when protecting surfaces from very hot cookware.
7. How can I prevent the decorative fabric layers from shifting?
Pin the decorative pieces securely before stitching, or use temporary basting stitches to hold them in position. Pressing each section before assembly also helps maintain its shape. Begin sewing at a stable point and guide the fabric gently without pulling it. If you are working with lightweight cotton, a small amount of suitable temporary fabric adhesive may help, provided it is compatible with the fabric and does not leave residue.
8. Can these handmade Christmas coasters be washed?
Yes, provided all the selected materials are washable. Gentle hand-washing is a good option for preserving the layered appliqué and decorative stitching. Use mild detergent, avoid harsh scrubbing, and allow the coasters to dry flat. Prewashing the cotton before sewing can help minimize shrinkage and color transfer. If you plan to machine-wash the finished coasters, use a gentle cycle and a protective laundry bag, then inspect the stitching afterward.
9. How long does it take to make a set of Christmas tree coasters?
The time required depends on sewing experience, the number of coasters, and the complexity of the decorative layers. A beginner may need approximately one to two hours for the first coaster, including template preparation and cutting. Once the pattern is ready and the construction process becomes familiar, additional coasters can often be completed more quickly. Cutting and preparing several pieces at once is an efficient approach when making coordinated sets.
10. Can I sell Christmas tree coasters made from this pattern?
Handmade fabric coasters can be a suitable product for craft fairs and small handmade businesses. If you create your own templates and designs, you can develop original variations using different fabric combinations and decorative details. Be mindful of any restrictions associated with commercially purchased patterns, licensed fabric designs, or protected artwork. For products intended for sale, prioritize secure stitching, accurate product descriptions, clear care instructions, and appropriate statements about heat resistance.
11. How do I make the Christmas tree shape look symmetrical?
Fold your paper template vertically before cutting the main silhouette. Drawing one side and cutting through both folded layers helps produce matching left and right edges. After opening the template, inspect the pointed top, branch steps, and curved bottom edge. When cutting fabric, keep the template flat and avoid stretching the material. Consistent seam allowances and careful pressing also help maintain symmetry during construction.
12. Are these Christmas tree coasters suitable for hot drinks?
They can be used with many ordinary coffee and tea mugs, but their protective performance depends on the fabric, batting, construction, and temperature of the cup. The coaster should remain flat beneath the mug, and the mug should sit securely without tipping. These fabric coasters are not designed to protect furniture from hot pans, baking dishes, or other high-temperature cookware. For surfaces that are especially sensitive to heat or moisture, use additional protection.
13. What makes layered appliqué different from traditional patchwork?
Traditional patchwork usually involves sewing separate fabric pieces together along their edges to create a larger continuous fabric surface. Layered appliqué, by contrast, places decorative fabric shapes on top of a background fabric and secures them with stitching. The Christmas tree-shaped coasters Pattern primarily uses layered appliqué because the curved decorative branches overlap the solid tree base. This method creates dimension while allowing each fabric print to remain clearly visible.
14. How can I customize the pattern for a modern Christmas theme?
You can replace traditional red and green fabrics with neutral or contemporary colors such as ivory, sage green, dusty blue, or soft gold. Select simple prints with small geometric patterns instead of traditional holiday motifs. Matching thread creates a subtle appearance, while contrasting thread highlights the layered construction. Keep the tree silhouette and curved branches consistent so that the finished design remains recognizable even with an updated color palette.
15. How many coasters should I make for a Christmas gift set?
Sets of four or six are practical choices for households that regularly serve drinks to family members or guests. A smaller set of two or three can also make a charming gift when paired with a mug or other seasonal accessory. Choose a consistent color palette while varying the decorative fabric combinations to make each coaster distinctive. This creates a coordinated collection without making every piece look exactly the same.
Conclusion
The Christmas tree-shaped coasters Pattern is a creative and practical sewing project that brings together festive fabrics, simple construction techniques, and the warmth of handmade holiday decorations. Throughout this tutorial, you learned how to choose suitable cotton fabrics, prepare a symmetrical Christmas tree template, cut the necessary pieces, assemble a padded coaster base, attach a contrasting trunk, and create the three decorative branch layers that give the design its distinctive appearance. You also explored finishing techniques, color combinations, cleaning recommendations, and useful solutions to common sewing challenges.
One of the greatest advantages of these handmade Christmas tree coasters is their versatility. With a few fabric scraps and basic sewing tools, you can create coordinated sets for your own holiday table, prepare thoughtful handmade gifts, or experiment with different decorative styles. The combination of layered appliqué, carefully finished edges, and cheerful Christmas prints makes each coaster a small but meaningful example of traditional fabric craftsmanship.
Whether you are a beginner discovering the joy of sewing or an experienced crafter searching for a relaxing seasonal project, this Christmas tree-shaped coasters Pattern provides an enjoyable way to celebrate the holiday season through creativity. Take your time with each step, choose fabrics that inspire you, and enjoy watching the individual pieces come together into a beautiful finished decoration.
EASILY FIND THE FREE PDF FOR THIS PATTERN HERE!
We would love to hear your sincere opinion about this Christmas tree-shaped coasters Pattern! Did you enjoy the layered Christmas tree design? Which fabric colors and holiday prints would you choose for your own set? Share your honest feedback, creative ideas, and suggestions for improving the project in the comments. Your experiences and recommendations can inspire other sewing enthusiasts to create their own beautiful DIY Christmas fabric coasters and discover new ways to make the holiday season even more special.