
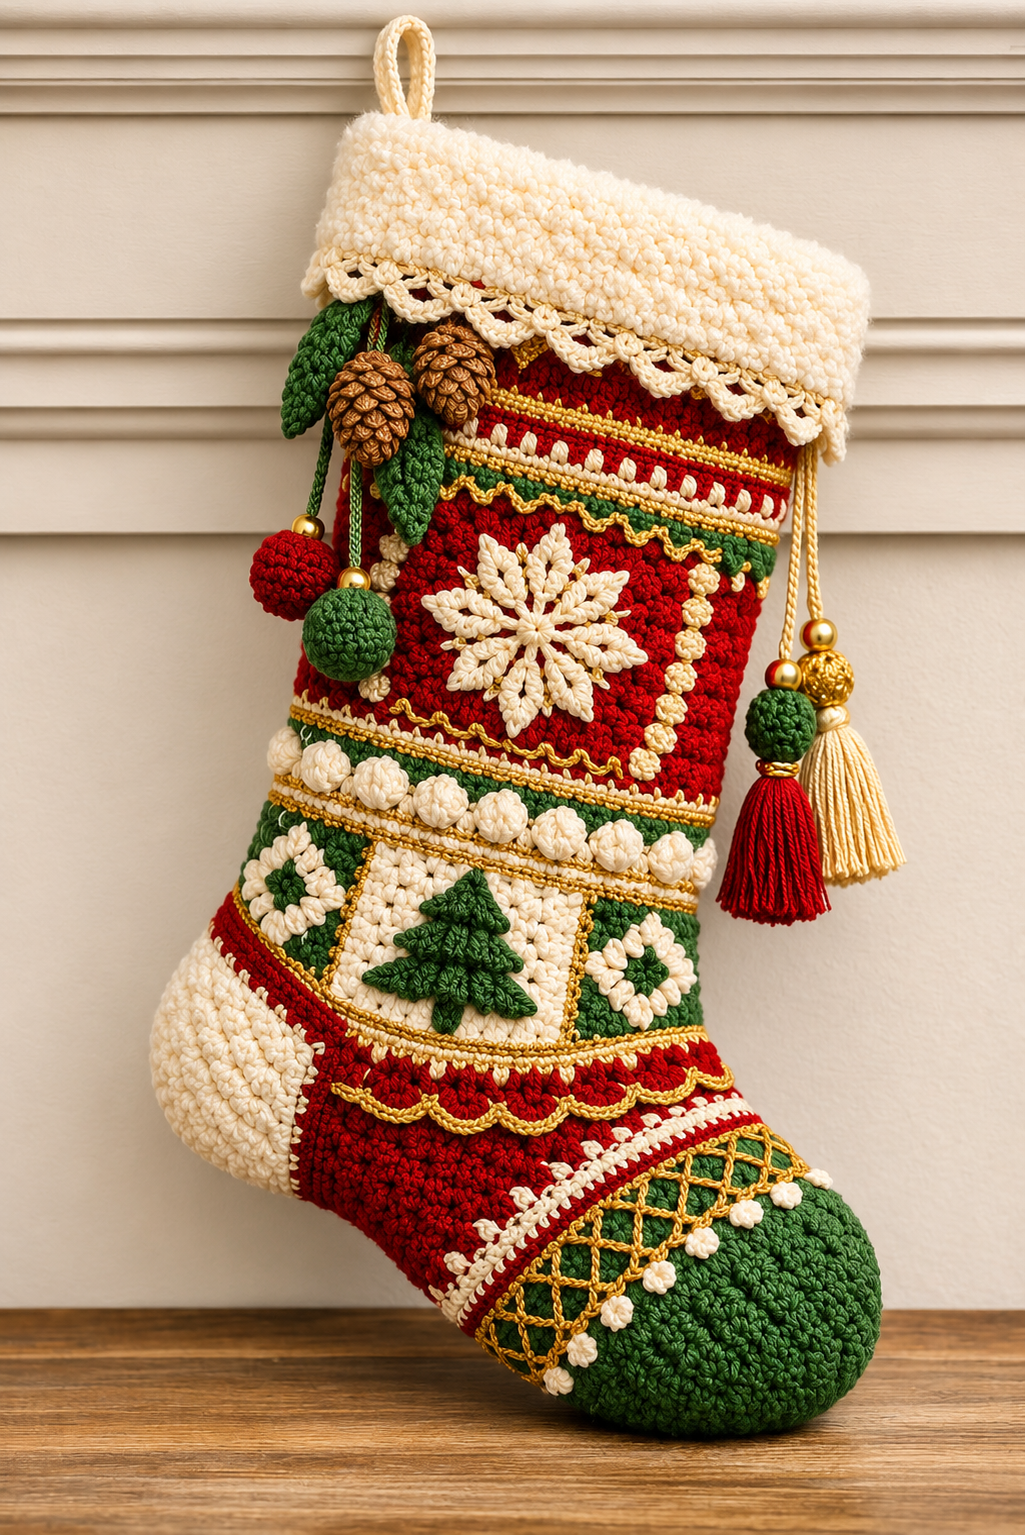
The Crochet Christmas stocking Pattern is a beautiful way to bring handmade warmth, traditional holiday colors, and creative crochet techniques into your Christmas decorations. A handcrafted stocking is more than a festive accessory; it is a meaningful decoration that can become part of your family’s holiday traditions for years. This design combines rich red and green yarn, soft ivory accents, delicate golden details, and dimensional crochet embellishments to create a stocking filled with Christmas charm. Inspired by the elegant stocking shown in the reference image, this project features a textured body, decorative snowflake, miniature Christmas tree, raised floral motifs, and a fluffy folded cuff. Whether displayed on a fireplace mantel, staircase, or decorative wall hook, this Crochet Christmas stocking adds a welcoming and personalized touch to any holiday setting.
One of the most enjoyable aspects of this Christmas stocking crochet Pattern is the opportunity to explore different stitches and decorative techniques while creating something practical and beautiful. The stocking begins with a rounded toe, gradually develops into a comfortable foot section, and continues through a shaped heel and tall leg. Decorative crochet bands divide the stocking into colorful sections, allowing each part of the design to stand out. The raised snowflake becomes the central feature of the upper leg, while the Christmas tree, textured flowers, hanging ornaments, and tassels provide additional dimension. Although the finished stocking appears elaborate, the construction can be approached through manageable stages, making it accessible to adventurous beginners and intermediate crocheters who enjoy learning new techniques.
This detailed Crochet Christmas stocking Pattern uses standard US crochet terminology and provides instructions for creating a complete decorative stocking inspired by the photograph. The project includes the main stocking construction, heel shaping, color changes, textured edging, festive appliqués, and final assembly. The instructions use an original, simplified construction method to reproduce the overall appearance of the pictured design rather than claiming to duplicate every stitch visible in the photograph. You can follow the suggested Christmas palette or personalize the stocking with your favorite seasonal colors. By working carefully through each section and checking your stitch counts, you can create a handmade Christmas decoration that looks festive, feels substantial, and offers plenty of room for small gifts, candy, or holiday surprises.
1. Materials, Crochet Stitches, and Preparation for the Christmas Stocking
The first step in making this Crochet Christmas stocking Pattern is choosing yarn that provides structure while remaining soft enough for decorative stitching. Medium-weight yarn, commonly labeled worsted weight or Category 4 in the United States, is suitable for the main stocking. Choose red for the primary body, forest green for the toe and decorative sections, ivory for the heel and fluffy-looking cuff, and a small quantity of gold-colored yarn for embroidery and trim. A cotton-acrylic blend works particularly well because it provides stitch definition and helps the finished stocking maintain its shape. The photograph features a highly textured, plush appearance, which can be approximated with bobble stitches, surface embroidery, and additional decorative motifs.
DISCOVER MORE FREE PATTERNS HERE!
Gather approximately 180–220 yards of red yarn, 130–170 yards of green yarn, 150–200 yards of ivory yarn, and 30–50 yards of gold-colored yarn. You will also need a 5.0 mm (H/8) crochet hook, a yarn needle, scissors, stitch markers, and a measuring tape. A smaller 3.5 mm or 4.0 mm hook can be useful for delicate appliqués. Optional decorations include lightweight gold beads, small bells, and handmade tassels. For a softer cuff, you may use a compatible fluffy yarn, although a regular worsted-weight yarn worked in textured stitches will also produce an attractive result. These quantities are estimates because yarn consumption varies with gauge and embellishment density.
Understanding the crochet abbreviations is essential before beginning the Christmas stocking Pattern. All stitch terminology follows US crochet standards. The abbreviation ch means chain, sc means single crochet, hdc means half double crochet, dc means double crochet, and tr means treble crochet. The abbreviation sl st means slip stitch, while st and sts refer to stitch and stitches. BLO means back loop only, inc means an increase made by working two stitches into one stitch, and dec means a decrease. The abbreviation sc2tog means single crochet two stitches together. The MR, or magic ring, is used to begin circular motifs. The FO instruction means fasten off.
Several decorative techniques give this Crochet Christmas stocking its distinctive appearance. The bobble stitch creates a raised, rounded texture, while the popcorn stitch produces fuller dimensional details. For a five-double-crochet popcorn, work five dc into the same stitch, remove the hook from the working loop, insert it through the first dc, pick up the dropped loop, and pull it through. A simple bobble can be made by working five unfinished dc into the same stitch and drawing the yarn through all six loops remaining on the hook. The surface slip stitch technique is used to add gold-colored decorative lines after the stocking is assembled. Practice these stitches on a small sample before beginning the main project.
The approximate finished size of this Crochet Christmas stocking Pattern is 43–46 cm long from the top cuff to the bottom of the heel, with a foot measuring approximately 25–27 cm from heel to toe. These measurements are suitable for a medium-sized decorative Christmas stocking. For the main construction, aim for a gauge of approximately 14 sc and 16 rounds per 10 cm, worked in continuous rounds with worsted-weight yarn and a 5.0 mm hook. The exact gauge is less important than maintaining consistent tension, but a firm fabric is desirable if the stocking will hold gifts. Make a small gauge swatch and adjust your hook size if the fabric feels too loose or excessively stiff.
Before starting the actual Pattern, organize the construction into separate stages: toe, foot, heel, leg, cuff, decorative appliqués, and finishing. Use stitch markers to identify the beginning of each round and the heel placement. Unless otherwise specified, work the stocking in continuous rounds without joining, and do not count a beginning chain as a stitch. For decorative bands that require a visible starting point, you may switch to joined rounds. Keep a notebook nearby to record completed rounds and color changes. Preparing your materials and understanding the construction sequence will make the project more enjoyable and help you avoid unnecessary adjustments later.
2. Step-by-Step Crochet Christmas Stocking Pattern: Toe, Foot, Heel, and Leg
Begin the Crochet Christmas stocking Pattern at the rounded toe using forest green yarn. Make a magic ring and work Round 1: 6 sc into the ring (6 sts). Round 2: 2 sc in each stitch (12 sts). Round 3: 1 sc, inc, repeat six times (18 sts). Round 4: 2 sc, inc, repeat six times (24 sts). Round 5: 3 sc, inc, repeat six times (30 sts). Round 6: 4 sc, inc, repeat six times (36 sts). Round 7: 5 sc, inc, repeat six times (42 sts). Round 8: 6 sc, inc, repeat six times (48 sts). Rounds 9–14: work 1 sc in each stitch around. This creates a rounded toe with a slightly textured surface. If you prefer more dimension, replace every fourth sc in Round 12 with a small bobble, keeping the stitch count at 48.
Continue the foot by changing to red yarn at the beginning of Round 15. Work Rounds 15–29 with 1 sc in each stitch around (48 sts per round). To create the decorative appearance seen in the photograph, add ivory and gold accents between the red and green sections. For example, work Round 16 in ivory and Round 17 in red, then add gold surface slip stitches afterward. You can also embroider a diamond lattice across the green toe with gold yarn once the stocking is complete. For a comfortable foot shape, maintain the 48-stitch circumference without increasing. The fabric should remain flexible while holding its structure. After Round 29, the foot is ready for the heel opening.
The heel is created using a short-row heel construction, which gives the stocking its familiar curved shape. At the beginning of Round 30, work 24 sc for the instep, then chain 24 stitches and skip the remaining 24 stitches of the round. Continue from the beginning of the next round across the 24 instep stitches and the 24 foundation chains, giving 48 stitches around the leg opening. The 24 skipped stitches and the underside of the 24 chains form the heel opening. Continue working the leg as described below, and return to the heel opening later. This method is easier to manage than trying to shape the entire heel while working the foot and creates a clear opening for a contrasting ivory heel.
To complete the heel, attach ivory yarn to one corner of the reserved opening. Work 24 sc across the skipped foot stitches and 24 sc into the underside of the foundation chains (48 sts). Place a marker at each side corner, with 24 stitches between markers. Work one round of sc. On the following decrease round, work sc to two stitches before the first marker, sc2tog, move the marker, sc2tog, then repeat the same shaping at the second marker (44 sts). Work one plain round. Repeat the decrease round and plain round sequence until 16 stitches remain. The decrease rounds will contain 44, 40, 36, 32, 28, 24, 20, and finally 16 stitches. Fasten off, leaving a long tail, and use a yarn needle to close the remaining opening securely. This creates a rounded ivory heel that contrasts beautifully with the red foot.
Return to the leg opening and continue the Crochet Christmas stocking Pattern using red yarn. Work Rounds 31–38 with 48 sc in each round. For Round 39, change to ivory and work 48 sc. Round 40: change to green and work 48 sc. Round 41: work 48 sc in green. Round 42: change to ivory and work 48 sc. Rounds 43–50: return to red and work 48 sc per round. Rounds 51–52: work green sc around. Round 53: work ivory sc around. Rounds 54–57: work red sc around. These color changes create decorative horizontal bands and provide a suitable background for the central snowflake and Christmas tree appliqués. The bands can be adjusted slightly to suit your preferred proportions.
To complete the upper leg, continue Rounds 58–61 in red, working 48 sc in each round. Round 62: work 48 sc in green. Round 63: work 48 sc in ivory. Round 64: return to red and work 48 sc. The leg should now be tall enough to support the decorative cuff. Check the overall length before proceeding; if you want a longer stocking, add several plain red rounds before Round 62. Keep the leg circumference consistent to prevent unwanted widening. For extra decorative texture, work one round of surface slip stitches in gold along the boundaries between the red, green, and ivory sections. Fasten off the main body yarn, weave in loose ends, and prepare to add the cuff and appliqués.
3. Creating the Decorative Cuff, Snowflake, Christmas Tree, and Festive Embellishments
The fluffy cuff is one of the most recognizable features of this Crochet Christmas stocking Pattern. Attach ivory yarn to the upper edge of the stocking and work Round 1: 48 sc around. Round 2: 1 sc, 1 bobble, repeat 24 times. Round 3: work 48 sc around. Round 4: repeat the bobble pattern from Round 2. Continue alternating plain sc rounds and bobble rounds until the cuff measures approximately 8–10 cm in height. Work the final round in sc and fasten off. Fold the cuff outward over the top of the stocking, creating a thick, soft-looking border. If desired, work a decorative scalloped edging along the folded edge using sl st, skip 1 st, 5 dc in the next st, skip 1 st, repeated around as space allows.
The central snowflake is an important decorative element in this Christmas stocking Pattern. Using ivory yarn and a 3.5 mm hook, begin with a magic ring. Round 1: ch 1, work 12 sc into the ring, and join with a sl st. Round 2: ch 5, skip 1 sc, sl st into the next sc, repeat six times to create six chain loops. Round 3: in each chain-5 loop, work (sl st, ch 3, sc, ch 5, sc, ch 3, sl st). Repeat around to create six decorative points. Fasten off, leaving a long tail for sewing. Gently block the snowflake into shape and position it on the upper red section of the stocking. Secure each point with small stitches, keeping the design flat against the fabric. For a fuller appearance, embroider short ivory branches between the main points.
The miniature Christmas tree is created separately and attached to the lower decorative section of the leg. Using green yarn, begin with ch 2 and work 2 sc into the second chain from the hook. Turn and work 2 sc in each stitch (4 sts). Continue increasing at the beginning and end of alternate rows until the triangle reaches approximately 10–12 stitches across. To create a layered appearance, work a row of small shells along the front surface using sl st, skip 1 st, 3 dc in the next st, repeated across selected rows. Make a short brown trunk with ch 5 and one row of sc. Sew the trunk behind the lower edge of the tree. Attach the finished tree to an ivory panel on the lower leg, adding a few gold embroidery stitches to suggest decorative lights or garlands.
Small flowers and raised circular motifs help reproduce the rich texture of the photographed Crochet Christmas stocking. To make a simple dimensional flower, begin with an ivory magic ring and work 5 sc into the ring. Join with a sl st. For each petal, work ch 2, 3 dc into the same stitch, ch 2, sl st into the same stitch, then move to the next sc. Repeat until five petals are complete. Make several flowers and attach them along the green and ivory decorative bands. For a smaller bobble flower, create a magic ring, work five popcorn stitches separated by chain stitches, and close the ring tightly. Arrange the motifs in a balanced pattern, leaving enough space for the tree and snowflake to remain the main focal points.
The hanging pinecones, green leaves, and small decorative balls provide additional personality to this Crochet Christmas stocking Pattern. For a simplified pinecone, crochet a small brown oval using a magic ring, increases, and several rounds of sc, then sew overlapping shell-like stitches around its surface to imitate pinecone scales. For a leaf, ch 12, work sc, hdc, dc stitches along one side of the chain, then mirror the stitches along the opposite side to form a pointed oval. Make two or three green leaves and attach them near the upper cuff. Small red and green balls can be created with six sc in a magic ring, followed by two rounds of increases, several plain rounds, and matching decrease rounds. Add a small amount of polyester stuffing before closing each ball, and secure them with short crochet cords.
Finish the decorative elements by making tassels and a sturdy hanging loop. For each tassel, wrap yarn around a piece of cardboard approximately 10–12 cm wide, tie the upper section securely, and cut the lower loops to create an even fringe. Make one red tassel and one ivory tassel, then attach them to the side of the stocking using crochet cords. Add lightweight beads if desired, but secure them carefully and avoid detachable decorations when the stocking will be accessible to young children or pets. To make the hanging loop, ch 30 with doubled ivory yarn, work one row of sc across, and fasten off. Fold the cord into a loop and sew both ends firmly to the inside back of the cuff. Reinforce the attachment with several stitches so the stocking can hang safely when filled with lightweight holiday treats.
4. Finishing Techniques, Customization Ideas, and Care Instructions
Once all the decorative components are complete, inspect the entire Crochet Christmas stocking Pattern for loose ends, uneven stitches, or unsecured embellishments. Use a yarn needle to weave every yarn tail through several stitches on the wrong side of the fabric. Avoid cutting yarn tails too close to the surface because the stocking may stretch slightly when filled. Check the heel seam carefully and reinforce any gaps that could allow small items to escape. If you want a cleaner interior, you may add a simple fabric lining made from cotton or lightweight fleece. The lining should follow the shape of the finished stocking and be attached with small hand stitches just below the cuff.
Blocking helps improve the overall appearance of the Crochet Christmas stocking. Lay the finished piece on a clean towel and gently shape the toe, heel, foot, and leg with your hands. If the yarn is suitable for wet blocking, lightly dampen the stocking and allow it to dry completely in the desired shape. Avoid excessive stretching, especially around the heel and decorative appliqués. For acrylic yarn, gentle shaping is often sufficient, and high heat should be avoided. Arrange the snowflake points, tree branches, and floral petals while the stocking is drying. This finishing step makes the decorative details more visible and helps the stocking maintain an attractive silhouette when displayed.
One of the advantages of this Christmas stocking crochet Pattern is the freedom to customize the colors and decorative motifs. Traditional red, green, ivory, and gold create a classic Christmas appearance, but other combinations can be equally attractive. Burgundy and champagne produce an elegant vintage effect, while pale blue, white, and silver create a winter-inspired design. For a rustic stocking, try cream, brown, olive green, and muted red. You can also replace the snowflake with a crochet star, heart, or personalized initial. If you prefer a simpler project, omit the pinecones and tassels while keeping the decorative cuff and central appliqué. The basic stocking construction remains unchanged.
Personalization makes this Crochet Christmas stocking Pattern especially suitable for family gifts. Consider embroidering a name along the upper cuff using contrasting yarn or attaching small crocheted letters. You can also add a decorative date to commemorate a special Christmas celebration. For matching family stockings, use the same basic construction while varying the colors or central motifs. One stocking might feature a snowflake, another a Christmas tree, and another a festive flower. Handmade stockings can become meaningful keepsakes, especially when they are used year after year. Their individual details make them memorable without requiring expensive materials or complicated equipment.
Proper care will help preserve the texture and shape of the finished Crochet Christmas stocking. Always follow the care instructions on the yarn label, especially when combining different fiber types. For a heavily decorated stocking, gentle hand washing is usually preferable to machine washing. Use cool water and a mild detergent, avoiding aggressive rubbing or twisting. Press excess water out with a clean towel and reshape the stocking while it dries flat. Do not hang the stocking while wet because the weight of the water may stretch the fabric. If the design includes beads, bells, or delicate embroidery, inspect these details before cleaning and handle them carefully.
When storing your finished Christmas stocking Pattern project after the holiday season, place it in a clean, dry storage box or breathable fabric bag. Avoid compressing the fluffy cuff and dimensional appliqués under heavy decorations. If necessary, insert a small amount of clean tissue paper into the foot to help maintain its shape. Keep the stocking away from direct sunlight during long-term storage to reduce the risk of color fading. Before displaying it the following year, gently reshape the cuff, arrange the tassels, and check the hanging loop. With proper care, your handmade crochet stocking can remain a treasured part of your Christmas decorations for many holiday seasons.
Frequently Asked Questions About the Crochet Christmas Stocking Pattern
1. Is this Crochet Christmas stocking Pattern suitable for beginners?
This pattern is best suited to adventurous beginners and intermediate crocheters. The main stocking uses basic single crochet stitches, increases, and decreases, while the decorative elements introduce more advanced techniques such as bobbles, popcorn stitches, surface embroidery, and dimensional appliqués. Beginners can simplify the project by making the stocking without the more elaborate decorations. Working through the construction one section at a time will make the process easier to understand.
2. What is the best yarn for crocheting a Christmas stocking?
Medium-weight worsted yarn is a practical choice because it provides structure, durability, and good stitch definition. Cotton blends are particularly useful for decorative stockings, while acrylic yarn offers softness and easy maintenance. For a fluffy cuff, textured or plush yarn can be used, provided the gauge and thickness are compatible with the main stocking. Choose yarn that holds its shape well and does not stretch excessively when the stocking is filled.
3. How long does it take to make a Crochet Christmas stocking?
The amount of time depends on your crochet experience and the complexity of the decorations. A simple stocking may take approximately six to eight hours, while a heavily embellished version can require twelve to twenty hours or more. The snowflake, Christmas tree, flowers, pinecones, and tassels add considerable detail, so it is helpful to divide the project into several crochet sessions.
4. Can I make this Christmas stocking larger or smaller?
Yes. You can adjust the size by changing the yarn weight, hook size, stitch count, or number of rounds. For a larger stocking, use a thicker yarn and a correspondingly larger hook, or increase the toe circumference before beginning the foot. If you change the stitch count, adjust the heel opening and decorative bands proportionally. For a smaller stocking, use lighter yarn and a smaller hook while maintaining consistent tension.
5. How do I keep the heel from developing holes?
Small holes can appear at the corners where the heel opening meets the foot. To reduce this problem, pick up an additional stitch at each corner when beginning the heel and decrease those extra stitches in the following round. Keep your tension even and avoid pulling the yarn too tightly. After completing the heel, inspect the corners and close any remaining gaps with a yarn needle.
6. Can I use this Crochet Christmas stocking Pattern to make gifts?
Absolutely. Handmade Christmas stockings are thoughtful gifts for family members, friends, neighbors, and craft enthusiasts. You can personalize each stocking with different colors, names, or festive motifs. A matching set can also make a lovely housewarming or holiday gift. If you plan to fill the stockings, reinforce the hanging loop and avoid placing excessively heavy items inside.
7. How can I make the snowflake more dimensional?
Use slightly thicker ivory yarn or crochet the snowflake with a smaller hook to create firmer stitches. You can also add a second, smaller snowflake layer on top of the first one. Secure the center firmly while allowing the outer points to remain slightly raised. Gentle blocking will help define the shape and make the snowflake stand out against the red background.
8. What should I do if my stocking becomes too wide?
Check your stitch count at the end of each round to ensure that you have not added accidental increases. If the count is correct but the stocking is still too wide, your crochet tension may be loose. Try using a smaller hook or working more firmly. A gauge swatch before starting the project can prevent significant sizing problems.
9. Can the stocking be used for real Christmas presents?
Yes, provided the stocking is constructed with sturdy yarn, secure seams, and a reinforced hanging loop. Small gifts, candy, and lightweight holiday surprises are suitable. For heavier contents, place the stocking on a flat surface rather than suspending it from a hook. Decorative beads and delicate appliqués should also be checked regularly to ensure they remain securely attached.
10. How can I make a simpler version of this Christmas stocking?
For a beginner-friendly version, use the same toe, foot, heel, and leg construction but omit the raised flowers, pinecones, and hanging ornaments. Work the body in alternating red and green sections, add a plain ivory cuff, and sew one simple snowflake to the front. This creates an attractive handmade stocking while reducing the number of techniques and the overall construction time.
11. Why does my crochet stocking twist while I work?
A slight spiral is normal when working single crochet in continuous rounds. However, excessive twisting can occur when stitches are added or skipped unintentionally. Use a stitch marker to identify the beginning of each round and count regularly. If you want the decorative color bands to align more precisely, work those sections in joined rounds rather than continuous spirals.
12. How can I create the gold decorative details without using metallic yarn?
You can use mustard yellow, golden beige, or warm ochre yarn to imitate the appearance of gold. Surface slip stitches, simple embroidery, and chain-stitch decorations are excellent techniques for creating decorative borders. These alternatives are often easier to work with than metallic yarn and can produce a softer, more traditional handmade appearance.
13. Is it necessary to line the inside of the stocking?
A fabric lining is optional, but it can improve durability and prevent small objects from catching on the crochet stitches. If you plan to use the stocking mainly as a decorative item, a lining may not be necessary. For stockings intended to hold gifts regularly, a simple cotton lining can help distribute the weight and protect the crocheted fabric.
14. What is the difference between a decorative crochet stocking and a functional stocking?
A decorative stocking focuses primarily on appearance, texture, and embellishments. A functional stocking must also have strong seams, durable yarn, and enough structural support to hold its contents. This Crochet Christmas stocking Pattern can serve both purposes when constructed carefully, although very heavy gifts should not be placed inside a hanging crochet stocking.
Conclusion
The Crochet Christmas stocking Pattern combines traditional holiday colors, practical crochet construction, and beautiful decorative techniques into one memorable handmade project. Throughout this tutorial, you learned how to prepare the materials, understand US crochet abbreviations, create a rounded toe, work the foot, shape the heel, build the leg, and finish the stocking with a textured cuff. You also explored how to make a dimensional snowflake, miniature Christmas tree, decorative flowers, pinecones, tassels, and gold-colored embroidery details.
The finished Crochet Christmas stocking is more than a seasonal decoration. It represents the creativity, patience, and personal care that make handmade Christmas projects so special. Whether you follow the traditional red, green, and ivory palette or create your own combination, the techniques in this Pattern provide a versatile foundation for making beautiful holiday stockings that can be enjoyed for years.
EASILY FIND THE FREE PDF FOR THIS PATTERN HERE!
Now it is your turn to bring this festive crochet project to life! We would love to hear your honest opinion about this Crochet Christmas stocking Pattern. Which decorative detail did you enjoy the most? Would you choose the traditional Christmas colors or experiment with a different palette? Please share your experience, creative ideas, and suggestions for improving the tutorial. Your feedback can inspire new designs and help other crochet enthusiasts enjoy the wonderful tradition of making handmade Christmas decorations.