
The Crochet Christmas tree ornament Pattern is a delightful handmade project that brings warmth, texture, and a charming rustic appearance to holiday decorations. Creating your own crochet Christmas tree ornament is a wonderful way to celebrate the season while enjoying a relaxing and creative activity. These miniature Christmas trees are especially appealing because they combine simple crochet stitches with beautiful layered details, wooden beads, and soft yarn tassels. Whether you are decorating your own Christmas tree, preparing handmade gifts, or creating festive accessories for your home, this pattern offers an enjoyable experience for crocheters of different skill levels. The finished ornaments have a timeless appearance that complements traditional, Scandinavian, farmhouse, and minimalist Christmas decorating styles. With a few basic materials and some patience, you can transform ordinary yarn into a collection of beautiful handmade decorations that can be enjoyed year after year.
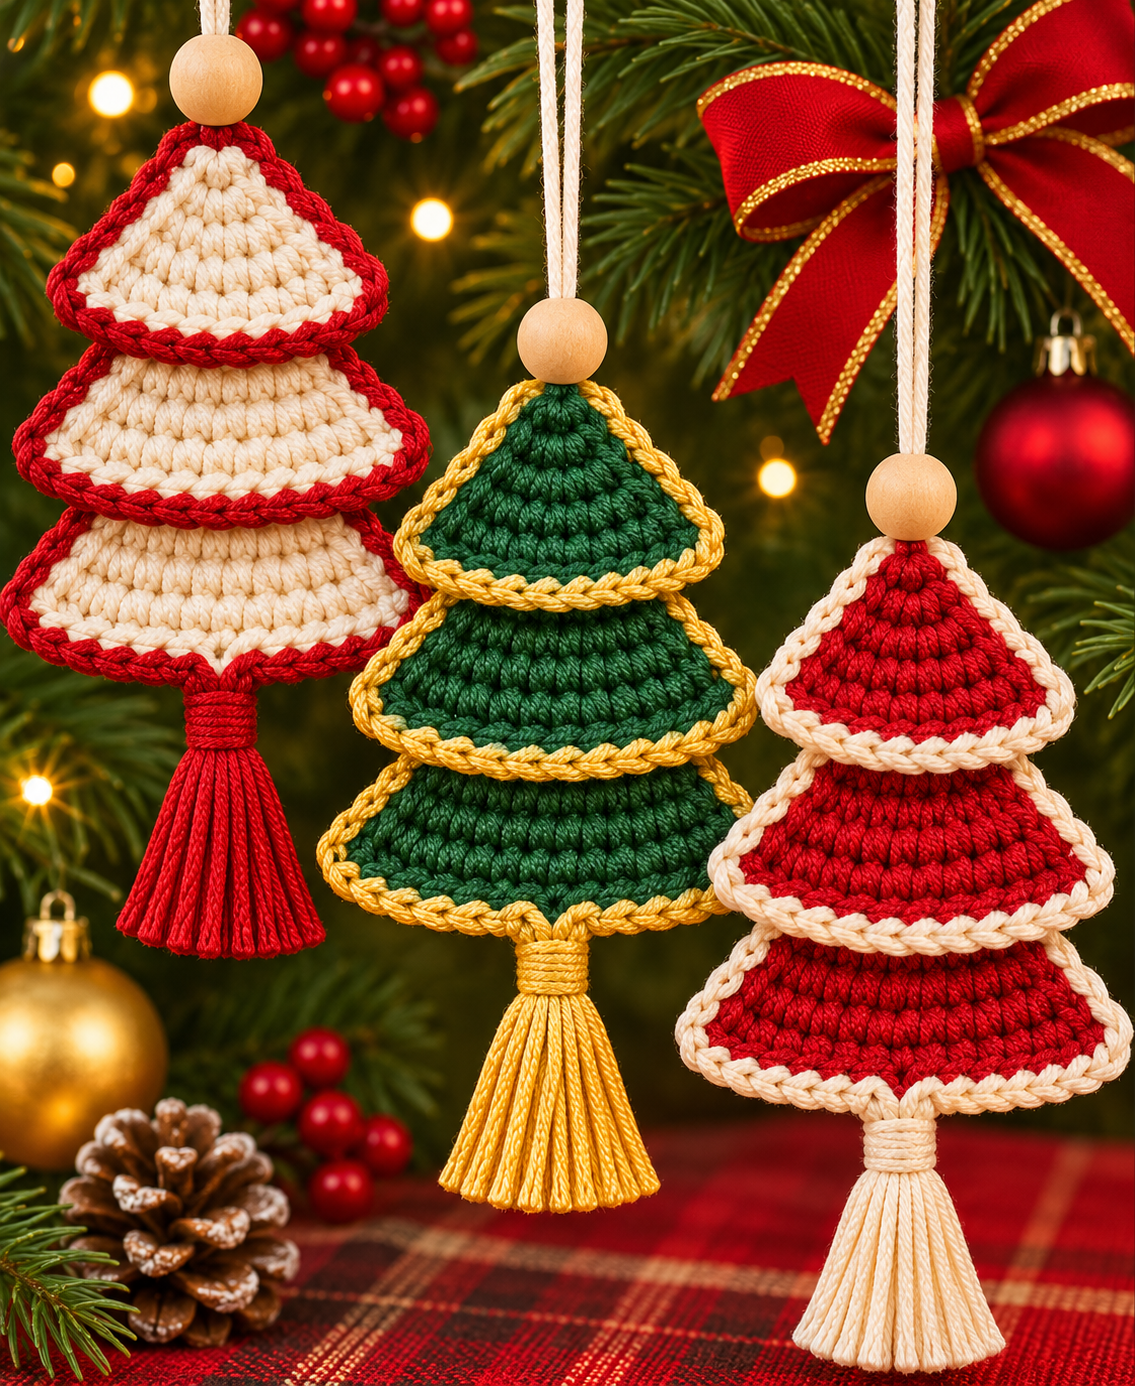
One of the most attractive features of this Crochet Christmas tree ornament Pattern is its three-dimensional appearance, created through overlapping crochet sections that resemble the branches of a real evergreen tree. As shown in the reference image, the ornaments feature three gently curved tiers, each becoming wider toward the bottom to form a recognizable Christmas tree silhouette. The soft cream, sage green, and dusty rose colors give the decorations a sophisticated and cozy appearance, while the natural wooden beads add a subtle organic touch. A matching tassel at the bottom completes the design and introduces movement and additional texture. Although the finished ornaments look detailed, their construction relies primarily on familiar crochet techniques, making them approachable for confident beginners. By following the instructions carefully, you can reproduce the layered structure and personalize the colors, dimensions, and finishing details according to your preferences.
Learning how to make a crochet Christmas tree ornament is also an excellent opportunity to practice fundamental crochet skills while creating something practical and decorative. This tutorial explains the materials, stitch abbreviations, construction methods, shaping techniques, and finishing steps necessary to complete the project from beginning to end. All crochet terminology follows US crochet terms, making the instructions easy to understand for crocheters in the United States. The pattern uses basic stitches such as single crochet (sc), half double crochet (hdc), double crochet (dc), and slip stitch (sl st) to create the ornament’s characteristic texture. You will also learn how to assemble the layered tree, create a decorative tassel, attach a wooden bead, and prepare a secure hanging loop. The result is a handmade Christmas decoration that combines simplicity, creativity, and festive charm in one memorable project.
1. Materials, Crochet Stitches, and Preparation for the Christmas Tree Ornament
Before beginning your Crochet Christmas tree ornament Pattern, gather all the necessary supplies and prepare a comfortable workspace. Choosing the right yarn is particularly important because the ornament needs enough structure to maintain its triangular shape without becoming excessively stiff. Cotton yarn is an excellent choice because it provides clear stitch definition, a smooth surface, and a naturally rustic appearance. Cotton-blend yarn also works well, especially when you want a slightly softer finish. For ornaments similar to those pictured, consider using cream, muted sage green, dusty pink, or other gentle Christmas-inspired colors. Traditional red, forest green, white, and gold combinations can create an equally attractive holiday decoration.
DISCOVER MORE FREE PATTERNS HERE!
Materials needed for one ornament:
- Approximately 15–25 g of worsted-weight cotton or cotton-blend yarn (Category 4).
- A 3.5 mm or 4.0 mm crochet hook, depending on your yarn and tension.
- One natural wooden bead with a hole large enough for the hanging cord.
- Cotton cord or matching yarn for the hanging loop.
- A tapestry needle for sewing and weaving in yarn ends.
- Sharp scissors for trimming the tassel.
- Stitch markers for identifying important stitches.
- A small piece of cardboard approximately 8–10 cm wide for creating the tassel.
- A measuring tape for checking the finished ornament.
- Optional fabric stiffener for a firmer decorative finish.
Understanding the basic US crochet stitch abbreviations is essential before starting the project. The abbreviation ch means chain, which creates the foundation for many crochet projects. Sc means single crochet, a compact stitch that provides stability and structure. Hdc means half double crochet, which creates a slightly taller stitch with a soft, textured appearance. Dc means double crochet, a taller stitch that allows the fabric to expand more quickly. Sl st means slip stitch, commonly used to join rounds, move between stitches, and finish edges. The abbreviation st means stitch, while sts means stitches. You will also encounter inc, meaning increase, which involves working two stitches into the same stitch to expand the fabric.
The miniature Christmas tree shown in the reference image features a layered construction, and this tutorial uses a practical three-tier approach to recreate that appearance. Each tier is worked separately in turned rows, beginning with a narrow top and gradually increasing in width toward the bottom. Once the sections are completed, they are arranged vertically with slight overlaps to imitate the natural branches of an evergreen tree. The top tier is the smallest, the middle tier is slightly wider, and the bottom tier forms the broadest portion of the ornament. This method makes it easier to adjust the proportions and ensures that the finished tree has a recognizable shape. A decorative lower edging gives each section the rounded, slightly raised appearance visible in the photograph.
For this easy crochet Christmas ornament, maintaining consistent tension is more important than achieving an exact gauge. Your stitches should be firm enough to prevent the ornament from becoming floppy, but not so tight that the fabric curls excessively. A slightly smaller crochet hook than normally recommended for your yarn can help create a denser texture. Before beginning the main project, make a small practice swatch using single crochet and half double crochet stitches. Observe how the yarn behaves and determine whether your fabric feels flexible yet stable. If the stitches appear too loose, reduce your hook size slightly. If the fabric feels extremely stiff or difficult to work, try a larger hook.
The finished size of your handmade crochet Christmas tree ornament will depend on the yarn, hook size, and individual crochet tension. Using worsted-weight yarn and a 3.5 mm hook, the assembled tree body may measure approximately 10–13 cm tall and 8–10 cm wide. The decorative tassel can add another 5–7 cm, while the hanging loop may contribute approximately 8–12 cm when extended. These measurements are approximate rather than strict requirements, so slight variations are perfectly acceptable. For a smaller ornament, choose sport-weight yarn and a correspondingly smaller hook. For a larger decoration, use thicker yarn and increase the number of rows in each tier while maintaining the same general shaping method.
Preparing your materials in advance will make the entire crochet Christmas decoration tutorial easier to follow. Cut a length of hanging cord approximately 25–30 cm long and set it aside for later assembly. Select a wooden bead that complements your yarn color, preferably one with a smooth surface and no sharp edges. Keep a tapestry needle nearby because the different crochet sections will need to be joined securely. If you are making several ornaments, consider organizing your yarn colors and beads into small groups before starting. This preparation is especially helpful when creating coordinated decorations for a Christmas tree, holiday garland, or handmade gift collection.
2. Step-by-Step Crochet Pattern for the Three Layered Christmas Tree Sections
The main body of the Crochet Christmas tree ornament Pattern is constructed using three triangular crochet pieces. Each piece begins with a narrow foundation and gradually widens through carefully placed increases. For this beginner-friendly version, the primary shaping stitch is half double crochet (hdc) because it creates a pleasant balance between height, texture, and firmness. Each row begins with a chain 1, which does not count as a stitch, and the work is turned at the end of every row. The increases are placed at both ends of selected rows to create the triangular shape. This written pattern is an original interpretation of the ornament pictured, rather than a verified reproduction of an unseen stitch chart.
Step 1: Crochet the smallest upper section. Begin with a magic ring, or chain 2 and work into the second chain from the hook. Row 1: Work 3 hdc into the ring or foundation chain, then turn. You should have 3 stitches. Row 2: Ch 1, work 2 hdc into the first stitch, 1 hdc into the next stitch, and 2 hdc into the last stitch. You now have 5 stitches. Row 3: Ch 1, work 1 hdc into each stitch across, then turn. Row 4: Ch 1, work 2 hdc into the first stitch, 1 hdc in each stitch until the last stitch, and 2 hdc into the final stitch. You now have 7 stitches. Row 5: Ch 1 and work 1 hdc in each stitch across. Row 6: Repeat the increase instructions from Row 4 to reach 9 stitches. Fasten off, leaving a long tail for assembly.
Step 2: Create the middle section of the tree. Using the same yarn color, begin with a magic ring or chain-2 foundation and work 3 hdc for Row 1. Repeat the same increase sequence used for the upper section, adding two stitches on every even-numbered row and maintaining the stitch count on odd-numbered rows. Continue until you complete Row 10, which should contain 13 hdc stitches. The resulting piece will be wider and slightly taller than the upper tier. Keep your increases symmetrical so the edges remain balanced. If one side begins to curve more than the other, check that you have worked the correct number of stitches in each row. Fasten off with a long sewing tail, and place the completed middle section beside the smaller piece to compare their proportions.
Step 3: Crochet the largest bottom section. Start with the same 3-hdc foundation and continue the established pattern of increasing at both ends of every even-numbered row. Work through Row 14, which should contain 17 hdc stitches. The bottom section should be the widest of the three pieces and will establish the overall width of the Christmas tree. For a fuller ornament, you may add two more rows, increasing to 19 stitches on Row 16. Remember that any additional rows will change the finished dimensions, so adjust the overlap during assembly if necessary. Once the desired width is reached, fasten off and leave enough yarn to attach the section securely to the other tiers.
Step 4: Add the decorative edging to each section. To recreate the rounded, textured lower edges shown in the reference image, attach your yarn at one lower corner of a completed triangle. Work 1 sc into the first stitch along the bottom edge, then continue with 1 sc in each stitch across. If you want a more pronounced decorative border, work a second row of slip stitches through the back loops only, taking care not to pull the yarn too tightly. This creates a subtle raised ridge that visually separates the tiers. Another option is to work reverse single crochet, sometimes called the crab stitch, for a twisted cord-like effect. Repeat the edging on all three pieces, maintaining similar tension so their borders look consistent.
Step 5: Check the shapes and prepare them for assembly. Place the three finished crochet triangles on a flat surface with their narrow points facing upward. Position the smallest section at the top, the middle section underneath it, and the largest section at the bottom. The lower edge of the top piece should overlap the upper portion of the middle piece, while the middle piece should overlap the upper portion of the bottom piece. Aim for an overlap of approximately 1.5–2.5 cm, depending on the dimensions of your crochet pieces. This arrangement creates the characteristic layered evergreen appearance. Adjust the positioning until the edges look balanced and the overall silhouette resembles the ornament in the photograph.
Step 6: Secure the layered Christmas tree structure. Thread a tapestry needle with the long yarn tail from the smallest section and carefully stitch it to the middle section along the concealed overlap. Use small, evenly spaced stitches, catching the back loops where possible to keep the joining stitches discreet. Repeat the process to attach the middle section to the bottom section. Avoid sewing across the entire lower edge of each tier because leaving part of the edge free helps preserve the dimensional layered effect. Once all three sections are attached, gently lift the ornament to check that it hangs evenly. Reinforce any loose connections, weave in the remaining ends, and trim excess yarn carefully.
3. How to Make the Tassel, Wooden Bead, and Hanging Loop
The finishing details are what make this Crochet Christmas tree ornament Pattern particularly charming. In the reference image, each miniature tree features a long yarn tassel extending from the bottom center, giving the impression of a decorative trunk. This tassel adds softness and movement while complementing the textured crochet branches. To make one, wrap matching yarn around a small piece of cardboard approximately 8–10 cm wide. Wrap the yarn 20–30 times, depending on the thickness of the yarn and the fullness you want. Slide a separate piece of yarn beneath the wrapped strands at the top and tie it tightly. Carefully remove the bundle from the cardboard without disturbing the loops.
Step 1: Shape and finish the tassel. After removing the yarn bundle from the cardboard, tie another short piece of yarn approximately 1–1.5 cm below the top to form the tassel’s rounded head. Wrap this piece several times around the bundle to create a neat decorative neck, then secure the ends with a small knot. Use sharp scissors to cut through the loops at the bottom of the tassel. Comb the strands gently with your fingers and trim them to an even length. For a fuller appearance, add more wrapped strands before tying the tassel. Cotton yarn creates a clean, slightly structured tassel, while softer acrylic yarn may produce a fluffier finish.
Step 2: Attach the tassel to the bottom of the crochet tree. Identify the center stitch along the lower edge of the largest triangular section. Thread the tassel’s top yarn tails through the back of the crochet fabric using a tapestry needle. Tie the tails securely on the reverse side and weave them into the surrounding stitches. Make sure the tassel hangs directly beneath the center of the tree rather than leaning toward one side. If necessary, adjust the attachment point before tightening the knot. The tassel should move naturally when the ornament is lifted, but its connection must remain firm enough to withstand normal handling and seasonal storage.
Step 3: Prepare the wooden bead and hanging cord. Cut a piece of cotton cord or matching yarn approximately 25–30 cm long. Fold the cord in half to create a loop, then thread both loose ends through the wooden bead. If the bead opening is narrow, use a tapestry needle or a thin wire loop to guide the cord through the hole. Slide the bead upward until it sits near the folded portion of the cord, leaving enough space for the hanging loop above it. The bead acts as a decorative accent between the crochet tree and the hanging cord. Choose a natural wood finish for a rustic appearance or a painted bead for a more colorful holiday design.
Step 4: Secure the hanging loop to the top of the tree. Insert both loose cord ends through the uppermost stitches of the smallest crochet section, passing from front to back. Adjust the bead so it rests just above the pointed top of the tree. Tie the cord ends securely on the back of the ornament, making sure the loop is large enough to hang comfortably from a Christmas tree branch. A loop measuring approximately 5–7 cm when folded is usually suitable for a small ornament. Reinforce the attachment with a few additional stitches if the yarn is particularly soft or stretchy. Trim any excess cord after checking that the knot is secure.
Step 5: Shape the ornament and refine the layered details. Lay the completed tree on a clean towel and gently adjust the three crochet tiers until they form an even triangular silhouette. If the edges curl slightly, lightly dampen the fabric and shape it with your fingers. You may pin the ornament in place while it dries, taking care not to stretch the stitches excessively. For cotton yarn, gentle blocking can help create smoother edges and more consistent proportions. If you prefer a firmer decoration, apply a small amount of fabric stiffener according to the manufacturer’s instructions. Allow the ornament to dry completely before hanging it or placing it in storage.
Step 6: Inspect the completed handmade Christmas ornament. Hold the ornament by its hanging loop and observe how the different elements fall into place. The wooden bead should remain centered above the tree, the three crochet sections should overlap evenly, and the tassel should hang straight beneath the bottom tier. Check that all knots are secure and that no loose yarn ends remain visible. If the ornament twists when suspended, adjust the cord attachment or redistribute the overlap between the sections. Your completed crochet Christmas tree decoration should now display a charming combination of textured branches, a natural wooden bead, and a matching tassel, closely reflecting the overall style of the reference image.
4. Creative Variations, Decorating Ideas, and Care Tips for Crochet Christmas Ornaments
One of the greatest advantages of this Crochet Christmas tree ornament Pattern is the freedom to experiment with different color combinations. The cream, sage green, and dusty rose ornaments shown in the reference image are ideal for soft, neutral holiday decorating themes. However, you can easily adapt the design to match your personal Christmas color palette. Forest green yarn creates a traditional evergreen appearance, while bright red introduces a cheerful festive touch. White and silver yarn combinations work beautifully in winter-inspired arrangements, and warm beige or caramel tones complement farmhouse interiors. For a coordinated collection, use the same yarn weight and hook size for every ornament while varying the colors.
You can also personalize your handmade crochet Christmas ornaments by adding small decorative embellishments. Tiny embroidered stars, miniature bows, or a few carefully sewn beads can give each tree a unique appearance. For a subtle sparkling effect, choose yarn containing a delicate metallic thread. Another attractive option is to embroider small dots across the branches to resemble Christmas lights or ornaments. Keep additional decorations lightweight so they do not distort the crochet fabric. If the ornaments will be displayed in a home with young children or pets, avoid detachable beads and other small components that could become choking hazards. Simple embroidered details are often a safer alternative for those settings.
The same easy crochet Christmas tree pattern can be adapted into several different decorative projects. Make a collection of miniature trees and attach them to a long crocheted chain to create a festive garland for a mantel, window, or doorway. Use individual ornaments as decorative accents on wrapped Christmas gifts, allowing the recipient to keep the handmade decoration afterward. You can also attach a small tree to a holiday wreath or incorporate several into a seasonal wall hanging. For table decorations, create slightly larger trees and arrange them around candles that are not lit, greenery, and other nonflammable decorative items. Always keep yarn ornaments away from open flames and direct heat sources.
If you enjoy making gifts, this Crochet Christmas tree ornament Pattern offers a thoughtful way to share handmade creativity with family and friends. A set of three ornaments in coordinating colors makes a lovely seasonal present, especially when packaged in a small reusable fabric bag or decorative box. You might choose colors that match the recipient’s holiday decorations or create a personalized collection using their favorite shades. Adding a small handwritten gift tag with the year can make the ornament even more meaningful. Handmade decorations often become cherished keepsakes because they represent the time, care, and attention invested in creating them.
Proper care will help your crochet Christmas decorations remain attractive for many holiday seasons. Cotton ornaments can usually be spot-cleaned with a damp cloth and a small amount of mild detergent, but always consider the yarn manufacturer’s care instructions. Avoid soaking ornaments that contain wooden beads because prolonged exposure to moisture may affect the wood’s appearance. If the tassel becomes tangled, gently separate the strands with your fingers and trim any uneven ends. Before storing the decorations, make sure they are completely dry to prevent unwanted odors or mildew. Place them flat in a breathable storage container and avoid compressing the layered sections beneath heavy objects.
For crocheters interested in improving their skills, repeating this crochet Christmas ornament tutorial provides valuable practice in stitch consistency, shaping, and finishing techniques. Making several ornaments allows you to compare different yarn types, hook sizes, and edging methods. You may discover that a slightly smaller hook creates sharper stitch definition or that an additional edging row produces a more pronounced layered appearance. Keeping notes about your adjustments will make future projects easier and help you develop your own preferred version of the pattern. With each ornament, your confidence in crochet construction and decorative finishing will continue to grow, making this project both enjoyable and educational.
Frequently Asked Questions (FAQ) About the Crochet Christmas Tree Ornament Pattern
1. Is this Crochet Christmas tree ornament Pattern suitable for beginners?
Yes. This pattern is suitable for confident beginners who already understand basic crochet stitches, including chain (ch), single crochet (sc), half double crochet (hdc), and slip stitch (sl st). The triangular sections use a straightforward increase sequence, and the assembly process requires only basic sewing techniques. Beginners may benefit from practicing increases and maintaining consistent stitch counts before starting the complete ornament.
2. What is the best yarn for crocheting Christmas tree ornaments?
Cotton yarn is one of the best options because it provides excellent stitch definition and helps the ornament maintain its shape. Cotton-blend yarn is also suitable, particularly when a softer finish is desired. Worsted-weight yarn works well for the dimensions described in this tutorial, while lighter yarn can be used for smaller decorations. Choose a yarn that feels comfortable to crochet and produces a fabric with enough structure to support the layered design.
3. How long does it take to crochet one Christmas tree ornament?
The time required depends on your crochet experience and the complexity of the finishing details. An experienced crocheter may complete one ornament in approximately 60–90 minutes, while a beginner may need two or three hours. Preparing the tassel, attaching the wooden bead, and assembling the sections can take additional time. Working carefully is more important than finishing quickly, especially when creating ornaments intended as gifts.
4. Can I make this crochet Christmas tree ornament without a wooden bead?
Absolutely. The wooden bead is decorative rather than essential to the construction. You can replace it with a small crocheted ball, a fabric bow, or a simple knot made from matching yarn. You may also attach the hanging loop directly to the top of the tree for a more minimalist appearance. Removing the bead is a practical option when creating decorations for households with small children or pets.
5. How can I make the crochet Christmas tree ornament larger or smaller?
To make a larger ornament, use thicker yarn, a larger hook, or add more increase rows to each triangular section. To create a smaller ornament, choose thinner yarn and a smaller crochet hook. You can also reduce the number of rows in each tier, provided that the three sections maintain progressively increasing widths. Always compare the pieces before assembly to ensure the finished tree has balanced proportions.
6. Why are the edges of my crochet Christmas tree curling?
Curling may occur when your crochet tension is too tight, the hook is too small, or the increases are not distributed evenly. Check your stitch counts and confirm that you are working the correct number of increases in each row. If the fabric continues to curl, try using a slightly larger hook. Gentle blocking after completing the sections can also help smooth the edges and improve the finished shape.
7. Can I use acrylic yarn instead of cotton yarn?
Yes. Acrylic yarn is a practical alternative and is available in a wide variety of colors. However, acrylic may behave differently from cotton, particularly when blocking or shaping the finished ornament. Use a suitable hook size and maintain consistent tension to prevent the layers from becoming too loose. Avoid applying direct heat to acrylic yarn because excessive heat can permanently damage the fibers.
8. How do I keep my crochet Christmas tree ornaments from losing their shape?
Using firm stitches and a relatively small crochet hook will help the ornaments maintain their structure. You can also lightly block cotton pieces before assembly or use a suitable fabric stiffener if additional firmness is needed. Store the ornaments flat and avoid placing heavy objects on top of them. Proper storage will help preserve the layered branches and prevent the tassels from becoming misshapen.
9. Can I sell Christmas ornaments made from this pattern?
You can generally sell ornaments you personally make using these instructions, subject to applicable laws and any relevant third-party rights. When selling handmade decorations, focus on consistent craftsmanship, secure assembly, and accurate descriptions of materials and dimensions. Attractive photographs and coordinated color collections can help customers understand the appearance and quality of your finished ornaments.
10. What colors work best for handmade crochet Christmas ornaments?
Traditional Christmas colors such as red, green, white, and gold are always popular choices. However, neutral shades like cream, beige, sage green, and dusty rose create a softer and more contemporary appearance. You can also experiment with navy blue, silver, burgundy, or pastel tones. Choosing colors that complement your existing Christmas decorations will help create a cohesive seasonal display.
11. How do I make the tassel look fuller and more professional?
For a fuller tassel, wrap additional strands of yarn around your cardboard template before tying the bundle. Make sure all strands are approximately the same length and secure the neck tightly to prevent the yarn from slipping. After cutting the loops, gently straighten the strands and trim the ends evenly. Using the same yarn as the crochet tree creates a coordinated appearance, while a contrasting color can add visual interest.
12. Can these crochet Christmas tree ornaments be washed?
Cleaning depends on the yarn and decorative components used. If the ornament is made from washable yarn without delicate embellishments, gentle spot-cleaning is usually the simplest approach. Avoid soaking wooden beads or decorations that have been treated with stiffener unless the product instructions specifically allow it. Allow the ornament to air-dry completely before storing or displaying it again.
13. How many crochet Christmas tree ornaments can I make from one skein of yarn?
The number depends on the skein size, yarn weight, ornament dimensions, and tassel fullness. If each ornament uses approximately 15–25 g of yarn, a 100 g skein may provide enough material for roughly four to six small ornaments. This estimate can vary, so weighing your first completed ornament is a helpful way to calculate yarn requirements for larger batches.
14. Can I turn this pattern into a Christmas garland?
Yes. Create several completed trees and attach their hanging loops to a long crochet chain or sturdy decorative cord. Space the ornaments evenly and alternate colors for a balanced appearance. A garland made with cream, sage green, and dusty rose trees can create a beautiful handmade holiday accent. Secure each ornament carefully so it hangs straight and does not slide along the cord.
Conclusion: Create Beautiful Handmade Christmas Decorations with Crochet
The Crochet Christmas tree ornament Pattern is a charming and rewarding project that combines traditional crochet techniques with creative holiday decorating. Throughout this tutorial, you learned how to select suitable yarn, understand essential US crochet stitches, shape three triangular sections, create decorative edging, assemble the layered tree, and complete the ornament with a handmade tassel, wooden bead, and hanging loop. These techniques provide a practical foundation for creating beautiful miniature Christmas trees with a textured, dimensional appearance.
One of the most enjoyable aspects of this project is its versatility. By changing the yarn colors, adjusting the size, or adding subtle embellishments, you can create ornaments that complement almost any Christmas decorating theme. Whether you prefer traditional festive colors or the soft neutral palette shown in the reference image, each handmade tree can reflect your personal creativity. The pattern also provides an opportunity to practice important crochet skills while producing decorations that can be displayed, gifted, or incorporated into larger holiday projects.
Making your own crochet Christmas tree ornaments is about more than decorating a Christmas tree. It is also a way to enjoy the creative process, develop your crochet abilities, and make meaningful handmade items that can become part of your holiday traditions. With a little yarn, a crochet hook, and careful attention to the finishing details, you can create a collection of beautiful ornaments to enjoy for years to come.
EASILY FIND THE FREE PDF FOR THIS PATTERN HERE!
Now we would love to hear from you! What do you think about this Crochet Christmas tree ornament Pattern? Would you make your ornaments in traditional Christmas colors, or would you choose soft shades such as cream, sage green, and dusty rose? Please leave your honest opinion, creative suggestions, and personal experiences in the comments. Your feedback can inspire new ideas, help other crochet enthusiasts, and make future tutorials even more enjoyable. Happy crocheting, and may your holiday season be filled with creativity, warmth, and beautiful handmade decorations!