
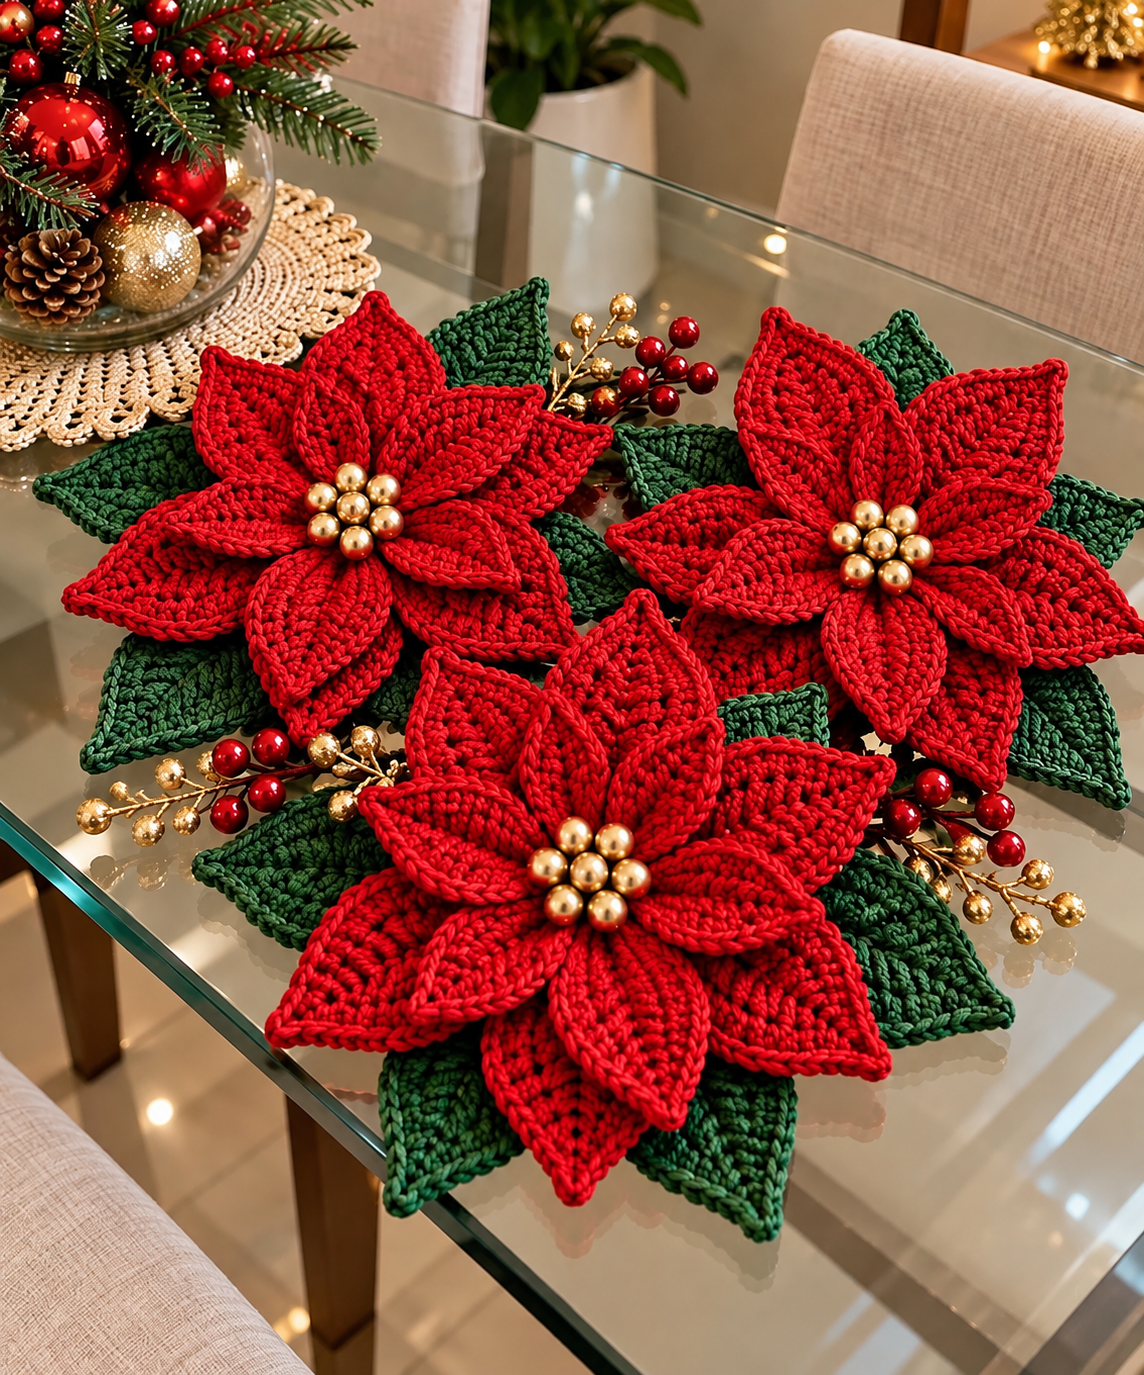
The Crochet Placemat with a Poinsettia Motif Pattern is a beautiful way to bring handmade elegance, festive colors, and traditional Christmas charm into your home. Inspired by the vibrant red poinsettia flowers and deep green leaves associated with the holiday season, this crochet project transforms a simple table decoration into a stunning handmade centerpiece. With its layered petals, textured stitches, and delicate golden accents, the finished design adds warmth and personality to dining tables, coffee tables, and Christmas displays. Whether you enjoy creating seasonal decorations or want to explore new crochet techniques, this pattern offers a rewarding opportunity to combine creativity with practical craftsmanship. The arrangement shown in the reference image features three dimensional poinsettia flowers surrounded by pointed green leaves and decorative golden berries, creating a rich, festive appearance.
One of the most appealing qualities of the Crochet Placemat with a Poinsettia Motif Pattern is its versatility. Although poinsettias are traditionally associated with Christmas, their elegant floral shape makes them suitable for winter decorations and handmade gifts throughout the season. This project combines several fundamental crochet techniques, including chain stitches, single crochet, half double crochet, double crochet, and treble crochet. These stitches are worked together to create pointed petals with raised textures and decorative edges. The layered construction gives each flower a realistic appearance, while the green leaves provide contrast and visual balance. Beginners who already understand basic crochet stitches can gradually develop their skills, while experienced crocheters can experiment with different yarn textures, colors, and arrangements to create personalized versions.
Creating a handmade crochet poinsettia placemat is also an enjoyable way to celebrate traditional needlework and the beauty of handmade Christmas decorations. Unlike mass-produced table accessories, every crocheted flower carries small details that reflect the maker’s individual style. The finished project can be displayed beneath decorative candles, arranged around a holiday centerpiece, or used as a festive table accent. For a design similar to the photograph, three large red poinsettias are positioned in a triangular arrangement, surrounded by green leaves and small golden ornaments. In this tutorial, you will learn how to select suitable materials, crochet pointed flower petals, construct decorative leaves, assemble the individual elements, and finish the project professionally. The instructions use US crochet terminology, making the pattern accessible to crocheters throughout the United States.
1. Materials and Crochet Stitches for the Poinsettia Placemat Pattern
Before beginning the Crochet Placemat with a Poinsettia Motif Pattern, gather the materials needed to achieve a structured and decorative finish. The photographed arrangement has thick, well-defined stitches that help the petals maintain their pointed shapes. A smooth cotton yarn or a firm cotton-blend yarn is an excellent choice because it provides stitch definition and durability. Medium-weight yarn works particularly well for this project, although thinner yarn can be used to create smaller flowers. Select a bright Christmas red for the petals, forest green for the leaves, and optional metallic gold accessories for the flower centers. Using consistent yarn thickness throughout the project helps the finished elements maintain balanced proportions.
DISCOVER MORE FREE PATTERNS HERE!
For a medium-sized decorative arrangement measuring approximately 40–45 cm across, prepare the following supplies:
-
Red medium-weight cotton yarn, approximately 250–350 g.
-
Dark green cotton yarn, approximately 120–180 g.
-
Crochet hook, size 3.5 mm or 4.0 mm, depending on yarn thickness.
-
Yarn needle for joining and finishing.
-
Sharp scissors.
-
Stitch markers.
-
Measuring tape.
-
Six to eight gold-colored beads for each flower center.
-
Optional decorative golden berry stems.
-
Matching sewing thread for attaching decorative elements.
-
Optional fabric backing or a crocheted connecting base.
Understanding the basic US crochet abbreviations is essential before working on the flower petals and leaves. This pattern uses familiar stitches arranged in different combinations to create curved surfaces and pointed edges. The abbreviations below will appear throughout the tutorial, and each one represents a specific technique used in the construction process.
| Abbreviation | US Crochet Term |
|---|---|
| ch | Chain |
| sl st | Slip stitch |
| sc | Single crochet |
| hdc | Half double crochet |
| dc | Double crochet |
| tr | Treble crochet |
| st / sts | Stitch / stitches |
| sp | Space |
| inc | Increase |
| dec | Decrease |
| BLO | Back loop only |
| FLO | Front loop only |
| RS | Right side |
| WS | Wrong side |
The chain stitch (ch) creates the foundation for each individual petal and leaf. To make a chain, form a slip knot, insert the crochet hook, yarn over, and pull the yarn through the loop. Repeat this movement until the required number of chains has been completed. Chains are also useful for creating small spaces between stitches and forming pointed tips. When working this pattern, avoid pulling the foundation chains too tightly, because tight chains can make the petals curl unevenly. Maintaining a comfortable, consistent tension will help the flower components lie naturally when assembled.
The single crochet (sc) is used to create firm edges and secure sections of the flower. Insert the hook into the indicated stitch, yarn over, and pull up a loop. Yarn over again and pull through both loops on the hook. The half double crochet (hdc) provides slightly more height and helps create smooth transitions between the narrow petal tips and wider sections. For a half double crochet, yarn over, insert the hook, pull up a loop, yarn over, and pull through all three loops. Combining these two stitches gives the petals a clean outline without excessive bulk.
The double crochet (dc) and treble crochet (tr) are responsible for creating the fuller, elongated sections of the poinsettia petals. Double crochet is made by yarning over, inserting the hook, pulling up a loop, and completing the stitch in two stages. Treble crochet begins with two yarn overs and is completed by pulling through two loops at a time until one loop remains. These taller stitches help the petals expand naturally toward their widest points. The pattern also uses increases, which means working more than one stitch into the same stitch, and decreases, which combine stitches to reduce width. Together, these techniques produce the characteristic pointed shape of a poinsettia flower.
For the best results, crochet a small practice sample before beginning the complete arrangement. A suggested gauge is approximately 16–18 sc stitches across 10 cm, although the exact measurement depends on your yarn, hook, and tension. Gauge is not critical for decorative flowers, but it helps maintain consistency between the individual petals. If your stitches appear loose or the petals do not hold their shape, try using a slightly smaller hook. If the fabric feels excessively stiff or difficult to work, increase the hook size slightly. The goal is to create a flexible but structured crochet fabric that can support the layered appearance of the finished Christmas poinsettia crochet placemat.
2. How to Crochet the Red Poinsettia Flower Petals Step by Step
The most recognizable feature of the Crochet Placemat with a Poinsettia Motif Pattern is the arrangement of overlapping red petals. The reference photograph shows three large flowers, each with multiple pointed petals arranged in layers. To recreate this appearance, the following original, photo-inspired pattern uses two petal sizes: larger petals for the bottom layer and smaller petals for the upper layer. The photograph does not provide an exact stitch chart, so these written instructions offer a practical construction designed to achieve a similar look rather than claiming to reproduce an unseen original pattern. Each flower will have six large petals and six smaller petals, giving it a full, dimensional appearance.
Begin by crocheting the large poinsettia petals using red yarn. Each petal is worked in rows, starting at the narrow base, expanding toward the middle, and decreasing toward the pointed tip. Follow these instructions for one large petal:
Large petal pattern — make 6 per flower
-
Row 1: Ch 4. Sc in the second ch from the hook and in each remaining ch. You should have 3 sc. Ch 1 and turn.
-
Row 2: Work 2 sc in the first st, sc in the next st, and 2 sc in the last st. You should have 5 sts. Ch 1 and turn.
-
Row 3: Work 2 sc in the first st, sc across until the last st, and 2 sc in the last st. You should have 7 sts. Ch 1 and turn.
-
Row 4: Repeat the same increase method to obtain 9 sts. Ch 1 and turn.
-
Row 5: Repeat the increase method to obtain 11 sts. Ch 1 and turn.
-
Rows 6–8: Work 1 sc in each st across, maintaining 11 sts. Ch 1 and turn after each row.
-
Row 9: Sc2tog, sc in the next 7 sts, sc2tog. You should have 9 sts. Ch 1 and turn.
-
Row 10: Sc2tog, sc in the next 5 sts, sc2tog. You should have 7 sts. Ch 1 and turn.
-
Row 11: Sc2tog, sc in the next 3 sts, sc2tog. You should have 5 sts. Ch 1 and turn.
-
Row 12: Sc2tog, sc in the next st, sc2tog. You should have 3 sts. Ch 1 and turn.
-
Row 13: Sc3tog to form the pointed tip. Fasten off, leaving a tail for assembly.
To create the smaller upper petals, use the same shaping principle but reduce the overall length and width. These petals will sit above the larger ones and give the flower its dimensional appearance. Begin with ch 4 and work 3 sc across the foundation. Increase by two stitches on each following row until reaching 9 sts. Work two rows evenly, then decrease by two stitches on each row until three stitches remain. Finish with sc3tog to create a pointed tip. Repeat this process until you have six smaller petals for each flower. The smaller petals should measure approximately 8–10 cm long, while the larger petals may measure approximately 11–13 cm, depending on yarn and gauge.
Once the petals have been completed, add a decorative crochet border to give each piece a more defined outline. Attach the red yarn at the narrow base of a petal and work sc stitches evenly along the outer edge. Place approximately one sc into each row end, adjusting the spacing so the fabric remains flat. At the pointed tip, work (sc, ch 2, sc) into the tip stitch to emphasize its shape. Continue down the opposite side and finish with a sl st. For a more pronounced outline, work a second round of slip stitches through the back loops. This technique creates a slightly raised edge that resembles the decorative borders visible in the photograph.
The petals in the reference image also feature textured central sections. To achieve a similar appearance, create a raised central vein using surface slip stitches. Thread the yarn through the fabric at the narrow base and bring the hook to the front. Work surface slip stitches along the middle of the petal toward the tip, following the natural direction of the crochet rows. Keep these stitches loose enough to prevent puckering. Alternatively, use a yarn needle to embroider a straight line with matching red yarn. This subtle detail adds depth and makes the flower look more realistic without complicating the basic construction.
After finishing all the petals, arrange them into two overlapping layers. Place the six large petals in a circular formation, with their narrow bases meeting at the center and their pointed tips facing outward. Secure the bases with a yarn needle and matching red yarn, stitching through several rows to create a stable foundation. Position the six smaller petals above the larger ones, rotating the upper layer slightly so the petals fill the gaps below. Sew the second layer securely into place. Repeat this assembly process for all three flowers. The result should be three full, layered crochet poinsettia flowers ready for their decorative centers.
3. Crocheting the Green Leaves and Assembling the Christmas Placemat
The green leaves are essential to the overall design of the Crochet Placemat with a Poinsettia Motif Pattern because they provide contrast and support the vibrant red flowers. In the reference image, the leaves are elongated, pointed, and arranged beneath the flower petals. Their dark green color creates a natural-looking background that enhances the festive appearance of the arrangement. For this tutorial, each flower will have approximately six green leaves, although additional leaves can be made if you prefer a fuller design. The leaves are crocheted individually using a simple combination of stitches that gradually increase and decrease in height.
To make one pointed crochet poinsettia leaf, begin with dark green yarn and follow these instructions:
Green leaf pattern — make approximately 18
-
Foundation: Ch 16.
-
Side 1: Starting in the second ch from the hook, work 1 sc, 1 hdc, 2 dc, 6 tr, 2 dc, 1 hdc, and 1 sc.
-
Leaf base: Work 3 sc into the final foundation ch to turn around the end.
-
Side 2: Working along the opposite side of the foundation chain, work 1 sc, 1 hdc, 2 dc, 6 tr, 2 dc, 1 hdc, and 1 sc.
-
Leaf tip: At the starting end, work (sc, ch 2, sc) into the first foundation chain to form a pointed tip. Join with a sl st.
-
Border: Work a round of sc evenly around the leaf, placing (sc, ch 2, sc) in the ch-2 tip space. Join and fasten off, leaving a long sewing tail.
The completed crochet leaves should have a gently curved outline and a noticeable pointed tip. Depending on yarn thickness, each leaf may measure approximately 12–15 cm long. If you want a more prominent leaf structure, add a central vein using surface slip stitches or embroidery. Work from the base toward the pointed tip, keeping the line centered. For a more natural appearance, create a few additional leaves in slightly different sizes by changing the foundation chain length and adjusting the number of taller stitches proportionally. This variation can make the finished arrangement look less uniform and more botanical.
The next stage involves creating the golden flower centers, which are an important decorative feature of the reference design. The photograph shows clusters of shiny gold-colored beads positioned at the center of each poinsettia. For a similar effect, arrange six to eight small beads in a compact circular cluster. Sew each bead individually through the central layers of the flower using strong matching thread. Reinforce the stitches several times to prevent the beads from becoming loose. If you prefer a completely crocheted version, make a small golden-yellow center by working six sc into a magic ring, increasing to twelve sc in the next round, and adding small popcorn stitches for texture. This alternative provides a softer finish without separate decorative beads.
After completing the flowers and leaves, begin arranging the individual elements into a Christmas crochet table decoration. Place the three red flowers on a flat surface in a triangular arrangement, with one flower toward the front and two positioned slightly behind it. Slide the green leaves underneath each flower, allowing their pointed tips to extend beyond the red petals. Adjust the placement until the overall arrangement looks balanced and full. The finished piece should resemble a broad floral display rather than three separate flowers. Use stitch markers or temporary thread to hold the elements in position before sewing them together.
To secure the arrangement, turn the project carefully to the wrong side and sew the overlapping flower bases and leaves together with matching yarn. Work through the thicker central areas rather than the outer petal tips, which should remain free to create dimension. For additional stability, crochet a simple connecting base using green yarn. Start with a magic ring containing six sc, increase evenly in each round to create a flat circle, and continue until the base measures approximately 18–22 cm across. Sew the flower arrangement onto this base, keeping the supporting fabric hidden beneath the petals and leaves. This method is particularly useful if you intend to move the decoration frequently or display it on a dining table.
For the final decorative touch, add golden berry branches between the flowers, as shown in the reference photograph. Artificial berry stems can be attached with small stitches or secured to a removable backing. Position them so the golden accents extend naturally between the red petals and green leaves without overwhelming the crocheted design. If using wire-based decorative stems, cover or bend any sharp ends so they cannot scratch the table or catch on the yarn. Avoid placing loose beads or detachable ornaments where young children or pets could reach them. With all elements securely attached, the arrangement will have the rich, layered appearance associated with traditional Christmas poinsettia decorations.
4. Finishing, Styling, and Caring for Your Crochet Poinsettia Placemat
The final stage of the Crochet Placemat with a Poinsettia Motif Pattern focuses on shaping, finishing, and presenting the completed decoration. Once all the flowers and leaves have been attached, inspect the entire piece carefully. Check that the stitches are secure, the petals overlap naturally, and the green leaves extend evenly around the arrangement. Use a yarn needle to weave in any remaining yarn ends through several stitches on the wrong side. Trim excess yarn only after confirming that the ends are securely hidden. A carefully finished crochet project looks more professional and is less likely to unravel during handling or storage.
Blocking is an effective way to improve the shape of the petals and leaves. If your yarn is suitable for wet blocking, lightly dampen the crochet pieces and place them on a clean towel or blocking mat. Gently stretch each petal into its intended shape, emphasizing the pointed tips and smooth edges. Secure the pieces with rust-resistant pins if necessary and allow them to dry completely. For the best results, block individual petals and leaves before final assembly. If the decoration has already been assembled with beads or metallic accessories, avoid soaking it. Instead, use gentle shaping by hand or carefully apply steam from a safe distance when permitted by the yarn manufacturer’s care instructions.
The Crochet Placemat with a Poinsettia Motif Pattern can be adapted to different decorating styles by changing the colors and arrangement. Traditional Christmas red and forest green create a classic holiday appearance, while burgundy and olive green offer a more rustic interpretation. White poinsettias with gold centers can produce an elegant winter centerpiece, and soft pink petals with sage green leaves provide a romantic alternative. For a coordinated Christmas table, create several matching pieces using the same yarn colors and flower dimensions. Smaller versions can also be used as decorative accents on side tables, shelves, or holiday gift displays.
When using the finished project on a dining table, consider its decorative and practical functions. The raised flowers and beads make this design best suited as a centerpiece, table accent, or decorative placemat rather than a flat surface for dinner plates and glasses. If you want a functional placemat, crochet a separate flat oval or rectangular base and attach the poinsettia motifs near one corner or along the outer edge. This keeps the central dining area smooth while preserving the festive floral design. Avoid placing hot cookware directly on decorative yarn, especially when the project contains synthetic fibers, beads, or metallic accessories. The decoration should also be kept away from open flames and direct heat sources.
Proper cleaning and storage will help preserve your handmade crochet Christmas decorations for many holiday seasons. Cotton crochet pieces can often be washed gently, but the exact cleaning method depends on the yarn and attached ornaments. If the arrangement contains beads, artificial berries, or wire stems, spot cleaning with a soft cloth is generally the safest approach. Remove dust with a gentle brush and allow the decoration to dry completely before storing it. Place the finished piece in a breathable storage container, avoiding excessive pressure on the petals. A layer of tissue paper between the flower sections can help maintain their shape and prevent the decorative elements from becoming tangled.
Beyond its decorative beauty, this poinsettia crochet pattern offers an opportunity to develop valuable crochet skills. By completing the project, you practice increasing and decreasing stitches, creating pointed shapes, working decorative borders, joining separate motifs, and assembling dimensional flowers. These techniques can be applied to many other crochet projects, including floral appliqués, handmade wreaths, cushion decorations, and seasonal wall hangings. The pattern is also easy to personalize, allowing you to experiment with additional leaves, larger flowers, or alternative centers. Whether you make one arrangement for your home or several as handmade gifts, the finished poinsettia placemat celebrates the creativity and satisfaction of traditional crochet.
Frequently Asked Questions About the Crochet Placemat with a Poinsettia Motif Pattern
1. Is the Crochet Placemat with a Poinsettia Motif Pattern suitable for beginners?
Yes, this pattern can be completed by confident beginners who already understand basic crochet stitches. The individual petals and leaves use straightforward increases, decreases, and common US crochet stitches. However, assembling the layered flowers requires patience and careful positioning. Beginners may find it helpful to complete one flower before making all three.
2. What is the best yarn for crocheting a poinsettia placemat?
Medium-weight cotton yarn is an excellent choice because it provides clear stitch definition and helps the petals maintain their shape. Cotton-blend yarn can also work well. Acrylic yarn is an option for decorative versions, but it may produce softer petals and should not be exposed to heat.
3. How much yarn is needed for this crochet Christmas decoration?
For an arrangement with three large flowers, approximately 250–350 g of red yarn and 120–180 g of green yarn is a useful starting estimate. The exact quantity depends on the size of the flowers, yarn thickness, hook size, and individual crochet tension. Purchasing a little extra yarn is recommended to ensure consistent colors throughout the project.
4. How many poinsettia flowers should I make for one placemat?
The design inspired by the photograph uses three large poinsettia flowers arranged in a triangular formation. However, you can make one flower for a small decorative accent or five flowers for a larger centerpiece. The number of flowers should correspond to the size of the table and the desired visual effect.
5. Can I make this poinsettia crochet pattern without beads?
Absolutely. Although golden beads add a festive appearance, they are optional. You can replace them with crocheted popcorn stitches, small yellow yarn circles, French knots, or embroidered details. A completely crocheted center is especially useful when you prefer a softer decoration without detachable accessories.
6. What crochet stitches are used to make the poinsettia petals?
The pattern primarily uses chain stitches, single crochet, half double crochet, double crochet, and treble crochet. Increases and decreases create the pointed petal shapes, while surface slip stitches can add decorative texture. All instructions use US crochet terminology.
7. How can I make the crochet petals look more realistic?
To create realistic petals, maintain consistent stitch tension, use firm yarn, and shape the pointed ends carefully. Adding a raised central vein and arranging the petals in overlapping layers creates a more natural appearance. Blocking the petals before assembly can also improve their shape.
8. Can the crochet poinsettia placemat be washed?
The crocheted sections may be washable depending on the yarn, but decorative beads and artificial berry stems can complicate cleaning. For assembled decorations containing these accessories, gentle spot cleaning is recommended. Always check the yarn care label before washing or applying heat.
9. How long does it take to crochet a poinsettia placemat?
The time required depends on crochet experience and the complexity of the design. A crocheter familiar with basic stitches may complete one flower in approximately two to four hours. A three-flower arrangement may take several sessions, especially when decorative borders, leaves, and finishing details are included.
10. Can I use the poinsettia motif to decorate other crochet projects?
Yes. The individual flowers can be used as appliqués for cushion covers, Christmas stockings, handmade bags, wall decorations, and holiday wreaths. Smaller flowers can also be attached to gift packaging or fabric table runners. Simply adjust the yarn thickness and hook size to create different dimensions.
11. What size should the finished crochet poinsettia placemat be?
A decorative arrangement with three flowers can measure approximately 40–45 cm across, depending on the size of the petals and the positioning of the leaves. Smaller versions can be made by using thinner yarn and a smaller hook. For a larger centerpiece, increase the number of flowers or add more leaves around the outer edges.
12. How do I prevent the crochet poinsettia petals from curling?
Petal curling can occur when stitches are too tight, increases are uneven, or the border is worked with excessive tension. Use a consistent gauge and avoid pulling the yarn too firmly when working around the edges. Gentle blocking can help flatten the petals and improve their final appearance.
13. Can I turn this decorative design into a functional dining placemat?
Yes, but a few adjustments are necessary. Create a flat crochet base with enough space for a plate and utensils, then attach smaller poinsettia motifs along the outer edge. This provides a practical dining surface while keeping the decorative flowers visible.
14. What colors work best for a Christmas poinsettia crochet project?
Traditional red and dark green are the most recognizable combination. However, cream, burgundy, dusty pink, white, sage green, and metallic gold can create beautiful alternatives. Choosing colors that complement your existing holiday decorations will help the finished piece blend naturally with your home.
15. How can I make the flowers more dimensional?
The easiest way to create a three-dimensional effect is to crochet petals in two different sizes and arrange them in overlapping layers. Slightly lifting the smaller upper petals during assembly adds depth. A firm yarn and carefully shaped petal edges also contribute to the realistic floral appearance.
Conclusion: Create a Beautiful Handmade Christmas Poinsettia Placemat
The Crochet Placemat with a Poinsettia Motif Pattern is a festive and rewarding project that combines traditional crochet techniques with elegant Christmas decoration. Throughout this tutorial, you learned how to select suitable yarn and materials, understand essential US crochet stitches, create pointed red petals, crochet textured green leaves, and assemble the individual elements into a dimensional floral arrangement. You also explored decorative finishing techniques, including raised borders, golden flower centers, and careful blocking to improve the appearance of the finished piece.
One of the most enjoyable aspects of this handmade crochet poinsettia placemat is the freedom to personalize the design. You can follow the traditional red, green, and gold color palette shown in the photograph or experiment with different shades to create a unique holiday decoration. By adjusting the number of flowers, the dimensions of the leaves, and the arrangement of the motifs, you can create everything from a small table accent to an impressive Christmas centerpiece. The skills developed during this project can also inspire future crochet flowers, appliqués, and decorative accessories.
Whether you are crocheting for your own home, preparing a thoughtful handmade gift, or exploring new seasonal craft ideas, this pattern offers a wonderful combination of creativity, beauty, and practical learning. The layered poinsettia flowers bring warmth and festive character to any Christmas setting, while the handmade details make each finished piece special.
EASILY FIND THE FREE PDF FOR THIS PATTERN HERE!
Now we would love to hear from you! 🌺🧶 Have you ever made a crochet poinsettia decoration? Would you choose traditional Christmas red or experiment with a different color combination? Leave your honest opinion, share your suggestions, and tell us what you would change or add to this pattern. Your ideas and experiences can inspire other crochet enthusiasts to create their own beautiful handmade Christmas decorations! ❤️🎄