
The Mrs. Claus door/wall decoration Pattern is a delightful Christmas sewing project that brings warmth, personality, and handmade charm to holiday decorating. With her cheerful smile, rosy cheeks, beautiful white hair, and traditional Christmas outfit, Mrs. Claus is a wonderful character to recreate using colorful felt and simple sewing techniques. This charming DIY Christmas felt decoration combines classic holiday colors, decorative stitching, and layered fabric details to create an eye-catching ornament for your home. Whether displayed on a front door, in a cozy living room, or near a Christmas tree, this handmade decoration adds a welcoming touch to the festive season. The project is especially appealing to crafters who enjoy working with felt because the material is easy to cut, comfortable to handle, and available in many beautiful colors. Best of all, the design can be customized to match your favorite Christmas decorations while preserving the traditional appearance of Mrs. Claus.
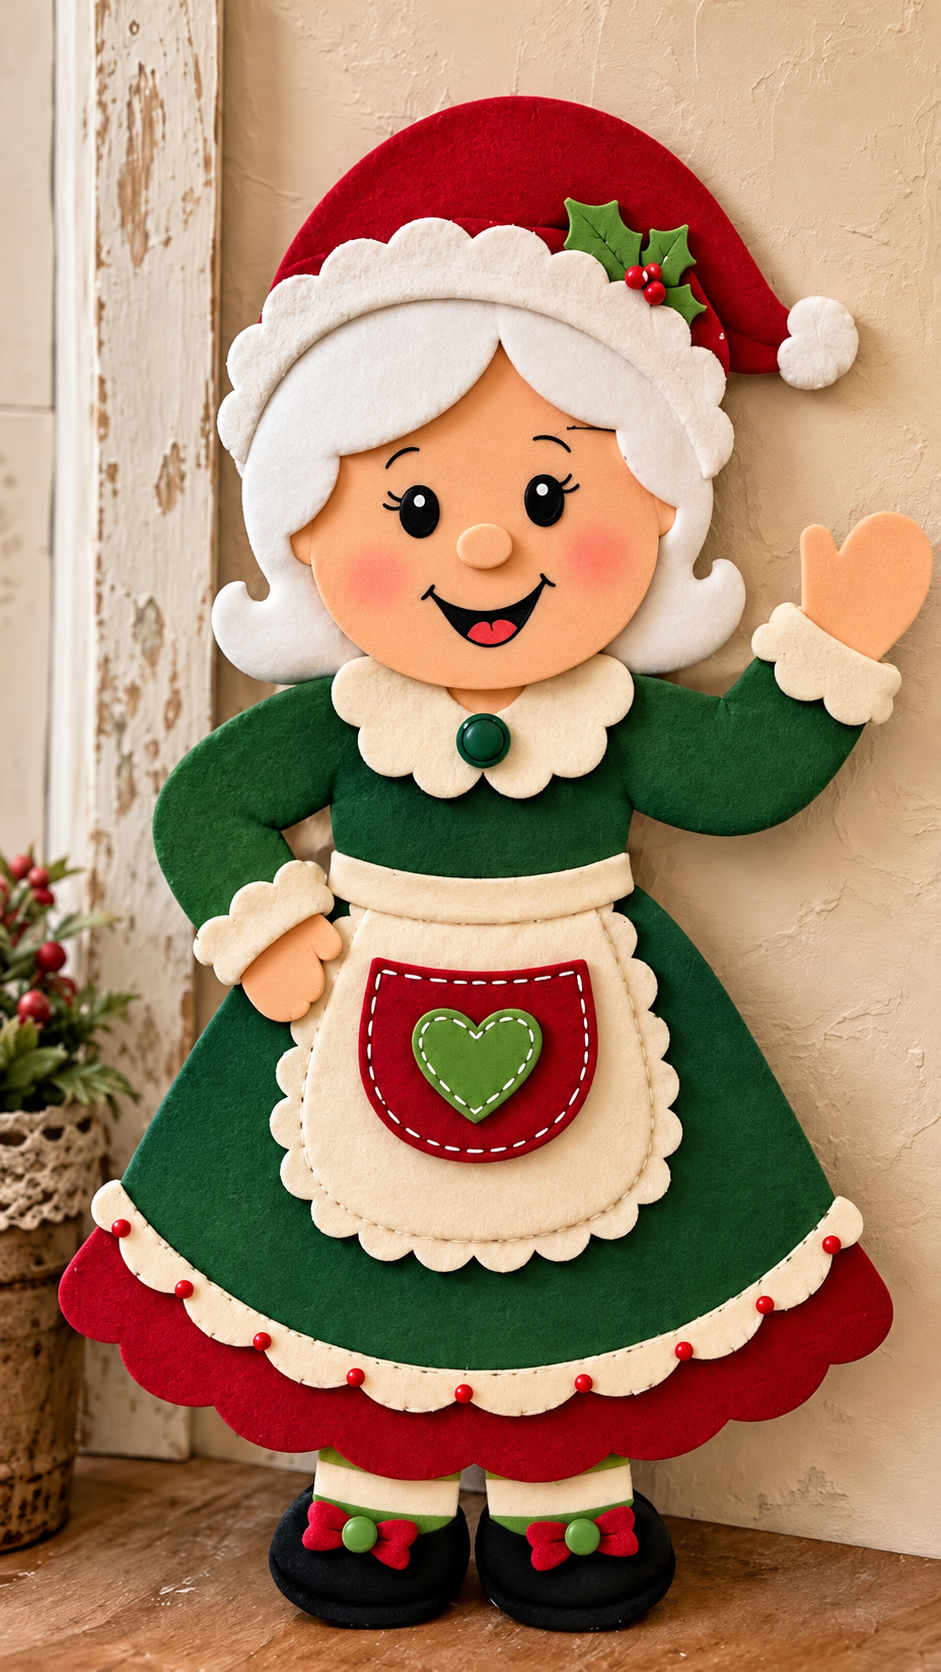
Creating a Mrs. Claus door/wall decoration Pattern is also an enjoyable opportunity to explore different techniques used in felt sewing, fabric appliqué, and handmade Christmas crafts. The design shown in the reference image features a friendly Mrs. Claus wearing a deep green dress, a bright red Christmas hat, a cream-colored apron, and decorative black shoes with festive bows. Her clothing includes scalloped edges, embroidered details, a small heart appliqué, and colorful embellishments that give the decoration a professional handmade appearance. Although the finished piece looks elaborate, the construction becomes much easier when the design is divided into manageable sections. By preparing the pattern pieces carefully and assembling the layers in the correct order, even someone with limited sewing experience can achieve an attractive result. This tutorial explains the entire process, from choosing materials and preparing the templates to sewing the decorative elements and finishing the ornament for display.
One of the greatest advantages of this handmade Mrs. Claus Christmas decoration is its versatility. You can make a large version to hang on a door, a medium-sized version for a wall, or a smaller variation to decorate a Christmas corner. The project also offers plenty of opportunities for creative expression through fabric colors, embroidery, buttons, and decorative accents. For example, you may prefer a traditional red dress instead of green, or you might choose gold embroidery thread to create a more elegant holiday appearance. The construction method remains essentially the same, making this Christmas felt sewing pattern suitable for different decorating styles and skill levels. Throughout this guide, you will learn how to prepare the individual shapes, assemble Mrs. Claus’s face and clothing, create dimensional details, and attach a secure hanging system. With patience and attention to detail, you can transform ordinary pieces of felt into a beautiful seasonal decoration that can be enjoyed year after year.
1. Materials and Preparation for the Mrs. Claus Door/Wall Decoration Pattern
Before beginning the Mrs. Claus door/wall decoration Pattern, gather all the materials needed to create the different sections of the character. For a decoration measuring approximately 55 cm tall and 38 cm wide, you will need felt in dark green, Christmas red, white, cream, peach, black, and light green. Dark green felt will form the dress and sleeves, while red felt will be used for the Christmas hat, skirt trim, apron pocket, and shoe bows. White felt is ideal for the hair, hat pom-pom, and decorative details, while cream felt works beautifully for the apron, collar, cuffs, and scalloped borders. Peach felt will form the face and hands, and black felt will be used for the eyes, mouth, and shoes. These measurements are suggested dimensions for recreating the photographed design rather than measurements taken from an existing printable template.
DISCOVER MORE FREE PATTERNS HERE!
In addition to the felt, prepare embroidery thread, sewing needles, fabric scissors, fabric glue, polyester fiberfill, and decorative buttons or beads. White embroidery thread is particularly useful for creating the visible decorative stitches around the apron pocket and heart appliqué. Black thread will help define the eyebrows, eyelashes, and smiling mouth. Small red beads can imitate holly berries and decorate the bottom of the dress, while a round green button can become the central detail of the collar. If you want the finished decoration to have a slightly raised appearance, use a thin layer of polyester fiberfill beneath selected pieces. For a flatter wall hanging, lightweight felt interfacing can provide stability without adding excessive thickness.
The next step is preparing the Mrs. Claus felt pattern templates. Begin by sketching the entire character on a large sheet of paper, using the reference image as a visual guide. Divide the drawing into individual sections, including the head, face, hair, Christmas hat, body, sleeves, hands, apron, skirt trim, collar, shoes, and decorative accessories. A practical starting point is a face approximately 19 cm wide, a dress approximately 35 cm wide at the hem, and a Christmas hat approximately 28 cm wide. These proportions can be adjusted according to the desired finished size. Keep the character symmetrical where appropriate, but preserve the raised arm and playful waving hand that give the decoration its friendly personality.
Once the templates are ready, transfer each shape onto the appropriate felt color using a removable fabric marker or tailor’s chalk. Cut the pieces carefully with sharp scissors, following the curved edges as smoothly as possible. For the main body, hat, face, sleeves, and shoes, prepare matching front and back pieces if you intend to create a lightly padded decoration. Decorative elements such as the apron pocket, collar, hair sections, and holly leaves generally require only one visible layer. When using a blanket stitch, leave approximately 0.5 cm between the stitching line and the outer edge where the design allows. If you prefer to sew conventional seams and turn the pieces right side out, add approximately 0.7 cm seam allowance around the corresponding templates.
Organizing the cut pieces before sewing will make the entire DIY Mrs. Claus felt ornament easier to assemble. Arrange the pieces on a clean work surface in the same order they will appear on the finished character. Position the green dress in the center, place the face and hair above it, and arrange the hat along the top of the head. Add the sleeves, apron, collar, and shoes to check their proportions. This preliminary arrangement allows you to identify any pieces that need trimming or resizing. Taking a photograph of the layout can also help you remember the correct placement during assembly.
Finally, choose the sewing techniques that will give your decoration its finished appearance. The blanket stitch is ideal for joining felt edges because it produces a neat decorative border and helps prevent the layers from separating. The running stitch is useful for outlining pockets, attaching appliqués, and creating simple decorative lines. A backstitch works well for embroidered facial details, while a few small straight stitches can secure beads and buttons. Beginners may prefer to practice these techniques on leftover felt before working on the main project. Preparing everything carefully at this stage will make the following construction steps smoother and more enjoyable.
2. How to Make Mrs. Claus’s Face, Hair, and Christmas Hat
The face is the most expressive part of the Mrs. Claus door/wall decoration Pattern, so begin by preparing a smooth peach-colored felt shape with a softly rounded outline. For the suggested 55 cm decoration, the visible face can measure approximately 19 cm wide and 18 cm tall. Cut a matching backing piece if you want a slightly padded appearance. Place a thin layer of polyester fiberfill between the pieces, then join the edges using small blanket stitches. Avoid overfilling because excessive stuffing can distort the facial proportions. The goal is to create a gentle three-dimensional effect while keeping the surface smooth enough for attaching the eyes, nose, and mouth.
Next, create the friendly facial expression using felt appliqué and embroidery techniques. Cut two small oval shapes from black felt for the eyes and add tiny white highlights to imitate reflected light. Position the eyes evenly across the upper half of the face, leaving enough space for the eyebrows and eyelashes. Use black embroidery thread to create curved eyebrows and short eyelashes near the outer corners of the eyes. For the mouth, cut a curved black shape with an open smile and add a small red tongue inside. The nose can be made from a small oval of peach felt, lightly padded to give it a rounded appearance. Soft pink fabric-safe blush or a small amount of dry pastel applied carefully can create the rosy cheeks seen in the reference image.
The white hair is another essential feature of this Christmas Mrs. Claus felt decoration. Begin by cutting two large curved sections of white felt that frame the face from the upper forehead toward the cheeks. Create additional rounded sections near the lower sides of the head to imitate Mrs. Claus’s soft, fluffy hairstyle. The hairstyle in the image includes a gentle center part, with each section curving outward toward the sides. Layer the hair pieces over the face and secure them with small hidden stitches or a thin application of fabric glue. If you want more dimension, add a very small amount of fiberfill beneath the larger sections before attaching them. This technique creates a soft sculpted appearance without making the head excessively bulky.
To make the Christmas hat, cut a large curved shape from bright red felt, approximately 28 cm wide and 17 cm tall before adjusting it to the head. The hat should form a rounded cap with an extended tip that bends toward one side. Cut a matching backing piece if desired, then join the two pieces around the outer edges using red thread. A small amount of fiberfill can be placed inside the hat to help it maintain its shape. The extended tip should remain flexible enough to curve naturally. At the end of the hat, attach a rounded white felt pom-pom approximately 5 cm in diameter, made from two circular pieces with a little stuffing between them.
The white hat trim adds an especially charming detail to the Mrs. Claus door/wall decoration Pattern. Cut a long strip of cream or white felt with a scalloped lower edge, creating rounded sections that resemble fluffy fabric. Position the strip across the forehead, overlapping the lower edge of the red hat and the upper portion of the hair. For a more dimensional finish, cut two identical trim pieces and add a thin layer of fiberfill before stitching them together. Use small white stitches along the outer edges to keep the trim neat. The scalloped shape should follow the natural curve of the head, framing the face without covering the eyes or eyebrows.
Complete the hat by creating a small holly leaf and berry appliqué. Cut three pointed holly leaves from green felt, each approximately 3–4 cm long, and use darker green embroidery thread to stitch the central leaf veins. Arrange the leaves near one side of the white hat trim, slightly overlapping the red fabric. Add three small red felt circles or securely attached decorative beads to represent the berries. This traditional Christmas detail creates a beautiful contrast against the white trim and red hat. Once the embellishment is attached, inspect the entire head and make any necessary adjustments before connecting it to the body.
3. Sewing the Green Dress, Apron, Sleeves, and Decorative Details
The green dress forms the largest section of the Mrs. Claus door/wall decoration Pattern and provides the foundation for the remaining clothing details. Begin by cutting a wide dress shape from dark green felt, approximately 35 cm wide at the lower edge and 30 cm tall, adjusting the upper portion to fit beneath the head. The dress should have a fitted upper body and a gradually widening skirt, creating the traditional silhouette shown in the image. Cut a matching backing piece and, if desired, add a thin layer of batting or fiberfill between the layers. Join the edges with green blanket stitches, leaving the neckline area accessible until the head and sleeves are positioned. Keep the skirt smooth so that the decorative apron will lie neatly over the front.
Next, prepare the sleeves and hands using the same felt sewing and appliqué techniques. Cut two green sleeve shapes, making one arm curve downward toward the waist and the other extend upward in a waving position. The raised sleeve should be slightly longer to accommodate the hand and cuff. Cut peach-colored felt pieces for the hands, shaping the raised hand into a simplified mitten-like form with a visible thumb. The opposite hand can be smaller and positioned near the waist. Sew the hand pieces together with small stitches, adding a little stuffing if desired. Attach cream-colored scalloped cuffs at the wrists, then secure the sleeves to the body with reinforced stitching. Ensure the raised arm is supported by the main backing so that it does not bend excessively when the decoration is hung.
The cream-colored collar is a distinctive element of this handmade Christmas wall hanging. Cut a decorative collar from cream felt with rounded scallops along the lower edge, approximately 15 cm wide and 7 cm tall. Position it just below the face, allowing the scalloped sections to overlap the upper part of the green dress. For a soft raised effect, use two layers of felt with a small amount of stuffing between them. Stitch around the edges with matching thread, keeping the scallops smooth and evenly shaped. Add a round green decorative button at the center of the collar, where the two sides meet. This small detail helps connect the green dress with the other festive accents throughout the design.
To create the apron, cut a large cream-colored felt shape with rounded lower corners and a scalloped border. A suggested size is 23 cm wide and 22 cm tall, although the final dimensions should be adjusted to the dress. The apron should cover the center of the skirt while leaving a generous green border visible on both sides. Cut a narrow cream waistband and position it horizontally across the upper edge of the apron. Sew the apron to the dress using small running stitches, leaving the scalloped edges visible. For additional dimension, attach the apron only around its perimeter and allow the center to remain slightly raised. The scalloped border gives the design a soft, traditional appearance that complements the hat trim and collar.
The apron pocket is one of the most attractive features of the Mrs. Claus felt Christmas decoration. Cut a rounded pocket from red felt, approximately 13 cm wide and 10 cm tall, and place it in the center of the cream apron. Use white embroidery thread to create a decorative running stitch around the curved sides and lower edge of the pocket. If you want the pocket to function, leave its upper edge open and reinforce the top corners with small stitches. Cut a green heart approximately 7 cm wide, then position it in the center of the red pocket. Add white running stitches around the heart to emphasize its shape. This combination of red, green, and cream creates a beautiful focal point that reflects the traditional Christmas color palette.
Finish the dress by adding the scalloped skirt trim and decorative shoes. Cut a wide red scalloped border and position it beneath the lower edge of the green dress, allowing the rounded red sections to remain visible. Add a narrower cream scalloped strip over the transition between the green skirt and red border. Sew small red beads or felt circles at regular intervals along the cream trim, approximately 3–4 cm apart. For the shoes, cut two rounded black felt shapes and attach them beneath the skirt. Add cream and green strips above the shoes to imitate stockings, then decorate each shoe with a small red bow and green circular center. These details complete the traditional Mrs. Claus outfit and give the decoration a cheerful, polished appearance.
4. Assembling, Finishing, and Displaying Your Mrs. Claus Christmas Decoration
Once all the individual sections are complete, begin assembling the Mrs. Claus door/wall decoration Pattern on a flat surface. Position the finished head above the green dress, making sure the neckline is hidden beneath the hair and cream collar. Arrange the arms so that one hand rests near the waist while the other extends upward in a friendly wave. Place the shoes beneath the lower edge of the skirt, keeping them evenly spaced. Before permanently attaching the pieces, check the overall balance of the design. The character should appear centered, with the hat and raised arm creating a playful but visually balanced silhouette. Make small adjustments until the proportions closely resemble the reference image.
To secure the different sections, use strong hand stitching or a combination of stitching and fabric glue. Begin by attaching the head to the upper body, using reinforced stitches through the backing layers. Next, secure the sleeves and hands, ensuring that the raised arm is firmly connected to the shoulder. Attach the shoes to the lower portion of the dress, allowing them to extend slightly below the skirt. If you are making a large decoration, consider adding a single backing silhouette cut from firm felt or fabric-covered interfacing. This additional layer helps support the entire design and reduces the risk of individual sections bending or shifting during display.
After the main assembly, inspect the decorative embroidery and appliqué details. Check the white stitches around the apron pocket, the green heart, the scalloped dress trim, and the collar. Make sure all decorative beads and buttons are securely attached. If any felt edges appear uneven, trim them carefully with small scissors. You may also add subtle embroidery lines to emphasize the folds of the sleeves or the curves of the hair. Avoid adding too many embellishments, as the design already contains several attractive details. The goal is to highlight the character’s friendly expression and traditional Christmas clothing while maintaining a clean, coordinated appearance.
Creating a reliable hanging system is essential for a DIY Christmas door decoration. For a wall hanging, sew a sturdy fabric loop or narrow ribbon to the upper back of the hat or head, positioning it near the decoration’s center of gravity. A ribbon approximately 15–20 cm long is usually sufficient, depending on the intended hanging method. Reinforce the attachment with several rows of stitching through the backing material. For a larger decoration, two hanging points may provide better stability and prevent the character from tilting. If the ornament will be displayed on a door, use a suitable over-the-door hook or another secure support that can hold the finished weight without damaging the surface.
The Mrs. Claus door/wall decoration Pattern can be personalized in many ways without changing its basic construction. For a traditional Christmas look, keep the green dress, red hat, cream apron, and white hair. For a softer farmhouse-inspired style, consider muted green felt, burgundy accents, and warm ivory trim. Gold embroidery thread can replace white stitching for a more elegant finish, while tiny fabric stars or snowflakes can be added to the apron. You can also embroider a short holiday greeting onto a separate felt banner and attach it beneath the character. These simple modifications allow you to create a decoration that complements your existing Christmas theme while maintaining the recognizable charm of Mrs. Claus.
Proper care will help preserve your handmade felt Christmas decoration for many holiday seasons. Display it indoors or in a protected location away from rain, strong sunlight, and excessive moisture. Felt can absorb water and lose its shape when exposed to damp conditions, so a covered indoor wall or sheltered doorway is generally the safest choice. When the holiday season ends, gently remove dust using a soft brush or lint roller. Store the decoration flat in a clean box with acid-free tissue paper between delicate sections. Avoid placing heavy objects on top of the hat, face, or raised arm. With careful storage and occasional maintenance, your handmade Mrs. Claus can remain a cherished part of your Christmas decorations for years.
Frequently Asked Questions About the Mrs. Claus Door/Wall Decoration Pattern
1. Is the Mrs. Claus door/wall decoration Pattern suitable for beginners?
Yes. This project is suitable for motivated beginners who have basic cutting and hand-sewing skills. Although the finished decoration includes several detailed elements, each component can be prepared separately. Beginners should start with the larger pieces, such as the dress, head, and hat, before working on smaller appliqués. Practicing the blanket stitch and running stitch beforehand will make the process easier. The most important qualities are patience, careful cutting, and attention to the placement of the individual pieces.
2. What type of felt is best for making a Mrs. Claus Christmas decoration?
A good-quality craft felt or wool-blend felt is recommended for this project. Felt approximately 1–2 mm thick works well for decorative appliqués, facial features, and clothing details. Slightly firmer felt can be used for the main backing to provide additional stability. Wool-blend felt often offers a smoother finish and better durability, while polyester craft felt is usually more affordable and widely available. Choose felt that holds its shape well and does not stretch excessively during sewing.
3. How large should the finished Mrs. Claus door decoration be?
The finished size depends on where you plan to display it. A decoration measuring approximately 55 cm tall and 38 cm wide is a practical starting point for a wall or interior door. Smaller versions measuring around 30–40 cm tall can work beautifully in compact spaces. For larger doors, the pattern can be enlarged proportionally. Remember to measure the intended display area before cutting the felt, allowing enough room for the raised arm and extended Christmas hat.
4. Can I make this Christmas felt decoration without a sewing machine?
Absolutely. The Mrs. Claus door/wall decoration Pattern can be completed entirely by hand. In fact, hand sewing is particularly useful for the curved edges, small appliqués, and decorative embroidery. A blanket stitch creates attractive edges, while running stitches and backstitches provide neat decorative details. Fabric glue may be used to temporarily position small pieces, but stitching is recommended for structural connections and hanging points. A sewing machine is optional rather than necessary.
5. How can I make the face look more expressive and professional?
The key is careful placement of the facial features. Position the eyes symmetrically, create gently curved eyebrows, and make the smile wide enough to communicate a cheerful expression. Small white highlights on the black eyes help create a lively appearance. A lightly padded nose adds dimension, while soft pink cheeks contribute warmth. Before attaching the facial features permanently, arrange them on the peach felt and adjust their positions until you are satisfied with the expression.
6. What is the best way to attach small decorative elements?
Small felt pieces can be secured with tiny hand stitches or a suitable fabric adhesive. For items such as buttons, beads, and raised embellishments, stitching generally provides a more reliable connection. Use thread that matches the surrounding felt whenever possible. When attaching holly berries or decorative buttons, pass the needle through the backing several times to strengthen the connection. If the decoration will be accessible to young children or pets, avoid loose beads and other small detachable elements that could become choking hazards.
7. Can I wash a handmade felt Mrs. Claus decoration?
Machine washing is generally not recommended because it can distort the felt, loosen embroidery, and damage padded sections. Instead, remove dust with a soft brush or lint roller. For small stains, gently dab the affected area with a slightly damp cloth, testing an inconspicuous section first. Avoid rubbing the felt aggressively or soaking the decoration. Allow any damp areas to air-dry completely before storing or displaying the ornament.
8. How long does it take to complete this felt Christmas sewing project?
The time required depends on your sewing experience and the amount of decorative detail you include. A beginner may need approximately 8–12 hours, especially when preparing the templates and practicing the stitches. More experienced crafters may complete the project in 5–8 hours. Dividing the work into several sessions can make the process more enjoyable. For example, you can cut the pieces on the first day, sew the face and clothing on the second day, and complete the final assembly on the third day.
9. Can I use fabric instead of felt for this Mrs. Claus pattern?
Yes, although traditional woven fabric requires a slightly different construction method. Unlike felt, woven cotton fabric can fray along cut edges, so you will need to include appropriate seam allowances and finish the raw edges. Fusible interfacing can help stabilize the fabric, especially for smaller appliqué pieces. For beginners, felt remains the simplest option because it is easy to cut, does not fray significantly, and allows decorative stitches to remain visible.
10. How can I keep the decoration from bending when it hangs on a door?
Use a firm backing layer made from stiff felt, heavyweight interfacing, or another suitable textile stabilizer. Secure the head, body, and arms to this backing with strong stitches. For larger decorations, lightweight flexible plastic canvas can provide additional support when fully covered and securely attached. Avoid excessive stuffing, which can make the ornament heavier than necessary. Two reinforced hanging points can also help distribute the weight and keep the decoration balanced.
11. Can I sell handmade decorations made from this design?
Handmade Christmas decorations can be created for personal use, gifts, or craft sales, but it is important to respect any copyright or licensing restrictions associated with a specific purchased pattern or original artwork. If you develop your own templates and decorative details, keep records of your original design process. When selling finished decorations, focus on secure construction, consistent quality, and accurate product descriptions. Small handmade variations can become part of the charm of each finished piece.
12. What are some creative ways to personalize this Mrs. Claus decoration?
You can change the colors of the dress, apron, hat, or decorative bows to match your holiday theme. Personalized embroidery, small felt snowflakes, decorative stars, and seasonal fabric accents can also make the design unique. Another lovely idea is to create a matching Santa Claus decoration using similar colors and stitching techniques. This allows you to build a coordinated collection of handmade Christmas decorations for your home.
Conclusion: Create a Beautiful Handmade Mrs. Claus Christmas Decoration
The Mrs. Claus door/wall decoration Pattern is a charming project that combines creativity, traditional Christmas colors, and accessible sewing techniques. Throughout this tutorial, we explored how to select suitable felt materials, prepare pattern templates, cut the individual pieces, and assemble the cheerful face, white hair, and red Christmas hat. We also covered the construction of the green dress, cream apron, decorative pocket, scalloped trim, and festive shoes. Finally, we explained how to attach the completed sections, reinforce the backing, add a secure hanging system, and care for the finished decoration.
One of the most rewarding aspects of this DIY Mrs. Claus felt decoration is the opportunity to create something personal with your own hands. Every embroidered stitch, carefully shaped piece of felt, and colorful embellishment contributes to the character’s unique personality. Whether you are making this decoration for your own home, preparing a thoughtful handmade gift, or exploring new Christmas sewing and felt appliqué techniques, the project offers a wonderful way to celebrate the holiday season through creativity.
Now that you have learned the steps for creating this beautiful Mrs. Claus door/wall decoration Pattern, it is time to gather your materials and begin your own handmade Christmas project. Remember that small variations are part of the beauty of crafting, and your finished decoration does not need to look exactly like the reference image to be special.
EASILY FIND THE FREE PDF FOR THIS PATTERN HERE!
We would love to hear your sincere opinion! What do you think of this Mrs. Claus Christmas decoration? Would you choose the traditional green and red combination, or would you prefer different colors? Share your honest feedback, creative ideas, and suggestions for future sewing tutorials. Your experiences and recommendations can inspire other craft enthusiasts to create their own beautiful handmade Christmas decorations.