
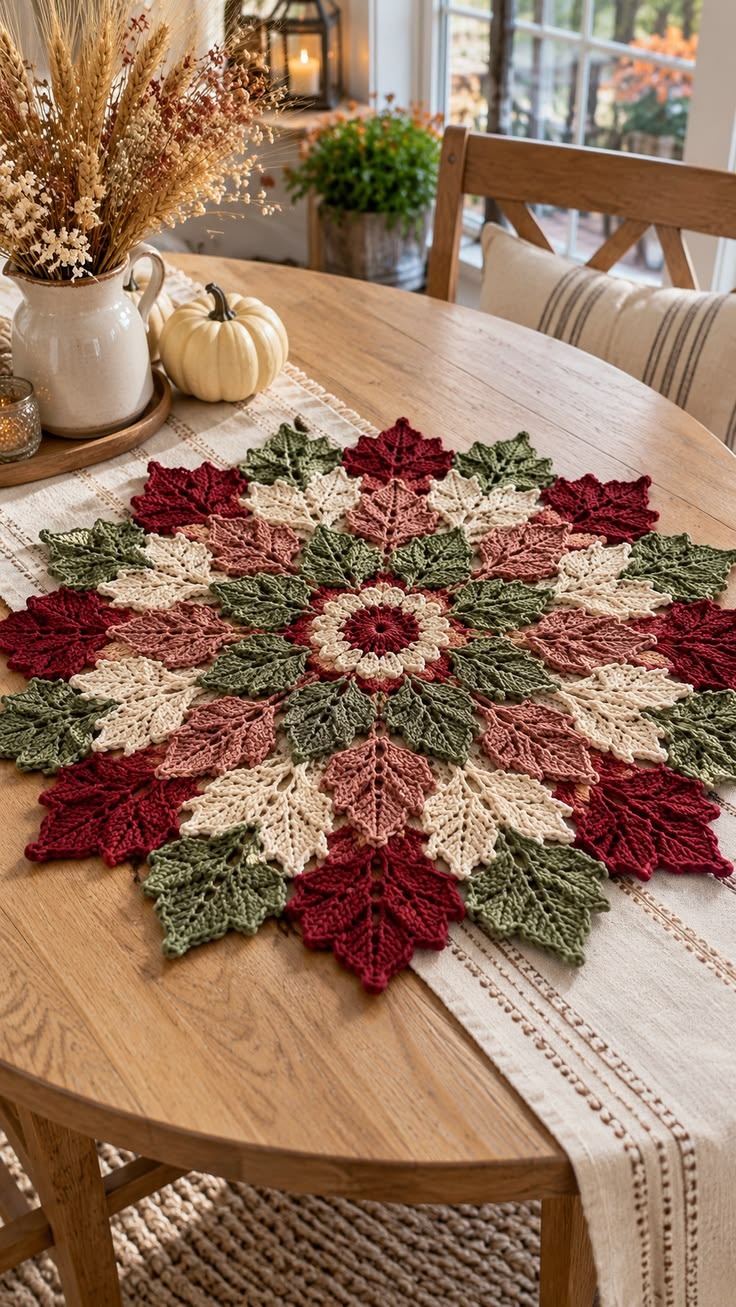
The Leaf shaped crochet centerpiece Pattern is a beautiful way to bring handmade elegance, natural textures, and seasonal warmth into your home. Inspired by the graceful shapes of autumn leaves, this decorative crochet project combines delicate stitches, layered motifs, and rich colors to create an impressive centerpiece for a dining table, coffee table, or seasonal display. The design features a circular floral center surrounded by carefully arranged crochet leaves in burgundy, olive green, cream, and dusty rose. Each leaf contributes to the overall symmetry, creating a stunning arrangement that resembles a blooming autumn flower. Whether you enjoy decorating your home with handmade accessories or creating thoughtful gifts, this crochet leaf centerpiece offers a rewarding opportunity to explore textured stitches and decorative crochet techniques.
One of the most appealing characteristics of this Leaf shaped crochet centerpiece Pattern is its combination of individual leaf motifs and a detailed central flower. Unlike traditional circular doilies that rely on continuous rounds, this design uses separately crocheted leaves arranged around a decorative center. This construction makes it easier to experiment with different color combinations, adjust the finished dimensions, and create a unique piece that reflects your personal style. The pointed leaves, raised stitch details, and openwork sections add depth and movement to the design. Although the finished centerpiece looks intricate, the individual components can be completed with familiar crochet techniques, including chain stitches, single crochet, double crochet, treble crochet, and slip stitches. With patience and careful assembly, even an adventurous beginner can gradually develop the skills needed to complete this project.
Creating a handmade crochet table centerpiece is also a wonderful way to celebrate the beauty of traditional needlework while introducing a contemporary decorative element into your home. The warm colors shown in the reference image are especially suitable for autumn decorating, Thanksgiving gatherings, farmhouse interiors, and rustic dining spaces. However, the same pattern can be adapted for Christmas using red, green, and ivory yarn or transformed into a spring decoration with pastel shades. This tutorial explains how to select appropriate materials, understand American crochet abbreviations, construct the central flower, crochet individual leaf motifs, and assemble the finished arrangement. Because the exact stitch counts of the photographed piece cannot be determined from the image alone, the instructions below provide an original, reproducible interpretation of its layered design rather than claiming to reproduce an unavailable original chart.
Materials, Crochet Abbreviations, and Preparation for the Leaf Shaped Crochet Centerpiece
Before beginning the Leaf shaped crochet centerpiece Pattern, gather the materials needed to create a decorative piece with clear stitch definition and a soft, elegant appearance. For a centerpiece similar to the photograph, choose size 3 crochet cotton thread or lightweight cotton yarn. Cotton is particularly suitable because it holds decorative stitches well, provides a relatively firm structure, and allows the finished leaves to maintain their pointed shapes after blocking. A 2.5 mm to 3.5 mm crochet hook is a practical starting range, depending on the thickness of your yarn and your personal tension. You will also need scissors, a tapestry needle, stitch markers, rustproof blocking pins, and a measuring tape. A foam blocking mat is helpful when shaping the individual leaves before assembly.
DISCOVER MORE FREE PATTERNS HERE!
The color palette is an important part of this autumn crochet centerpiece pattern. To reproduce the visual atmosphere of the reference image, select deep burgundy for the outer leaves, muted olive green for the foliage, warm ivory for the lighter motifs, and dusty rose for the intermediate decorative layers. A small amount of each color can also be used in the central flower. These shades create a harmonious combination of warm and earthy tones that works beautifully with natural wooden furniture. For a balanced result, choose colors with similar softness rather than combining extremely bright yarn with heavily muted shades. The estimated yarn requirement for a centerpiece approximately 55–65 cm across is 300–450 g in total, although the actual amount will depend on yarn thickness, stitch density, and the number of leaves.
Understanding US crochet terminology is essential before following the instructions. In American crochet patterns, ch means chain, sl st means slip stitch, sc means single crochet, hdc means half double crochet, dc means double crochet, and tr means treble crochet. The abbreviation st refers to stitch, sp means space, rep means repeat, and rnd means round. A picot is a small decorative point usually formed by chaining three stitches and joining back into the first chain. The abbreviation BLO means back loop only, while FO means fasten off. These stitches will be used throughout the project to create the central flower, elongated leaf shapes, decorative edges, and connecting elements.
For this interpretation, the finished centerpiece is built from one circular flower, twelve inner leaves, twelve middle leaves, and twelve outer leaves, for a total of 36 individual leaf motifs. The arrangement is divided into twelve repeating sections, which helps maintain symmetry during assembly. Each section contains one smaller inner leaf, one medium leaf, and one larger outer leaf. The different yarn colors are distributed evenly around the circle to create the layered appearance visible in the photograph. The center is worked first, followed by the leaf motifs, and the components are joined through carefully positioned stitches. This modular construction is especially helpful because you can complete several leaves during short crochet sessions without handling the entire centerpiece.
To obtain consistent results, crochet a small practice leaf before making the full collection. Work a foundation chain, add stitches of increasing height toward the middle, and gradually decrease the stitch height toward the tip. This technique creates the familiar elongated shape associated with decorative leaves. Practice placing multiple stitches into the same chain to produce a rounded base, and experiment with working around both sides of a foundation chain. You should also become comfortable with slip-stitch surface detailing, which can be used to emphasize the central vein. If your stitches appear too loose, try a slightly smaller hook. If the fabric curls excessively or feels rigid, increase the hook size or relax your tension.
A useful preparation step is to create a simple assembly plan before crocheting the individual motifs. Place twelve stitch markers around a circular template, spacing them evenly to represent the twelve decorative sections. Decide where each color will appear and keep a written record of the sequence. For example, the inner ring can alternate olive green and burgundy accents, while the middle ring uses cream and dusty rose, and the outer ring combines burgundy with olive green. The exact color arrangement may be adjusted, but repeating the sequence consistently will give the finished crochet leaf table decoration a polished, intentional appearance.
Step-by-Step Instructions for Crocheting the Central Flower and Leaf Motifs
Begin the Leaf shaped crochet centerpiece Pattern with the circular flower that forms the decorative center. Using burgundy yarn, make a magic ring and work 12 dc into the ring. Join with a sl st to the first dc, then pull the ring closed. For this pattern, a beginning ch 2 does not count as a stitch. In Round 2, ch 2 and work 2 dc into each stitch around, producing 24 dc. Join with a sl st. In Round 3, change to cream yarn, ch 1, and work (sc in the next stitch, ch 3, skip the next stitch) twelve times. Join to the first sc. You will now have twelve chain-3 spaces distributed around the flower, forming the foundation for its raised petals.
Continue the central flower by working decorative petals into the chain spaces. In Round 4, sl st into the first ch-3 space and work (sc, hdc, 3 dc, hdc, sc) into that space. Repeat the same sequence in every remaining ch-3 space, creating twelve rounded petals. Join with a sl st and fasten off. For additional texture, attach burgundy yarn to a back loop of a Round 2 stitch and work a loose decorative circle of slip stitches around the flower base, avoiding excessive tension. The result is a layered floral motif with a darker center and lighter petals. If you prefer a fuller flower, add a second petal layer behind the first by attaching yarn to the unused back portions of the petal bases and working larger shells.
Next, create the small leaf motif that will form the innermost foliage ring. With olive green yarn, ch 13. Starting in the second chain from the hook, work sl st, sc, hdc, dc, dc, tr, tr, dc, dc, hdc, sc, and sl st across the twelve available chains. Ch 1, rotate the work, and crochet along the opposite side of the foundation chain, beginning at the pointed end. Work sl st, sc, hdc, dc, dc, tr, tr, dc, dc, hdc, sc, and sl st into the corresponding foundation-chain loops. Join at the starting point and fasten off. This produces an elongated leaf with a rounded middle and narrow ends. For a more natural appearance, use a tapestry needle and matching yarn to embroider a central vein with a loose running stitch.
The medium-sized leaves provide the next layer of the crochet autumn table centerpiece. Begin with ch 17 and work into the second chain from the hook. Follow this stitch sequence: sl st, sc, sc, hdc, hdc, dc, dc, tr, tr, dc, dc, hdc, hdc, sc, sc, and sl st. Ch 1 and rotate the work to crochet along the opposite side of the foundation chain. Repeat the same sequence, starting from the pointed end, to create a symmetrical leaf. For a decorative edge, work a second round of sc evenly around the perimeter, placing (sc, ch 2, sc) at the outer tip. Join with a sl st and fasten off. Use cream and dusty rose yarn for these motifs, alternating the colors around the centerpiece.
The largest leaves create the dramatic outer edge that makes the Leaf shaped crochet centerpiece Pattern so distinctive. Start with ch 21 and work from the second chain: sl st, sc, sc, hdc, hdc, dc, dc, tr, tr, tr, tr, dc, dc, hdc, hdc, sc, sc, sc, sc, and sl st. Ch 1, rotate the work, and repeat the sequence along the opposite side of the foundation chain. For a more detailed border, crochet one round of sc around the leaf, adding small picots at selected positions along both edges. Place the picots symmetrically so they resemble gentle leaf serrations. Make twelve large leaves, alternating burgundy and olive green. If desired, work a few additional surface slip stitches along the central vein to create the textured appearance of natural foliage.
After completing the three leaf sizes, compare their proportions before assembling the centerpiece. The smaller leaves should fit comfortably near the central flower, while the medium leaves should extend beyond the first ring. The larger leaves should create a wide, pointed outer silhouette. If any leaf appears noticeably shorter or narrower than the others in its group, check your stitch count and tension. Make all twelve leaves of each size using the same hook and yarn weight whenever possible. You may also add a second decorative round to selected leaves, using (sc, ch 1, skip one stitch) along the sides to create a subtle openwork effect. This optional detail brings the design closer to the airy lace appearance shown in the reference photograph.
How to Assemble the Crochet Leaves into a Beautiful Table Centerpiece
Once all the components are complete, begin assembling the Leaf shaped crochet centerpiece Pattern on a flat surface. Place the central flower in the middle of a blocking mat or large table and arrange the twelve small leaves around it, with their narrow inner ends directed toward the flower. Position them at approximately equal intervals, similar to the numbers on a clock. The small leaves should radiate outward without overlapping excessively. Before sewing, use stitch markers or pins to hold the arrangement temporarily. Stand back and examine the overall shape, adjusting the leaf positions until the center appears balanced. This careful planning helps prevent uneven spacing and makes the later assembly process considerably easier.
Attach the inner leaves using a tapestry needle and matching cotton yarn. Sew the inner base of each leaf to the underside of the central flower, catching several stitches from both pieces to create a secure connection. Keep the sewing thread hidden whenever possible so the front remains neat. Each leaf should be attached firmly enough to prevent twisting, but the stitches should not pull the flower out of shape. Once all twelve leaves are attached, connect neighboring leaves at one or two points along their inner side edges. These small connections create a stable circular structure while preserving the open spaces that give the centerpiece its delicate appearance.
Arrange the twelve medium leaves between the smaller motifs, placing each medium leaf so that its inner base overlaps the outer portions of two neighboring small leaves. This staggered placement creates a layered arrangement similar to the petals of a large flower. Alternate cream and dusty rose yarn to produce a soft contrast against the darker foliage. Pin the leaves in position before sewing, and check that their outer tips extend to approximately the same distance from the center. Secure each medium leaf to the underlying motifs with several small stitches at the base and along the side edges. Avoid sewing across the entire surface, because the layered texture is an important feature of the finished handmade crochet centerpiece.
The outer ring gives the project its recognizable autumn-inspired appearance. Position the twelve large leaves around the perimeter, alternating burgundy and olive green. Place each leaf between two medium motifs, allowing its pointed end to extend beyond the previous ring. The resulting silhouette should resemble a large floral wreath with decorative leaves radiating in every direction. For a particularly attractive arrangement, distribute the burgundy leaves evenly so the darker color creates a repeating rhythm around the edge. Use the same attachment method as before, securing each large leaf at its base and at selected side points. Check the arrangement regularly to ensure that the overall shape remains symmetrical.
If the assembled centerpiece feels too flexible, add discreet connecting stitches between neighboring motifs. With matching yarn, join the sides of adjacent leaves using short chains or slip stitches. For example, attach yarn to the side of one leaf, ch 3, and sl st into a nearby stitch on the neighboring leaf. Repeat where necessary to bridge small gaps without closing the decorative openwork. These connections can help distribute the weight of the motifs and prevent the outer leaves from folding inward. However, avoid adding too many connecting chains, because excessive reinforcement may make the design look crowded. The goal is to maintain a lightweight, lace-like structure with enough stability for practical tabletop use.
When the assembly is finished, carefully inspect the entire crochet leaf centerpiece for loose ends, uneven joins, or twisted motifs. Weave each yarn tail through several stitches on the wrong side using a tapestry needle, changing direction at least once to help secure the end. Trim the excess yarn only after confirming that the stitches are firmly anchored. Place the centerpiece on a flat surface and gently spread the leaves into their intended positions. At this stage, the arrangement should already resemble the photographed design, with a decorative flower at the center, overlapping foliage, soft cream and rose accents, and a wide outer ring of pointed burgundy and green leaves.
Blocking, Decorating, and Caring for Your Leaf Shaped Crochet Centerpiece Pattern
Blocking is one of the most important finishing techniques for the Leaf shaped crochet centerpiece Pattern, especially because the design contains many individual pointed leaves. Blocking helps relax the stitches, define the edges, and create a more consistent overall shape. Before blocking, check the yarn manufacturer’s care instructions. If your cotton yarn permits wet blocking, gently dampen the centerpiece with cool water and remove excess moisture by pressing it between clean towels. Do not twist or wring the fabric. Lay the centerpiece on a blocking mat and carefully arrange each leaf so the tips point outward. Use rustproof pins to hold the edges in place while the piece dries completely.
For the best visual result, pay special attention to the outer leaf tips and the spacing between the different layers. Gently stretch each burgundy and olive green leaf to emphasize its elongated silhouette, but avoid pulling so firmly that the stitches become distorted. The cream and dusty rose leaves should remain slightly closer to the center, creating the impression of overlapping floral petals. Adjust the central flower so its petals lie evenly around the middle. Allow the centerpiece to dry naturally in a well-ventilated location, away from excessive heat or direct sunlight. Once dry, remove the pins and check whether the leaves maintain their shape. If necessary, repeat the blocking process on individual areas.
The completed autumn leaf crochet centerpiece can be displayed in several attractive ways. For a rustic farmhouse look, place it directly on a natural wooden dining table, allowing the colors and openwork details to contrast with the wood grain. You can also position it over a neutral linen table runner to create a layered decorative arrangement similar to the reference image. Cream-colored pumpkins, dried flowers, ceramic vases, and natural wooden accessories complement the warm autumn palette beautifully. Keep bulky decorative objects away from the delicate leaf tips so the intricate stitchwork remains visible. If using candles, place them in stable, nonflammable holders and maintain a safe distance from the crochet fabric.
Although the photographed centerpiece uses an autumn-inspired palette, the Leaf shaped crochet centerpiece Pattern can be adapted for many other seasons. For Christmas, replace dusty rose with bright red and use forest green, ivory, and gold-colored yarn. For spring, try pale pink, sage green, lavender, and soft yellow. A summer version might feature turquoise, coral, white, and light green. You can also create a sophisticated neutral centerpiece using beige, taupe, ivory, and warm brown. When changing colors, maintain a consistent yarn weight and hook size so the leaf proportions remain balanced. The design’s repeating structure makes it easy to experiment with color without changing the basic construction.
Proper care will help preserve the beauty of your crochet table centerpiece for years. Because decorative crochet often contains openwork stitches and delicate edges, gentle hand washing is usually the safest approach when permitted by the yarn label. Use cool water and a mild detergent, then rinse carefully without rubbing or stretching the fabric. Remove excess water with a towel and reshape the leaves while the piece dries flat. Avoid hanging the centerpiece while wet, because the weight of the water may stretch the motifs. For storage, place the completely dry centerpiece flat inside a clean cotton bag or between layers of acid-free tissue paper. This helps prevent dust accumulation and reduces the likelihood of permanent creases.
Another enjoyable aspect of this crochet leaf pattern is its potential for customization. If you want a smaller centerpiece, use fewer leaf motifs or make the project with finer cotton thread and a smaller hook. For a larger decoration, add another ring of leaves using longer foundation chains and taller stitches. You can also incorporate decorative beads, embroidered veins, or contrasting edging, provided these embellishments do not make the fabric too heavy. A carefully finished centerpiece makes a thoughtful handmade gift for someone who appreciates crochet, seasonal decorating, or traditional textile crafts. By adjusting the colors and dimensions, you can create a piece that suits a particular home, celebration, or personal preference.
Frequently Asked Questions About the Leaf Shaped Crochet Centerpiece Pattern
Is the Leaf shaped crochet centerpiece Pattern suitable for beginners?
This pattern is most appropriate for adventurous beginners and intermediate crocheters. The individual leaf motifs use basic US crochet stitches, but assembling multiple layers requires patience and attention to symmetry. Beginners can practice by making one leaf at a time before attempting the complete centerpiece.
What type of yarn works best for a crochet leaf centerpiece?
Cotton yarn or crochet cotton thread is generally the best choice because it provides good stitch definition and helps decorative leaves hold their shape. Size 3 crochet thread or lightweight cotton yarn can produce a beautiful lace-like appearance. Acrylic yarn may also work, although it can behave differently during blocking.
How much yarn do I need to make the entire centerpiece?
For an approximate finished diameter of 55–65 cm, plan for around 300–450 g of lightweight cotton yarn. The exact amount depends on the yarn, hook size, tension, and number of decorative motifs. Purchasing a little extra yarn is helpful when making matching leaves or adding decorative borders.
How large should the finished Leaf shaped crochet centerpiece Pattern be?
The suggested version measures approximately 55–65 cm across after assembly and blocking, but this is an estimate rather than a fixed gauge measurement. Using finer thread produces a smaller centerpiece, while thicker yarn and a larger hook increase its dimensions.
Can I use different colors instead of autumn shades?
Absolutely. This pattern works beautifully with Christmas colors, spring pastels, summer brights, or elegant neutral tones. The most important consideration is maintaining enough contrast between the different layers so the individual leaves remain visible.
How do I keep the crochet leaves from curling?
First, check that your stitch counts are consistent and that your tension is not too tight. Wet blocking, when appropriate for the yarn, can help flatten and shape the leaves. If curling persists, try a slightly larger crochet hook or reduce the number of stitches added around the edges.
Do I need to sew every leaf separately?
In this version, the individual leaves are crocheted separately and joined during assembly. This method makes it easier to arrange the colors and control the final shape. You can use a tapestry needle for invisible joins or short crocheted chains for decorative connections.
Can I make the centerpiece without the central flower?
Yes. You can replace the flower with a simple circular crochet motif. However, the flower creates an attractive focal point and helps support the first ring of leaves. If you choose a plain circle, make sure it is large enough to accommodate the inner leaf attachments.
How long does it take to complete this crochet centerpiece?
The project may take approximately 15–25 hours, depending on your experience, crochet speed, and decorative details. Making the individual leaves in batches can help you work more efficiently while keeping the stitch counts consistent.
Can the Leaf shaped crochet centerpiece Pattern be used as a placemat?
A smaller version can function as a decorative placemat, but the layered openwork design is better suited to a centerpiece or table decoration. For everyday placemat use, choose a flatter construction and avoid heavy embellishments that could interfere with dishes or glasses.
How can I make the leaf motifs look more realistic?
Use gradual changes in stitch height to create natural leaf contours. Add subtle picots along the edges and embroider a central vein using matching or slightly darker yarn. Blocking the tips into gentle points will also improve the botanical appearance.
Can I sell finished centerpieces made from this tutorial?
You can generally sell physical items you personally crochet from these original instructions, subject to applicable laws and any other materials or designs you incorporate. Clear photographs, accurate measurements, and honest descriptions can help customers understand the handmade nature of the finished product.
What is the best way to wash a crochet table centerpiece?
Follow the care instructions for the yarn you used. For washable cotton, gentle hand washing with cool water and mild detergent is often appropriate. Dry the centerpiece flat and reshape the leaves before it is completely dry.
Why does my centerpiece look uneven after assembly?
Unevenness may result from inconsistent tension, different leaf sizes, or irregular spacing during assembly. Measure the distance between the center and the outer tips, reposition the motifs if necessary, and use blocking to refine the final shape.
Can I add another layer of leaves to make the centerpiece larger?
Yes. You can create an additional outer ring using longer foundation chains and taller stitches. Arrange the new leaves evenly around the existing perimeter and secure them at multiple points. Remember that a larger centerpiece may require additional connecting stitches to maintain stability.
Conclusion
The Leaf shaped crochet centerpiece Pattern is a rewarding decorative project that combines traditional crochet techniques with the natural beauty of botanical shapes. Throughout this tutorial, you learned how to choose suitable cotton yarn, understand US crochet abbreviations, create a textured central flower, crochet three sizes of leaf motifs, and assemble them into a balanced circular centerpiece. You also discovered how blocking, careful finishing, and thoughtful color combinations can enhance the final appearance.
One of the greatest advantages of this handmade crochet centerpiece is its versatility. By changing the colors, yarn thickness, or number of leaves, you can adapt the same basic construction for autumn, Christmas, spring, or everyday home decoration. The layered design provides an opportunity to practice important crochet skills while creating something both functional and visually appealing.
EASILY FIND THE FREE PDF FOR THIS PATTERN HERE!
Whether you display your finished centerpiece on a wooden dining table, give it as a handmade gift, or create several versions for different seasons, this project celebrates the charm and creativity of crochet. Each individual leaf contributes to a larger design, reminding us that beautiful handmade pieces often begin with simple stitches repeated with care. What do you think of this Leaf shaped crochet centerpiece Pattern? We would love to hear your sincere opinion! Share your favorite color combinations, tell us which part of the project you enjoyed most, and leave any suggestions for improving the tutorial or creating future crochet designs. Your ideas and experiences can inspire other crochet enthusiasts to explore new techniques and enjoy the wonderful art of handmade decoration.