
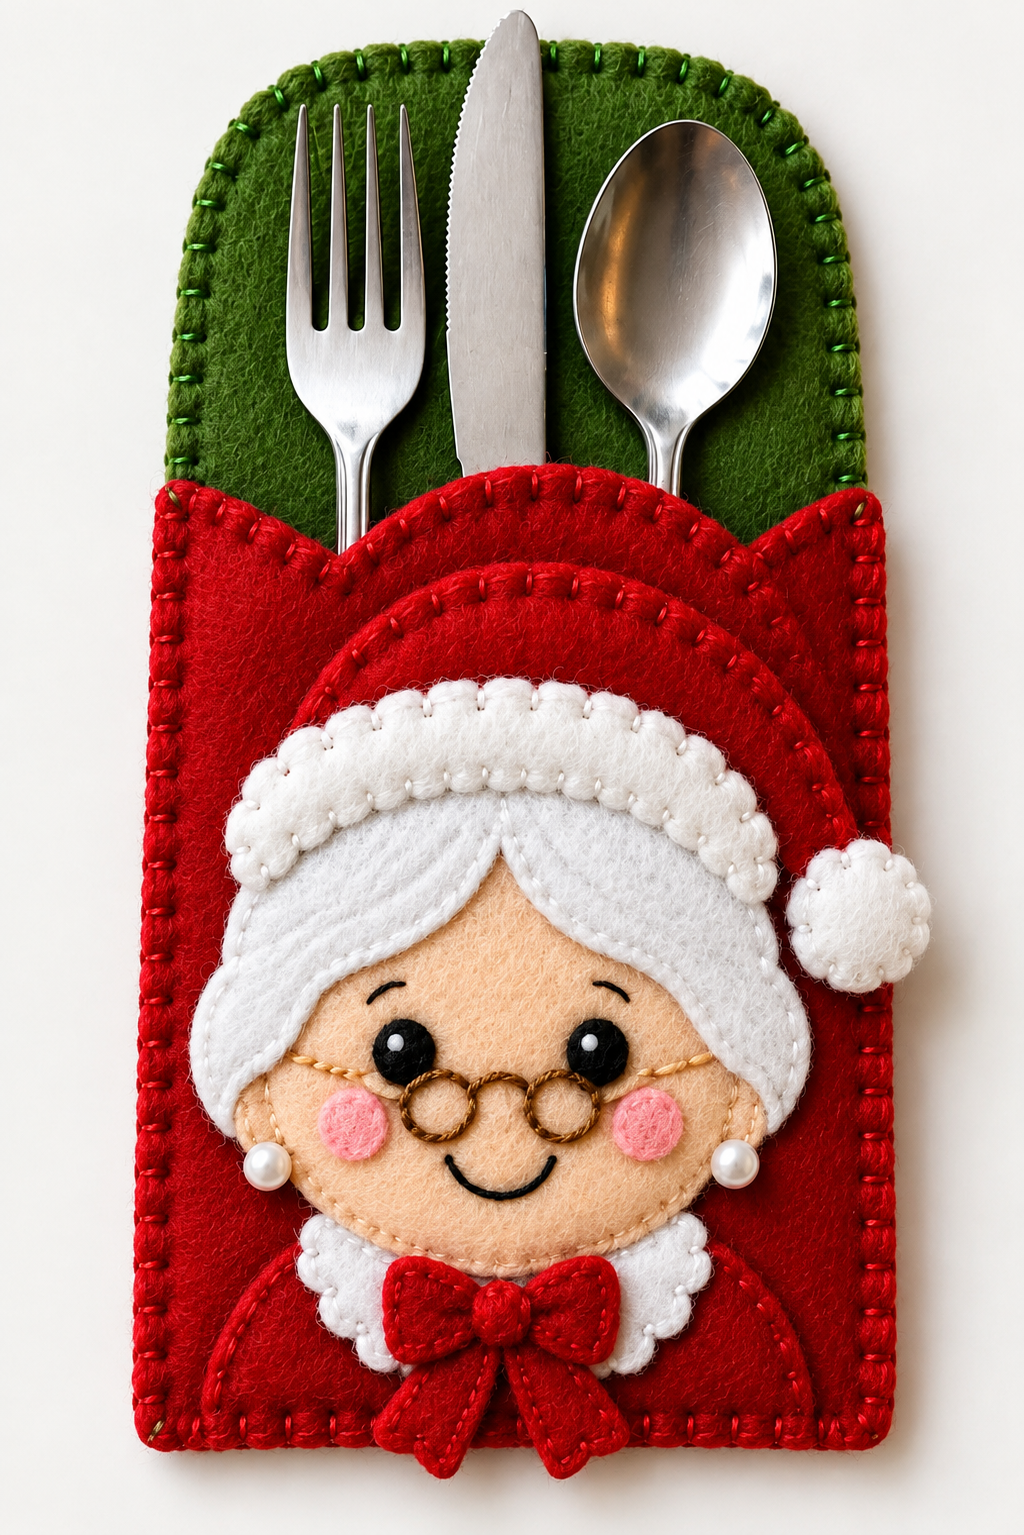
The Grandma’s house style felt Christmas utensil holder Pattern is a charming handmade Christmas project that combines traditional felt sewing, colorful holiday decorations, and the comforting atmosphere of a family Christmas gathering. Inspired by the warmth of Grandma’s kitchen, this delightful utensil holder features a cheerful grandmother’s face, a classic red Christmas hat, delicate embroidered details, and a practical pocket designed to hold silverware. The combination of red, green, white, and soft peach felt creates a nostalgic Christmas appearance that looks beautiful on a festive dining table. Whether you enjoy creating handmade Christmas decorations or want to prepare something special for a holiday dinner, this felt Christmas utensil holder is an enjoyable project that brings personality and warmth to your table setting.
One of the most appealing qualities of this Grandma’s house style felt Christmas utensil holder Pattern is its combination of decorative craftsmanship and everyday functionality. Instead of placing forks, knives, and spoons directly on the table, you can arrange them inside a handmade felt pocket decorated with a smiling grandmother wearing a festive Santa-style hat. The soft felt texture, carefully finished blanket stitches, embroidered facial features, and tiny decorative details give the project a cozy, handcrafted appearance. This design is particularly suitable for people who appreciate DIY Christmas sewing projects, handmade felt ornaments, and traditional holiday crafts. Although the finished piece looks detailed, the construction can be divided into manageable stages, making it accessible to patient beginners and enjoyable for experienced sewing enthusiasts.
Creating your own Christmas felt cutlery holder also provides an opportunity to personalize your holiday decorations without requiring expensive equipment or advanced sewing skills. With a few sheets of craft felt, embroidery thread, scissors, a needle, and simple embellishments, you can create a decorative utensil pocket inspired by the reference design. The project uses basic hand-sewing techniques, including the blanket stitch, running stitch, appliqué stitching, and simple embroidery. Each technique contributes to the finished appearance while helping secure the individual felt layers. In this complete tutorial, you will learn how to prepare the materials, create the felt templates, construct the utensil pocket, assemble Grandma’s cheerful face, decorate the Christmas hat, and finish the holder so it is ready for a memorable holiday celebration.
1. Materials, Measurements, and Preparation for the Felt Christmas Utensil Holder
Before beginning the Grandma’s house style felt Christmas utensil holder Pattern, gather the materials and organize your workspace. The reference design uses a deep green felt background, a bright red front pocket, a peach-colored face, white hair, a red Christmas hat, and small decorative accents. You will need approximately two sheets of red felt, one sheet of green felt, one sheet of white felt, a small piece of peach felt, black felt for the eyes, pink felt for the cheeks, and additional scraps for decorative details. Choose felt approximately 1.5–2 mm thick for the main structure. Softer felt works well for the face and hair, while slightly firmer felt helps the utensil holder maintain its shape. For a more substantial result, consider using wool-blend felt or high-quality polyester craft felt.
DISCOVER MORE FREE PATTERNS HERE!
The recommended finished dimensions for this handmade Christmas utensil holder are approximately 22 cm high and 13 cm wide, although you can adjust the measurements to accommodate your preferred silverware. For the green background, prepare a rounded rectangle measuring approximately 22 × 13 cm. For the red pocket, prepare a piece measuring approximately 14 × 13 cm, with the top edge shaped into a gentle decorative curve. The face can be created from a peach felt oval approximately 9 × 7.5 cm. The Christmas hat should measure approximately 11 × 7 cm before assembly, while the white hair and hat trim can be adjusted to fit the face. These measurements are suggested dimensions for recreating the photographed style rather than measurements taken from an original printable template.
You will also need embroidery floss in red, green, white, black, peach, and brown. A sharp hand-sewing needle, embroidery needle, fabric scissors, small detail scissors, removable fabric marker, ruler, pins, and paper for drawing templates are essential tools. For decorative embellishments, prepare two small pearl-style beads for Grandma’s earrings and a small amount of white stuffing for the hat pom-pom. Brown embroidery floss can be used to create the round eyeglasses, while black floss works beautifully for the smile and eyebrows. If you prefer not to use beads, substitute small circles of white felt to create sewn-on earrings. This alternative is especially useful when you want a completely soft, washable design.
To prepare the felt sewing pattern, begin by drawing each component on ordinary paper or lightweight cardstock. Make separate templates for the green backing, red pocket, grandmother’s face, white hair sections, Christmas hat, hat brim, pom-pom, collar, bow, eyes, and cheeks. Carefully cut out the paper shapes and arrange them on a flat surface to check their proportions. The face should be centered on the lower portion of the red pocket, while the Christmas hat should extend slightly above the face. The green backing must remain visible above the pocket, creating enough space for the silverware handles and upper portions to rest comfortably. This preliminary arrangement helps you visualize the finished decoration before cutting the felt.
When transferring the pattern to felt, place each paper template on the corresponding color and trace around it with a removable fabric marker. Cut slowly with sharp scissors to achieve smooth edges and accurate curves. Most felt appliqué pieces do not require traditional seam allowances because felt generally does not fray like woven fabric. However, if you prefer a stitched construction with turned seams, add approximately 0.5 cm around the relevant structural pieces. For the decorative appliqué used in this project, cutting directly along the pattern outlines will usually produce the cleanest result. Keep the smaller pieces in separate containers or labeled groups so the eyes, cheeks, hair, and bow components are easy to locate during assembly.
Before sewing, practice the blanket stitch, which is one of the most important techniques in this project. This stitch creates a decorative border while helping secure felt layers together. Insert the needle near the fabric edge, pass the working thread beneath the needle, and pull gently to form a small loop along the edge. Repeat at regular intervals, keeping the stitches approximately 0.4–0.5 cm apart. For the photographed style, green thread complements the green backing, while red thread blends beautifully with the red pocket. Practice on a scrap of felt until the stitches appear evenly spaced. Consistent stitching will give your DIY felt Christmas table decoration a more polished and professional handmade finish.
2. Step-by-Step Construction of the Green Backing and Red Utensil Pocket
Begin assembling the Grandma’s house style felt Christmas utensil holder Pattern by preparing the green backing. Cut two identical rounded rectangles from green felt, each measuring approximately 22 × 13 cm. Using two layers creates a sturdier structure that can support the silverware without becoming excessively flexible. Align the two pieces carefully and secure them with pins or small sewing clips. Sew around the entire outer perimeter using green embroidery floss and a blanket stitch. Keep the stitches evenly spaced and avoid pulling the thread too tightly, as this can cause the felt to curl. Once the backing is complete, gently smooth it with your hands and check that the rounded upper corners remain symmetrical.
Next, prepare the red pocket that will hold the utensils. Cut a red felt panel approximately 14 cm high and 13 cm wide, adjusting the top into a gently curved opening. The reference image features a decorative red upper edge that rises toward the center and creates an attractive layered appearance. You can reproduce this effect by cutting a shallow arch along the upper portion of the pocket. If you want a thicker and more durable pocket, cut two matching red pieces and stitch them together along the upper opening before attaching them to the green backing. This creates a neat finished edge that is comfortable to handle and helps prevent stretching when silverware is inserted and removed.
Position the red pocket over the lower portion of the green backing. Align the bottom and side edges, leaving the upper edge completely open. The red felt should cover most of the lower green panel, while the green section remains visible above the pocket. Secure the pieces temporarily with pins and check that the opening is wide enough for a fork, knife, and spoon. Sew along the left side, bottom edge, and right side using a strong blanket stitch with red embroidery floss. Do not stitch across the upper pocket opening, because this is where the utensils will be inserted. Reinforce the two upper corners with a few extra stitches, since these areas experience the most tension during regular use.
After securing the pocket, test its capacity with clean utensils similar to those you intend to use during Christmas dinner. Insert the handles into the opening and check that the silverware rests securely against the green backing. The pocket should hold the utensils without squeezing them tightly or allowing them to fall forward. If your cutlery is unusually long or wide, adjust the pocket dimensions before continuing. A practical handmade holder should allow guests to remove the silverware easily without pulling on the decorative felt appliqué. For a more structured result, you may add a thin piece of flexible fabric interfacing between the two green backing layers, provided it is securely enclosed and does not make the holder excessively rigid.
The next stage is preparing the red decorative base that will sit behind Grandma’s face. Cut a curved red felt piece approximately 11–12 cm wide and 9–10 cm high, shaped like a broad semicircle or gently rounded Christmas hat background. In the reference image, the red hat and decorative elements overlap the pocket to create a layered, three-dimensional appearance. Arrange this piece over the upper-middle portion of the pocket, ensuring that it does not interfere with the utensil opening. Because the holder must remain functional, attach decorative layers only to the front red pocket panel, avoiding stitches that accidentally pass through the green backing and close the storage space.
Before attaching the detailed appliqué, inspect the overall construction. The Christmas silverware holder pattern should now have a sturdy green background, a securely attached red pocket, and a clear space for the grandmother decoration. Check the blanket stitches along the perimeter and reinforce any loose sections. If you notice uneven edges, trim only small amounts of felt to preserve the original proportions. At this point, you can also make several matching pocket bases if you plan to create a complete set for your Christmas dining table. Preparing multiple bases together saves time and allows you to maintain consistent measurements across the entire collection.
3. Creating Grandma’s Face, White Hair, Christmas Hat, and Decorative Details
The most recognizable feature of the Grandma’s house style felt Christmas utensil holder Pattern is the adorable grandmother’s face. Begin by cutting an oval from peach-colored felt, approximately 9 × 7.5 cm. For additional volume, cut a second matching oval and place a very thin layer of polyester stuffing between the pieces. Join them with small running stitches or blanket stitches using peach-colored thread. The stuffing should be minimal, creating a gently rounded appearance rather than a thick pillow. Position the completed face on the lower center of the red decorative background. Leave enough space above the face for the white hair and Christmas hat, and below it for the white collar and red bow.
To create Grandma’s facial expression, cut two small black felt circles for the eyes, each approximately 0.8–1 cm in diameter. Attach them symmetrically to the upper-middle area of the face using tiny stitches. Add a small white stitch or miniature white felt dot to each eye to imitate a reflection and create a friendly expression. Embroider two gently curved eyebrows using black floss, positioning them slightly above the eyes. For the smile, use a backstitch to create a soft upward curve near the bottom center of the face. Add two pink felt circles, approximately 1 cm in diameter, to represent rosy cheeks. These simple details give the felt Grandma Christmas decoration its cheerful and welcoming personality.
The grandmother’s eyeglasses are another charming feature of the design. Use brown embroidery floss to create two small circular frames, approximately 1.2–1.5 cm in diameter. You can form each circle with carefully placed backstitches or couch a thin length of brown embroidery thread onto the felt surface. Connect the circles with a short curved bridge across the center of the face. Add small side details extending toward the cheeks to suggest the glasses’ arms. Keep the embroidery slightly raised for a handcrafted appearance, but avoid bulky knots on the back of the face. Once the glasses are complete, attach a small pearl-style bead to each side of the face to represent earrings, or use white felt circles for an entirely stitched alternative.
Next, prepare the white hair that frames Grandma’s face. Cut two curved white felt sections that meet near the center of the forehead and extend downward along the sides of the face. The reference design features soft white hair divided into two symmetrical sections, giving the grandmother a gentle and familiar appearance. Arrange the hair pieces so they partially overlap the upper face without covering the eyes or eyebrows. Attach them with small white running stitches placed close to the edges. For additional texture, use short embroidery stitches to suggest individual strands of hair. The white felt should contrast clearly with the peach face and red background, creating the layered appearance characteristic of Christmas felt appliqué patterns.
To make the Christmas hat, cut a broad red felt shape approximately 11 × 7 cm, with a rounded upper section and a slightly angled tip extending toward one side. The photographed hat resembles a soft Santa-style cap with a white textured brim and a fluffy pom-pom. Place the red hat above Grandma’s hair and attach it to the decorative base using red thread. Cut a curved white felt strip approximately 10 × 2 cm for the hat brim and position it along the lower edge of the red hat. Secure the brim with small white stitches, allowing it to overlap the upper portion of the hair slightly. For the pom-pom, cut two white felt circles approximately 2 cm in diameter, sew them together around most of the edge, insert a small amount of stuffing, and close the opening. Attach the pom-pom securely to the hat tip.
Finish the grandmother decoration by adding the white collar and red bow beneath the face. Cut two small white scalloped felt pieces to create a soft collar that extends from either side of the chin. Sew them to the red pocket using white thread, allowing the collar to remain visible beneath the face. For the bow, cut two red loops, two short ribbon tails, and a small circular center. Arrange the pieces into a traditional Christmas bow, securing each layer with small red stitches. Position the completed bow at the center beneath Grandma’s chin. The red bow, white collar, round glasses, rosy cheeks, and cheerful smile work together to give the handmade Grandma Christmas utensil holder its distinctive nostalgic character.
4. Final Assembly, Finishing Techniques, and Christmas Table Decoration Ideas
Once the decorative elements are complete, carefully attach Grandma’s face and hat arrangement to the front of the red pocket. Position the appliqué so the hat extends toward the upper portion of the red pocket while the face and bow remain centered below. Use small, evenly spaced stitches around the outer edges of the appliqué, matching the thread color to each felt section whenever possible. To protect the pocket’s functionality, place a piece of cardboard inside the pocket while sewing. This simple technique helps prevent the needle from passing through the green backing accidentally. Remove the cardboard after the appliqué is attached and confirm that the utensil compartment remains completely open.
Inspect the Grandma’s house style felt Christmas utensil holder Pattern for loose threads, uneven stitches, and decorative pieces that may need additional reinforcement. Pay particular attention to the eyeglasses, earrings, hat pom-pom, and bow, since these smaller details can experience movement during handling. Tie secure knots on the reverse side of the appliqué where they will remain hidden. If you prefer a cleaner finish, use tiny locking stitches instead of large knots. Avoid relying on ordinary craft glue for structural seams, especially around the utensil pocket. Hand stitching provides a more flexible and durable finish, while small amounts of fabric-safe adhesive may be used only to temporarily position decorative components before sewing.
The completed felt Christmas utensil holder should have a neat rectangular shape with rounded upper corners, a visible green background, a bright red pocket, and a centered grandmother decoration. The silverware should slide into the pocket from the top, with the eating ends extending above the holder. To protect the felt from food residue, place only clean, completely dry utensils inside. Because this project uses felt and decorative embellishments, it is best treated as a decorative table accessory rather than a food-contact surface. If you plan to use it during a large holiday gathering, prepare the holders in advance and store them flat until you are ready to set the table.
For a coordinated Christmas table arrangement, combine the Grandma’s house style felt Christmas utensil holder Pattern with red napkins, green placemats, white dinner plates, and simple holiday centerpieces. The traditional Christmas colors create a festive atmosphere without requiring elaborate decorations. You can also place a folded fabric napkin behind the silverware or coordinate the holder with a handmade felt table runner. If you are preparing a family dinner, consider making one utensil holder for each guest. A matching collection creates a thoughtful presentation and gives every place setting a personal handmade touch. The grandmother motif is especially appropriate for celebrations centered on family traditions, homemade meals, and cherished Christmas memories.
This DIY Christmas felt craft can also be personalized with different colors, facial expressions, and decorative accents. For a more traditional appearance, use dark green felt, deep red fabric, and creamy white details. For a softer farmhouse-inspired style, consider muted sage green, burgundy, and ivory. You can embroider a small initial on the lower corner of each holder or add a tiny felt holly leaf near the Christmas hat. Another creative option is to make coordinating grandfather, Santa Claus, snowman, or gingerbread character holders using the same basic pocket construction. These variations allow you to create a complete handmade Christmas collection while maintaining a consistent size and sewing method.
Proper storage and care will help preserve your handmade Christmas table decorations for future celebrations. After use, remove the utensils and gently shake away any crumbs or loose debris. If the felt becomes dusty, use a soft brush or lint roller to clean the surface. For minor stains, dab carefully with a slightly damp cloth and mild soap, avoiding excessive rubbing around the embroidery and embellishments. Do not soak the finished holder, especially if it contains stuffing, beads, or adhesive. Allow it to air-dry completely before storing. Keep the finished pieces flat in a clean, dry container, preferably with tissue paper between them to protect the raised decorations. With careful handling, these charming felt holders can become part of your family’s Christmas traditions for many years.
Frequently Asked Questions About the Grandma’s House Style Felt Christmas Utensil Holder Pattern
1. Is the Grandma’s house style felt Christmas utensil holder Pattern suitable for beginners?
Yes. This project is suitable for beginners who are comfortable using scissors, needles, and basic hand-sewing techniques. The construction relies mainly on cutting felt shapes, assembling layers, and sewing decorative details. Beginners may find the facial embroidery and eyeglasses slightly challenging, but these features can be completed slowly with practice. Preparing paper templates before cutting the felt also makes the process easier and helps maintain consistent proportions.
2. What type of felt is best for making a Christmas utensil holder?
Wool-blend felt and high-quality polyester craft felt are both suitable options. For the backing and pocket, choose felt approximately 1.5–2 mm thick to provide enough stability for the silverware. Softer felt is appropriate for the hair, face, and decorative appliqué. Avoid very thin felt for the main pocket because it may stretch or lose its shape after repeated use. A double-layer backing is particularly helpful when working with lightweight materials.
3. Can I make this felt Christmas utensil holder without a sewing machine?
Absolutely. The entire Grandma’s house style felt Christmas utensil holder Pattern can be completed by hand. In fact, hand sewing is particularly appropriate for this design because the blanket stitches and embroidered facial features contribute to its traditional appearance. A sewing machine is optional and may be used for straight structural seams, but it is not necessary. Basic hand stitches are sufficient to create a secure and attractive finished project.
4. How long does it take to make one felt Christmas utensil holder?
The time required depends on your experience and the amount of decorative detail you include. A beginner may need approximately three to five hours to prepare the templates, cut the felt, embroider the face, assemble the layers, and finish the holder. Someone experienced with felt appliqué may complete the project more quickly. Making several holders at once can also save time because you can cut all matching pieces together and complete similar sewing stages in batches.
5. Can I change the size of the Christmas utensil holder?
Yes. The suggested finished size of approximately 22 × 13 cm can be adjusted to fit different utensils or table-setting preferences. For longer silverware, increase the backing height and consider making the pocket slightly deeper. For children’s table settings, a smaller version may be appropriate, provided the utensils fit securely. When resizing, remember to scale the grandmother decoration proportionally so it does not overwhelm the pocket or interfere with the opening.
6. How do I prevent the felt pocket from stretching?
Use a sturdy felt material, double the pocket layer if necessary, and reinforce the upper corners with additional stitches. Keep the blanket stitches evenly spaced and avoid pulling the thread too tightly. If the holder will be used frequently, consider inserting lightweight interfacing between the backing layers. It is also important to avoid overfilling the pocket with heavy utensils, since excessive weight can gradually distort the felt.
7. Can I wash a handmade felt Christmas utensil holder?
Spot cleaning is the safest approach for most handmade felt decorations. Use a slightly damp cloth with a small amount of mild soap to treat minor marks. Avoid machine washing, vigorous scrubbing, or soaking unless all materials have been specifically selected and tested for those cleaning methods. Decorative beads, embroidery, and stuffed elements may become damaged during aggressive washing. Always allow the holder to dry completely before putting it away.
8. Is this Christmas utensil holder a good handmade gift?
Yes. A set of handmade felt Christmas utensil holders can make a thoughtful seasonal gift for someone who enjoys decorating their home or hosting holiday meals. You can prepare a matching set of four, six, or eight holders and package them neatly with a handmade gift tag. Personalized colors or embroidered initials can make the gift even more meaningful. The grandmother design is especially charming for people who appreciate traditional Christmas crafts and nostalgic holiday decorations.
9. What sewing stitches are used in this felt Christmas pattern?
The main stitches are the blanket stitch, running stitch, backstitch, and small appliqué stitches. The blanket stitch is used around the edges of the backing and pocket, while the running stitch helps secure decorative felt layers. Backstitch works well for the smile, eyebrows, and eyeglasses because it creates smooth, continuous embroidered lines. Small appliqué stitches are useful for attaching the eyes, cheeks, hair, and Christmas hat.
10. Can I sell finished utensil holders made from this tutorial?
You can create your own handmade versions of this general design and consider selling them, subject to any applicable rights, marketplace requirements, and local regulations. If you plan to sell finished items, use your own templates and original decorative details rather than assuming that an existing artist’s pattern or photograph is available for commercial reproduction. Securely attach all embellishments, describe the materials accurately, and provide appropriate care information to customers.
11. How many felt sheets do I need to make a complete Christmas dinner set?
The quantity depends on the size of the felt sheets and how efficiently the pattern pieces are arranged. For a set of six holders, begin by calculating the total area required for six green backings and six red pockets, then add extra felt for hats, bows, faces, and decorative pieces. Purchasing a little additional material is helpful because it allows for cutting mistakes and small adjustments. Cutting identical shapes together can reduce waste and make the finished set more consistent.
12. Can children help make this Christmas felt decoration?
Children can participate in age-appropriate stages under adult supervision. They may enjoy choosing felt colors, arranging paper templates, and helping position decorative shapes. Cutting with sharp scissors, hand sewing, and attaching small beads should be handled or closely supervised by an adult. For projects involving younger children, consider replacing small beads with embroidered details or sewn-on felt circles to reduce the risk associated with detachable small parts.
Conclusion: Create a Warm and Memorable Handmade Christmas Table Decoration
The Grandma’s house style felt Christmas utensil holder Pattern is more than a practical way to organize silverware. It is a delightful handmade decoration that celebrates family traditions, creativity, and the welcoming atmosphere of Christmas gatherings. With its bright red pocket, deep green backing, cheerful grandmother’s face, white hair, round eyeglasses, and festive Christmas hat, this project brings a charming nostalgic touch to any holiday table.
Throughout this tutorial, you learned how to select suitable felt materials, prepare paper templates, cut the main shapes, construct a durable utensil pocket, and use traditional hand-sewing techniques to assemble the design. You also explored how to embroider Grandma’s facial features, create her Christmas hat and pom-pom, attach the decorative collar and bow, and finish the project with neat blanket stitches. Finally, you discovered ways to personalize the holder, coordinate it with Christmas table decorations, and care for it so it can be enjoyed during future celebrations.
Whether you create one special holder or an entire matching set for your family dinner, this DIY felt Christmas utensil holder offers a rewarding opportunity to transform simple craft materials into something beautiful and meaningful. The project is especially enjoyable because each small detail adds character, from the embroidered smile to the tiny earrings and festive red bow.
EASILY FIND THE FREE PDF FOR THIS PATTERN HERE!
Now I would love to hear your sincere opinion! What do you think about this Grandma-inspired Christmas utensil holder? Would you keep the traditional red and green colors, or would you create your own variation? Share your honest thoughts, creative suggestions, and ideas for improving this pattern in the comments. Your feedback can inspire new handmade Christmas projects and help other craft enthusiasts discover creative ways to decorate their holiday tables.