
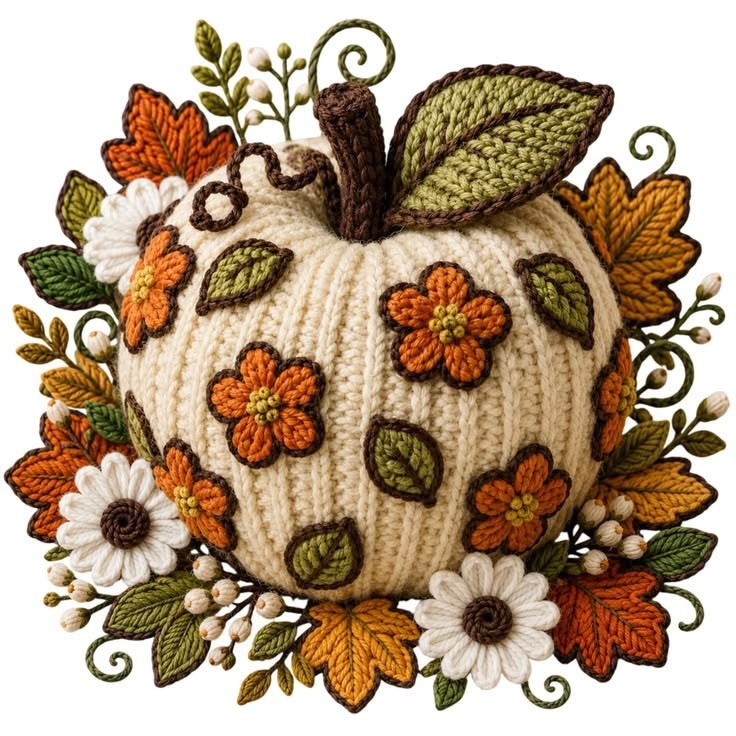
The Crochet autumn pumpkin with flowers and leaves Pattern is a beautiful way to celebrate the warmth, color, and creativity of the fall season. Combining a soft, textured pumpkin with delicate crochet flowers, colorful autumn leaves, and decorative vines, this handmade centerpiece brings a cozy and welcoming atmosphere to any home. The design features a lovely cream-colored pumpkin decorated with orange blossoms, olive-green leaves, white daisies, and rich brown details. These elements create an elegant combination of rustic charm and seasonal beauty. Whether you enjoy making handmade decorations for your living room, preparing unique Thanksgiving centerpieces, or creating thoughtful gifts for family and friends, this crochet autumn pumpkin offers a rewarding creative experience. The project also provides an opportunity to practice several crochet techniques while producing a decorative piece that can be displayed throughout the autumn months.
One of the most appealing features of this Crochet autumn pumpkin with flowers and leaves Pattern is the combination of three-dimensional texture and carefully arranged floral embellishments. Instead of creating a simple pumpkin shape, this design uses pronounced vertical ribs to imitate the natural curves of a real pumpkin. The decorative flowers are crocheted separately and attached to the surface, allowing each blossom to stand out against the soft background. Green leaves, golden autumn foliage, and curled vines add movement and depth to the arrangement. The finished piece can be placed on a dining table, displayed on a mantel, or incorporated into a larger seasonal decoration. Although the completed design appears elaborate, the construction becomes much easier when divided into manageable stages. By working carefully through the instructions, crocheters can build the pumpkin first and gradually add the smaller decorative components.
This tutorial explains how to create a handmade crochet pumpkin with flowers and leaves using standard American crochet terminology. The instructions include yarn recommendations, basic crochet abbreviations, detailed stitch explanations, pumpkin shaping, floral construction, leaf-making techniques, and final assembly. The project is particularly suitable for confident beginners and intermediate crocheters who are comfortable working in rows, making increases and decreases, and sewing crochet pieces together. However, beginners can also complete the design by practicing each decorative element separately before attaching it to the pumpkin. The pattern presented here is an original interpretation of the photographed decoration, using practical stitch counts and repeatable construction methods to reproduce its overall appearance. Since yarn thickness, crochet tension, and stuffing density affect the finished measurements, small adjustments may be necessary. The goal is to create a balanced, beautifully textured autumn decoration that reflects the inspiration while allowing room for personal creativity.
1. Materials, Crochet Stitches, and Preparation for the Autumn Pumpkin
Before beginning the Crochet autumn pumpkin with flowers and leaves Pattern, gather all the materials needed for the pumpkin body and its floral decorations. Using coordinated yarn colors helps achieve the rich autumn appearance shown in the inspiration image. Cream or ivory yarn works beautifully for the pumpkin itself, while orange, mustard yellow, olive green, dark brown, and white create the flowers and foliage. Medium-weight yarn is recommended because it produces well-defined stitches without making the project unnecessarily bulky. For a decorative pumpkin approximately 20–24 cm wide, depending on tension and shaping, use worsted-weight yarn and a 4.0 mm crochet hook for the main body. Smaller decorative pieces may be made with a 3.0–3.5 mm hook to produce tighter stitches and more defined details.
DISCOVER MORE FREE PATTERNS HERE!
Materials needed:
-
150–200 g of cream or ivory worsted-weight yarn for the pumpkin body
-
30 g of dark brown yarn for the stem, outlines, and flower centers
-
30 g of burnt orange yarn for the decorative flowers
-
20 g of mustard yellow yarn for autumn leaves and flower centers
-
30 g of olive-green yarn for leaves and vines
-
20 g of white yarn for daisies and small floral details
-
4.0 mm crochet hook for the pumpkin
-
3.0–3.5 mm crochet hook for smaller embellishments
-
Polyester fiberfill stuffing
-
Yarn needle, stitch markers, and scissors
-
Optional floral wire for decorative stems, securely enclosed if used
The pattern uses US crochet terminology, which is important because American and British stitch names are different. The most frequently used stitches are chain, slip stitch, single crochet, half double crochet, double crochet, and treble crochet. These stitches create the different textures found throughout the design. Single crochet produces firm, compact fabric suitable for the pumpkin and stem, while taller stitches such as double crochet and treble crochet are useful for shaping flower petals and pointed leaves. The pumpkin body also uses back-loop-only crochet to create the vertical ridges that give the finished decoration its realistic appearance.
Crochet abbreviations (US terms):
| Abbreviation | Meaning |
|---|---|
| ch | Chain |
| sl st | Slip stitch |
| sc | Single crochet |
| hdc | Half double crochet |
| dc | Double crochet |
| tr | Treble crochet |
| BLO | Back loop only |
| inc | Increase: 2 stitches in one stitch |
| dec | Decrease |
| sc2tog | Single crochet 2 stitches together |
| st(s) | Stitch(es) |
| rep | Repeat |
| RS | Right side |
| FO | Fasten off |
| MR | Magic ring |
Understanding the basic crochet techniques will make the project much easier to complete. To create a chain stitch, make a slip knot, yarn over, and pull the yarn through the loop on the hook. For a single crochet, insert the hook into the designated stitch, yarn over, pull up a loop, yarn over again, and pull through both loops. For a half double crochet, yarn over before inserting the hook, pull up a loop, and then pull through all three loops. For a double crochet, yarn over, insert the hook, pull up a loop, and complete the stitch by pulling through two loops twice. A treble crochet begins with two yarn overs and is completed by pulling through two loops three times. Practicing these stitches with leftover yarn is helpful before starting the decorative elements.
Another important technique in this textured crochet pumpkin pattern is working through the back loop only. Normally, a crochet stitch has two loops at the top, forming a small V shape. When instructed to work in BLO, insert the hook through only the loop farthest from you. This leaves the front loop visible and creates a raised line along the fabric. Repeating this technique across multiple rows produces the ribbed surface that makes the pumpkin look rounded and natural. Maintaining even tension is essential because excessively tight stitches can make the fabric difficult to shape, while loose stitches may allow stuffing to show through. If necessary, adjust the hook size to create a firm but flexible fabric.
The finished crochet pumpkin decoration can be customized according to the available space and desired appearance. A larger hook and thicker yarn will create a bigger pumpkin, while thinner yarn will produce a smaller decorative piece. For a traditional autumn palette, combine ivory, burnt orange, olive green, golden yellow, and chocolate brown. For a softer farmhouse appearance, use cream, sage green, beige, and muted terracotta. Prepare several small yarn balls before beginning the flowers and leaves so that the colors are easy to change during construction. It is also helpful to keep the completed embellishments in separate groups until assembly, preventing small leaves and petals from becoming tangled.
Finally, prepare a comfortable workspace with good lighting and enough room to arrange the finished components. The crochet pumpkin centerpiece requires several individual decorations, including flowers, leaves, vines, and small buds, so organization makes the process more enjoyable. Keep a stitch marker nearby to identify the beginning of rounds, especially when making circular flower centers and decorative stems. Use a yarn needle with a large eye for sewing the pieces together. If the decoration will be displayed around young children or pets, avoid loose beads, exposed wire, and other detachable accessories. A fully yarn-based arrangement with securely stitched decorations is a practical alternative that preserves the appearance of the original design.
2. Step-by-Step Instructions for Crocheting the Textured Pumpkin Body
The main structure of the Crochet autumn pumpkin with flowers and leaves Pattern begins with a rectangular piece of ribbed crochet fabric. Once completed, the rectangle is joined into a tube, gathered at the bottom, filled with polyester stuffing, and shaped into a rounded pumpkin. This construction method is popular for decorative crochet pumpkins because it creates pronounced vertical ridges without requiring complicated stitch combinations. The key is to crochet consistently through the back loops while keeping the rows approximately the same length. For this version, begin with a foundation chain of 41 stitches, which creates 40 working stitches across each row. The completed rectangle should be approximately 25–28 cm tall before assembly, depending on yarn tension.
Step 1 – Crochet the pumpkin rectangle. With cream yarn and a 4.0 mm hook, ch 41. Row 1: Starting in the second chain from the hook, work 1 sc in each chain across. You should have 40 sc. Ch 1 and turn. Row 2: Work 1 sc in BLO of each stitch across, maintaining 40 sc. Ch 1 and turn. Repeat Row 2 until the rectangle contains approximately 70–80 rows, or until its length is roughly 50–55 cm. The exact number of rows can be adjusted to achieve the desired fullness. Do not stretch the fabric excessively when measuring. The rectangle should have clearly visible ridges running across the direction of the rows, which will become the pumpkin’s vertical ribs after assembly.
Step 2 – Join the fabric into a cylinder. Fold the completed rectangle so that the first and last rows meet, keeping the ridges on the outside. Using a yarn needle and matching cream yarn, sew the two short edges together with a mattress stitch or whipstitch. Alternatively, join them with slip stitches if preferred. Work carefully to keep the seam flat and avoid pulling the fabric too tightly. The result should be a flexible crochet cylinder with an opening at the top and another at the bottom. The ribbed lines should run vertically from one opening to the other. Turn the piece if necessary so the neatest side faces outward.
Step 3 – Close the bottom of the pumpkin. Thread a long piece of cream yarn through a yarn needle and weave it through the edge stitches around one opening. Use a running stitch, passing the needle through every one or two stitches. Once the yarn has traveled around the entire opening, pull it gently to gather the fabric toward the center. Continue tightening until the opening is closed as much as possible. Secure the gathering yarn with several strong stitches, then weave in the end. If a small opening remains, stitch across it a few times to close the gap. This gathered section will form the bottom of the pumpkin and should be firm enough to hold the stuffing securely.
Step 4 – Stuff and close the pumpkin. Turn the cylinder so the closed section rests at the bottom. Begin filling the pumpkin with polyester fiberfill, distributing the stuffing evenly around the edges. Add enough filling to create a rounded shape without stretching the stitches excessively. The pumpkin should feel soft but maintain its structure when placed on a flat surface. Once the body is adequately filled, thread a long yarn strand through the top edge and gather it in the same manner as the bottom. Pull the opening closed and secure it with several stitches. Avoid overstuffing the center because the pumpkin still needs to be shaped into its characteristic flattened form.
Step 5 – Shape the pumpkin and emphasize its ribs. Insert a long yarn needle threaded with a strong strand of cream yarn through the center of the top and down through the pumpkin to the bottom. Bring the yarn back through the center to the top, pulling gently to create an indentation. Repeat this process until the pumpkin has a slightly flattened top and bottom. Secure the yarn without pulling so tightly that the fabric becomes distorted. To emphasize individual sections, wrap additional strands around selected rib channels from top to bottom, pulling them just enough to create subtle grooves. Space these shaping strands evenly and hide the knots beneath the stem area. The finished body should resemble a plump pumpkin with soft, natural curves.
Step 6 – Crochet and attach the brown pumpkin stem. Using dark brown yarn and a 3.5 mm hook, begin with a magic ring. Round 1: Work 6 sc into the ring. Round 2: Work 2 sc in each stitch around (12 sc). Rounds 3–10: Work 1 sc in each stitch around (12 sc). For a slightly wider base, Round 11: 1 sc in the next stitch, 2 sc in the following stitch; repeat around (18 sc). FO, leaving a long tail for sewing. Add a small amount of stuffing to the stem if necessary. Position it over the gathered opening at the top of the pumpkin and sew the base securely in place. For the curved vine detail, ch 20–25 with olive-green yarn, then work 2 sc into each chain beginning in the second chain from the hook. The resulting spiral can be attached beside the stem to create the curling tendril visible in the autumn-inspired design.
3. How to Crochet the Autumn Flowers, Leaves, and Decorative Vines
The floral decorations are what make this Crochet autumn pumpkin with flowers and leaves Pattern especially distinctive. The photographed design combines several types of flowers, including small orange blossoms with yellow centers and larger white daisies with dark brown centers. Olive-green leaves, pointed autumn foliage, and curled vines create a natural arrangement around the pumpkin. Each element can be crocheted separately and attached during the final assembly. For a balanced design, prepare approximately six orange flowers, three white daisies, eight small green leaves, four larger autumn leaves, and several decorative vines. These quantities are suggestions rather than strict requirements, allowing the arrangement to be adapted to the size of the finished pumpkin.
Step 7 – Make the orange five-petal flowers. Using mustard yellow yarn, create an MR and work 5 sc into the ring. Sl st into the first sc to join, then change to burnt orange yarn. Each of the five stitches will serve as the foundation for one petal. To form a petal, work (sl st, ch 2, 2 dc, ch 2, sl st) into the same stitch. Repeat this sequence in each of the remaining four stitches. After completing the fifth petal, FO and leave a long tail for attaching the flower. Gently shape the petals with your fingers to create a rounded appearance. If a fuller flower is desired, substitute 3 dc for the 2 dc in each petal. These small crochet autumn flowers are ideal for decorating the front and sides of the pumpkin.
Step 8 – Crochet the white daisies with brown centers. Begin with dark brown yarn and make an MR. Round 1: Work 6 sc into the ring. Round 2: Work 2 sc into each stitch around (12 sc). Sl st to join and change to white yarn. For each petal, work (sl st, ch 3, 2 tr, ch 3, sl st) into the same stitch, then skip the next stitch. Repeat around to create six petals. FO and leave a sewing tail. The tall treble crochet stitches give the white petals a longer, softer appearance than the orange blossoms. Make three daisies and position them around the lower edge of the pumpkin. The contrast between the white petals and dark centers adds brightness and helps separate the different layers of foliage.
Step 9 – Create small olive-green crochet leaves. Using olive-green yarn, ch 10. Starting in the second chain from the hook, work the following stitches along one side of the foundation chain: 1 sl st, 1 sc, 1 hdc, 1 dc, 1 dc, 1 hdc, 1 sc, and 1 sl st. In the final chain, work 3 sc to turn around the tip. Continue along the opposite side of the foundation chain with 1 sl st, 1 sc, 1 hdc, 1 dc, 1 dc, 1 hdc, 1 sc, and 1 sl st, then sl st to join. FO, leaving a long tail. The completed leaf should have a narrow, oval shape with a slightly pointed tip. For a decorative center vein, use dark brown yarn and surface slip stitches or embroidery to create a line running from the base toward the tip. Make approximately eight leaves in different shades of green.
Step 10 – Crochet larger autumn leaves. For the golden and orange foliage, use a simple five-lobed construction inspired by maple leaves. With mustard or burnt orange yarn, make an MR and work 10 sc into the ring, then sl st to join. Each pair of stitches will support one leaf lobe. For each lobe, sl st into the next stitch, ch 4, work 1 sc in the second chain from the hook, 1 hdc in the next chain, and 1 dc in the last chain. Sl st into the following stitch on the center ring to anchor the point. Repeat this process five times around the ring. FO and leave a long tail. For more pronounced leaf tips, increase the chain length to 5 and include a treble crochet near the base. Embroider simple veins with dark brown yarn to highlight the pointed lobes. These crochet fall leaves can be placed behind the pumpkin to create a warm seasonal backdrop.
Step 11 – Make decorative vines and small floral buds. To create a curled vine, ch 25 with olive-green yarn. Starting in the second chain from the hook, work 2 sc into each chain across. The extra stitches naturally cause the chain to curl into a spiral. For a longer vine, begin with 35 chains. Small buds can be made by creating an MR and working 5 sc into the ring, followed by one round of sc in each stitch. Stuff the tiny shape lightly with yarn scraps, then close the opening with a yarn needle. Make the buds in cream, white, or pale yellow to imitate the small berry-like accents visible around the floral arrangement. Attach them to crocheted chains or embroidered stems. These details provide visual interest without overwhelming the main pumpkin.
Step 12 – Arrange the flowers and leaves before sewing. Place the completed pumpkin on a flat surface and experiment with the positioning of the decorations. Begin with the larger autumn leaves, arranging them around the back and lower edges so they form a decorative frame. Next, position the white daisies near the base and distribute the orange blossoms across the front and sides. Add the small olive-green leaves between the flowers, allowing some to overlap slightly. The curled vines can be placed near the stem and around the outer edges to create movement. Avoid attaching everything immediately; arranging the components first makes it easier to achieve a balanced composition. Once satisfied, use matching yarn and small hidden stitches to secure each decoration to the pumpkin body.
4. Assembling, Finishing, and Decorating Your Crochet Autumn Pumpkin
The final stage of the Crochet autumn pumpkin with flowers and leaves Pattern involves bringing all the crocheted components together into one cohesive decoration. Although the pumpkin body provides the structure, the placement of the flowers, leaves, and vines determines the overall appearance. Begin by checking that the pumpkin sits securely on a flat surface and that the stem is firmly attached. If the body leans to one side, redistribute the stuffing gently or adjust the shaping threads. The decorative elements should be attached in layers, beginning with the largest leaves and continuing toward the smaller flowers and finishing details. This approach helps create the full, dimensional appearance seen in the inspiration image.
Step 13 – Attach the background foliage. Begin with the larger golden, orange, and olive-green leaves. Position them around the back and lower edges of the pumpkin so that their pointed tips extend beyond the main body. Use a yarn needle threaded with matching yarn to secure each leaf at its base. Leave the outer tips slightly free to create a natural layered effect. The leaves should appear to emerge from beneath the pumpkin rather than forming a perfectly symmetrical border. Alternate the colors to create visual contrast, placing mustard yellow leaves beside burnt orange foliage and darker green leaves. This background layer gives the arrangement depth and makes the central pumpkin appear fuller.
Step 14 – Secure the decorative flowers. Place the orange flowers across the visible surface of the pumpkin, spacing them between the raised ribs. A pleasing arrangement might include two flowers near the upper front, two around the middle, and smaller blossoms toward the sides. Sew through the center of each flower using matching yarn, making several secure stitches without flattening the petals. Position the white daisies near the base, where they can overlap the autumn leaves slightly. The white flowers provide contrast against the darker foliage and create a softer appearance. For a more dimensional finish, attach each flower primarily at its center, allowing the petals to lift naturally away from the pumpkin.
Step 15 – Add small leaves and embroidered details. Once the flowers are attached, fill the empty spaces with small olive-green crochet leaves. Place some leaves diagonally beside the flowers and others vertically along the pumpkin ribs. Use dark brown yarn to embroider veins through the center of selected leaves. The embroidery should be subtle and should follow the natural shape of each leaf. Additional surface stitches can be used to outline flower petals or create small decorative stems. These finishing touches are optional, but they help reproduce the detailed handcrafted appearance of the photographed design. Avoid adding too many embroidered lines, since the pumpkin’s ribbed texture should remain visible.
Step 16 – Position the vines and floral buds. Arrange the crocheted spirals near the stem and around the lower sides of the pumpkin. Secure the base of each vine with several stitches, allowing the curled portion to remain loose and decorative. Add small cream-colored buds between the leaves to create delicate highlights. If desired, make a few straight stems using foundation chains and attach the buds at their ends. For a fully soft decoration, use crocheted chains instead of exposed floral wire. If the project is intended only for adult decorative display, enclosed wire may provide additional shaping support, but it should never protrude through the yarn. The goal is to create graceful movement while keeping every component securely attached.
Step 17 – Shape and finish the completed centerpiece. After attaching all the decorations, examine the pumpkin from the front, sides, and top. Adjust the petals and leaves gently with your fingers so they sit naturally. If some leaves curl more than desired, lightly dampen them and shape them on a towel until dry. Avoid soaking the stuffed pumpkin because excessive moisture may take a long time to dry completely. Check all attachment points and reinforce any loose decorations with additional stitches. Weave in the remaining yarn ends carefully, hiding them beneath the flowers or inside the pumpkin body. A neatly finished project will have no visible knots or loose strands.
Step 18 – Display and care for your handmade pumpkin. The finished crochet autumn pumpkin centerpiece can be displayed on a dining table, mantel, shelf, or entryway console. It works especially well with natural wooden furniture, neutral table linens, and other soft autumn decorations. To maintain its appearance, keep it away from excessive moisture and prolonged direct sunlight, which may cause some yarn colors to fade. Remove dust gently with a soft brush or a vacuum using a low-suction setting and protective attachment. If cleaning becomes necessary, spot-clean the affected area with a damp cloth and allow the decoration to dry thoroughly. With careful storage between seasons, this handmade pumpkin can remain a cherished part of your fall decorating collection for years.
Frequently Asked Questions About the Crochet Autumn Pumpkin with Flowers and Leaves Pattern
1. Is this crochet autumn pumpkin pattern suitable for beginners?
Yes, beginners who already understand basic crochet stitches can complete this project. The pumpkin body uses repeated single crochet stitches worked through the back loops, making the main construction relatively straightforward. The flowers and leaves require a little more practice because they involve different stitch heights and shaping techniques. Beginners may find it helpful to make one flower and one leaf as practice pieces before starting the full arrangement.
2. What is the best yarn for making a crochet autumn pumpkin?
Worsted-weight acrylic or cotton-blend yarn is an excellent choice. Acrylic yarn is lightweight, affordable, and available in a wide variety of autumn colors. Cotton yarn provides excellent stitch definition and a slightly firmer structure, which can be especially useful for decorative leaves and flowers. A cotton-acrylic blend offers a balance of softness and durability.
3. How large will the finished crochet pumpkin be?
When made with worsted-weight yarn and a 4.0 mm crochet hook, the pumpkin body may measure approximately 20–24 cm across, depending on the crocheter’s tension, stuffing, and shaping. The attached leaves and flowers can increase the overall width of the decoration. To make a larger pumpkin, increase the foundation chain length and the number of ribbed rows proportionally.
4. How can I make the pumpkin ribs more noticeable?
The easiest way to create pronounced ribs is to work the body entirely in back-loop-only single crochet. After stuffing the pumpkin, use strong yarn to shape the center and gently pull the top and bottom inward. Additional shaping strands can be placed along selected rib channels to create deeper grooves. Be careful not to pull too tightly, as this can distort the pumpkin.
5. Can I change the flower colors in this crochet pattern?
Absolutely. Although the original inspiration uses orange, white, yellow, and green, the flowers can be made in almost any color combination. Burgundy, dusty rose, mustard, sage green, and cream are beautiful choices for a sophisticated autumn arrangement. For a more traditional Thanksgiving decoration, combine burnt orange, deep red, golden yellow, and brown.
6. How do I prevent the crochet flowers from curling?
Some curling is natural and can actually make the flowers appear more dimensional. However, if the petals curl excessively, check that the stitch counts are correct and that the crochet tension is not too tight. Using a slightly larger hook can help create softer petals. Gentle wet blocking may also improve their shape.
7. Can this crochet pumpkin be made without stuffing?
The pumpkin requires some form of filling to maintain its rounded shape. Polyester fiberfill is recommended because it is lightweight, washable in many applications, and easy to distribute. Clean leftover yarn scraps can also be used, although they may create a heavier or less uniform result. Avoid materials that retain excessive moisture.
8. How long does it take to crochet an autumn pumpkin with flowers and leaves?
The time required depends on experience and the number of decorative components. An intermediate crocheter may complete the pumpkin body in approximately three to five hours. The flowers, leaves, vines, and assembly may require another four to eight hours. A detailed arrangement with additional embroidery can take longer. Working on the project over several sessions often makes the process more relaxing.
9. Can I use this pattern to make a Thanksgiving centerpiece?
Yes. This crochet pumpkin with flowers and leaves is especially well suited to Thanksgiving decorations. Its warm autumn colors complement seasonal table settings, and the soft construction makes it easy to place on a decorative tray or fabric runner. For a larger centerpiece, create two or three pumpkins in different sizes and arrange them together.
10. How can I make the crochet leaves look more realistic?
Use several shades of green, orange, yellow, and brown rather than making every leaf the same color. Embroider a central vein and a few smaller side veins using contrasting yarn. Vary the size and angle of the leaves during assembly, and allow some tips to curve naturally. These small differences help create the appearance of real autumn foliage.
11. Is it possible to wash the finished crochet pumpkin?
Spot-cleaning is generally the safest option because the pumpkin contains stuffing and multiple attached decorations. If the yarn is washable, test a small area first and use a damp cloth with mild soap. Avoid soaking the entire piece unless all materials are suitable for washing and the decoration can dry completely. Proper drying is essential to prevent moisture from remaining inside the stuffing.
12. Can I sell handmade pumpkins created from this pattern?
Handmade crochet pumpkins can be attractive seasonal craft items, but selling finished pieces requires attention to material costs, labor time, presentation, and applicable local rules. If using a pattern created by someone else, review any relevant licensing terms. For this original interpretation, makers can personalize the colors, floral arrangement, and decorative details to create distinctive finished pieces.
13. What should I do if my pumpkin looks too tall or narrow?
A tall pumpkin may result from using too few rows in the rectangle or adding too much stuffing. To create a wider shape, increase the number of rows before joining the fabric into a cylinder. You can also gently compress the pumpkin from top to bottom while tightening the central shaping yarn. This encourages a rounded, slightly flattened silhouette.
14. Can I make a miniature version of this autumn crochet pumpkin?
Yes. Use sport-weight or fingering-weight yarn with a smaller crochet hook and reduce the foundation chain and number of rows. The same construction principles apply, although the flowers and leaves should also be reduced in size. Miniature pumpkins make charming shelf decorations, seasonal gift accents, and decorative additions to autumn wreaths.
Conclusion: Create a Beautiful Handmade Crochet Autumn Pumpkin
The Crochet autumn pumpkin with flowers and leaves Pattern brings together texture, color, and creative detail in a charming handmade decoration. Throughout this tutorial, you learned how to prepare the necessary materials, work with basic American crochet stitches, create a ribbed pumpkin body, shape it with stuffing, and add a sturdy decorative stem.
You also explored how to crochet orange flowers, white daisies, olive-green leaves, pointed autumn foliage, curled vines, and small floral buds. By arranging these components in layers and securing them carefully, you can create a dimensional autumn centerpiece inspired by the beautiful floral pumpkin shown in the photograph.
One of the greatest advantages of this DIY crochet fall decoration is its flexibility. You can change the yarn colors, adjust the pumpkin size, add more flowers, or simplify the foliage to match your personal style. Every handmade pumpkin can become a unique expression of creativity, making the project suitable for seasonal decorating, thoughtful gifts, or handmade craft collections.
The most important part of this project is enjoying the creative process. Take your time with the details, experiment with different floral arrangements, and appreciate the beauty of each completed stitch. With patience and a little imagination, a simple collection of yarn can become a warm and inviting autumn decoration.
EASILY FIND THE FREE PDF FOR THIS PATTERN HERE!
We would love to hear your sincere opinion! 🍂🎃 What do you think of this Crochet autumn pumpkin with flowers and leaves Pattern? Would you prefer the classic orange and cream combination, or would you choose different autumn colors? Share your honest feedback, creative suggestions, and ideas for future crochet tutorials in the comments. Your experiences and suggestions can inspire other crochet enthusiasts and help make future projects even more enjoyable!