
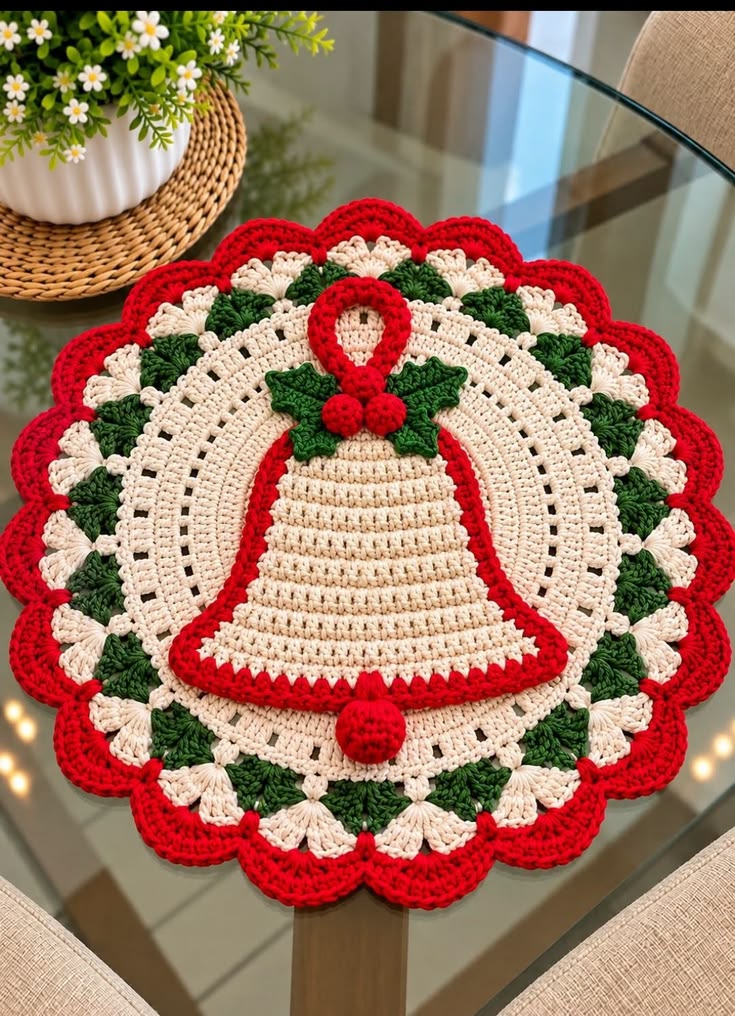
The Crochet Christmas wreath with little bells Pattern is a beautiful holiday project that combines traditional crochet techniques with the warmth and charm of handmade Christmas decorations. Featuring a delicate cream-colored circular base, rich green accents, bright red scalloped edges, and an adorable Christmas bell in the center, this design creates a festive piece that looks wonderful on a dining table, coffee table, or decorative holiday display. The combination of colors and textures gives the wreath a classic Christmas appearance, while the detailed stitches add an elegant handmade touch. Whether you enjoy creating seasonal decorations for your home or making thoughtful gifts for friends and family, this crochet Christmas wreath pattern offers a creative opportunity to celebrate the holiday season with yarn and a crochet hook.
One of the most appealing features of this Crochet Christmas wreath with little bells Pattern is its layered construction. The circular foundation uses a combination of solid crochet stitches and decorative openwork sections, creating an attractive lace-inspired texture. Around the outer edge, green shell-shaped motifs alternate with small cream-colored clusters, while a bold red scalloped border frames the entire design. At the center, a charming crocheted Christmas bell is decorated with green holly leaves and red berries, completing the festive arrangement. Each component can be made separately and assembled carefully, making this project manageable for crocheters who already understand basic stitches and would like to practice more decorative techniques. The finished piece can also be customized with different yarn colors, border styles, or additional Christmas embellishments.
This detailed tutorial explains how to recreate the Crochet Christmas wreath with little bells Pattern using US crochet terminology, including clear stitch abbreviations, suggested materials, construction techniques, and finishing instructions. The pattern is an original interpretation of the pictured design rather than an exact reproduction of an unpublished stitch chart, so stitch counts and measurements are provided as a practical working guide. The project is best suited to confident beginners and intermediate crocheters, although patient beginners can also follow the instructions by working one section at a time. You will learn how to crochet a flat circular foundation, create decorative Christmas-colored borders, shape a bell appliqué, make dimensional holly leaves and berries, and assemble everything into a coordinated holiday decoration. By the end, you will have the skills to make a lovely handmade crochet Christmas centerpiece that can become part of your seasonal decorating tradition.
1. Materials, Crochet Stitches, and Preparation for the Christmas Wreath
Before beginning your Crochet Christmas wreath with little bells Pattern, gather the necessary supplies and organize your yarn colors. For a design similar to the photograph, choose cotton yarn in natural cream, Christmas red, and dark forest green. Mercerized cotton is especially suitable because it provides good stitch definition and helps the finished decoration maintain its shape. A lightweight cotton yarn, approximately sport or DK weight, works well with a 3.0 mm or 3.5 mm crochet hook. You will also need a yarn needle, sharp scissors, stitch markers, measuring tape, and rustproof pins for blocking. If you prefer a firmer decorative mat, select a hook slightly smaller than the yarn manufacturer’s recommendation.
DISCOVER MORE FREE PATTERNS HERE!
The finished crochet Christmas wreath with little bells can measure approximately 38–42 cm across, depending on yarn thickness, hook size, and individual tension. For a project in this size range, prepare approximately 180–250 g of cream yarn, 80–120 g of red yarn, and 60–100 g of green yarn. These quantities are estimates rather than guaranteed requirements. The circular base should remain flat throughout construction, so it is helpful to place the work on a smooth surface after every few rounds. If the edges begin to curl upward, additional increases may be necessary. If the fabric develops excessive waves, reduce the number of increases in the following round.
Understanding the crochet abbreviations is essential for following this Christmas crochet decoration pattern. All instructions use standard US crochet terms, which differ from some international crochet terminology. The main abbreviations are:
-
MR: Magic ring
-
ch: Chain
-
sl st: Slip stitch
-
sc: Single crochet
-
hdc: Half double crochet
-
dc: Double crochet
-
tr: Treble crochet
-
inc: Increase, working two stitches into one stitch
-
dec: Decrease, joining two stitches into one
-
st / sts: Stitch / stitches
-
sp: Space
-
BLO: Back loop only
-
FO: Fasten off
-
rep: Repeat
-
RS / WS: Right side / wrong side
For beginners, it is useful to review how the principal stitches are formed before starting the wreath. To make a single crochet (sc), insert the hook into the indicated stitch, yarn over, pull up a loop, yarn over again, and pull through both loops. For a double crochet (dc), yarn over, insert the hook, pull up a loop, yarn over and pull through two loops, then yarn over and pull through the remaining two loops. A half double crochet (hdc) is made by yarning over, inserting the hook, pulling up a loop, and drawing the yarn through all three loops. These stitches will form most of the wreath’s base, bell, and decorative elements.
The project also uses shell stitches, chain spaces, and picot edging to achieve the textured appearance visible in the photograph. A shell stitch consists of several tall stitches worked into the same stitch or chain space, producing a fan-shaped design. For example, a five-double-crochet shell is written as 5 dc in the same sp. A picot is a small decorative point, usually made by chaining three stitches and joining them with a slip stitch into the first chain. Chain-space lace is created by alternating groups of stitches with chains, leaving small openings that make the crochet fabric lighter and more decorative.
Before beginning the main wreath, make a small gauge sample using cream yarn and your chosen hook. Work approximately 20 dc stitches across several rows and measure the result without stretching the fabric. Consistent tension is more important than matching an exact gauge because this project is decorative rather than fitted. Keep the stitches firm enough to maintain definition but loose enough for the hook to move comfortably. For a polished Crochet Christmas wreath with little bells Pattern, weave in yarn ends securely as each component is completed, and avoid pulling color changes too tightly. Taking time with preparation will make the decorative rounds easier to shape and the final assembly more attractive.
2. Step-by-Step Crochet Instructions for the Circular Wreath Base
The circular foundation is the largest component of the Crochet Christmas wreath with little bells Pattern. Begin with cream yarn and make a magic ring. Work 3 chains, which count as the first dc, followed by 11 dc into the ring. Pull the ring closed and join with a sl st to the top of the beginning chain-3. You should have 12 dc stitches. For Round 2, chain 3 and work one additional dc in the same stitch, then make 2 dc in each remaining stitch around. Join with a slip stitch to complete 24 stitches. This simple beginning creates a flat, solid center that will support the decorative bell appliqué later.
Continue increasing the circular base using the standard double crochet circle increase method. For Round 3, work (1 dc in the next st, 2 dc in the following st) around, producing 36 stitches. For Round 4, work (1 dc in each of the next 2 sts, 2 dc in the following st) around, producing 48 stitches. Continue in the same sequence, adding one additional single dc between increases in each new round. Round 5 has 60 stitches, Round 6 has 72 stitches, Round 7 has 84 stitches, and Round 8 has 96 stitches. Begin each round with chain 3, counting it as the first dc, and join at the end. These rounds establish the cream center of the wreath.
To introduce the decorative openwork visible in the photograph, begin a lace-inspired section after Round 8. For Round 9, chain 3, work 1 dc in the next stitch, chain 1, and skip the following stitch. Repeat the sequence of (1 dc in each of the next 2 sts, ch 1, skip 1 st) around, then join. This produces small openings between groups of solid stitches. For Round 10, work dc stitches into the tops of the previous dc stitches and into selected chain spaces, distributing approximately 12 increases evenly to maintain the circular shape. The exact placement can be adjusted to prevent puckering. This alternating approach creates the delicate mesh texture associated with a crochet lace Christmas wreath.
For the following rounds, repeat a balanced sequence of solid and openwork crochet. Work one round of dc stitches with approximately 12 evenly distributed increases, followed by a decorative round using 2 dc, ch 1, skip 1 across the available stitch positions. Repeat until the cream foundation reaches approximately 28–30 cm in diameter. Count the stitches and check the shape after each round, since chain-space rounds change the effective stitch count. The important goal is to create a flat circle with evenly spaced openings rather than force a fixed number of stitches. The cream foundation should be broad enough to accommodate the central bell while leaving the decorative lace visible around it.
Next, introduce the dark green yarn to create the Christmas wreath foliage border. Join the green yarn at any evenly spaced chain opening near the outer edge. Work (5 dc in the selected sp, sc in the next suitable sp) repeatedly to form green shell-shaped motifs. Adjust the spacing so the shells are distributed uniformly around the circle. If your foundation does not contain enough openings, place shells in selected stitch groups instead. For a balanced appearance, aim for approximately 16–20 green shell motifs, depending on the finished diameter. These textured green sections resemble small leaves or evergreen branches and provide a rich contrast against the cream lace background.
Complete the circular foundation with cream clusters and a bright red scalloped edging. Between the green motifs, join cream yarn and work groups of 5 dc into alternating spaces, securing each group with a sc. Once the cream and green decorative band is complete, join red yarn along the outer edge. Work one round of sc to stabilize the border, increasing where necessary to prevent tightening. For the final scalloped round, repeat (skip 1 st, 7 dc in the next st, skip 1 st, sl st in the next st), adjusting the spacing to suit the circumference. A second red round of sc or hdc around each scallop can make the border fuller. Fasten off and lay the wreath flat. The result should be a decorative circular base with a soft cream center, green foliage details, and a festive red outline.
3. How to Crochet the Christmas Bell, Holly Leaves, and Red Berries
The centerpiece of the Crochet Christmas wreath with little bells Pattern is a large cream-colored bell appliqué decorated with a red outline and green holly leaves. Begin the bell at its narrow upper section using cream yarn. Chain 15, then work 1 sc in the second chain from the hook and in each remaining chain, giving 14 sc. Chain 1 and turn. Work Rows 2–4 evenly with 14 sc in each row. For Row 5, work 2 sc in the first stitch, sc across until the final stitch, and 2 sc in the last stitch. This increases the width to 16 stitches. Continue using the same increase method on every second row to create the gradually widening bell silhouette.
Keep expanding the bell until the lower portion reaches approximately 26–30 stitches across, depending on the desired size. To make the bell more decorative, alternate rows of sc and hdc, maintaining the increases along both edges. The photograph shows a bell with a textured, slightly horizontal stitch pattern, so working hdc in the back loop only on selected rows can create subtle ridges. Continue until the bell measures approximately 19–22 cm tall. To form the flared bottom, work two additional increase rows, adding stitches at both ends. Finish with one row of sc across the entire bottom edge. The shape should resemble a gently widening bell with a rounded, broad lower section.
To outline the bell, join bright red yarn at one lower corner and work sc stitches evenly around the entire appliqué. Place 2 or 3 sc in the lower corners to maintain the flare, and use approximately one sc per row end along the sides, adjusting as necessary to avoid gathering. Work a second red border round using sc or hdc stitches for a more prominent outline. Along the lower edge, you can add a decorative series of small shells by working (3 dc in one stitch, skip 1 stitch, sc in the next stitch). This creates a slightly ruffled red bell rim. Fasten off, leaving a long yarn tail for sewing the bell onto the circular wreath foundation.
The upper bell ornament can be created with a small red crocheted loop. Chain approximately 22 stitches and join into a ring, taking care not to twist the chain. Work one round of sc around the ring and another round of hdc for additional thickness. Fasten off and shape the loop into a teardrop. Position it above the bell body so that the cream center remains visible. To create a dimensional red clapper, make a magic ring and work 6 sc into it. Increase to 12 sc in the next round, then to 18 sc in the third round. Work two rounds evenly, then decrease gradually while adding a small amount of polyester fiberfill. Close the opening and attach the rounded clapper beneath the bell’s lower rim.
The green crochet holly leaves are an important part of the Christmas arrangement. Make a foundation chain of 12 using dark green yarn. Starting in the second chain from the hook, work 1 sc, 1 hdc, 2 dc, 2 tr, 2 dc, 1 hdc, and 1 sc, adjusting the remaining stitches to form a pointed oval. Work along the opposite side of the foundation chain using a similar sequence. To create the characteristic holly leaf points, add small picots along the outer edges by chaining 3 and joining into the base of the chain. Make two leaves and position them diagonally across the upper section of the bell. For additional dimension, embroider a central vein using a lighter green yarn and a yarn needle.
Finish the central Christmas embellishment with three small red berries. Make a magic ring and work 6 sc into the ring. For the second round, work 2 sc in each stitch, giving 12 sc. Work one round evenly, then decrease by crocheting pairs of stitches together until the opening becomes small. Add a little stuffing if desired, close securely, and leave a tail for attachment. Repeat to create three berries. Arrange the berries together at the center of the two holly leaves, forming a compact festive cluster. The crochet bell with holly leaves and berries can now be positioned on the wreath base, creating the dimensional centerpiece that gives the design its distinctive Christmas appearance.
4. Assembling, Finishing, and Decorating Your Crochet Christmas Wreath
Once all components are complete, the final stage of the Crochet Christmas wreath with little bells Pattern is careful assembly. Place the circular base on a clean, flat surface with the right side facing upward. Center the crocheted bell over the cream foundation, leaving an even amount of decorative lace visible around its sides. The bell should occupy most of the center without completely covering the openwork sections. Use rustproof pins or removable stitch markers to hold the appliqué in position. Check that the bell is straight and that its red outline contrasts evenly against the cream background. This step is important because the central appliqué establishes the overall balance of the finished decoration.
Using a yarn needle and matching cream yarn, sew the bell onto the circular foundation with small, nearly invisible stitches. Work through the back loops of the bell and selected stitches of the base, avoiding long visible strands on the reverse side. Do not pull the stitches too tightly, since this can distort the circular mat. Secure the upper loop first, then attach the bell along its sides and lower edge. For a slightly raised appearance, stitch the perimeter while leaving the center unattached. If the piece will be used on a tabletop, keep the bell relatively flat so that decorative items placed nearby will remain stable.
Attach the crochet holly leaves near the top of the bell, overlapping them slightly. Position one leaf toward the left and the other toward the right to create a symmetrical arrangement. Sew along the central portion of each leaf while leaving the pointed edges free for dimension. Place the three red berries where the leaves overlap and secure them with several small stitches. Attach the rounded red bell clapper near the center of the lower rim. The berries, leaves, and clapper should be firmly attached, particularly if the wreath will be moved frequently or stored between holiday seasons.
Blocking is one of the most useful finishing techniques for a handmade crochet Christmas wreath. Lightly dampen the finished project with clean water or use gentle steam according to the yarn manufacturer’s care instructions. Spread the wreath on a blocking mat or clean towel, then shape the outer red scallops into evenly spaced curves. Use rustproof pins to hold the points and rounded edges in position. Allow the wreath to dry completely before removing the pins. Avoid stretching the lace excessively, since this may make the central appliqué appear too small. Proper blocking helps the circular base lie flat and highlights the individual crochet stitches.
This Crochet Christmas wreath with little bells Pattern can be customized to suit different Christmas decorating styles. For a traditional appearance, use deep red, evergreen green, and warm ivory. For a softer farmhouse look, replace bright red with burgundy and choose muted sage green. A more elegant version could feature white cotton yarn with gold-colored decorative thread worked into selected border stitches. You can also make the bell smaller, add more holly leaves, or replace the center ornament with several miniature crocheted bells. If you plan to use the piece as a wall hanging, attach a fabric-covered hanging loop to the back and consider adding a lightweight backing for support.
To preserve the finished wreath, store it flat in a clean, dry container away from direct sunlight and moisture. If it becomes dusty, gently shake it or use a soft brush to remove surface particles. For washable cotton yarn, hand washing in cool water with mild detergent is usually appropriate, provided the yarn label permits it. Reshape the wreath and dry it flat after washing. Avoid machine drying if the piece contains dimensional decorations or delicate lacework. With proper care, your crochet Christmas wreath with little bells can be displayed for many holiday seasons, becoming a cherished handmade decoration that reflects the time and creativity invested in every stitch.
Frequently Asked Questions (FAQ) About the Crochet Christmas Wreath with Little Bells Pattern
1. Is the Crochet Christmas wreath with little bells Pattern suitable for beginners?
This pattern is best suited to confident beginners and intermediate crocheters. The circular foundation uses familiar stitches such as single crochet, half double crochet, and double crochet, but the decorative shell edging and shaped bell appliqué require additional attention. Beginners can complete the project successfully by practicing the stitches first and working slowly through each section. Using stitch markers and counting regularly will help prevent mistakes.
2. What type of yarn is best for a crochet Christmas wreath?
Cotton yarn is an excellent choice because it provides good stitch definition, maintains its shape, and creates a firm decorative fabric. Mercerized cotton is especially useful for detailed lacework and scalloped borders. Acrylic yarn can also be used, although the finished wreath may feel softer and require additional blocking. Choose yarns with similar thicknesses for all components to maintain a consistent appearance.
3. What size crochet hook should I use?
A 3.0 mm or 3.5 mm crochet hook is a practical starting point for sport or DK-weight cotton yarn. However, the ideal hook depends on your yarn and personal tension. If your stitches are loose and the wreath feels floppy, try a smaller hook. If the fabric is too stiff or difficult to work, increase the hook size slightly.
4. How large will the finished Christmas wreath be?
Using the suggested materials, the finished wreath may measure approximately 38–42 cm in diameter. The exact size depends on yarn weight, hook size, tension, and the number of decorative rounds completed. You can create a smaller wreath by stopping the circular foundation earlier or a larger version by adding more rounds while maintaining evenly distributed increases.
5. How do I prevent my crochet wreath from curling or becoming wavy?
Curling usually indicates that the circular base needs more increases or that the stitches are too tight. Excessive waviness often means there are too many increases. Lay the work flat after every few rounds and adjust the stitch distribution as needed. Blocking can correct minor irregularities, but significant shaping problems should be corrected while crocheting.
6. Can I make the Christmas bell separately?
Yes. The central bell is a separate appliqué and can be used independently for other Christmas crafts. It can decorate a pillow, fabric gift bag, holiday wall hanging, or another crocheted project. Simply complete the bell, add its red border, holly leaves, berries, and clapper, then attach it to your chosen surface.
7. Can I use different colors for this Christmas crochet pattern?
Absolutely. Traditional red, green, and cream create a classic Christmas appearance, but the design also works with burgundy, ivory, gold, sage green, or even blue and silver. The important consideration is choosing colors with enough contrast to make the bell and decorative borders stand out clearly.
8. How long does it take to crochet this Christmas wreath?
The project may take approximately 10–18 hours, depending on your experience, yarn choice, and the amount of detail added. The circular foundation generally requires the most time, while the holly leaves, berries, and bell clapper are relatively quick to make. Working over several sessions can make the process more enjoyable.
9. Can the wreath be used as a Christmas table centerpiece?
Yes. This pattern is particularly suitable for a Christmas table centerpiece, decorative mat, or holiday display. The circular shape and scalloped border create an attractive base for seasonal arrangements. Keep candles in protective holders away from the yarn, and avoid placing hot cookware directly on the crochet fabric.
10. How can I make the bell decoration look more three-dimensional?
You can add texture by working selected bell rows in the back loops only, using a thicker red border, and attaching the holly leaves only along their centers. Lightly stuffing the red berries and clapper also creates dimension. For a raised bell appearance, add a thin layer of suitable soft padding behind the appliqué before sewing it to the wreath.
11. Can I wash a finished crochet Christmas wreath?
Most cotton crochet decorations can be gently hand washed, but always check the yarn manufacturer’s care instructions first. Use cool water and mild detergent, avoid twisting or wringing the fabric, and reshape the wreath while damp. Allow it to dry completely on a flat surface before storing or displaying it.
12. Can I make several smaller wreaths as Christmas gifts?
Yes. Miniature versions of the Crochet Christmas wreath with little bells Pattern can make thoughtful handmade gifts. Use finer yarn and a smaller hook, or reduce the number of rounds in the circular base. Smaller wreaths can be used as ornaments, decorative gift toppers, or seasonal wall decorations. Ensure that all small components are attached securely, especially when giving them to households with young children or pets.
13. What is the difference between a crochet Christmas wreath and a crochet Christmas doily?
A crochet Christmas doily is typically a flat decorative mat made with lace-inspired stitches, while a traditional Christmas wreath is often designed for hanging. This project combines characteristics of both. Its flat circular foundation resembles a decorative doily, while the red scalloped border, green foliage, and Christmas bell create the visual appearance of a festive wreath.
14. How can I make the scalloped border look more professional?
Consistent stitch tension and evenly spaced shells are the keys to a neat scalloped border. Count the stitches before beginning the final round and distribute any adjustments across the circumference. Work each shell with the same number of stitches, avoid pulling slip stitches too tightly, and block the finished wreath to emphasize its rounded edges.
15. Can I sell finished wreaths made using this tutorial?
You can generally sell physical items you make from this original instructional pattern, subject to any applicable local rules. If you plan to sell finished decorations, calculate the cost of yarn, materials, packaging, and labor before setting a price. Photograph your finished work clearly and describe the materials and approximate dimensions accurately.
Conclusion: Create a Beautiful Handmade Christmas Wreath with Little Bells
The Crochet Christmas wreath with little bells Pattern is a delightful way to bring handmade charm into your Christmas decorations. By combining a cream-colored circular crochet foundation, decorative openwork stitches, green shell motifs, a red scalloped border, and a festive bell appliqué, you can create a unique holiday piece that celebrates traditional crochet craftsmanship.
Throughout this tutorial, you learned how to select suitable yarn and crochet tools, understand essential US crochet abbreviations, build a flat circular foundation, create textured decorative borders, shape a Christmas bell, crochet holly leaves and berries, and assemble the finished design. You also discovered practical techniques for blocking, customizing, cleaning, and storing your handmade wreath.
One of the greatest joys of crochet is the opportunity to transform simple yarn into something meaningful and beautiful. Every stitch adds character, and every handmade decoration carries a personal touch that makes holiday celebrations feel even more special. Whether you choose to display your wreath on a table, incorporate it into a festive arrangement, or give it as a thoughtful Christmas gift, the finished project can become a wonderful reminder of your creativity.
EASILY FIND THE FREE PDF FOR THIS PATTERN HERE!
Now I would love to hear from you! ❤️🎄 What do you think about this Crochet Christmas wreath with little bells Pattern? Would you keep the traditional red, green, and cream colors, or would you try a different Christmas color combination? Please leave your sincere opinion, share your suggestions, and tell us what you would change or add to this crochet project. Your ideas and experiences can inspire other crochet lovers to create their own beautiful handmade Christmas decorations!