
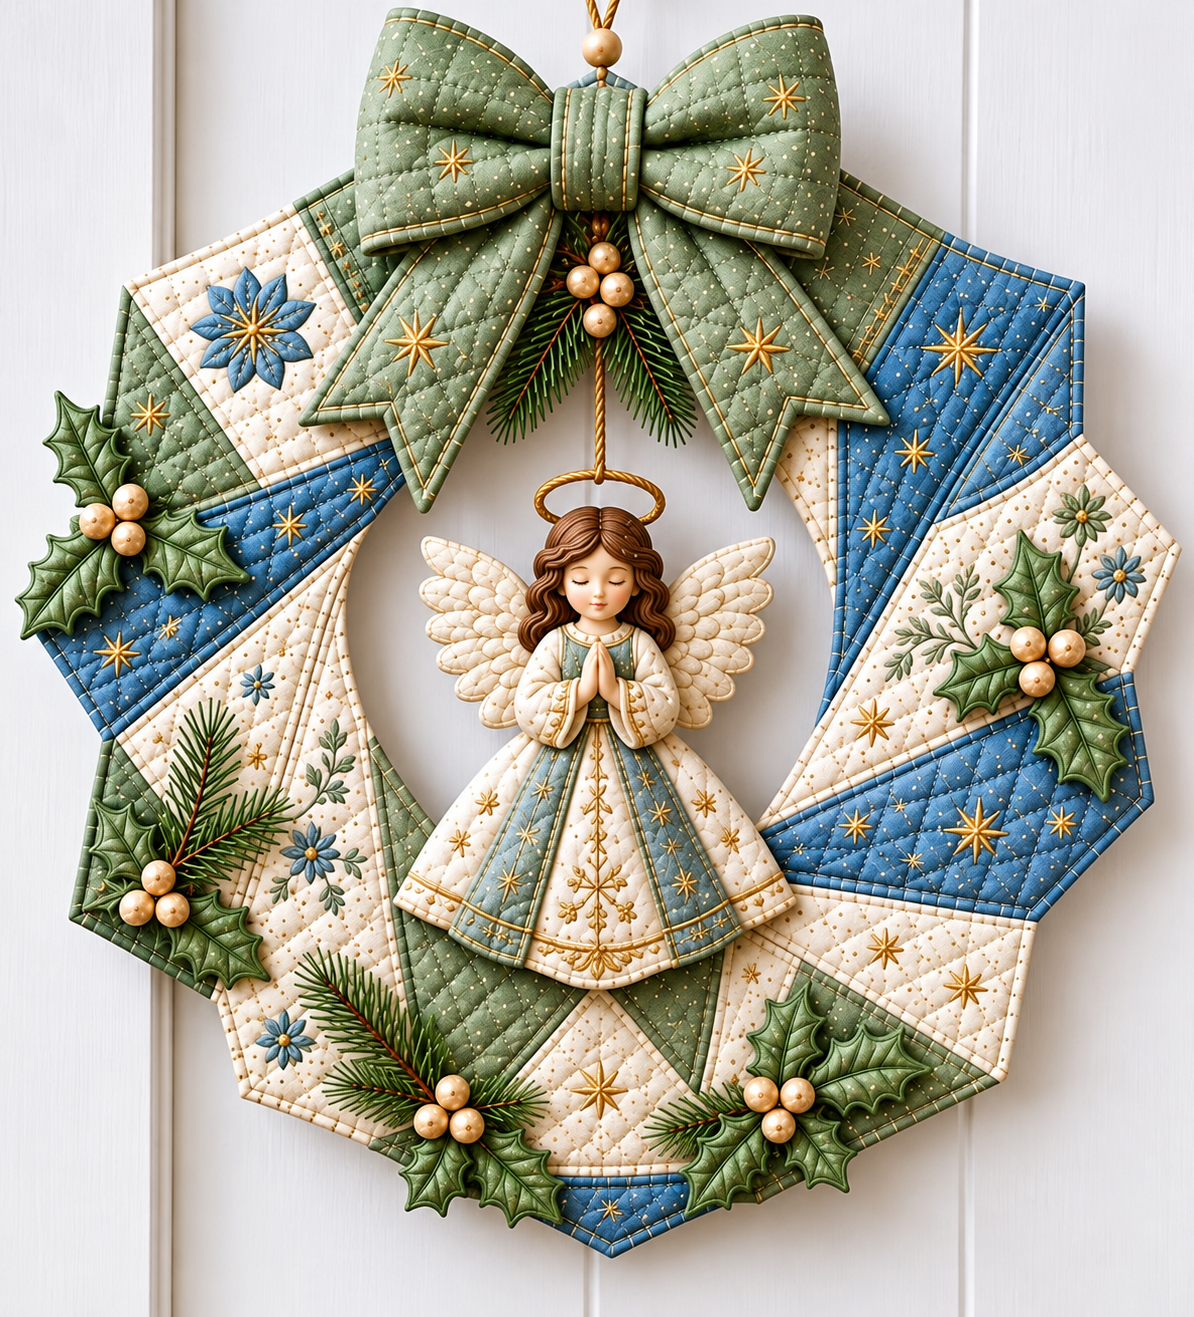
The Christmas Wreath with Patchwork Angel Pattern is a beautiful holiday sewing project that combines traditional quilting techniques, delicate fabric appliqué, and charming Christmas decorations into one unforgettable handmade piece. Inspired by the elegance of classic American Christmas crafts, this decorative wreath features a lovely angel surrounded by quilted fabric sections, embroidered golden stars, evergreen branches, holly leaves, and a generously sized bow. Its combination of soft green, blue, cream, and gold creates a peaceful holiday atmosphere that looks wonderful on a front door, above a fireplace, or as part of a festive wall display. What makes this project especially appealing is the opportunity to combine several creative techniques while producing something meaningful for the holiday season. Whether you are an experienced quilter or someone learning to sew decorative fabric ornaments, this Christmas Wreath with Patchwork Angel Pattern offers an enjoyable way to explore fabric combinations, dimensional appliqué, and detailed finishing. With patience, careful cutting, and a few simple sewing methods, you can create a personalized decoration that brings warmth and handmade beauty into your home.
One of the most delightful characteristics of this patchwork Christmas wreath is its layered construction, which gives the finished decoration an elegant, almost sculptural appearance. Instead of using a traditional circular greenery base, the design features individual quilted fabric sections arranged into an open wreath shape. Each section incorporates contrasting fabric colors, delicate quilting stitches, and decorative details that enhance the overall composition. The central angel adds a gentle and meaningful touch, making this project particularly suitable for families who enjoy traditional Christmas imagery. The large green bow at the top provides a balanced finishing element, while the gold embroidery introduces subtle brightness without overwhelming the design. Small holly clusters, miniature flowers, and pine branches create additional texture and visual interest. Although the reference image includes highly detailed dimensional decorations, this tutorial explains how to recreate the appearance using accessible fabric sewing, quilting, embroidery, and appliqué techniques. The result is a charming handmade interpretation that can be adapted to different skill levels, fabric collections, and decorating preferences.
Creating a Christmas Wreath with Patchwork Angel Pattern is also a wonderful opportunity to use leftover quilting cotton, decorative ribbons, embroidery thread, and small fabric scraps from previous sewing projects. Rather than purchasing large quantities of materials, you can combine coordinating fabrics to create a unique holiday palette. Cotton quilting fabric is particularly suitable because it is easy to cut, press, stitch, and shape into decorative elements. Lightweight batting adds the soft padded texture visible throughout the wreath, while stabilizer helps maintain the structure of the individual sections. The project can be made entirely with traditional Christmas colors, such as red and green, or with the sophisticated blue, sage green, cream, and gold combination shown in the inspiration image. Throughout this step-by-step guide, you will learn how to prepare the materials, construct the quilted wreath base, sew a decorative angel, create dimensional embellishments, and assemble everything into a finished Christmas decoration. The measurements are provided in centimeters, and the sewing instructions use terminology familiar to crafters in the United States.
1. Materials, Measurements, and Preparation for the Christmas Wreath with Patchwork Angel Pattern
Before beginning your Christmas Wreath with Patchwork Angel Pattern, gather the fabrics and sewing supplies needed to create the wreath structure and decorative elements. For a finished wreath approximately 45 cm wide and 50 cm tall, including the bow, prepare 40 × 55 cm of sage green quilting cotton, 40 × 55 cm of blue quilting cotton, 50 × 60 cm of cream cotton with small floral or star prints, and 25 × 35 cm of coordinating fabric for the angel. You will also need approximately 60 × 80 cm of lightweight quilt batting, fusible interfacing or stabilizer, fabric scraps for the holly leaves, cream fabric for the wings, and small pieces of brown fabric for the angel’s hair. Add gold embroidery floss, coordinating sewing thread, decorative cord, a small wooden bead, and a hanging loop. Optional supplies include miniature artificial evergreen branches and pearl-colored beads for the berry clusters. Choose washable, colorfast fabrics whenever possible, especially if the wreath will be stored and reused for several Christmas seasons.
DISCOVER MORE FREE PATTERNS HERE!
The basic sewing equipment includes a sewing machine, sharp fabric scissors, a rotary cutter, a cutting mat, quilting rulers, pins or fabric clips, hand-sewing needles, an embroidery needle, a fabric marking pencil, and an iron. A walking foot is useful when quilting through multiple layers, while a free-motion quilting foot can help create decorative patterns. For the angel’s face, use fabric-safe embroidery thread or textile paint designed for cotton. If you prefer a completely handmade appearance, many details can be completed with hand stitching. The important thing is to maintain consistent seam allowances and secure the layers carefully. Throughout this tutorial, use a 0.7 cm seam allowance unless another measurement is specified.
To create the wreath base, begin by drawing a large circle measuring approximately 42 cm in outside diameter on pattern paper. Draw a second circle with a diameter of 23 cm inside the first, keeping both circles centered. Divide the ring into eight equal sections, each measuring 45 degrees. These sections will become the individual padded fabric panels that form the wreath. The image features angular, overlapping segments rather than a perfectly smooth circular ring, so you can slightly extend the outer corners of the sections to create a geometric appearance. Label the paper pieces from one to eight, mark the inner and outer edges, and indicate their placement before cutting. These measurements are a practical adaptation of the pictured design rather than dimensions taken from an original commercial pattern.
For each wreath section, prepare a decorative fabric top, a batting layer, and a backing fabric layer. The decorative tops can be pieced from blue, cream, and sage green cotton using diagonal seams to create the alternating color arrangement. Cut the fabric pieces slightly larger than their final paper patterns so there is enough material for piecing, quilting, and trimming. Once each patchwork top is assembled, press the seams carefully and place the batting underneath. Add the backing fabric with its wrong side facing the batting, then temporarily secure the layers with basting stitches or quilting pins. Quilt the panels before trimming them to their final shape, leaving the required seam allowance around each section.
The color arrangement plays an important role in recreating the elegant appearance of this Christmas quilted wreath. Position blue sections on opposite sides of the wreath and distribute cream floral panels between the sage green pieces. This creates a balanced composition that feels festive without relying exclusively on traditional red Christmas fabric. Small gold stars embroidered across the surfaces provide contrast and connect the different colors visually. When choosing printed fabrics, select relatively small patterns so the details remain visible after the sections are assembled. Large prints can be attractive, but they may become difficult to recognize when divided into narrow geometric shapes. A mixture of subtle polka dots, miniature flowers, and delicate stars works particularly well.
Before cutting all the decorative elements, make a small test sample using the chosen fabric, batting, and quilting thread. Stitch a few straight quilting lines and practice sewing around curved shapes. This allows you to adjust the machine tension, stitch length, and needle size before working on the actual wreath. A stitch length between 2.5 and 3 mm is suitable for most construction seams, while slightly longer stitches may work better for decorative topstitching. Check that the batting does not bunch and that the layers remain smooth. Taking time to prepare everything carefully will make the remaining steps easier and help your finished Christmas Wreath with Patchwork Angel Pattern look polished and professionally assembled.
2. How to Sew and Quilt the Patchwork Christmas Wreath Base
Begin assembling the patchwork wreath base by joining the colored fabric pieces for each of the eight sections. Arrange the blue, green, and cream cotton pieces on a flat surface, following the layout of your paper templates. To create the diagonal transitions visible in the reference image, place two fabric pieces right sides together along the intended seam and stitch using the established 0.7 cm seam allowance. Press the seam allowances toward the darker fabric to reduce visible shadows through the cream sections. Continue joining pieces until each panel has its planned combination of colors. Trim loose threads and press the completed patchwork tops before adding the batting and backing.
Next, quilt each section to produce the soft padded texture that gives this Christmas fabric wreath its distinctive appearance. The reference design combines closely spaced diagonal quilting lines with subtle decorative stitching. For a similar effect, draw diagonal guidelines approximately 2 cm apart across the fabric panels. Stitch along the marked lines through the fabric top, batting, and backing. Then sew a second set of diagonal lines in the opposite direction to form a diamond-shaped quilting grid. Keep the stitching evenly spaced, and avoid pulling the fabric while sewing. A walking foot can help the layers move smoothly through the machine, especially when working with thicker batting.
After quilting the individual sections, trim each one to the appropriate pattern shape, remembering to preserve the seam allowance. To assemble the wreath, position the sections in their numbered order around the paper layout. For a dimensional finish, the panels can overlap slightly, creating the appearance of folded quilted fabric. Join neighboring sections at their overlapping edges with secure machine stitching or small hand stitches. Alternatively, sew the sections into a continuous ring before adding the backing. When using overlapping panels, make sure the interior opening remains approximately 23 cm across so there is enough room for the central angel. Press gently, using a pressing cloth to avoid flattening the quilted texture.
The wreath needs a stable backing to prevent the fabric from sagging when hung vertically. Cut a matching ring from firm sew-in stabilizer or heavyweight interfacing, using the same inner and outer diameters as the assembled wreath. Position this reinforcement behind the quilted sections and secure it with hand stitching or carefully placed machine stitches. If the fabric layers are especially thick, use a flexible stabilizer rather than rigid cardboard, which can bend or deteriorate during storage. Cover the back with a coordinating cotton fabric ring for a neat appearance. Turn under the raw edges and secure them with a slip stitch, or finish the edges with narrow fabric binding. This reinforcement helps the wreath retain its shape while supporting the bow and angel.
To enhance the design, embroider small gold Christmas stars across the quilted panels. A simple eight-point star can be created by stitching four straight lines that intersect at the center. Use three strands of gold embroidery floss for small stars and six strands for larger decorative accents. Vary the star sizes to create a natural arrangement similar to the reference image. Some stars can be positioned near the diagonal fabric seams, while others can decorate the plain blue and green sections. Keep the embroidery balanced rather than filling every available space. The goal is to add sparkle while preserving the beauty of the patchwork fabrics and quilting stitches.
Once the embroidery is complete, inspect the wreath base carefully. Check the joining seams, reinforce any areas that feel loose, and trim excess thread. Lay the wreath on a flat surface to confirm that the circular opening is centered and that the outer edges form a balanced shape. If one section extends farther than the others, adjust the overlap before permanently securing it. This is also the ideal moment to plan where the bow, holly decorations, pine branches, and angel will be placed. Mark these locations lightly with a removable fabric pencil. A well-prepared base makes the decorative assembly much easier and provides a reliable foundation for the remaining steps of the Christmas Wreath with Patchwork Angel Pattern.
3. Creating the Fabric Angel, Quilted Bow, and Christmas Appliqué Decorations
The central angel is the most recognizable feature of the Christmas Wreath with Patchwork Angel Pattern, so it deserves special attention. Begin by drawing a simple angel template approximately 19 cm tall, including the head and dress. Create separate pattern pieces for the face, hair, body, sleeves, wings, and dress panels. The angel shown in the image has a rounded face, flowing brown hair, cream-colored wings, and a full dress decorated with sage green, cream, and gold details. To recreate this appearance in fabric, use a soft cotton or felt base for the body and layer the clothing pieces over it. Cut two body shapes, stitch them right sides together, leave a small turning opening, and turn the piece right side out. Add a small amount of polyester stuffing to create gentle dimension, then close the opening with an invisible hand stitch.
For the angel’s dress, cut a flared cream fabric shape approximately 18 cm wide at the hem and 13 cm tall, adjusting it to fit the body template. Divide the front into several vertical sections and add sage green fabric panels along the sides. Sew the panels together, press the seams, and decorate the center with gold embroidery. Small stars, delicate vines, and ornamental stitching create the graceful appearance of the inspiration image. Add narrow gold trim along the lower edge and around the sleeves. The sleeves can be made from two small cream fabric pieces with lightly gathered cuffs. Attach them to the body, positioning the hands together in front to suggest a peaceful praying pose.
The angel’s face can be created from a small oval of peach-colored cotton or felt. Embroider closed eyes using fine brown thread, add a tiny nose with a few stitches, and create a subtle mouth with pale pink embroidery floss. For the hair, cut curved sections from brown felt or use soft brown yarn arranged into gentle waves. Attach the hair around the face with small hand stitches. The wings can be made from two layers of cream fabric with lightweight batting between them. Draw feather-shaped quilting lines, stitch the layers together, turn them right side out, and add decorative stitching to suggest individual feathers. Position the wings behind the shoulders so they extend approximately 7 cm outward on each side. Finish the angel with a small gold cord halo secured above the head.
The large quilted Christmas bow at the top gives the wreath its distinctive festive silhouette. Cut two sage green rectangles measuring approximately 18 × 14 cm for the bow loops, plus batting and backing pieces of the same size. Quilt the rectangles with diagonal lines, then fold and shape them into two rounded loops. Create two pointed ribbon tails measuring approximately 9 × 23 cm each, including seam allowances, and quilt them using the same method. Turn the finished pieces right side out, press gently, and arrange the loops over the tails. Wrap a narrow padded strip of matching fabric around the center to form the bow knot. Secure everything with strong hand stitches. The completed bow should be approximately 32–35 cm wide, depending on how tightly the loops are gathered.
For the decorative holly leaf appliqué, draw several pointed leaf templates measuring between 5 and 9 cm long. Cut two green fabric pieces for each leaf, adding a narrow seam allowance. Place them right sides together with a thin layer of stabilizer, stitch around the outline, and leave a small opening for turning. Clip carefully into the inner curves without cutting the stitching, then turn and press the leaves. Embroider the central vein and smaller branching veins using dark green thread. To create the berry clusters, cut small circles of cream or pearl-colored fabric, gather the edges with running stitches, fill them lightly with stuffing, and close the openings. Group three berries together for each holly arrangement. These dimensional elements give the wreath additional texture and resemble the decorative clusters shown around the outer ring.
Complete the embellishments with miniature evergreen branches and small blue fabric flowers. Evergreen sprigs can be made using narrow green fabric strips cut into pointed shapes, or by attaching short pieces of artificial greenery. If using artificial branches, secure them firmly and keep any wire ends covered. For the flowers, cut five or six small blue fabric petals, gather their bases, and stitch them around a tiny gold bead or embroidered center. Position the flowers sparingly on the cream-colored sections. You can also add a few small embroidered leaves to connect the floral details visually. Arrange all the decorative pieces on the wreath before sewing them permanently in place. This allows you to experiment with spacing and achieve the balanced, elegant appearance associated with a handmade patchwork angel Christmas decoration.
4. Assembling, Finishing, and Displaying Your Christmas Wreath with Patchwork Angel Pattern
With the quilted base, angel, bow, and appliqué decorations prepared, you can begin the final assembly of the Christmas Wreath with Patchwork Angel Pattern. Lay the wreath on a clean, flat surface and place the large green bow at the top. Center the bow carefully so its ribbon tails extend diagonally over the upper quilted sections. Secure the bow through its center and behind the ribbon tails using strong polyester thread and small hand stitches. Avoid relying entirely on fabric glue, especially if the wreath will be displayed for several years. The bow should remain firmly attached without pulling the quilted sections out of shape. Add a small wooden bead or decorative pearl above the bow if you want to recreate the hanging detail visible in the reference image.
Next, position the angel inside the center opening. The angel should appear suspended beneath the bow, with the wings extending toward the inner edges of the wreath. Use a narrow gold cord or matching ribbon to create a discreet support between the angel’s upper body and the top of the wreath. Attach the support securely to the reinforced backing rather than only to the decorative fabric. For additional stability, place two small anchoring stitches behind the wings or dress where they meet the wreath. This prevents the angel from swinging excessively when the decoration is moved. Make sure the angel remains centered and hangs vertically before tightening the final stitches.
Attach the holly leaves and berry clusters around the wreath, following the approximate arrangement shown in the reference image. Place one cluster on the upper-left side, another on the right, and additional groups along the lower sections. Slightly overlap the leaves to create a natural layered appearance. Secure each leaf near its base, allowing the pointed tips to lift gently away from the quilted background. Sew the fabric berries in the center of each cluster, covering the attachment stitches. Add the evergreen branches between the holly leaves and position them so they follow the circular direction of the wreath. This arrangement creates movement and helps guide the viewer’s eye around the entire design.
After attaching the larger decorations, add the remaining embroidered stars and small flowers. Step away from the wreath occasionally to examine the overall balance. If one side looks heavier, adjust the placement of the smaller embellishments rather than adding too many new pieces. The combination of blue patchwork fabric, sage green quilting, cream floral prints, and gold embroidery should remain visible throughout the finished project. You may also sew a narrow decorative gold cord along selected seams to emphasize the geometric construction. Use a couching stitch to hold the cord in place without pulling it tightly. These finishing details help connect the different elements and give the decoration a cohesive appearance.
To prepare the wreath for hanging, cut a strong ribbon or braided cord approximately 20–25 cm long. Fold it into a loop and attach both ends to the reinforced backing at the top center. Stitch through the stabilizer and backing fabric several times to create a secure attachment. Test the hanging loop by lifting the wreath gently and checking whether it remains level. If the angel or bow causes the wreath to tilt, adjust the hanging point slightly until the decoration balances properly. For indoor display, choose a sturdy wall hook or wreath hanger that can support the finished weight. Keep the decoration away from candles, fireplaces, heaters, and other sources of direct heat, especially if it contains polyester batting, artificial greenery, or decorative beads.
Your completed Christmas Wreath with Patchwork Angel Pattern can be displayed on an interior door, above a mantel, in a hallway, or as part of a Christmas-themed craft display. Because the project is primarily made from cotton fabric, it is best suited to indoor spaces protected from moisture and prolonged direct sunlight. When the holiday season ends, gently remove dust with a soft brush and store the wreath flat in a clean, breathable fabric bag or sturdy storage box. Avoid placing heavy objects on top of the bow or angel, as this can flatten the dimensional details. With proper care, this handmade wreath can become a treasured Christmas decoration that returns year after year, bringing the beauty of quilting and traditional holiday craftsmanship into your home.
Frequently Asked Questions About the Christmas Wreath with Patchwork Angel Pattern
Is the Christmas Wreath with Patchwork Angel Pattern suitable for beginners?
Yes, although the complete design is best considered an intermediate sewing project because it combines patchwork, quilting, appliqué, embroidery, and dimensional construction. Beginners can simplify the project by using larger fabric sections, reducing the number of embroidered details, and creating a flat angel appliqué instead of a stuffed figure. Working on one component at a time makes the process much more manageable.
What is the best fabric for making a patchwork Christmas wreath?
High-quality 100% cotton quilting fabric is an excellent choice because it is easy to cut, sew, press, and quilt. Cotton also works well with fusible interfacing and lightweight batting. Felt can be used for small decorations such as the angel’s hair, holly leaves, and floral details. Avoid very stretchy fabrics unless you have experience stabilizing them.
How much fabric do I need for this Christmas wreath project?
For a wreath approximately 45 cm wide, the suggested fabric quantities in the materials section should provide enough material for the main patchwork panels and several decorations. Actual requirements depend on fabric width, pattern placement, and cutting efficiency. If you plan to match directional prints or create additional decorative elements, purchase a little extra fabric.
Can I make the Christmas wreath without a sewing machine?
Yes. The entire project can be completed with hand sewing, although it will require more time. Use small running stitches for joining fabric pieces, backstitches for stronger construction seams, and slip stitches for invisible finishing. Hand quilting can create a particularly charming traditional appearance. A sewing machine is helpful but not essential.
How do I make the angel look three-dimensional?
Use a small amount of polyester stuffing inside the body and head, quilt the wings with thin batting, and layer the dress panels over the body. Lightly padded sleeves and dimensional hair also contribute to the effect. Avoid overstuffing, as too much filling can distort the shape and make the angel difficult to attach securely.
Can I change the colors of the Christmas Wreath with Patchwork Angel Pattern?
Absolutely. The design can be adapted to traditional red, green, and gold, or to more contemporary combinations such as white and silver, burgundy and cream, or pastel blue and ivory. Maintaining contrast between the main patchwork sections will help preserve the wreath’s geometric appearance.
What type of batting works best for the quilted wreath?
Lightweight cotton or polyester quilt batting is suitable for the panels and bow. Batting approximately 0.3–0.5 cm thick provides gentle dimension without making the sections excessively bulky. For the central angel, use a small amount of polyester fiberfill where additional shaping is needed.
How long does it take to complete this patchwork Christmas wreath?
An experienced sewer may complete a simplified version in approximately 8–12 hours, while a detailed version with extensive embroidery and dimensional decorations may require 15–25 hours or longer. Beginners should allow additional time for cutting, practicing stitches, and assembling the decorative elements.
Can this handmade wreath be washed?
Spot cleaning is generally the safest option, especially when the wreath includes stuffing, wooden beads, artificial greenery, or dimensional embellishments. Use a slightly damp cloth and mild detergent on washable fabric areas, then allow the decoration to air-dry completely. Machine washing is not recommended because it may distort the quilted structure and loosen the decorations.
How can I make the Christmas wreath larger or smaller?
Resize the inner and outer ring templates proportionally, then adjust the angel and bow dimensions to maintain visual balance. For example, a smaller wreath with an outer diameter of 30 cm will require a smaller angel and narrower ribbon tails. Always test the arrangement on paper before cutting your fabric.
Can I use leftover quilting fabric for this project?
Yes. This Christmas patchwork sewing project is an excellent way to reuse fabric scraps. Small pieces can be combined into the wreath panels, flowers, dress details, and appliqué decorations. Try to select fabrics with similar weights so the finished sections remain even and easy to quilt.
Is this Christmas wreath suitable for outdoor display?
The recommended cotton and batting construction is intended for indoor use. Exposure to rain, strong sunlight, and humidity may damage the fabric, cause colors to fade, and weaken the decorative stitching. If you want to display it on a front door, choose a protected interior-facing location or an enclosed porch where the decoration will remain dry.
Can I make this wreath as a handmade Christmas gift?
Certainly. A handmade patchwork angel wreath makes a thoughtful holiday gift for friends, relatives, teachers, or anyone who appreciates traditional sewing crafts. You can personalize it by changing the colors, embroidering a family initial on the back, or adding a small fabric label with the year it was made.
How can I keep the wreath looking beautiful for many Christmas seasons?
Store it in a cool, dry place away from direct sunlight. Use acid-free tissue paper to support the bow and angel if needed, and avoid compressing the padded sections. Inspect the hanging loop and decorative stitching before displaying the wreath each year.
Conclusion: A Handmade Christmas Decoration Filled with Meaning and Creativity
The Christmas Wreath with Patchwork Angel Pattern brings together the beauty of traditional quilting, festive fabric combinations, delicate embroidery, and thoughtful handmade details. Throughout this tutorial, you have learned how to prepare the materials, measure and cut the wreath sections, assemble the patchwork panels, create quilted textures, and add decorative golden stars. You have also explored how to sew a dimensional fabric angel, construct an elegant quilted bow, prepare holly leaf appliqués, and finish the design with evergreen branches and small fabric flowers. Each technique contributes to the finished wreath’s layered appearance and gives you an opportunity to develop your sewing skills while creating something special for Christmas.
One of the greatest pleasures of making this Christmas Wreath with Patchwork Angel Pattern is the freedom to personalize every detail. You can choose fabrics that match your Christmas decorations, use meaningful scraps from previous quilting projects, or create a completely different color palette. The finished wreath is more than a seasonal ornament; it represents the care, creativity, and patience that go into handmade craftsmanship. Whether you display it in your own home or give it to someone special, this project can become a beautiful part of your family’s Christmas traditions.
EASILY FIND THE FREE PDF FOR THIS PATTERN HERE!
Now I would love to hear your sincere opinion! What do you think about this Christmas wreath design? Would you keep the elegant sage green, blue, cream, and gold combination, or would you choose traditional Christmas colors? Share your honest feedback, creative suggestions, and any ideas that could make this Christmas Wreath with Patchwork Angel Pattern even more beautiful. Your experiences and suggestions can inspire other sewing and quilting enthusiasts to create their own unique holiday decorations.