
The Felt Scarecrow Decoration Pattern is a delightful autumn sewing project that brings warmth, creativity, and a touch of country charm into your home. Inspired by traditional harvest decorations, this handmade scarecrow combines colorful felt patches, rustic stitching, raffia details, and a cheerful embroidered face. Its welcoming appearance makes it an excellent choice for decorating entryways, living rooms, kitchens, and seasonal displays. Whether you enjoy making handmade ornaments for your own home or creating thoughtful gifts for family and friends, this felt scarecrow craft offers a wonderful opportunity to explore decorative sewing techniques. The project is especially appealing because it uses simple materials and beginner-friendly stitches while producing an ornament that looks detailed and professionally finished. With its warm brown hat, smiling face, and colorful patchwork outfit, this little scarecrow captures the cozy feeling of autumn and the beauty of traditional handmade decorations.
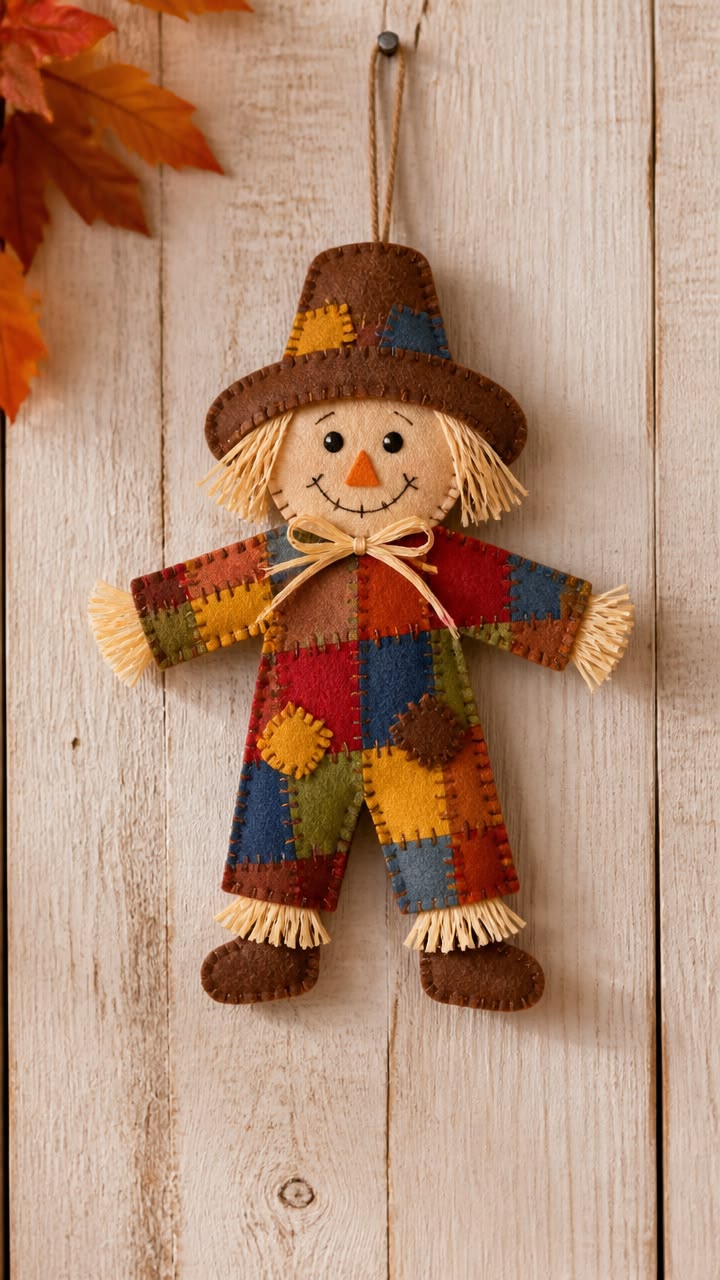
One of the most enjoyable features of this Felt Scarecrow Decoration Pattern is its combination of different textures and colors. The scarecrow shown in the reference image features a soft beige face, a dark brown felt hat, and a patchwork outfit decorated with small pieces of red, mustard yellow, navy blue, olive green, orange, and earthy brown felt. Carefully arranged embroidery stitches outline the fabric pieces, creating a charming handmade appearance. Small strands of raffia represent the scarecrow’s hair, hands, and straw-filled pant legs, while a simple raffia bow completes the neckline. These details give the decoration personality without requiring complicated sewing equipment. Even if you have never made a stuffed felt ornament before, you can follow this tutorial using basic hand-sewing skills, a little patience, and a few affordable crafting supplies. The result is a beautiful DIY autumn scarecrow decoration that can be displayed throughout the fall season.
Creating your own handmade felt scarecrow ornament is also an excellent way to use leftover felt pieces from previous sewing projects. Instead of purchasing large quantities of fabric, you can combine small scraps to create the colorful patchwork design. This approach encourages creativity, reduces unnecessary material waste, and allows every scarecrow to have its own unique appearance. You can choose traditional harvest colors for a rustic farmhouse look or experiment with softer shades for a more modern seasonal decoration. Throughout this complete tutorial, you will learn how to prepare the pattern, cut the felt pieces, assemble the body, create the embroidered face, decorate the clothing, and finish the ornament with a hanging loop. You will also discover helpful sewing techniques, recommended measurements, and practical tips for achieving clean edges and balanced proportions. By the end, you will have the knowledge needed to complete this Felt Scarecrow Decoration Pattern from beginning to end.
1. Materials and Preparation for the Felt Scarecrow Decoration Pattern
Before beginning your Felt Scarecrow Decoration Pattern, gather all the materials and arrange them on a clean, well-lit work surface. Having everything prepared makes the sewing process more enjoyable and helps prevent interruptions. For a finished scarecrow measuring approximately 28 cm tall and 25 cm wide, including its extended arms, you will need craft felt in beige, dark brown, red, mustard yellow, orange, olive green, navy blue, and other autumn-inspired colors. You will also need embroidery floss, polyester fiberfill, natural raffia, fabric scissors, a hand-sewing needle, straight pins or sewing clips, a fabric marking pencil, and paper for drawing the templates. A small amount of fabric glue may be useful for temporarily positioning decorative patches, although most of the ornament can be assembled entirely with stitching. These measurements are suggested proportions based on the photographed design rather than measurements taken from an original printable template.
DISCOVER MORE FREE PATTERNS HERE!
Choosing the right felt fabric for sewing makes a noticeable difference in the final appearance of your scarecrow. Wool-blend felt is an excellent option because it generally has a soft texture, holds its shape well, and provides a beautiful finish. Polyester craft felt is another practical choice, particularly for beginners or anyone working with a limited budget. Select felt approximately 1–2 mm thick for the main body and decorative pieces. Avoid excessively thick materials because they can make small details difficult to sew. For the face, choose a warm beige or light peach shade that contrasts nicely with the brown hat. The outfit should include several complementary autumn colors, allowing the patchwork design to become one of the most attractive features of the completed ornament.
The next step is preparing the scarecrow sewing pattern. On paper, draw a rounded head approximately 9 cm wide and 8 cm tall, a hat measuring about 13 cm across the brim and 9 cm tall overall, and a slightly tapered torso approximately 8 cm wide and 10 cm tall. Draw two arms, each measuring approximately 9 cm long and 3.5 cm wide, along with two trouser legs approximately 4.5 cm wide and 9 cm long. Create two rounded shoe shapes measuring about 5 cm wide and 3 cm tall. The scarecrow should have a friendly, simplified silhouette with softly rounded edges rather than sharp corners. These measurements can be adjusted to suit your preferred finished size. Remember that the body components will overlap during assembly, so the sum of their individual measurements will be greater than the finished height.
When transferring the felt scarecrow template onto fabric, use a washable fabric marker or tailor’s chalk to trace each piece carefully. Cut two head pieces, two torso pieces, four arm pieces, four leg pieces, four shoe pieces, and two main hat pieces. For the hat, cut the crown and brim as a single silhouette if you prefer a simpler construction. If you want a layered appearance, create separate crown and brim sections instead. Cut additional small felt rectangles, squares, and irregular shapes for the decorative clothing patches. Because the ornament is primarily assembled with visible blanket stitching, you can cut most pieces directly along the pattern outline without adding a traditional turned seam allowance. Keep the scissors perpendicular to the felt for clean edges and matching front and back pieces.
Preparing the patchwork felt decorations is one of the most creative parts of the project. Cut approximately 15–20 small patches in different shapes and colors, ranging from 1.5 cm to 4 cm in width. Some patches should be rectangular, while others can be slightly irregular to imitate the appearance of old-fashioned repaired clothing. Arrange mustard yellow beside navy blue, orange beside olive green, and deep red beside earthy brown to create an attractive contrast. The patches do not need to be identical or perfectly symmetrical. In fact, slight variations help produce the charming rustic style associated with handmade scarecrow decorations. Before attaching anything permanently, place the pieces over the torso, arms, and legs to visualize the complete design.
Finally, prepare your embroidery supplies and review the basic hand-sewing techniques for felt crafts. The blanket stitch will be used to finish the outer edges, while the running stitch and backstitch can secure decorative patches and create facial details. Choose embroidery floss in dark brown, black, mustard yellow, and coordinating autumn colors. Separate the strands according to the thickness you want; two or three strands generally work well for small facial embroidery, while three strands can create stronger decorative outlines. Cut several pieces of raffia approximately 8–12 cm long for the hair, hands, and pant cuffs. Keep extra strands available for the bow and hanging loop. Once everything is organized, you are ready to begin assembling your handmade scarecrow.
2. Step-by-Step Instructions for Sewing the Scarecrow Body and Face
Begin assembling the Felt Scarecrow Decoration Pattern by creating the smiling face. Place one beige felt head piece flat on your work surface and lightly mark the positions of the eyes, nose, and mouth. Position the eyes approximately 3 cm apart, slightly above the center of the face. Using black embroidery floss, create two small satin-stitched circles or attach securely embroidered black felt circles. Avoid loose beads or buttons if the decoration may be accessible to small children. Cut a small triangle from orange felt for the nose, measuring approximately 1.5 cm tall, and stitch it in place using tiny matching stitches. The combination of black eyes and an orange triangular nose gives the scarecrow its recognizable friendly expression.
Next, embroider the cheerful smile that makes this DIY felt scarecrow especially appealing. Use a fabric marking pencil to draw a gentle curved line beneath the nose, extending toward both cheeks. Thread your needle with dark brown embroidery floss and follow the line using a backstitch. Add several short perpendicular stitches across the mouth to imitate the traditional stitched smile seen on rustic scarecrow dolls. You can also embroider small curved eyebrows and subtle cheek details. Keep the stitches evenly spaced and avoid pulling the thread too tightly, as this can cause the felt to wrinkle. When the face is complete, secure the thread on the reverse side with small knots. A carefully embroidered expression adds personality and makes the finished decoration look warm and inviting.
To assemble the stuffed felt scarecrow head, place the embroidered front piece over the matching back piece, aligning their edges. Before stitching, position several small bundles of raffia along the sides of the head, allowing the strands to extend outward like straw hair. The raffia ends should sit between the two felt layers so they become secured inside the seam. Use a blanket stitch around the perimeter, leaving a small opening near the lower edge. Insert a modest amount of polyester fiberfill, distributing it evenly with your fingers. The head should feel softly padded rather than excessively firm. Continue stitching until the opening is closed, making sure the raffia remains secure. Trim the hair to create an uneven, natural-looking fringe around the cheeks.
Now move on to the felt scarecrow body assembly. Position the torso pieces together and use a blanket stitch around most of the perimeter, leaving an opening for stuffing. Add a small amount of fiberfill, concentrating on the center to create gentle dimension. Close the opening with matching stitches. Repeat the process for both arms and both trouser legs, keeping the padding relatively light so the ornament maintains its flat decorative appearance. Before closing the outer ends of the arms, insert short bundles of raffia to create straw hands. The strands should extend approximately 2–3 cm beyond the felt sleeves. Secure the raffia with several additional stitches inside the seam. This simple detail gives the scarecrow its classic harvest-inspired appearance.
The scarecrow legs and shoes can be assembled separately for a neat finish. Stitch the two layers of each trouser leg together, inserting small raffia bundles at the bottom to represent straw emerging from the pants. Cut the exposed raffia ends to approximately 2 cm in length. Sew the dark brown felt shoe pieces together using blanket stitching and add a small amount of stuffing if you want slightly raised footwear. Attach each shoe beneath the corresponding trouser leg with strong hidden stitches. Make sure the shoes are positioned evenly so the decoration appears balanced when hanging. Once both legs are complete, attach them to the lower portion of the torso, overlapping the pieces slightly to create a continuous body shape.
Finish this stage by connecting the scarecrow head, arms, and torso. Lay all the components on a flat surface before sewing them together. Position the head above the torso, allowing the lower edge to overlap the neckline. Arrange the arms outward at gentle angles, as shown in the reference image, and adjust the legs so they hang naturally. Use strong hand stitches to attach each component securely from the back. If desired, add a small felt reinforcement patch behind the neckline and shoulder joints to strengthen the connections. Check the ornament from the front to make sure the head is centered and both arms extend at similar angles. At this stage, the scarecrow should have its complete shape, even though the decorative clothing and hat still need to be finished.
3. Creating the Colorful Patchwork Outfit and Rustic Scarecrow Hat
The colorful clothing is the most distinctive feature of this Felt Scarecrow Decoration Pattern. Begin by arranging the prepared felt patches over the front of the torso, sleeves, and trouser legs. Use a combination of mustard yellow, burgundy red, navy blue, orange, olive green, and warm brown to reproduce the traditional harvest palette shown in the photograph. Position larger pieces near the center of the body and smaller patches toward the arms and lower legs. Slightly overlap some pieces to imitate clothing that has been repaired many times. The arrangement should look playful and handmade rather than perfectly symmetrical. Once you are satisfied with the layout, secure the patches temporarily with pins or a tiny amount of fabric glue.
To attach the patches, use a decorative blanket stitch or small whipstitches around their edges. Thread your needle with dark brown or contrasting embroidery floss and begin stitching along one side of each patch. Keep the stitches approximately 3–4 mm apart, adjusting the spacing for smaller pieces. A visible blanket stitch creates a beautiful rustic outline while holding the felt securely in place. For a different appearance, use simple straight stitches across the patch edges to imitate handmade repairs. Alternate thread colors occasionally to add variety, but maintain enough consistency for the outfit to look coordinated. The goal is to create an attractive patchwork scarecrow costume with clearly visible handcrafted details.
After attaching the main patches, add several smaller decorative accents to the autumn felt scarecrow outfit. Cut tiny squares or irregular shapes from mustard yellow, dark brown, and orange felt, and place them over larger patches to create additional layers. The reference design includes small patches on the lower torso and trouser legs, helping the clothing look richly textured without becoming overcrowded. Stitch each small accent securely using contrasting embroidery floss. You can also add short rows of decorative stitches across selected seams. These details imitate traditional fabric mending and make the scarecrow feel like a treasured farmhouse ornament. Take your time with this stage, because the combination of colorful felt and visible stitching creates much of the project’s visual appeal.
The next step is constructing the felt scarecrow hat pattern. Use dark brown felt to create a tall, slightly tapered crown with a wide, gently curved brim. For a hat approximately 13 cm wide and 9 cm tall, cut two matching silhouettes. Before joining them, decorate the front crown with two small patches, one mustard yellow and one navy blue, as shown in the image. Attach these patches with visible dark brown embroidery stitches. If desired, add a few short decorative stitches around the brim to imitate rustic handmade edging. Position the two hat layers together and blanket stitch around their outer edges. A thin layer of fiberfill can be inserted into the crown to provide a little dimension, but avoid excessive stuffing so the hat remains relatively flat.
Once the hat is complete, place it over the upper portion of the scarecrow’s head. The brim should sit just above the embroidered eyes, while the raffia hair remains visible beneath both sides. Secure the hat with small hidden stitches along the lower edge and sides. Make sure the hat does not cover the face or distort the head’s rounded shape. For the rustic raffia bow, gather several thin strands of natural raffia and tie them into a small bow approximately 7–9 cm wide. Position the bow at the neckline, where the head meets the body, and attach it with a few strong stitches. The bow helps conceal the joining seam and creates an attractive finishing detail that complements the straw hair and hands.
To complete the decorative assembly, inspect the entire handmade scarecrow wall hanging for loose threads, uneven patches, or exposed knots. Trim any excessively long raffia strands while preserving their natural, slightly irregular appearance. Add a few extra stitches to areas that need reinforcement, particularly around the arms, legs, and hat. If the scarecrow seems too flat, gently massage the fiberfill through the felt to distribute it more evenly. Avoid pressing the ornament with a hot iron because some synthetic felt materials can melt or become permanently flattened. At this point, your scarecrow should closely resemble the photographed design, with its smiling beige face, wide brown hat, colorful patchwork clothing, straw details, and cheerful autumn personality.
4. Finishing the Felt Scarecrow Decoration and Creative Display Ideas
The final construction step for the Felt Scarecrow Decoration Pattern is adding a sturdy hanging loop. Cut a piece of natural jute twine or braided cotton cord approximately 20–25 cm long. Fold it in half to create a loop and position the two loose ends behind the upper center of the hat. Attach the ends securely with several strong stitches, passing the needle through the back felt layer without allowing the stitches to show prominently on the front. For additional strength, place a small rectangular felt reinforcement patch over the cord ends and stitch it into position. Test the hanging loop gently before displaying the ornament. A properly secured loop helps the scarecrow hang straight and reduces the risk of the decoration falling.
Once the hanging loop is attached, take a moment to evaluate the overall appearance of your finished felt scarecrow ornament. Hold the decoration upright and check whether the head, hat, torso, and legs are properly aligned. If one arm appears noticeably lower than the other, make a small adjustment by reinforcing its attachment point. Straighten the raffia bow and arrange the hair so that it frames the face naturally. Remove visible fabric marking lines according to the marker manufacturer’s instructions. If necessary, use a soft lint brush to remove loose fibers or tiny felt scraps. These finishing touches may seem minor, but they contribute to a clean and polished appearance while preserving the handcrafted charm of the decoration.
There are many ways to incorporate this DIY scarecrow fall decoration into your seasonal home styling. Hang it on a wooden wall, interior door, decorative hook, or autumn-themed display board. The warm felt colors pair beautifully with natural wood, dried leaves, small pumpkins, woven baskets, and neutral farmhouse accessories. For an inviting entryway arrangement, position the scarecrow beside a wreath featuring orange and yellow foliage. In a kitchen, it can become a cheerful accent near a seasonal shelf display. The ornament is intended primarily for indoor decorative use, since prolonged exposure to rain, humidity, and strong sunlight may damage the felt, fade the colors, or weaken the raffia. Keep it away from candles, heaters, and other sources of heat.
You can also personalize the Felt Scarecrow Decoration Pattern to create different seasonal characters. For a more traditional country appearance, use muted browns, mustard yellow, rust orange, and olive green. For a playful family-friendly design, introduce brighter shades such as turquoise, golden yellow, and cherry red. Another idea is to embroider a small heart or flower on one of the clothing patches. You could create a matching pair of scarecrows by changing the hat shapes, facial expressions, or outfit colors. Small variations in the embroidery and patch placement can make every ornament unique. These creative options are especially enjoyable when making several decorations as gifts or coordinating pieces for an autumn display.
If you plan to make felt scarecrow ornaments for gifts or craft fairs, consistency and durability become particularly important. Use strong stitching, secure all decorative elements carefully, and choose materials that will maintain their appearance during handling and storage. Consider creating a simple paper template that can be reused for future projects. You can also prepare several sets of felt pieces in advance to make the sewing process more efficient. Handmade ornaments often feel especially meaningful when accompanied by a small card explaining that they were individually crafted. If selling your creations, calculate the cost of materials, preparation time, and labor before setting a price. Keep small detachable decorations and loose fibers away from young children, and clearly identify the scarecrow as a decorative item rather than a toy.
Proper storage will help preserve your handmade autumn felt decoration for many seasons. When autumn ends, gently remove dust with a soft brush and make sure the ornament is completely dry before packing it away. Place the scarecrow inside a clean fabric bag or a storage box lined with tissue paper. Avoid placing heavy objects on top, as pressure can flatten the hat, distort the stuffing, or bend the raffia strands. Store the decoration in a cool, dry location away from direct sunlight and excessive humidity. Before displaying it again, check the hanging loop and gently reshape any flattened areas. With careful handling and storage, your felt scarecrow can remain a cherished part of your seasonal decorating tradition year after year.
Frequently Asked Questions About the Felt Scarecrow Decoration Pattern
1. Is the Felt Scarecrow Decoration Pattern suitable for beginners?
Yes. This beginner-friendly felt sewing project uses straightforward shapes and basic hand-sewing techniques. The most important stitches are the blanket stitch, running stitch, and backstitch. Beginners can practice these techniques on leftover felt scraps before assembling the decoration. Although the patchwork clothing includes many small details, the project does not require advanced sewing experience.
2. What type of felt works best for making a scarecrow ornament?
Wool-blend felt and polyester craft felt are both suitable. Wool-blend felt generally offers a softer texture and attractive finish, while polyester felt is affordable and widely available. Felt approximately 1–2 mm thick works well for the body, hat, and decorative patches. Choose materials that are easy to cut and sew without excessive stretching.
3. How much felt is needed for one scarecrow decoration?
For a scarecrow measuring approximately 28 cm tall, a few small sheets of felt in the main colors are usually sufficient. You will need larger pieces of beige and brown felt for the head and hat, along with assorted smaller scraps for the outfit. The exact amount depends on the dimensions of your pattern and how many decorative patches you include.
4. Can I make the felt scarecrow without a sewing machine?
Absolutely. The Felt Scarecrow Decoration Pattern is designed for hand sewing, making it ideal for crafters who do not own a sewing machine. Visible hand stitches are part of the ornament’s rustic appearance. A needle, embroidery floss, scissors, and a little patience are enough to complete the main construction.
5. What can I use instead of raffia for the scarecrow’s hair and hands?
Natural raffia creates the traditional straw-like appearance, but you can substitute cotton yarn, jute fibers, embroidery thread bundles, or thin strips of felt. Choose materials that complement the colors and proportions of your decoration. Secure the fibers firmly between the felt layers so they do not pull out easily.
6. How do I keep the felt patches from moving while sewing?
Use sewing clips, small pins, or a tiny amount of fabric-safe glue to hold the patches temporarily. Arrange all the pieces before attaching them permanently. If using glue, apply it sparingly and allow it to dry according to the manufacturer’s directions. Too much glue can stiffen the felt and make hand sewing difficult.
7. Can I change the size of the Felt Scarecrow Decoration Pattern?
Yes. You can enlarge or reduce the paper templates while keeping the proportions consistent. A smaller scarecrow could become a decorative ornament for a seasonal tree, while a larger version could serve as a wall hanging. When changing the size, adjust the width of the patches, the length of the raffia, and the amount of stuffing accordingly.
8. What is the best stitch for joining felt pieces?
The blanket stitch is one of the best options because it creates a decorative border while securing two felt layers together. A whipstitch can also be used for smaller sections, while the backstitch works especially well for embroidered facial details. Choose stitches according to the appearance and strength required for each part.
9. How long does it take to make a handmade felt scarecrow?
A beginner may need approximately four to six hours to complete the decoration, depending on the number of patches and the amount of embroidery involved. More experienced crafters may finish sooner. Preparing the templates and cutting the felt in advance can help make the process more efficient.
10. Can children participate in making this scarecrow decoration?
Children can participate in age-appropriate activities such as choosing colors, arranging patches, and helping plan the design. Cutting felt, handling needles, and using sharp tools should be supervised by an adult. Because the ornament may contain small parts and loose fibers, it should not be treated as a toy for young children.
11. How can I make the scarecrow look more professional?
Focus on consistent stitching, neatly cut felt pieces, balanced proportions, and securely attached details. Use complementary colors and avoid overcrowding the outfit with too many patches. Light stuffing helps maintain a clean silhouette, while carefully positioned raffia adds realistic texture. Taking time with the final inspection can significantly improve the finished appearance.
12. Can the felt scarecrow be washed?
Spot cleaning is generally safer than machine washing. Use a slightly damp cloth to remove small marks, taking care not to soak the felt or raffia. Avoid twisting, scrubbing, or placing the decoration in a tumble dryer. Always allow it to air-dry completely before storing it.
13. Is this pattern suitable for Christmas decorations as well as autumn?
Yes. Although the traditional design uses harvest colors, you can adapt the felt scarecrow craft pattern with red, green, cream, and gold felt for a festive winter appearance. A coordinating bow or seasonal patches can help transform the decoration while preserving its recognizable scarecrow shape.
14. Can I use fabric scraps instead of felt for the patchwork clothing?
Yes, although ordinary woven fabric may fray along the cut edges. To prevent fraying, use lightweight fusible interfacing, turn under the raw edges, or apply a suitable edge-finishing method. Felt is generally easier for beginners because it does not require traditional seam finishing.
15. What makes this felt scarecrow decoration a good handmade gift?
Its cheerful expression, colorful outfit, and personalized details make it a thoughtful seasonal gift. You can customize the colors to match someone’s home décor or add small embroidered initials to a clothing patch. Because the ornament is lightweight and reusable, it can become a meaningful part of a family’s autumn traditions.
Conclusion: Create Your Own Felt Scarecrow Decoration Pattern
The Felt Scarecrow Decoration Pattern is a wonderful way to celebrate the autumn season through traditional hand sewing and creative fabric decoration. By following this tutorial, you have learned how to select suitable felt materials, prepare the paper templates, cut the individual pieces, embroider a friendly face, assemble the padded body, and decorate the clothing with colorful patchwork accents. You have also explored how to create the rustic brown hat, attach natural raffia details, add a decorative bow, and finish the ornament with a secure hanging loop.
One of the greatest advantages of this DIY felt scarecrow project is its flexibility. You can follow the traditional harvest-inspired color palette shown in the reference image or experiment with your own combinations of felt, embroidery floss, and decorative materials. The simple construction makes it approachable for beginners, while the detailed patchwork and embroidery offer plenty of creative possibilities for experienced crafters. Every handmade scarecrow can become a unique expression of your personal style.
Beyond its decorative appeal, this project encourages the enjoyment of slow crafting, creative reuse of materials, and the satisfaction of making something beautiful by hand. Whether you hang your finished scarecrow in an entryway, include it in a farmhouse-inspired display, or give it as a thoughtful seasonal present, it can bring a welcoming touch of autumn charm to any space.
EASILY FIND THE FREE PDF FOR THIS PATTERN HERE!
Now I would love to hear your sincere opinion! What do you think of this Felt Scarecrow Decoration Pattern? Would you use the traditional autumn colors, or would you create a different combination? Share your honest feedback, creative ideas, and suggestions in the comments. Your experiences and recommendations can inspire other craft lovers to discover new techniques and create their own beautiful handmade decorations!