
The Felt Christmas ornaments Pattern is a wonderful handmade Christmas project that combines traditional holiday colors, delicate embroidery, and beautiful decorative details. These charming ornaments bring warmth and personality to Christmas trees, festive wreaths, door decorations, and seasonal displays. Featuring classic red, green, and ivory felt, each ornament is decorated with elegant bows, embroidered snowflakes, holly leaves, golden accents, and small red berries. The result is a collection of Christmas decorations that look sophisticated while maintaining the cozy appearance of handmade crafts. Whether you are an experienced crafter or someone discovering the joy of sewing with felt, this DIY felt Christmas ornament tutorial provides a practical way to create beautiful decorations using accessible materials and simple techniques.
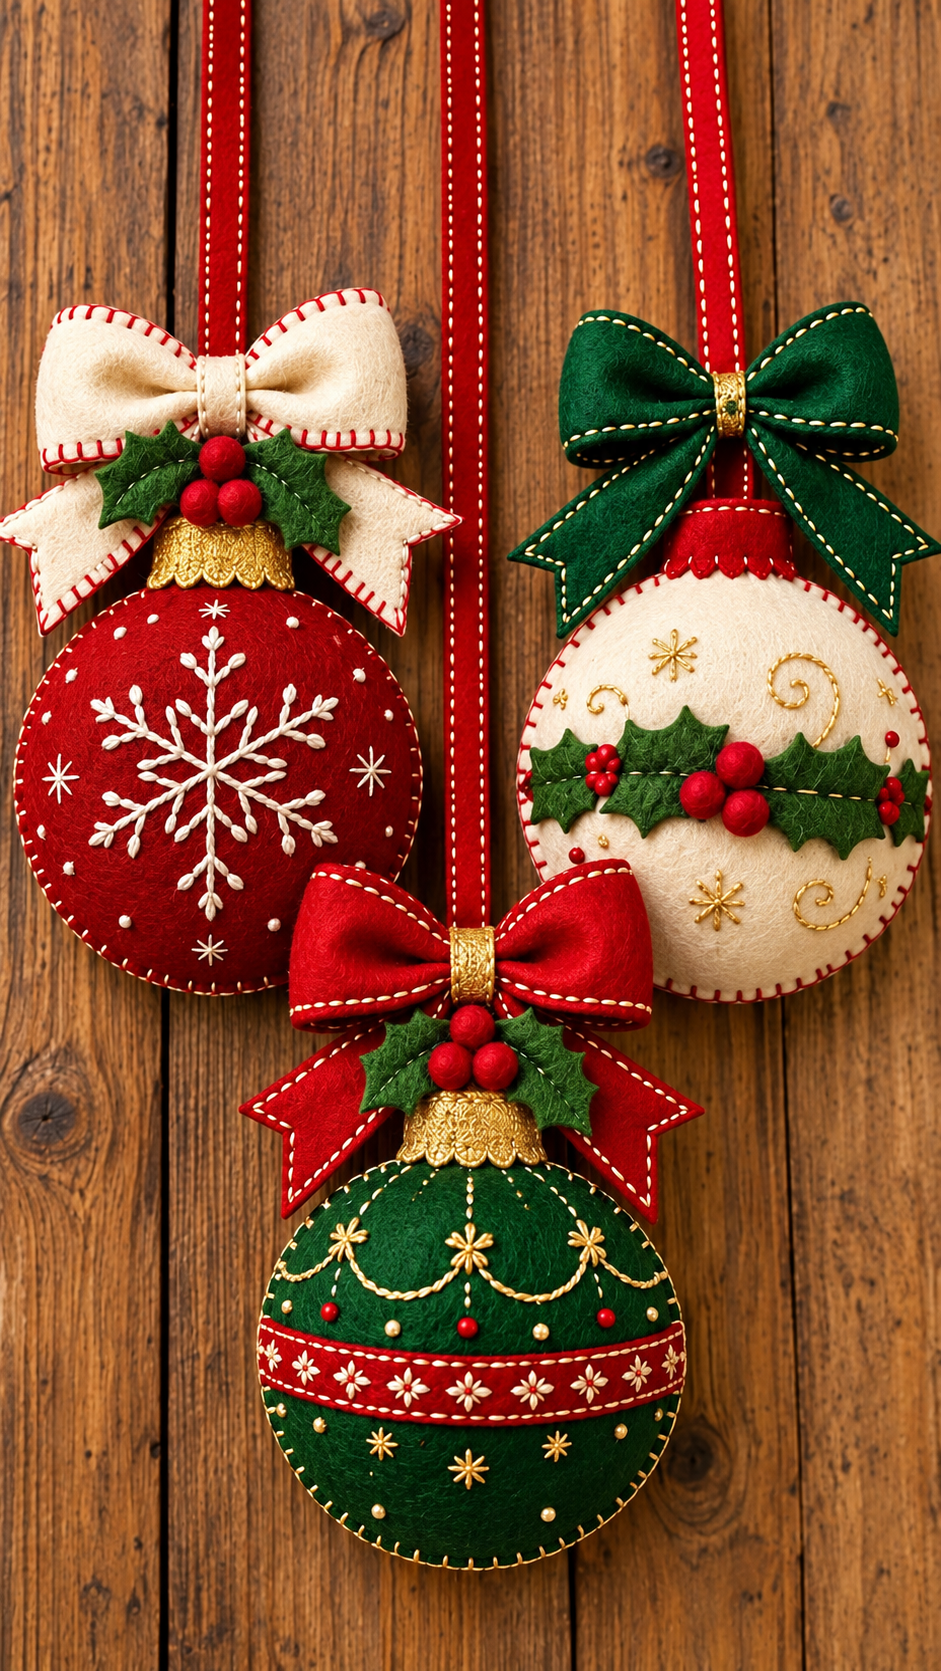
One of the most appealing characteristics of this Felt Christmas ornaments Pattern is its versatility. The design features three traditional round Christmas baubles, each with a different arrangement of decorative elements. The first ornament has a rich red background with a large embroidered white snowflake, an ivory bow, and green holly leaves. The second features an ivory background decorated with golden embroidery, a dark green bow, and a horizontal arrangement of holly leaves and red berries. The third ornament combines deep green felt with a decorative red band, golden embroidery, and a bright red bow. Although these designs appear elaborate, they can be recreated through a series of manageable steps. Careful cutting, simple embroidery stitches, and thoughtful assembly are the secrets to achieving a polished result.
Creating handmade felt Christmas decorations is also a meaningful way to celebrate the holiday season. Unlike mass-produced ornaments, handmade pieces allow you to select your favorite colors, personalize the embroidery, and add special details that reflect your family’s traditions. Felt is particularly suitable for this type of project because it is easy to cut, does not fray along the edges, and can be sewn by hand without complicated equipment. These ornaments can become thoughtful homemade gifts, festive keepsakes, or decorations that return to your Christmas tree year after year. In this complete tutorial, you will learn how to prepare the materials, create a practical felt ornament sewing pattern, embroider the decorative elements, assemble the stuffed ornaments, and finish them with beautiful ribbons and embellishments.
Materials and Tools for the Felt Christmas ornaments Pattern
Before beginning your Felt Christmas ornaments Pattern, prepare a comfortable workspace with good lighting and enough room to organize your materials. For a set of three ornaments similar to those shown in the reference image, you will need red, dark green, and ivory felt. Wool-blend felt is an excellent option because it generally provides a soft texture and attractive finish, although good-quality polyester craft felt can also work. Choose felt approximately 1–2 mm thick for the main ornament pieces. You will also need embroidery floss in white, red, green, and metallic gold, along with matching sewing thread for assembling the decorations.
DISCOVER MORE FREE PATTERNS HERE!
For the main ornament bodies, prepare circular templates approximately 12 cm in diameter. Each finished ornament will measure around 12 cm across, excluding the bow and hanging ribbon. Cut two circles for each ornament, creating six circular felt pieces in total. You will also need small scraps of green felt for holly leaves, red felt for decorative bands, and ivory or red felt for the bows. Prepare polyester fiberfill for lightly stuffing the ornaments, giving them the rounded, padded appearance visible in the photograph. If you prefer a flatter decoration, you can reduce the amount of stuffing while maintaining the same overall construction.
The decorative bows are important elements of this Christmas felt ornament pattern because they provide dimension and elegance. For each bow, prepare a felt rectangle measuring approximately 18 × 8 cm, two ribbon-tail pieces measuring around 11 × 5 cm, and a narrow strip measuring 2 × 6 cm for the center. These are suggested measurements rather than dimensions taken directly from the photograph, so you may adjust them to suit your preferred proportions. You can also use fabric ribbon instead of felt for the hanging loops. A red ribbon approximately 1.5 cm wide works beautifully with all three designs.
Additional decorative supplies include small red felt balls or handmade stuffed berries, metallic gold trim, embroidery needles, fabric scissors, sewing pins, and a washable fabric marking pencil. You may also use small gold beads to reproduce the elegant details on the green ornament. If you plan to hang the decorations in a household with small children or pets, consider replacing loose beads with embroidered dots and securely sewing every embellishment. The ornaments are intended for decoration rather than play, and small detachable pieces can present a choking hazard.
A blanket stitch is one of the most useful techniques for this project. This decorative hand-sewing stitch creates evenly spaced loops along the outer edges of felt pieces, helping hold the front and back layers together while adding a charming handmade finish. A running stitch is another essential method, consisting of small, evenly spaced stitches that are ideal for decorating ribbons, bows, and felt bands. You will also use backstitch for curved lines and lazy daisy stitches for embroidered snowflakes and floral details. Practicing these stitches on leftover felt before starting the ornaments can make the sewing process more enjoyable.
For an organized project, separate your materials into three groups according to the ornament designs. Keep the red ornament materials together, place the ivory ornament components in another group, and reserve the green ornament pieces for the final design. This simple preparation method helps prevent missing components and makes the assembly process easier. It is especially helpful when creating several DIY Christmas felt ornaments at once. With your templates prepared and supplies arranged, you can begin transferring the designs onto felt and creating the decorative foundations.
Cutting and Preparing the Three Christmas Felt Ornament Designs
Begin the Felt Christmas ornaments Pattern by creating the circular templates. Draw a circle measuring 12 cm in diameter on sturdy paper or lightweight cardboard, then cut carefully along the outline. Use this template to trace two circles onto red felt, two onto ivory felt, and two onto dark green felt. Cut all six circles with sharp fabric scissors, keeping the edges smooth and consistent. Matching front and back pieces are essential because uneven edges can make the finished ornaments appear distorted. Place each pair together to check the alignment before adding embroidery or decorations.
The first ornament features a traditional red felt Christmas bauble with snowflake embroidery. Place one red felt circle on your work surface and mark the center lightly with a washable fabric pencil. Draw six equally spaced lines radiating outward to create the foundation of a symmetrical snowflake. Each main branch can extend approximately 4 cm from the center, leaving room for the decorative blanket stitch around the perimeter. Add smaller diagonal branches along the main lines, imitating the intricate white snowflake shown in the reference image. Mark several small dots and miniature stars around the central motif to create a balanced composition.
For the second ornament, use one ivory felt circle as the decorative front. This ivory felt Christmas ornament with holly appliqué features a horizontal band of green leaves across the center, accompanied by red berries and delicate gold embroidery. Cut approximately six to eight holly leaves from dark green felt, making each leaf around 3–4 cm long. Draw gently pointed leaf shapes with curved, slightly jagged edges to reproduce the familiar appearance of Christmas holly. Arrange the leaves across the center of the ivory circle, allowing them to overlap slightly. Leave enough space above and below the arrangement for golden swirls, embroidered stars, and small decorative accents.
The third ornament features a deep green background with a red horizontal decorative band. Cut one strip of red felt approximately 2 cm wide and 12 cm long, then position it across the center of the green circle. Trim the ends to follow the rounded outline. The band will eventually be decorated with small white embroidered flowers, while the green background will feature golden scalloped lines and star-shaped accents. This green felt Christmas ornament pattern offers an opportunity to combine simple embroidery techniques with decorative stitching. Mark the placement of the gold details before sewing to maintain symmetry and avoid overcrowding the design.
Next, prepare the decorative bows and holly appliqués. For each bow, fold the long edges of the rectangular felt piece toward the center, creating a neat layered shape. Gently pinch the middle to form two rounded loops, then secure the folds with a few stitches. Cut the lower ends of the ribbon tails into a V shape to imitate traditional Christmas ribbon ends. Place the tails behind the bow loops and secure them at the center. Wrap the narrow felt strip around the middle to hide the gathering stitches. The finished bow should have a soft, dimensional appearance rather than looking completely flat.
Before moving to the embroidery stage, prepare the hanging ribbons and ornament caps. Cut three pieces of red ribbon approximately 25–30 cm long, depending on the desired hanging length. Fold each piece into a loop and secure the ends together with a few stitches. For the decorative caps beneath the bows, cut small scalloped pieces from gold felt or use metallic gold decorative trim. Each cap can measure approximately 4–5 cm wide and 2 cm high. These components help recreate the classic Christmas bauble appearance. Keep the bows, caps, holly leaves, and hanging loops separate until the embroidered ornament bodies are complete.
Step-by-Step Embroidery and Appliqué Techniques for Felt Christmas Ornaments
Start decorating the red ornament by threading an embroidery needle with white embroidery floss. Use three strands for a delicate appearance or all six strands for thicker, more visible stitches. Following the guidelines drawn earlier, embroider the six main snowflake branches using backstitch or a combination of straight stitches. Add the smaller branches with short diagonal stitches, working from the center outward. To create the leaf-shaped details along the snowflake, use lazy daisy stitches or small detached chain stitches. Keep the spacing consistent so that the snowflake looks balanced. Finish by adding tiny white stars and scattered dots around the central design.
After completing the snowflake, decorate the red ornament’s outer edge with small white embroidered dots if desired. These details can be made using French knots, tiny straight stitches, or securely attached felt circles. Avoid placing them too close to the seam allowance because the outer edges will later be joined with blanket stitches. For an ornament measuring 12 cm across, leaving approximately 5 mm around the perimeter provides enough space for assembly. This hand embroidery for Christmas ornaments adds texture and personality without requiring advanced sewing skills. The contrast between the red felt and white embroidery creates a timeless holiday appearance.
Move on to the ivory ornament and arrange the prepared green holly leaves across its center. Attach the leaves individually using small green running stitches along their central veins. These stitches serve two purposes: they secure the appliqué pieces and create realistic leaf details. Slightly overlap the leaves to achieve a natural arrangement. Once the leaves are attached, sew three small red felt berries near the center and smaller berry clusters toward the sides. To make dimensional berries, cut small red felt circles approximately 2–2.5 cm in diameter, gather their edges with running stitches, add a tiny amount of stuffing, and pull the thread closed. Stitch each berry securely into place.
The golden embroidery on the ivory ornament gives the design its elegant finishing touch. Using metallic gold embroidery thread, create small stars, curved swirls, and decorative accents around the holly arrangement. Backstitch works well for the curved lines, while straight stitches can form six-pointed or eight-pointed stars. Metallic embroidery thread can sometimes twist or fray, so work with shorter lengths and avoid pulling too tightly. The gold details should complement the holly rather than overwhelm it. This combination of felt appliqué and decorative embroidery creates an ornament that looks festive, traditional, and carefully handcrafted.
For the green ornament, begin by attaching the red horizontal felt band across the middle of the front circle. Use small running stitches along both edges of the band, preferably in white or ivory thread to create the visible contrast shown in the reference. Embroider a row of small white flowers along the center using lazy daisy stitches, with tiny golden or white centers. Above the band, create a series of curved golden lines resembling hanging garlands. Add small golden stars at the points where the curves meet. Below the band, embroider additional stars and scattered dots to balance the design.
Complete the green ornament by adding a few small red and gold accents. Red felt dots can be stitched above the decorative band, while tiny gold beads or embroidered French knots can imitate the sparkling embellishments. Check the placement of all decorative elements before securing them permanently. Once the three ornament fronts are finished, compare them side by side to make sure each design has its own personality while maintaining a coordinated Christmas color palette. The red ornament emphasizes the embroidered snowflake, the ivory ornament highlights holly appliqué, and the green ornament showcases decorative bands and golden stitching. Together, they form a beautiful collection of handmade Christmas tree ornaments.
Assembling, Stuffing, and Finishing the Felt Christmas ornaments Pattern
Once the embroidery and appliqué work are complete, it is time to assemble the ornament bodies. Place each decorated felt circle on top of its matching plain backing circle, aligning the edges carefully. If the decorative stitches have created slight tension in the fabric, gently smooth the felt with your fingers before pinning the layers together. Insert the folded hanging ribbon between the two layers at the top of the circle, with the ribbon ends extending approximately 1.5 cm inside the ornament. Secure the ribbon ends with several strong stitches so the ornament can hang safely without pulling apart.
Begin sewing around the circular edge using a blanket stitch for felt ornaments. Choose embroidery floss that complements each design: ivory or white for the red ornament, red for the ivory ornament, and gold or ivory for the green ornament. Start near the top and work around the circumference, keeping the stitches approximately 4–5 mm apart and 4–5 mm deep. Try to maintain consistent tension without pulling the felt too tightly. The blanket stitch should create a decorative border while joining the two layers securely. Leave an opening of approximately 4 cm near the bottom for inserting the stuffing.
Add small amounts of polyester fiberfill through the opening, distributing it evenly throughout the ornament. Use your fingers or the blunt end of a wooden tool to gently push the stuffing toward the outer edges. The goal is to create a softly padded ornament rather than an overly inflated shape. Too much stuffing can distort the embroidery and cause the circular edges to bulge. Once the ornament has reached the desired thickness, close the remaining opening with blanket stitches, matching the spacing and tension of the previous stitches. Repeat the process for the other two ornaments until all three have smooth, rounded shapes.
Attach the decorative gold caps near the top of each ornament, just below the hanging ribbon. These caps imitate the metallic fittings commonly found on traditional glass Christmas baubles. Use small hand stitches to secure the caps, hiding the thread beneath the decorative trim whenever possible. If you are using metallic ribbon or gold braid, fold the edges neatly before stitching them into position. The caps should be centered so that they align with the hanging ribbons and bows. This small detail gives the Felt Christmas ornaments Pattern a more finished and recognizable Christmas ornament appearance.
Next, attach the prepared bows above the ornament caps. Position the ivory bow on the red ornament, the dark green bow on the ivory ornament, and the red bow on the green ornament. Sew through the center of each bow and into the upper section of the ornament, taking care not to damage the embroidery or pull the stuffing out of place. Add a narrow gold felt strip or decorative trim around each bow’s center. For the red and green ornaments, arrange a few green holly leaves beneath the bows and attach three small red berries. These festive clusters connect the bows visually to the ornament bodies and create the layered decorative appearance shown in the photograph.
Finish your DIY Felt Christmas ornaments Pattern by examining every seam, bow, and embellishment. Trim loose threads, adjust the hanging ribbons, and check that the bows sit evenly above the circular bodies. If any felt edges appear uneven, carefully trim them without cutting the blanket stitches. Gently reshape the ornaments with your hands to distribute the stuffing and improve their symmetry. Your completed decorations can be displayed on a Christmas tree, attached to a festive garland, incorporated into a holiday wreath, or presented as handmade gifts. Store them in a clean, dry box between seasons, separating delicate embellishments with tissue paper to preserve their shape.
Frequently Asked Questions About Felt Christmas ornaments Pattern
What type of felt is best for making Christmas ornaments?
Wool-blend felt is a popular choice for handmade felt Christmas ornaments because it has a soft texture, holds its shape well, and provides an attractive surface for embroidery. However, polyester craft felt is also suitable, especially for beginners or larger projects. Choose a felt thickness of approximately 1–2 mm for the main pieces. Extremely thin felt may stretch during stuffing, while very thick felt can make detailed appliqué and hand embroidery more difficult.
Can beginners make these felt Christmas ornaments?
Yes. This Felt Christmas ornaments Pattern can be adapted for beginners because it uses basic cutting, embroidery, and hand-sewing techniques. New crafters may want to begin with the red snowflake ornament, which features a straightforward circular shape and a central embroidered motif. After practicing the blanket stitch, running stitch, and backstitch, they can move on to the more detailed holly appliqué and decorative embroidery designs.
Do I need a sewing machine to complete this project?
No sewing machine is necessary. All three ornaments can be completed entirely by hand using an embroidery needle and matching thread. In fact, hand sewing is particularly suitable for this project because it allows better control over the small decorative details, curved edges, and delicate appliqué pieces. A sewing machine may be useful for other felt projects, but it is not required for these traditional Christmas felt sewing patterns.
How long does it take to make one felt Christmas ornament?
The time required depends on your sewing experience and the complexity of the decoration. A simple snowflake ornament may take approximately one to two hours, while the holly and gold-embroidered designs may require two to four hours. Preparing all the templates and cutting the felt pieces in advance can make the process more efficient. If you are creating several ornaments, consider completing each stage for the entire collection before moving to the next.
What can I use instead of polyester stuffing?
Small amounts of clean fabric scraps or leftover felt pieces can be used as an alternative to polyester fiberfill. However, these materials may produce a slightly firmer or less uniform surface. For the softly rounded appearance shown in the reference image, polyester fiberfill is generally easier to distribute evenly. If you prefer completely flat decorations, you can omit the stuffing and simply sew the two felt circles together.
How can I make the ornaments look more professional?
The most important factors are accurate cutting, consistent stitching, balanced embroidery, and careful assembly. Use sharp scissors to create smooth felt edges, maintain equal distances between blanket stitches, and position decorative elements before sewing them permanently. Matching the thread colors to the felt or choosing intentional contrasting colors also improves the final appearance. Taking extra time to secure the bows and hide loose thread ends can make a noticeable difference.
Can I change the colors of the Felt Christmas ornaments Pattern?
Absolutely. Although the traditional combination of red, green, ivory, and gold is especially popular during Christmas, these ornaments can be customized with many other color palettes. Blue and silver create a winter-inspired appearance, while burgundy and champagne offer a more elegant holiday style. Pastel pink, mint green, and white can produce a softer decorative theme. The basic cutting and assembly instructions remain the same regardless of the colors selected.
Are these felt Christmas ornaments washable?
Handmade felt ornaments with embroidery, metallic trim, and dimensional embellishments should generally not be machine washed. Excessive water and agitation may distort the felt, loosen the decorative elements, or affect the stuffing. For routine cleaning, gently remove dust with a soft brush or dry cloth. If a small stain appears, carefully spot-clean it with a slightly damp cloth after testing an inconspicuous area, then allow the ornament to air-dry completely.
Can I make these ornaments to sell at Christmas craft fairs?
Yes, you can create your own handmade ornaments using the techniques described in this tutorial and offer them at local craft fairs or holiday markets. Focus on consistent construction, secure embellishments, attractive packaging, and accurate descriptions of the materials used. If selling to customers, avoid presenting decorative ornaments with small parts as children’s toys, and check any product safety or labeling requirements that apply to your market.
How should I store handmade felt Christmas ornaments after the holidays?
Store the ornaments in a dry, clean container away from direct sunlight and excessive humidity. Place a small piece of tissue paper between decorations to prevent bows, berries, and embroidered details from becoming compressed. Avoid stacking heavy objects on top of them. With careful storage and occasional gentle cleaning, your handmade felt Christmas decorations can remain beautiful for many holiday seasons.
Can children participate in making these Christmas ornaments?
Children can help with age-appropriate activities such as selecting felt colors, arranging pre-cut shapes, and planning decorative patterns under adult supervision. Needlework, sharp scissors, small beads, and other potentially hazardous materials should be handled by adults or appropriately supervised older children. For younger participants, simplified designs with larger felt pieces and fewer small embellishments are a better choice.
What is the best way to personalize these felt ornaments?
You can personalize your Felt Christmas ornaments Pattern by embroidering initials, names, or meaningful dates onto the ornament backs. Another idea is to choose colors that match your family’s Christmas decorations or create special designs representing favorite holiday memories. Personalized ornaments also make thoughtful gifts for teachers, friends, neighbors, and family members.
Conclusion: Create Beautiful Handmade Christmas Memories
The Felt Christmas ornaments Pattern is a delightful sewing project that transforms simple felt pieces into beautiful holiday decorations filled with color, texture, and personality. Throughout this tutorial, you learned how to select the appropriate materials, prepare circular templates, cut decorative felt shapes, create embroidered snowflakes, attach holly appliqués, and add elegant golden details. You also discovered how to assemble the ornaments using blanket stitches, add soft stuffing, secure hanging ribbons, and finish each design with dimensional bows and festive berries.
The three ornaments presented in this project demonstrate how different decorative techniques can create a coordinated collection without making every piece identical. The red snowflake ornament brings traditional Christmas charm, the ivory holly ornament offers an elegant and delicate appearance, and the green ornament introduces rich colors with beautiful decorative embroidery. Together, they represent the creativity and warmth that make DIY felt Christmas decorations so special.
One of the greatest pleasures of working with felt is the freedom to experiment. You can modify the colors, change the embroidery patterns, adjust the ornament sizes, and create personalized decorations that reflect your own style. Each handmade ornament becomes a small expression of creativity and care, making it a meaningful addition to your Christmas celebrations. Now that you have learned how to complete this Felt Christmas ornaments Pattern, consider making an entire collection for your Christmas tree or preparing a few as thoughtful handmade gifts. With patience, careful stitching, and a little imagination, these beautiful decorations can become cherished holiday keepsakes.
EASILY FIND THE FREE PDF FOR THIS PATTERN HERE!
We would love to hear your sincere opinion! Which of the three felt Christmas ornaments is your favorite: the red snowflake, the ivory holly design, or the green ornament with golden embroidery? Share your honest thoughts, creative ideas, and suggestions for future patterns in the comments. Your feedback can inspire new handmade Christmas projects and help other craft lovers discover the joy of creating something beautiful with their own hands. 🎄❤️