
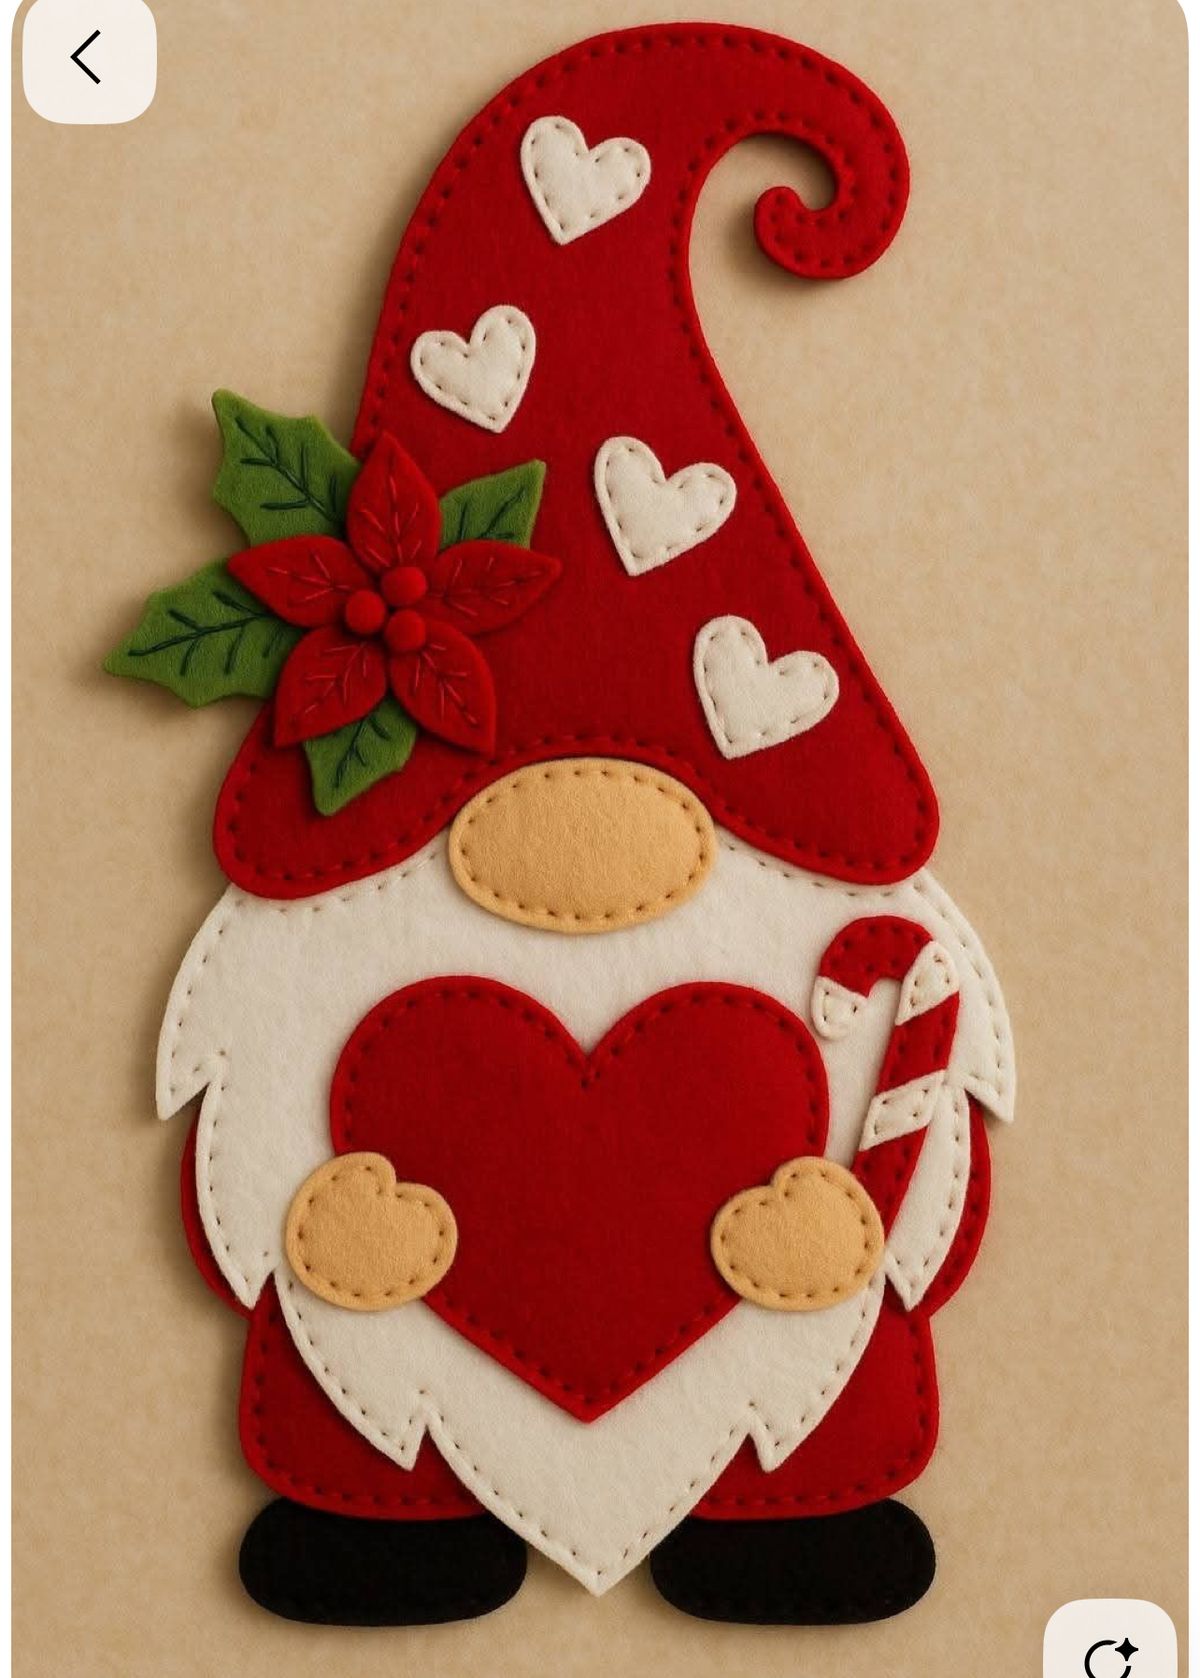
The Felt Christmas Gnome with Poinsettia and Heart Pattern is a delightful handmade Christmas decoration that combines traditional holiday colors, charming felt appliqué, and beautiful hand-stitched details. With its tall, curled red hat, delicate white hearts, festive poinsettia flower, and oversized red heart held close to its body, this adorable Christmas gnome captures the warmth and joy of the holiday season. Whether you enjoy creating seasonal decorations for your home or making thoughtful handmade gifts for family and friends, this Christmas felt craft pattern offers a wonderful opportunity to turn simple materials into something truly special. The combination of red, white, green, beige, and black felt creates a classic Christmas appearance that looks beautiful on doors, walls, decorative panels, and holiday displays. Best of all, this project can be completed using basic sewing supplies and beginner-friendly hand embroidery techniques.
One of the most appealing features of the Felt Christmas Gnome with Poinsettia and Heart Pattern is its layered construction, which gives the finished decoration a soft, dimensional appearance without requiring complicated sewing methods. The gnome features a large white beard, a rounded beige nose, small mitten-shaped hands, black shoes, and a beautifully shaped red hat decorated with four white hearts. A handmade poinsettia with green leaves adds an elegant botanical touch to the side of the hat, while a large red heart becomes the centerpiece of the design. Each individual felt piece is carefully positioned and secured with visible hand stitching, creating the cozy, handcrafted finish that makes felt Christmas ornaments so popular. The design is especially suitable for crafters who appreciate traditional Christmas decorations with a playful personality and a sentimental touch.
Creating your own handmade felt Christmas gnome is also a relaxing way to enjoy the creative side of the holiday season. Felt is an excellent material for this type of project because it is easy to cut, does not fray along the edges, and comes in a wide variety of colors. You do not need an expensive sewing machine or advanced embroidery skills to achieve attractive results. With a few carefully prepared templates, basic stitches, and a little patience, you can reproduce the charming arrangement shown in the reference image. This detailed tutorial explains how to prepare the materials, create the individual pattern pieces, assemble the gnome, sew the poinsettia flower, and finish the decoration professionally. The measurements are provided in centimeters, while the sewing terminology follows commonly used American crafting conventions, making the instructions practical and easy to follow for readers throughout the United States.
Materials and Supplies for the Felt Christmas Gnome with Poinsettia and Heart Pattern
Before beginning your Felt Christmas Gnome with Poinsettia and Heart Pattern, gather all the materials needed to complete the project. Choosing good-quality felt will make the cutting and sewing process easier and help the finished decoration maintain its shape. Wool-blend felt is an excellent option because it has a soft texture and holds stitches beautifully, although regular craft felt is also suitable. For a decoration approximately 35 cm tall and 22 cm wide, prepare enough felt in the main Christmas colors. These dimensions are suggested for a handmade version inspired by the photograph rather than exact measurements from an original printed template.
DISCOVER MORE FREE PATTERNS HERE!
The main material is red felt, which will be used for the tall curled hat, the gnome’s body, the large central heart, the poinsettia petals, and the candy cane. You will also need white or ivory felt for the beard, small decorative hearts, and candy cane stripes. Green felt is necessary for the poinsettia leaves, while beige or light peach felt will create the rounded nose and small hands. Finally, black felt is used for the shoes. Select colors that coordinate naturally, remembering that slightly warm ivory and beige tones can create a softer, more traditional appearance than bright white.
For the stitching, prepare embroidery floss or strong sewing thread in red, white, green, beige, and black. Matching thread creates a subtle finish, while slightly darker thread can make the decorative stitches more noticeable. A six-strand cotton embroidery floss works particularly well for visible stitching around the felt shapes. Use two or three strands for most outlines and one or two strands for delicate details. You will also need embroidery needles, sharp fabric scissors, small detail scissors, straight pins or sewing clips, and a washable fabric marking pen.
Additional supplies include paper for making the printable felt gnome pattern, a pencil, ruler, tracing paper, and optional lightweight polyester stuffing. Although the photographed design has a relatively flat appliqué appearance, a small amount of stuffing can be placed behind the nose, hands, and poinsettia center to create gentle dimension. You may also use a small quantity of fabric glue to temporarily position tiny decorative pieces before sewing. If you choose glue, use it sparingly and allow it to dry according to the manufacturer’s instructions so that it does not interfere with your stitches.
To reproduce the design accurately, prepare a set of individual paper templates. The main pieces include the curled hat, rounded body, large pointed beard, central heart, oval nose, two hands, two shoes, four small hearts, five poinsettia petals, approximately five green leaves, and the candy cane with its decorative stripes. Since the reference image does not provide exact dimensions, the following measurements are practical estimates for creating a similar design. Trace the shapes with smooth curves and rounded edges, paying special attention to the distinctive spiral at the tip of the hat and the pointed lower section of the beard.
The following cutting guide will help you organize the project before sewing. Felt appliqué pieces are generally cut to their finished outline because felt does not fray, so traditional seam allowances are unnecessary unless you plan to construct a stuffed, turned ornament.
| Pattern piece | Suggested size | Quantity |
|---|---|---|
| Curled red hat | 24 × 21 cm | 1 |
| Red body base | 21 × 23 cm | 1 |
| White pointed beard | 21 × 18 cm | 1 |
| Large red heart | 14 × 13 cm | 1 |
| Beige oval nose | 7 × 4.5 cm | 1 |
| Beige hands | 4 × 3.5 cm | 2 |
| Black shoes | 8 × 3.5 cm | 2 |
| Small white hearts | 3–4 cm wide | 4 |
| Red poinsettia petals | 4–5 cm long | 5 |
| Green leaves | 5–7 cm long | 5 |
| Candy cane | 3 × 10 cm | 1 |
These are approximate bounding dimensions, not exact outlines or measurements taken from a calibrated pattern. Arrange the paper pieces together before cutting your felt, adjusting the proportions until the overall silhouette resembles the reference photograph.
How to Cut and Assemble the Christmas Gnome Hat, Body, and Beard
Begin the Felt Christmas Gnome with Poinsettia and Heart Pattern by preparing the red body base. Draw a simple rounded gnome silhouette approximately 21 cm wide and 23 cm tall, with a gently curved upper edge and a slightly wider lower section. The body will remain mostly hidden beneath the hat, beard, and heart, so its primary purpose is to support the decorative layers. Transfer the template onto red felt using a washable fabric marker, then cut carefully along the outline. If you want a firmer wall decoration, cut a second body piece and place a lightweight stabilizer between the layers before stitching them together.
Next, create the tall curled Christmas gnome hat, one of the most distinctive elements of the design. The hat should have a wide, gently curved bottom edge that extends across the upper body and a tall, tapered shape that curves toward the right before forming a decorative inward spiral. Draw the spiral generously so the narrow curved section will be easy to cut without tearing or distorting the felt. Cut one hat piece from bright red felt, then place it temporarily over the body base. Check that the lower edge sits above the future beard and that the curled tip maintains its recognizable shape.
Before attaching the hat, prepare the four small white hearts that decorate its surface. Cut the hearts from ivory felt, making two slightly smaller pieces for the upper area and two larger pieces for the middle and lower right side. Position them in a scattered arrangement similar to the reference image, leaving enough space for the poinsettia decoration on the left. Secure each heart using small running stitches around the edges. A running stitch is made by passing the needle up and down through the fabric at regular intervals, creating a neat dashed outline. Keep the stitches approximately 3–4 mm long for an attractive handmade appearance.
Now prepare the large white beard. Draw a broad shape with softly curved sides and a long pointed center, adding a few irregular, pointed sections near the lower edges to imitate flowing strands of hair. The beard should extend below the center of the body and partially overlap the red clothing. Cut the piece from white or ivory felt, then test its placement beneath the hat. Use small running stitches around the outer edge, keeping the stitches approximately 3 mm from the cut edge. If desired, use a few tiny straight stitches near the pointed sections to emphasize the layered texture without making the beard look overly busy.
The nose is a simple oval made from beige or peach felt. Cut a piece approximately 7 cm wide and 4.5 cm tall, then position it at the center where the hat meets the beard. In the reference design, the nose sits prominently over both elements, creating the characteristic appearance of a traditional Scandinavian-inspired Christmas gnome. To make the nose slightly raised, place a thin layer of polyester stuffing beneath the felt before finishing the stitches. Use matching beige thread and small running stitches around the oval. Keep the stuffing evenly distributed so the nose remains rounded rather than becoming lumpy.
Once the major facial elements are prepared, arrange the body, beard, hat, and nose in their final positions. The order of overlapping is important: the red body sits at the back, the beard rests over the body, the hat overlaps the upper beard, and the nose covers their meeting point. Add the two black shoes along the bottom, allowing them to extend slightly beyond the red body. Secure the pieces with pins or small temporary glue dots, then sew them in place with matching thread. This careful layering establishes the recognizable foundation of your DIY felt Christmas gnome decoration.
Creating the Felt Poinsettia, Large Heart, and Candy Cane Details
The decorative poinsettia gives the Felt Christmas Gnome with Poinsettia and Heart Pattern much of its festive character. Begin by cutting five elongated, pointed petals from red felt. Each petal should be approximately 4–5 cm long, with a narrow base and a wider pointed tip. Arrange the petals in a circular flower shape, allowing them to overlap slightly near the center. Use a darker red embroidery thread to add a central vein and several smaller branching veins to each petal. These simple hand embroidery stitches create the appearance of natural poinsettia bracts and add visual depth to the finished flower.
Next, prepare approximately five green felt leaves in different sizes. Cut each leaf with a pointed tip and slightly irregular edges to imitate natural foliage. The leaves should extend beyond the red poinsettia petals, especially toward the left side of the gnome’s hat. Use dark green embroidery floss to stitch a central vein through each leaf, then add short diagonal stitches branching outward. These details can be made with a basic straight stitch, which is formed by bringing the needle through the felt and returning it to the back at the desired endpoint. Arrange the green leaves behind the red petals before securing the flower to the hat.
To complete the poinsettia, add three small rounded red felt circles to the center. These circles imitate the flower’s central cluster and give the decoration a dimensional finish. You can create them by cutting tiny felt discs or by making small stuffed felt balls. Sew the green leaves first, followed by the red petals, and finish with the three central circles. Position the completed poinsettia on the left side of the hat, approximately halfway between the top and bottom. Allow a few leaves to extend slightly beyond the hat’s outer edge, just as they do in the reference image.
The large red heart is another essential feature of this Christmas gnome holding a heart pattern. Draw a symmetrical heart approximately 14 cm wide and 13 cm tall, with generously rounded upper lobes and a tapered lower point. Cut it from red felt and position it at the center of the white beard. The heart should cover a substantial portion of the gnome’s front while leaving the lower pointed section of the beard visible. Secure it with small running stitches using a darker red thread. If you prefer a softly padded heart, cut a second identical piece, stitch most of the edges together, add a thin layer of stuffing, and close the opening before attaching it to the gnome.
Prepare the two small beige hands to make the gnome appear to be holding the heart. Each hand resembles a rounded mitten without individually defined fingers. Cut two matching shapes approximately 4 cm wide and 3.5 cm tall, then position one on each side of the heart. The hands should overlap the outer edges of the heart, creating a natural holding gesture. Attach them with beige embroidery thread using evenly spaced running stitches. For additional dimension, place a tiny amount of stuffing underneath each hand, but avoid overfilling because the finished decoration should maintain its soft, flat appliqué appearance.
Finally, make the decorative candy cane positioned along the right side of the gnome. Cut a curved candy cane shape from red felt, approximately 10 cm tall, with a rounded hook at the top. Add several small white felt sections to imitate the classic striped candy cane design. In the reference image, the candy cane is partially hidden behind the beard and the large heart, so it should be attached before the heart and right-hand pieces are permanently secured. Use small stitches around the red shape and the white stripes, making sure the candy cane remains visible without overpowering the central heart. This finishing detail completes the charming holiday arrangement.
Final Assembly, Decorative Stitching, and Christmas Display Ideas
After preparing all the individual components, it is time to complete the Felt Christmas Gnome with Poinsettia and Heart Pattern. Lay the entire project on a clean, flat work surface and compare the arrangement with the reference image. Check that the curled hat remains the tallest element, the poinsettia is balanced on the left side, and the large heart is centered over the beard. The nose should sit directly beneath the hat, while the black shoes should be visible at the bottom. Make any necessary adjustments before completing the final stitching, because moving a felt piece becomes more difficult after it has been sewn securely in place.
For the most attractive handmade finish, use consistent blanket stitches or running stitches around the visible edges. The reference design primarily features simple running stitches, which produce a soft, decorative outline without covering too much of the felt. A blanket stitch is another useful option, especially for joining two layers of felt along an exposed edge. To create a blanket stitch, bring the needle through the fabric near the edge, pass the thread around the edge, and catch the loop before tightening. Continue at regular intervals to create a tidy border. Choose one main stitch style for the project so the finished decoration looks coordinated.
If you want the gnome to function as a wall hanging, prepare a matching felt backing piece. Place the completed appliqué over a second piece of red or neutral-colored felt and trace the outer silhouette. Cut the backing carefully, then position a small ribbon loop between the front and back layers near the upper section. Stitch around the outer edges, securing the ribbon loop firmly. For additional structure, you can place a thin layer of lightweight interfacing between the two layers. This is particularly helpful if the decoration will hang on a door or be displayed throughout the holiday season.
Another option is to transform the felt gnome Christmas craft into a decorative pillow appliqué, festive table decoration, or framed holiday artwork. For a pillow, attach the completed design to a fabric panel before assembling the pillow cover, and avoid placing raised embellishments where they may experience heavy pressure. For framed artwork, mount the gnome on a neutral fabric background, such as beige linen or cotton, allowing the bright Christmas colors to stand out. You can also make several smaller versions using the same pattern and arrange them as a coordinated collection of handmade Christmas decorations.
Proper care will help preserve the appearance of your handmade felt gnome. Felt decorations should generally be cleaned gently rather than washed in a machine, especially when they contain embroidery, glue, or stuffing. Remove dust with a soft brush or lint roller, and spot-clean small marks with a lightly damp cloth when appropriate for the materials used. Allow the decoration to dry completely before storing it. During the off-season, place the gnome flat in a clean storage box, away from direct sunlight and moisture. Avoid placing heavy objects on top of the poinsettia or raised details, as this could flatten their shape.
The completed Felt Christmas Gnome with Poinsettia and Heart Pattern makes a lovely addition to traditional Christmas decorating. Its combination of soft felt, visible hand stitching, romantic heart shapes, and a festive poinsettia creates a warm, nostalgic appearance that works beautifully with farmhouse, rustic, and classic holiday styles. It can be displayed on a wall, attached to a decorative wreath, or given as a handmade gift to someone who appreciates sewing and seasonal crafts. The project also provides opportunities for personalization, such as changing the hat color, adding embroidered initials, or using patterned felt for selected elements. Keep any version with small attached pieces away from young children and pets, since these components are decorative rather than intended as toys.
Frequently Asked Questions About the Felt Christmas Gnome with Poinsettia and Heart Pattern
1. Is the Felt Christmas Gnome with Poinsettia and Heart Pattern suitable for beginners?
Yes. This project is suitable for beginners who are comfortable using scissors, tracing templates, and making basic hand stitches. Most of the construction involves cutting simple felt shapes and layering them together. The curled hat and poinsettia require a little extra attention, but neither involves complicated sewing techniques. Beginners can practice the running stitch on a scrap piece of felt before working on the main decoration.
2. What type of felt is best for making a Christmas gnome?
Wool-blend felt is an excellent choice because it is durable, soft, and easy to stitch. High-quality polyester craft felt is also suitable and is often more affordable. Felt with a thickness of approximately 1–2 mm works well for most of the appliqué pieces. For the main body and backing, a slightly firmer felt can help maintain the decoration’s shape.
3. Can I make this Christmas gnome without a sewing machine?
Absolutely. The entire Felt Christmas Gnome with Poinsettia and Heart Pattern can be completed by hand. In fact, visible hand stitching is an important part of its charming appearance. A basic running stitch is sufficient for most of the project, while straight stitches can be used for the leaf veins and poinsettia details.
4. How long does it take to complete this felt Christmas decoration?
The total time depends on your experience and the amount of detail you include. A beginner may need approximately 5–8 hours to trace, cut, assemble, and stitch the decoration. An experienced crafter may finish it in approximately 3–5 hours. Preparing the templates and cutting the smaller pieces in advance can make the process more efficient.
5. Can I use fabric glue instead of sewing the felt pieces?
Fabric glue can be used for selected areas, especially when attaching tiny decorative elements. However, hand stitching generally provides a more secure and attractive finish. If you use glue, choose a product suitable for felt and follow the manufacturer’s drying instructions. Combining small amounts of glue with hand stitching can make assembly easier without sacrificing durability.
6. How can I resize the felt Christmas gnome pattern?
You can enlarge or reduce the paper templates using a printer’s scaling settings or by redrawing the shapes proportionally. If you want a larger decoration, increase all pieces by the same percentage to maintain the original design. For a smaller ornament, reduce the templates and simplify some of the tiny details so they remain easy to cut and stitch.
7. What is the easiest way to make the poinsettia look realistic?
The secret is layering. Place the green leaves behind the red petals, vary their angles slightly, and add embroidered veins using contrasting thread. The three small red circles in the center provide an attractive finishing touch. Avoid arranging every petal at exactly the same angle, because a slightly irregular arrangement creates a more natural appearance.
8. Can this felt Christmas gnome be used as a gift?
Yes. A handmade Christmas gnome makes a thoughtful seasonal gift for friends, relatives, teachers, and anyone who enjoys traditional holiday decorations. You can personalize the project with different colors, embroidered initials, or a small hanging ribbon. If gifting it to a household with small children, explain that it is a decoration rather than a toy.
9. Should I add stuffing to the entire gnome?
Stuffing is optional. The design shown in the reference image is primarily a flat felt appliqué with softly raised details. Adding a small amount of stuffing behind the nose, hands, or central heart can enhance its dimensional appearance. If you want a flat wall panel, you can omit the stuffing entirely.
10. How can I keep the felt edges neat and professional?
Use sharp scissors, trace the templates carefully, and cut with slow, controlled movements. Avoid stretching the felt while sewing, and keep your stitches evenly spaced. For intricate areas such as the curled hat, small embroidery scissors can provide greater precision. Consistent stitching and cleanly cut shapes will make the finished handmade Christmas gnome look polished and attractive.
Conclusion: Create a Beautiful Handmade Felt Christmas Gnome
The Felt Christmas Gnome with Poinsettia and Heart Pattern is a wonderful project for anyone who loves handmade holiday decorations, felt appliqué, and traditional Christmas crafts. Throughout this tutorial, you learned how to choose suitable materials, prepare the paper templates, cut the felt pieces, construct the gnome’s body and curled hat, create the flowing white beard, and attach the rounded nose and black shoes. You also discovered how to make a layered poinsettia flower, decorate the hat with white hearts, create the large red heart, and finish the charming candy cane detail.
By following these steps carefully, you can create a festive decoration that reflects the warmth and personality of handmade Christmas crafting. The combination of red felt, white appliqué hearts, green poinsettia leaves, and decorative hand stitching produces a timeless design that can be enjoyed for many holiday seasons.
This project is also an opportunity to experiment with your creativity. Try different felt textures, adjust the size of the gnome, or personalize the design with your favorite Christmas colors. Whether you display it in your home or give it to someone special, the finished decoration will carry the charm of something made with care.
EASILY FIND THE FREE PDF FOR THIS PATTERN HERE!
Now I would love to hear your sincere opinion! ❤️🎄 What do you think of this Felt Christmas Gnome with Poinsettia and Heart Pattern? Would you keep the classic red and white colors, or would you try a different combination? Share your honest thoughts, creative suggestions, and ideas for future felt Christmas projects in the comments. Your feedback can inspire even more beautiful handmade decorations for the holiday season!