
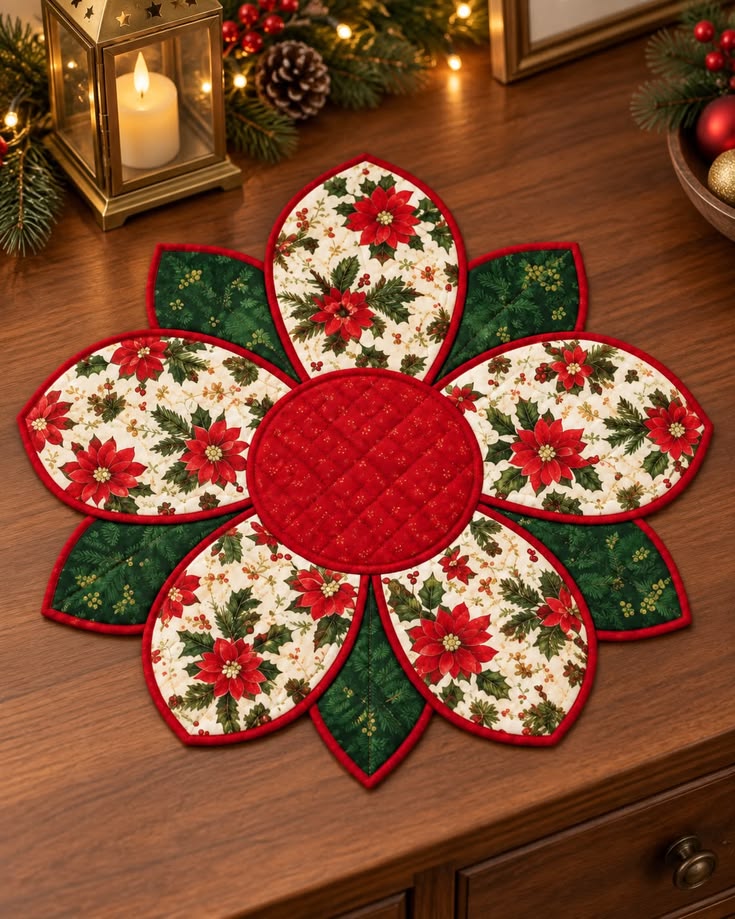
The Quilted Placemat with Poinsettia Motif Pattern is a beautiful Christmas sewing project that combines traditional quilting techniques, festive floral fabrics, and a charming layered design. Inspired by the timeless beauty of poinsettias, this handmade placemat brings warmth, elegance, and personality to holiday decorating. Its distinctive flower-shaped construction features five large petals made from Christmas poinsettia fabric, five smaller green fabric accents, and a circular red quilted center. Together, these elements create a stunning decorative piece that looks lovely on a dining table, coffee table, or wooden sideboard during the Christmas season.
One of the most appealing features of this Christmas quilted placemat pattern is its combination of practical sewing methods and creative fabric arrangements. The rich red binding beautifully outlines each petal, while the contrasting green fabric creates depth and visual interest. The central red circle includes decorative quilting stitches that add texture and reinforce the handmade appearance. Although the finished project looks intricate, it can be completed with basic quilting skills, careful cutting, and a little patience. Beginners who are comfortable using a sewing machine can follow the instructions, while experienced quilters may enjoy experimenting with different fabric combinations and quilting designs.
Creating your own Quilted Placemat with Poinsettia Motif Pattern is also a wonderful way to celebrate the tradition of handmade Christmas decorations. Instead of purchasing ordinary seasonal table accessories, you can choose your favorite holiday fabrics and make something that reflects your personal style. This project is particularly suitable for using coordinating cotton prints, leftover quilting materials, and decorative thread. Throughout this tutorial, you will learn how to select suitable materials, prepare the petal templates, assemble the layered flower design, add quilting stitches, and finish the edges neatly. With the right preparation, you can transform simple pieces of fabric into an eye-catching handmade Christmas placemat that can be enjoyed for many holiday seasons.
1. Materials and Fabric Preparation for the Quilted Placemat with Poinsettia Motif Pattern
Before beginning your Quilted Placemat with Poinsettia Motif Pattern, gather the necessary sewing supplies and prepare a comfortable workspace. The project shown in the reference image features five large cream-colored petals decorated with red poinsettias and green foliage, five smaller dark green pointed petals, and a red circular center. The following measurements are suggested for recreating a similar design with an approximate finished diameter of 45 cm (17.7 inches). Because the reference is a photograph rather than a measured sewing pattern, these dimensions are a practical reconstruction and can be adjusted to suit your preferred size.
DISCOVER MORE FREE PATTERNS HERE!
For the main petals, select approximately 50 cm × 110 cm of Christmas-themed quilting cotton featuring poinsettias, holly leaves, or other traditional holiday flowers. Choose a print with a cream or ivory background to create a bright contrast against the red binding. For the smaller petals, prepare approximately 30 cm × 110 cm of dark green cotton fabric, preferably with subtle botanical or golden details. You will also need a piece of red cotton fabric measuring approximately 30 cm × 30 cm for the central circle. Additional fabric in matching colors will be required for the backing, depending on whether you prefer a coordinated or contrasting reverse side.
The quilting batting provides the soft, padded appearance visible throughout the design. Lightweight cotton batting is an excellent choice because it produces a relatively flat finish while allowing the decorative quilting stitches to remain visible. Prepare enough batting and backing fabric for five large petals, five smaller petals, and the central circle. For this project, a thin batting is preferable to a thick, lofty variety because the placemat contains several overlapping fabric sections. Excessive thickness could make the center difficult to sew and cause the finished piece to sit unevenly on a table.
You will also need approximately 3.5 to 4 meters of red double-fold bias binding, about 1 cm wide when finished, to outline the petals and central circle. Bias binding is especially useful because it stretches gently around curved edges without creating excessive wrinkles. Other essential supplies include a sewing machine, a quilting needle, coordinating red thread, fabric scissors, a rotary cutter, a cutting mat, a quilting ruler, sewing clips, straight pins, a removable fabric marker, and an iron. A walking foot can help feed the fabric layers evenly, particularly when quilting the circular center.
Accurate cutting is important when making a flower-shaped quilted placemat. Begin by drawing two petal templates on sturdy paper or lightweight cardboard. For the five large petals, create an elongated oval with a softly pointed outer tip, approximately 22 cm long and 15 cm wide. For the five smaller green petals, draw a narrower pointed shape measuring approximately 19 cm long and 11 cm wide. These dimensions include a suggested 0.7 cm seam allowance for the layered petal construction. The red center should be cut as a circle approximately 17.5 cm in diameter, producing a finished visible circle close to 16 cm after binding. Test the paper shapes in a five-petal arrangement before cutting fabric, adjusting their width or overlap if necessary.
Before cutting your materials, press all fabrics carefully to remove wrinkles and improve cutting accuracy. If your cotton fabrics are not preshrunk, consider washing and drying them according to the manufacturer’s instructions to reduce the possibility of uneven shrinkage later. Place the large petal template over the poinsettia fabric, positioning the floral motifs attractively within each shape. Trace and cut five front pieces and five matching backing pieces. Repeat the process for the five green petals and cut corresponding batting pieces slightly smaller than the fabric shapes if you plan to turn their edges before binding. For the construction described here, however, all layers can be cut to the same template size and finished with binding.
2. Cutting, Layering, and Quilting the Christmas Flower Petals
The next stage of the Quilted Placemat with Poinsettia Motif Pattern involves constructing the individual petals that form the decorative flower. Start with the five large poinsettia-print pieces. For each petal, create a fabric sandwich by placing the backing fabric wrong side up, adding a layer of batting, and positioning the printed fabric right side up. Smooth the layers carefully so the batting lies flat and the edges align. Secure the sandwich with quilting pins or temporary basting stitches. Repeat this process until all five large petals have been prepared. Working on each petal individually makes the quilting easier to control and helps maintain a symmetrical final arrangement.
To quilt the large petals, use a walking foot and a medium stitch length of approximately 2.5 to 3 mm. The reference design emphasizes the poinsettia print rather than dense quilting, so gentle decorative stitching is appropriate. You may sew a line approximately 1 cm inside the petal edge or follow selected floral outlines with free-motion quilting. Another option is to add subtle curved lines that echo the shape of each petal. Whichever method you choose, maintain similar quilting density across all five pieces. Consistent quilting will help the petals retain their shape and give the finished placemat a professional appearance.
After quilting the main petals, prepare the five smaller green pieces using the same sandwich method. The green petals create a secondary layer between the larger poinsettia petals, making the overall design resemble a blooming Christmas flower. For an appearance similar to the photograph, use a dark evergreen fabric with delicate golden or botanical details. Quilt each smaller petal with one or two straight lines extending from its base toward the pointed tip. These simple lines resemble the natural veins of a leaf and add structure without overwhelming the printed fabric. Make sure the stitching is secure at both ends.
Once all ten petals have been quilted, trim any uneven batting or backing material. Check that the five large petals match one another and that the smaller green petals have consistent dimensions. Minor differences can be corrected by placing the paper template over each quilted piece and carefully trimming the excess fabric. Avoid cutting too close to the quilting stitches. If the fabric layers have shifted during sewing, gently press the pieces with a warm iron, using a pressing cloth when necessary. Proper trimming and pressing are essential for producing a neat Christmas floral quilt pattern.
The next step is to apply the red bias binding around each petal. Begin by opening one folded edge of the binding and aligning it with the raw edge on the front of the quilted petal, right sides together. Stitch along the fold using an appropriate seam allowance, generally about 0.7 cm. Slowly guide the binding around the curved edges, easing the fabric gently without stretching the petal itself. At the pointed tip, stop with the needle down, lift the presser foot, and carefully reposition the binding to create a smooth corner. Fold the binding over the raw edge to the back and secure it with clips before stitching it in place.
For the cleanest finish, use a narrow machine stitch or a small hand slipstitch to secure the folded binding on the reverse side. Repeat this process for all five large petals and all five green petals. The red fabric binding serves two important purposes: it protects the exposed fabric edges and visually unifies the different Christmas prints. In the reference design, the red outline creates a striking contrast against both the cream poinsettia fabric and the deep green accents. Once every petal is finished, arrange them temporarily on a flat surface to check their appearance before proceeding to the central assembly.
3. Creating the Red Quilted Center and Assembling the Poinsettia Placemat
The red circular center is one of the defining features of the Quilted Placemat with Poinsettia Motif Pattern. Its rich color connects the red poinsettias in the surrounding fabric and provides a strong focal point for the entire design. To make the center, cut one red fabric circle for the front, one matching circle for the backing, and one circle of lightweight batting, each approximately 17.5 cm in diameter. Arrange these materials into a quilting sandwich, with the batting between the two fabric layers. Secure the pieces with pins or temporary basting stitches, making sure the circle remains smooth and evenly shaped.
For a decorative finish similar to the photograph, quilt the red center using a diagonal crosshatch pattern. Start by marking parallel diagonal lines approximately 2.5 cm apart across the front fabric. Use a removable fabric marker and quilting ruler to keep the lines straight. Stitch along each marked line, beginning near the center and working outward when practical. Next, mark another series of diagonal lines crossing the first set at approximately 90 degrees. Stitch these lines to create a diamond-shaped quilting pattern. This traditional technique adds attractive texture while securing the fabric and batting together.
After completing the quilting, trim the circle carefully to maintain a smooth, symmetrical shape. Apply the same red bias binding used for the petals, easing it around the circumference and avoiding unnecessary stretching. Because circular binding can be slightly challenging for beginners, work slowly and use sewing clips to hold the fabric in position. Join the binding ends neatly with a diagonal seam to reduce bulk. Fold the binding to the back and secure it with small stitches. The completed center should appear softly padded, with visible diamond quilting and a clean red outline that complements the surrounding petals.
Now begin arranging the flower-shaped placemat. Place the five large poinsettia petals on a flat surface, with their rounded bases pointing toward the center and their decorative tips extending outward. Space them evenly around an imaginary circle, approximately 72 degrees apart. Next, position the five smaller green petals between the large floral petals, allowing their pointed ends to extend beyond the spaces between the larger pieces. The goal is to recreate the layered floral effect visible in the reference image. Adjust the overlap until the arrangement looks balanced and the overall shape resembles a large Christmas poinsettia.
Once you are satisfied with the arrangement, temporarily secure the overlapping petals using sewing clips or small basting stitches. Keep the central overlap compact enough to fit beneath the red circle. For better stability, join the petals with short lines of stitching within the area that will eventually be concealed by the center. Sew slowly through the overlapping layers, using a suitable quilting needle and a walking foot if needed. Avoid forcing thick sections through the machine. If the center becomes too bulky, carefully grade the concealed seam allowances or reduce unnecessary batting in the overlapping areas before final assembly.
Finally, position the completed red quilted circle over the center of the petal arrangement. The circle should cover the raw joining area and create a smooth transition between the floral and green sections. Pin or clip it securely, checking that all five large petals and five smaller petals remain evenly spaced. Attach the circle with a narrow topstitch close to its bound edge, or use small hand stitches for a less visible finish. Ensure the stitching catches the underlying petals securely without creating puckers. Once attached, the flower-shaped handmade quilted placemat will have the same essential construction as the reference design: five poinsettia petals, five green accents, and a textured red circular center.
4. Finishing Techniques, Decorating Ideas, and Care Instructions
After assembling the Quilted Placemat with Poinsettia Motif Pattern, take a few minutes to inspect the entire project. Check the binding around each petal, the stitching that connects the layers, and the attachment of the central circle. Trim any loose threads and reinforce areas where the stitches appear weak. Pay special attention to the pointed ends of the green petals and the curved tips of the poinsettia petals, as these areas experience the most handling. A well-finished placemat should feel secure, lie reasonably flat, and maintain its decorative flower shape when lifted from the table.
Pressing is another important finishing step, but it should be done carefully to preserve the soft quilting texture. Place the finished placemat on a clean ironing surface and cover it with a lightweight pressing cloth. Use a warm iron appropriate for cotton fabric and gently press the bound edges without flattening the padded center excessively. Avoid dragging the iron across the surface, which could distort the petals or stretch the curved binding. If needed, lightly steam the placemat and allow it to cool completely on a flat surface. This helps the flower maintain its shape and improves the overall presentation.
One advantage of this DIY Christmas placemat pattern is its versatility. Although the reference design uses traditional red, green, and cream fabrics, you can create entirely different appearances by changing the colors and prints. For a rustic farmhouse Christmas style, choose burgundy poinsettias, muted sage leaves, and natural linen-look cotton. For a more elegant holiday setting, combine ivory fabric, forest green accents, and subtle metallic gold prints. A playful version could feature bright red flowers, cheerful green backgrounds, and whimsical holiday motifs. The construction remains the same, making this pattern easy to personalize.
The finished piece can be used as a Christmas table centerpiece, a decorative placemat, or a festive accent beneath a lightweight holiday arrangement. It looks especially attractive on wooden furniture because the rich fabric colors contrast beautifully with natural wood tones. You might place a small decorative lantern, an unlit candle holder, or a bowl of ornaments near the center to create a cozy seasonal display. If using it beneath dishes, remember that quilted cotton is decorative rather than heatproof. Avoid placing very hot cookware, open flames, or burning candles directly on the fabric, since batting and cotton materials can be damaged by high temperatures.
Proper care will help preserve your quilted poinsettia table decoration for future Christmas celebrations. If the placemat becomes dusty, gently shake it outdoors or use a soft fabric brush. For small stains, spot-clean the affected area with cool water and a mild detergent, testing the fabric first to ensure the colors do not bleed. If all materials are washable and properly preshrunk, gentle handwashing may be suitable. Avoid aggressive scrubbing, twisting, or high-temperature drying, which can distort the flower shape. After washing, reshape the petals carefully and allow the placemat to dry flat on a clean towel.
This project also makes a thoughtful handmade Christmas gift for friends, relatives, neighbors, or anyone who appreciates quilting. You can create matching pieces using the same fabric collection or sew several variations to coordinate with different holiday decorations. For a coordinated table setting, consider making smaller matching flower mats or using leftover fabric to create simple napkin rings. The Quilted Placemat with Poinsettia Motif Pattern offers an enjoyable opportunity to practice fabric layering, decorative quilting, bias binding, and careful assembly while creating a memorable seasonal accessory. With each finished project, your confidence and sewing skills can continue to grow.
Frequently Asked Questions About the Quilted Placemat with Poinsettia Motif Pattern
1. Is the Quilted Placemat with Poinsettia Motif Pattern suitable for beginners?
Yes. This project is suitable for confident beginners who already understand basic sewing machine operation, straight stitching, and simple fabric cutting. The individual petals are relatively easy to prepare, although attaching bias binding around curved edges requires patience. Beginners may find it helpful to practice binding on scrap fabric before working on the actual placemat. The project also provides an excellent introduction to decorative quilting and layered fabric assembly.
2. What is the recommended finished size for this Christmas placemat?
The suggested finished diameter is approximately 45 cm (17.7 inches), although the exact measurement depends on the petal templates, binding width, and amount of overlap. If you prefer a larger decorative centerpiece, increase the dimensions of the petals and central circle proportionally. For smaller individual placemats, reduce the template sizes while maintaining the same five-petal arrangement.
3. What type of fabric works best for a quilted poinsettia placemat?
100% cotton quilting fabric is generally the best choice because it is easy to cut, press, stitch, and quilt. Medium-weight quilting cotton also provides enough stability for the decorative petal shapes without becoming overly stiff. Choose coordinating prints with similar fabric weights to ensure the layers behave consistently during sewing. Avoid very stretchy or slippery materials unless you have experience working with them.
4. Can I make this placemat without a sewing machine?
Yes, the entire project can be completed by hand, although it will require more time. Use small, even running stitches for quilting, secure the layered petals with strong hand stitches, and attach the bias binding with a neat slipstitch. Hand quilting can add a traditional appearance that many sewing enthusiasts appreciate. A thimble and sharp hand-sewing needles can make the process more comfortable.
5. How many petals are needed to recreate the design shown in the photograph?
The design uses ten petals in total: five large petals made from poinsettia-print fabric and five smaller green pointed petals. The green petals are positioned between the larger floral petals, creating a layered appearance. A red quilted circle covers the joining area in the center. Keeping the petals evenly spaced is essential for achieving the balanced flower shape.
6. What is the best batting for a decorative Christmas placemat?
A thin cotton batting or lightweight cotton-blend batting is recommended. These materials create gentle padding without making the placemat excessively thick. Thin batting is particularly important because several petals overlap beneath the central circle. If you prefer a flatter result, choose a low-loft batting designed for table linens and small quilting projects.
7. How can I prevent the placemat from becoming uneven or puckered?
Accurate cutting, consistent seam allowances, and careful fabric layering are the most effective ways to prevent puckering. Secure the fabric sandwiches before quilting and avoid pulling the material while sewing. A walking foot can help move the layers evenly through the machine. Press the petals individually before assembly and distribute the overlapping sections symmetrically around the center.
8. Can I use fabric scraps to make this quilted Christmas pattern?
Absolutely. This Christmas fabric scrap project is a wonderful way to use leftover quilting cotton, particularly if you have coordinating red, green, and cream fabrics. Make sure the scraps are large enough for the petal templates or piece smaller scraps together before cutting. Patchwork petals can add extra character to the design while reducing fabric waste.
9. Can the Quilted Placemat with Poinsettia Motif Pattern be used as a hot pad?
No. Unless the project is specifically redesigned with appropriate heat-resistant materials and tested construction, it should not be used as a hot pad or trivet. Ordinary cotton batting and decorative quilting fabrics are not intended to protect furniture from extremely hot cookware. Use the finished piece for decorative table settings, room-temperature serving dishes, or other lightweight seasonal displays.
10. How long does it take to complete this Christmas quilting project?
Most beginners should allow approximately five to eight hours, depending on their experience with cutting curved shapes, quilting individual pieces, and attaching bias binding. More experienced quilters may complete the project in less time. Preparing the templates and cutting all the materials in advance can make the sewing process more efficient and enjoyable.
11. Can I wash the finished poinsettia placemat?
Yes, provided that the fabrics, batting, thread, and binding are washable. Gentle handwashing in cool water is a good option for preserving the decorative shape. Avoid harsh detergents and excessive agitation. Lay the placemat flat to dry, reshape the petals while damp, and press gently if necessary. Always follow the care recommendations for the specific materials used.
12. What other projects can I create using this poinsettia quilting technique?
The same layered-petal construction can be adapted to make decorative wall hangings, Christmas table toppers, small fabric ornaments, and seasonal quilted decorations. You can also experiment with different flower shapes and fabric combinations for spring, autumn, or everyday home décor. The technique is especially useful for learning how to combine individual quilted shapes into one cohesive design.
Conclusion: Create a Beautiful Handmade Christmas Placemat
The Quilted Placemat with Poinsettia Motif Pattern is a rewarding holiday sewing project that combines the beauty of Christmas fabrics with practical quilting techniques. By following the instructions in this tutorial, you can create a charming flower-shaped placemat featuring five poinsettia-print petals, five green accent petals, a quilted red center, and carefully finished red binding.
Throughout this guide, you have learned how to select coordinating cotton fabrics, prepare accurate petal templates, construct quilted fabric sandwiches, apply decorative stitching, attach bias binding, and assemble the complete floral design. You have also explored useful finishing techniques, cleaning recommendations, and creative ways to personalize your project.
Whether you are making a festive decoration for your own home or preparing a thoughtful handmade gift, this DIY quilted Christmas placemat offers a wonderful opportunity to enjoy sewing while creating something beautiful and meaningful.
EASILY FIND THE FREE PDF FOR THIS PATTERN HERE!
Now we would love to hear from you! ❤️🎄 What do you think of this poinsettia placemat design? Would you keep the traditional red and green colors, or would you try a different Christmas fabric combination? Please share your honest opinion, creative ideas, and suggestions in the comments. Your feedback can inspire other quilting enthusiasts and help make future sewing tutorials even more enjoyable.