
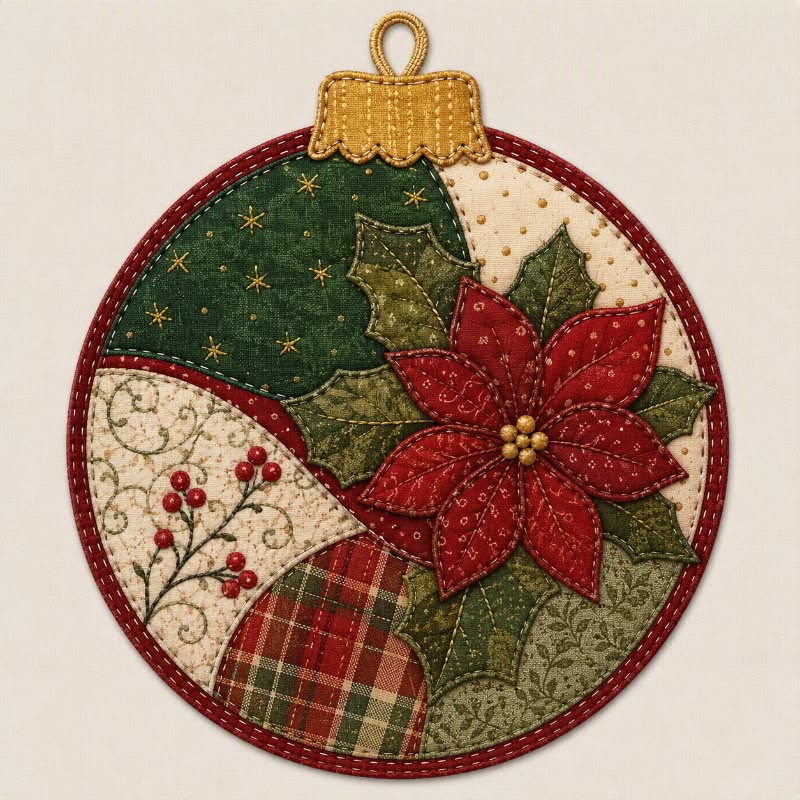
The Patchwork Christmas Ornament Appliqué Pattern combines festive fabric scraps, decorative stitching, and a layered poinsettia into a charming holiday decoration.
Inspired by the photograph, this project features a round ornament silhouette with rich red edging and a golden fabric cap.
Its background brings together dark green, cream, plaid, and botanical fabrics for a warm, traditional Christmas look.
Overlapping green leaves and red flower petals create the focal point, while embroidered details add texture and personality.
You can display the finished piece on a wall, hang it from a cabinet knob, or include it in a seasonal arrangement.
This tutorial explains a practical construction method using measurements in centimeters and familiar U.S. sewing terms.
One of the pleasures of Christmas patchwork is turning small pieces of fabric into something that feels thoughtfully designed.
The photograph uses contrasting prints, but the colors work together because red, green, cream, and gold appear throughout the composition.
Patchwork means assembling separate fabric pieces into a larger design, while appliqué means attaching decorative shapes onto a fabric foundation.
In this project, an appliqué-based patchwork background makes the curved arrangement easier to manage without complicated curved piecing.
The flower, leaves, ornament cap, and embroidered berries then build on that foundation to create the finished design.
Careful placement matters more than expensive materials, so this is an excellent opportunity to use coordinated scraps already in your sewing basket.
Before beginning your Patchwork Christmas Ornament Appliqué Pattern, remember that the photograph does not provide a scaled template or verified measurements.
The dimensions below describe a suggested recreation with a finished circular body approximately 30 cm in diameter, plus its cap and hanging loop.
You will draw simple paper templates, prepare the fabric layers, attach the decorative elements, and finish the circular edge.
The instructions favor securely stitched appliqué and a lightly padded base rather than a heavily stuffed ornament.
Beginners can simplify the embroidery, while more experienced makers can add dimensional stitching and extra decorative details.
Take your time with the templates and pressing, since these early steps help the finished decoration lie flat and look balanced.
1. Gather Materials and Draw the Ornament Templates
Start with quilting cotton in deep red, forest green, cream, gold, and a red-and-green plaid. Gather approximately 35 × 35 cm each of foundation fabric, backing fabric, and low-loft batting. For the decorative background, select five coordinated scraps measuring roughly 20 × 20 cm, adjusting their sizes to fit your templates. You will also need red cotton for binding, gold fabric for the cap, and scraps for the poinsettia and leaves.
DISCOVER MORE FREE PATTERNS HERE!
Prepare paper-backed fusible web, matching sewing thread, embroidery floss, fabric scissors, paper scissors, pins or clips, an embroidery needle, and an iron. A sewing machine is helpful for attaching the appliqué, although hand stitching also works. Use fusible web intended for sewing, and follow its pressing instructions. Choose lightweight material to avoid making the layered flower unnecessarily stiff.
Draw a 30 cm diameter circle on paper and mark its center. This circle represents the finished ornament body; it does not include the cap or loop. Sketch five irregular sections inside it, taking inspiration from the photograph: dark green at the upper left, cream at the upper right, cream botanical fabric at the lower left, plaid near the bottom, and green botanical fabric at the lower right.
Keep the background divisions gently curved and relatively broad. Label each section with its intended fabric color and mark which edges will sit underneath neighboring pieces. Trace each section onto separate paper. Add approximately 0.5 cm of overlap along edges that will be covered by another section, while extending the outer edges slightly beyond the circle so they can be trimmed later.
Draw one pointed flower petal approximately 10 cm long and 4.5 cm wide at its broadest point. Use this template to prepare six red petals. Draw three sizes of pointed holly-style leaves, approximately 8 cm, 10 cm, and 12 cm long. Plan for six leaves, varying their sizes and orientations. Their side edges should have broad, gentle points that are easy to cut and stitch.
For the ornament cap, draw a gold shape approximately 8 cm wide and 4 cm tall, with rounded upper corners and a gently scalloped lower edge. Add a 0.7 cm seam allowance around this template for a turned fabric cap. These measurements are suggested proportions for this recreation. Arrange the paper flower, leaves, and cap on the circle before cutting fabric, adjusting them until the composition feels balanced.
2. Build the Patchwork Background and Padded Base
Press the cotton fabrics before cutting. If you prewash them, do so before applying fusible web, then dry and press them thoroughly. Cut the foundation, backing, and batting into 35 × 35 cm squares. Lightly mark the 30 cm circle on the foundation using a removable fabric marker, testing the marker on a scrap first.
Trace the background sections onto the paper side of the fusible web. Because tracing onto fusible paper generally reverses the final shape, turn your paper templates over when necessary to preserve the planned arrangement. Roughly cut around each traced section, fuse it to the wrong side of the selected fabric, and then cut the fabric accurately along the traced outline.
Remove the paper backing and arrange the fabric sections on the foundation. Begin with pieces whose edges will be covered by neighboring sections. Allow the planned overlaps to hide the foundation along every interior join. Keep all background fabrics extending beyond the marked outer circle. This method creates a patchwork-style appliqué background without requiring you to sew curved seams together.
Check the arrangement before pressing. The dark green upper section should provide contrast behind the flower, while the cream and plaid sections create visual variety around it. When satisfied, fuse the pieces in place according to the product instructions. Lift and reposition the iron instead of sliding it, which can shift the pieces before the adhesive has set.
Stitch the exposed interior edges using a narrow zigzag stitch, blanket stitch, or carefully worked hand appliqué stitch. Test the stitch width and tension on layered scraps first. For hand sewing, work through the appliqué and foundation, keeping stitches evenly spaced. Raw-edge appliqué needs stitching for a durable finish; the adhesive alone should not be treated as permanent construction.
Create the quilt sandwich by placing the backing wrong side up, batting in the middle, and decorated foundation right side up. Baste with pins or thread. Quilt along the background divisions and add a few unobtrusive lines within larger areas to hold the layers together. Leave the outer square untrimmed until the flower and embroidery are complete, giving yourself extra fabric to handle comfortably.
3. Add the Poinsettia, Holly Leaves, and Decorative Stitching
Prepare six red petals and six green leaves using the same fusible appliqué process. Choose two or three related red prints for the petals and several green prints for the leaves. Small-scale designs work well because they remain recognizable on these narrow shapes. Cut slowly around the leaf points, avoiding tiny notches that would be difficult to secure neatly.
Arrange the leaves first, placing the flower center slightly to the right of the ornament’s center, as shown in the photograph. Let the leaves radiate upward, sideways, and downward behind the future petals. Keep their tips approximately 1.5 cm inside the finished circular edge. Fuse and stitch each exposed leaf edge before adding the flower so the overlapping layers remain easy to access.
Arrange the six red petals over the inner ends of the leaves. Point their narrow ends toward one shared center and distribute the broad outer points around it. A little asymmetry gives the flower a natural appearance. Fuse the petals only after checking that the surrounding cream, plaid, and green fabrics remain visible. Stitch their exposed edges with matching red thread or a decorative gold-toned thread.
Add leaf veins and petal details with embroidery floss or machine stitching. Use a central line running from each leaf’s base toward its tip, then add short diagonal branches. For the petals, embroider one gentle center line and a few smaller branches. A backstitch, which joins short stitches into a continuous line, works well for these details. Avoid pulling the thread tightly enough to pucker the fabric.
Create the poinsettia center with a cluster of gold French knots or small padded fabric circles. For a French knot, bring the needle up, wrap the thread around it once or twice, and insert it close to the starting point while holding the wraps gently. Arrange five to seven knots together. Fabric circles provide a larger, more dimensional alternative if you prefer the rounded center visible in the photograph.
Finish the background embellishments with small gold stars on the upper green section and embroidered berry sprigs on the lower cream section. Make each star from three or four intersecting straight stitches. For the sprigs, stitch green stems and add red satin-stitch berries, filling small circles with closely spaced stitches. Mark these details lightly first, leaving enough empty space for the main poinsettia to stand out.
4. Finish the Circular Edge, Gold Cap, and Hanging Loop
Once all appliqué and embroidery are complete, check the surface for loose threads and missed edges. Press gently from the back, protecting raised embroidery with a folded towel. Redraw the 30 cm circle if its marking has faded, then cut through the foundation, batting, and backing together. Sew a line of basting approximately 0.3 cm inside the edge to keep the layers aligned.
Cut enough red bias binding to measure approximately 110 cm long and 4 cm wide. Bias binding is cut diagonally across the fabric grain, allowing it to bend around the curved edge. Join shorter strips with diagonal seams if necessary. Press the binding in half lengthwise with wrong sides together, then place its raw edges against the raw edge of the ornament front.
Attach the binding with a seam approximately 0.7 cm from the edge, guiding it around the circle without stretching it. Leave several centimeters free at the beginning and end, then join the ends so the binding fits smoothly. Fold the binding over to the back and hand stitch the folded edge in place. Ease any slight fullness evenly around the curve instead of gathering it into one spot.
Make the gold cap from two fabric pieces cut with the planned seam allowance. Place them right sides together and sew around the outline, leaving an opening in the upper edge. Clip carefully into the shallow scallop valleys without cutting the stitches. Turn right side out, press gently, and close the opening. Add vertical gold embroidery lines before attaching the cap over the top edge of the ornament.
For the hanging loop, cut a gold fabric strip approximately 3 × 16 cm. Fold its long edges toward the center, fold again, and stitch along the open side to form a narrow strap. Bend it into a loop with overlapping ends. Secure those ends to the upper back of the ornament with several rows of stitching, then attach the cap so it covers the attachment area from the front.
Complete your Patchwork Christmas Ornament Appliqué Pattern by adding an optional running stitch around the red border. This simple stitch alternates small visible stitches with equally sized gaps. Check that the cap and loop are firmly attached, then hang the decoration briefly to assess its balance. If it tilts, adjust the loop attachment. Store the finished piece flat or gently supported to protect its flower and embroidered details.
FAQ
Is this Patchwork Christmas Ornament Appliqué Pattern suitable for beginners?
Yes, particularly if you use the fusible appliqué construction described here. You do not need to piece curved background seams. Beginners can use plain fabrics, omit the embroidered berries, and choose a simple zigzag edge finish. Practice on a small scrap before stitching the actual decoration.
What is the difference between patchwork, appliqué, and quilting?
Patchwork combines separate fabric pieces into a larger surface. Appliqué attaches shapes onto a foundation fabric. Quilting stitches through the fabric and batting layers to hold them together. This recreation uses appliqué to create the background arrangement and flower, followed by quilting to stabilize the padded base.
Are these measurements taken directly from the photograph?
No. The photograph does not establish a reliable scale. The 30 cm ornament body and accompanying template dimensions are suggested measurements for making a similar decoration. Test the paper arrangement before cutting, and adjust individual shapes if you want a closer visual match.
Do the appliqué shapes need seam allowances?
The raw-edge background pieces, petals, and leaves do not need turned-under seam allowances. Background sections need the specified overlap where neighboring pieces cover them. The turned gold cap does require a seam allowance, while the binding finishes the raw circular edge.
Can I make the decoration without a sewing machine?
Yes. Use hand blanket stitching around the appliqué, small running stitches through the quilt sandwich, and hand stitches to attach the binding. Secure the loop with several strong rows of stitching. The project takes longer by hand, but the construction remains the same.
How can I prevent wrinkles around the flower?
Use lightweight fusible web, avoid unnecessary layers at the center, and keep embroidery tension relaxed. Press each stage according to the adhesive instructions. If machine stitching causes puckering, test a longer stitch or lighter presser-foot pressure on scraps before continuing.
Can I make a smaller Christmas tree ornament?
Yes. Reduce every paper template by the same percentage to preserve the proportions. For a 15 cm circular body, use templates at 50 percent of the suggested size. Keep practical seam allowances and binding widths rather than automatically halving them, and simplify very small embroidery details.
How should I clean and store the finished appliqué decoration?
Gently remove surface dust with a soft brush. Spot-clean only when compatible with the fabrics, floss, and fusible web you used, testing a hidden area first. Let the decoration dry completely before storage. Wrap it in clean tissue and avoid placing heavy objects on its raised embellishments.
Conclusion
The Patchwork Christmas Ornament Appliqué Pattern brings together coordinated fabric scraps, a padded circular base, layered holly leaves, and a red poinsettia. You have learned how to draw the templates, arrange the patchwork-style background, secure the appliqué, embroider festive details, and finish the project with red binding, a gold cap, and a hanging loop.
EASILY FIND THE FREE PDF FOR THIS PATTERN HERE!
Each stage offers room for personal touches while keeping the construction approachable. Please leave your honest opinion about this design and share your suggestions, favorite fabric combinations, or ideas for improving the tutorial.