
The Felt Nutcracker Face Wall Decoration Pattern is a delightful Christmas sewing project that combines traditional holiday charm with the warmth of handmade decorations. Featuring a cheerful Nutcracker face, a tall red military-style hat, a golden star, a green decorative band, rosy cheeks, and a beautiful white mustache, this festive design brings personality and color to any Christmas display. Whether you enjoy creating seasonal decorations for your home or making thoughtful handmade gifts, this DIY felt Christmas ornament offers a wonderful opportunity to practice simple sewing techniques while producing something memorable. The soft texture of felt makes the project especially inviting, and its colorful layered details create a professional-looking finish without requiring complicated equipment. Best of all, this tutorial is designed for beginners and experienced crafters alike, using accessible materials, straightforward instructions, and traditional hand-sewing methods.
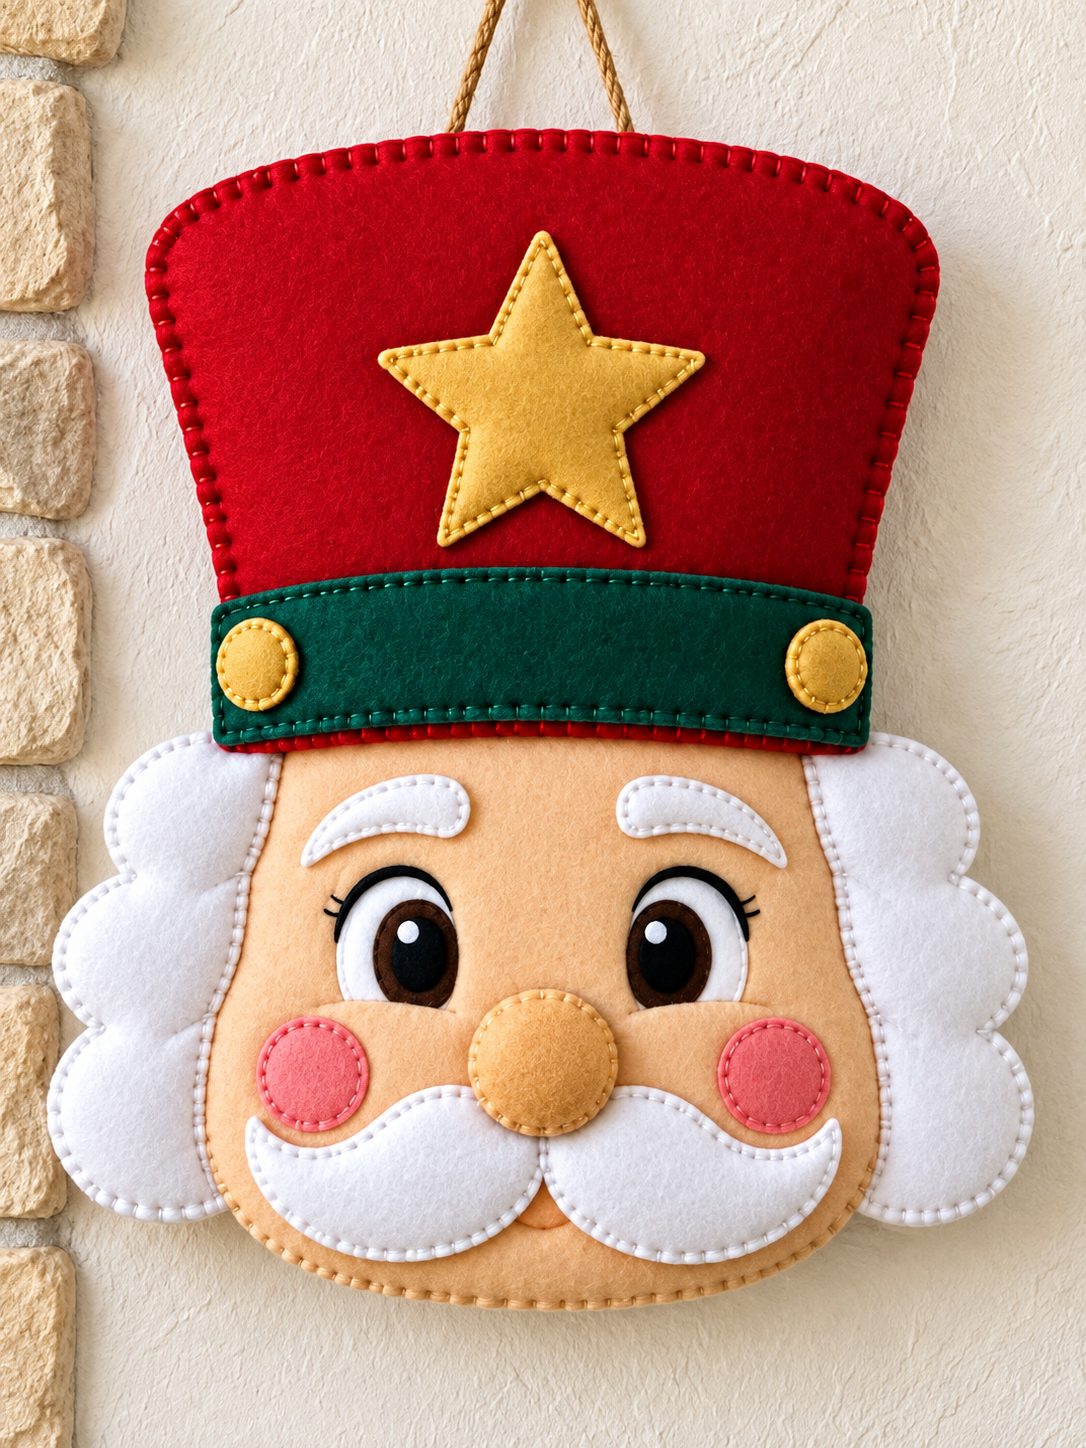
One of the most appealing features of this Felt Nutcracker Face Wall Decoration Pattern is its combination of carefully arranged felt appliqué pieces and decorative blanket stitching. The inspiration image shows a charming Nutcracker with a rounded peach-colored face, expressive brown eyes, white eyebrows, fluffy-looking side hair, and a large curled mustache. Above the face sits an oversized red hat decorated with a golden five-pointed star and a deep green horizontal band featuring two small golden circles. Every element contributes to the classic Nutcracker appearance associated with Christmas celebrations, while the visible stitches emphasize its handmade character. The decoration also includes a rustic hanging cord that allows it to be displayed on a wall, door, Christmas tree, or decorative hook. By learning how to cut, layer, stitch, and lightly stuff these pieces, you can recreate the same charming style while adapting the finished ornament to your preferred size.
Creating your own handmade felt Nutcracker decoration is also an enjoyable way to explore the possibilities of fabric crafting. Unlike projects that require advanced sewing machines or specialized tools, this ornament can be assembled almost entirely by hand using felt sheets, embroidery floss, a needle, scissors, and a small amount of polyester stuffing. The process encourages careful attention to shape, symmetry, color combinations, and decorative stitching, making it an excellent project for developing basic felt appliqué techniques. You can prepare the pieces in stages, work comfortably at your own pace, and personalize details such as the hat color or facial expression. In this complete guide, you will learn how to select the right materials, prepare a practical pattern, assemble the Nutcracker’s facial features, create the decorative hat, and finish the ornament with a secure hanging loop. The goal is to help you transform simple pieces of felt into a festive decoration that can be enjoyed for many Christmas seasons.
1. Materials and Preparation for the Felt Nutcracker Face Wall Decoration Pattern
Before beginning your Felt Nutcracker Face Wall Decoration Pattern, gather all the supplies and organize your workspace. For a finished decoration measuring approximately 28 cm wide and 33 cm tall, excluding the hanging cord, you will need red, dark green, golden yellow, peach, white, pink, brown, and black felt. Choose quality craft felt with a thickness of approximately 1–2 mm. Slightly firmer felt is especially useful for the tall hat, while softer felt works well for the rounded facial features. You will also need matching embroidery floss, a hand-sewing needle, fabric scissors, pins or sewing clips, a removable fabric marker, polyester fiberfill, and a piece of natural jute cord. Optional lightweight fusible interfacing can provide additional stability if your felt is particularly soft.
DISCOVER MORE FREE PATTERNS HERE!
For accurate cutting, prepare a printable felt Nutcracker pattern or draw the individual shapes on paper before transferring them to fabric. The suggested dimensions below are approximate construction measurements developed from the reference image, rather than measurements taken from a printed template. The main face should be a softly rounded shape approximately 22 cm wide and 18 cm tall. The red hat should measure about 25 cm wide and 18 cm tall, with a broad, gently curved top and tapered sides. The white side-hair sections extend outward from the face, while the golden star, green band, eyebrows, eyes, cheeks, nose, and mustache complete the design. Make each template symmetrical where appropriate, and check that the pieces overlap naturally before cutting your felt.
Suggested cutting guide
| Pattern piece | Approximate size | Quantity |
|---|---|---|
| Red hat front and back | 25 × 18 cm | 2 |
| Peach face front and back | 22 × 18 cm | 2 |
| White side-hair shapes | 8 × 15 cm | 2 |
| White mustache halves | 9 × 5 cm | 2 |
| Golden star | 9 × 9 cm | 1 |
| Green hat band | 22 × 5 cm | 1 |
| Golden band buttons | 2.5 cm diameter | 2 |
| White eyebrows | 6 × 2 cm | 2 |
| White eye bases | 4 × 5 cm | 2 |
| Brown irises | 2.5 cm diameter | 2 |
| Black pupils | 1.7 cm diameter | 2 |
| Pink cheeks | 3.5 cm diameter | 2 |
| Peach nose | 4 cm diameter | 1 |
The dimensions in this guide describe the approximate bounding areas of the pieces, not exact rectangular cutting shapes. When making your felt Christmas wall hanging, trace each component onto paper, cut out the templates, and arrange them on a flat surface to verify the proportions. Cut two matching main layers for the hat and face because these sections will eventually form the padded structure of the ornament. Smaller appliqué pieces usually need only one layer, although the nose can be doubled for a more dimensional appearance. If your felt is thick, avoid adding unnecessary layers beneath the smaller decorations because excessive bulk can make hand stitching difficult.
Choosing suitable thread colors is another important part of achieving the polished appearance shown in the inspiration image. Use red embroidery floss around the red hat, dark green around the hat band, golden yellow around the star and decorative buttons, and white around the hair, eyebrows, and mustache. Peach or light tan thread blends beautifully with the face, while pink thread highlights the cheeks. For a classic blanket stitch felt ornament, separate your embroidery floss into two or three strands, depending on the thickness of the felt and the visibility you want. Keep the stitches evenly spaced, approximately 3–4 mm apart, for a neat decorative outline.
The final preparation step involves organizing the layers in the correct order before sewing. Place the main peach face on your work surface, position the white side-hair sections behind its edges, and arrange the facial features on top. Then place the red hat above the face, allowing its lower portion to overlap the forehead slightly. The green band should cover the transition between the hat and face, just as it does in the reference design. Photographing this arrangement or making small placement marks with a removable fabric marker can help preserve the intended proportions during assembly. This simple preparation makes the remaining DIY Nutcracker sewing tutorial much easier to follow.
2. Cutting and Sewing the Nutcracker Face and Facial Details
Begin constructing the felt Nutcracker face appliqué by cutting the peach-colored face shape with smooth, rounded edges. The lower portion should form a broad chin, while the upper sides should narrow slightly beneath the hat. Place the two face layers together temporarily to check that their outlines match. Set the back layer aside and work on the front piece first. Arrange the white side-hair sections behind the left and right edges of the face, allowing their softly scalloped shapes to extend outward. The inspiration image features approximately three rounded lobes on each side, giving the appearance of traditional powdered Nutcracker hair. Secure the hair pieces with small stitches or a tiny amount of fabric-safe adhesive before continuing.
Next, prepare the eyes, which are among the most expressive details of the Felt Nutcracker Face Wall Decoration Pattern. Cut two white oval eye bases and position them symmetrically across the upper-middle portion of the face. Add a brown circular iris and a smaller black pupil to each eye, placing the pupils slightly inward to create a friendly expression. Tiny white felt circles can serve as highlights, making the eyes appear lively. Stitch each layer carefully using a small running stitch or appliqué stitch. Add curved black upper eyelids and two or three short eyelashes near the outer corners. The reference image uses dark outlines around the eyes, which help them stand out against the light peach background.
The eyebrows should be made from white felt and positioned just above the eyes. Instead of cutting simple straight strips, shape them into gently curved forms with tapered ends. These curved eyebrows contribute to the Nutcracker’s warm, whimsical personality. Attach them using small white running stitches along their edges, keeping the spacing consistent with the rest of the ornament. When sewing facial details, avoid pulling the thread too tightly because this can cause the felt to wrinkle. A relaxed, even tension produces a smoother surface and preserves the rounded shapes. If you are new to hand-sewn felt appliqué, practice several stitches on a scrap piece before working on the visible face.
To create the rosy cheeks, cut two pink circles approximately 3.5 cm in diameter and place them below the eyes, near the outer edges of the face. The cheeks should be balanced but do not need to be mathematically perfect. Secure them with pink embroidery floss using small, evenly spaced stitches around their circumference. Next, make the nose from a peach-colored felt circle approximately 4 cm in diameter. For the softly raised effect visible in the image, place a tiny amount of polyester stuffing beneath the nose before stitching it down. Alternatively, use two felt circles sewn together around the edges to form a small padded piece. Position the nose at the center of the face, slightly overlapping the upper area of the mustache.
The large white mustache is one of the most recognizable features of this Christmas Nutcracker felt pattern. Create two mirrored mustache halves, each shaped like a broad curved leaf with a gently pointed outer tip. The inner ends should meet beneath the nose, while the outer ends curl upward toward the cheeks. Position the pieces so they partially overlap the lower facial area without covering the eyes or the majority of the cheeks. Sew around their edges with white embroidery floss, using a running stitch approximately 3 mm from the edge. A small amount of stuffing beneath each mustache section can create a raised appearance, but keep it minimal so the mustache remains smooth and attractive.
After completing the facial features, inspect the arrangement carefully before joining the front and back face layers. Check that the eyes are level, the cheeks are balanced, and the mustache curves naturally on both sides. If you want to add a small mouth, use a short curved stitch in brown or peach thread beneath the mustache, although the inspiration image keeps this detail subtle. Place the backing face behind the decorated front, with the white side hair captured securely between the layers where needed. Sew around the exposed face perimeter using a blanket stitch, leaving an opening of approximately 5 cm. Insert a modest amount of polyester stuffing, distribute it evenly, and close the opening. The finished face should be softly padded rather than overly firm.
3. Creating the Red Nutcracker Hat with a Golden Star and Green Band
The distinctive red hat is the centerpiece of the Felt Nutcracker Face Wall Decoration Pattern and gives the character its traditional Christmas appearance. Begin by cutting two matching red felt shapes with a gently arched upper edge and sides that taper slightly toward the lower corners. The hat should be wider at the top than the visible forehead, creating a dramatic silhouette. A finished height of approximately 18 cm provides enough space for the golden star and green band. Place the front hat piece on your work surface and mark the center lightly with a removable fabric marker. This centerline will help you position the star accurately and maintain symmetry throughout the assembly process.
For the decorative star, cut a five-pointed shape from golden yellow felt measuring approximately 9 cm across its widest points. Position it in the upper-middle section of the red hat, leaving enough red felt visible around its edges. The star should appear centered and balanced, as shown in the inspiration image. Secure it with small golden stitches placed approximately 2–3 mm inside its perimeter. A running stitch works particularly well because it creates the delicate handmade outline seen in the design. If you prefer a slightly dimensional star, add a second felt layer underneath or a very thin piece of batting. Avoid excessive padding, which may distort the star’s points.
The green band adds a beautiful contrast to the bright red hat and visually separates the headpiece from the Nutcracker’s face. Cut a dark green felt strip approximately 22 cm long and 5 cm tall, adjusting its length to fit the actual width of your hat. Gently curve the upper and lower edges to follow the shape of the hat rather than making a perfectly straight rectangle. Position the band across the lower portion of the red felt, overlapping the hat and eventually covering the upper edge of the face. Sew along its top and bottom edges with dark green embroidery floss, keeping the stitches evenly spaced. This felt appliqué sewing technique creates a clean, decorative border.
Next, create the two golden circular buttons that decorate the ends of the green band. Cut two circles approximately 2.5 cm in diameter from golden yellow felt. Position one near the left end of the band and the other near the right end, leaving a small margin around each circle. Sew the buttons using matching golden thread and a fine running stitch. If desired, place a tiny second felt circle beneath each button to add dimension. The buttons in the reference design are simple and understated, allowing the star to remain the main decorative element. Maintaining this balance is important when recreating the classic Nutcracker Christmas wall decoration.
Once the front of the hat is decorated, prepare the hanging loop before assembling the padded layers. Cut approximately 30–35 cm of natural jute cord, fold it in half, and adjust the loop to your preferred hanging length. Position the two loose ends inside the top of the hat, approximately 6–8 cm apart, leaving the loop extending above the curved upper edge. Secure the ends to the inside of the back hat layer with several strong stitches. For added durability, reinforce the attachment points with small pieces of felt. The hanging cord should be firmly anchored because it will support the entire finished decoration. Natural jute complements the handmade appearance, but a sturdy ribbon can also be used.
Finally, join the decorated hat front to its backing piece using red embroidery floss and a blanket stitch around the exposed perimeter. Leave the lower edge open temporarily if you plan to add a small amount of stuffing or insert a lightweight stabilizer. Keep the padding thin so the hat remains relatively flat and hangs neatly against a wall. Once the hat has the desired shape, close the remaining seam, taking care not to stitch across the area that will overlap the face until you have checked the final placement. The completed red hat should have a smooth outline, a centered golden star, a securely attached green band, and a strong hanging loop ready for final assembly.
4. Assembling, Finishing, and Displaying Your Felt Nutcracker Christmas Decoration
With the face and hat completed, you can begin the final assembly of the Felt Nutcracker Face Wall Decoration Pattern. Place the padded face on a clean work surface and position the hat above it, allowing the lower section of the red hat to overlap the upper portion of the face. The green band should sit directly above the eyebrows without covering them. Compare the arrangement with the inspiration image, paying attention to the overall proportions. The hat should look large and impressive, while the face remains clearly visible beneath it. Adjust the placement until the ornament appears balanced, then secure the pieces temporarily with sewing clips or pins.
To join the two main sections, use strong red or peach embroidery floss and make small hidden stitches along the overlapping area behind the green band. Stitch through the hat backing and face backing wherever possible to avoid creating visible lines on the front. For additional stability, you can attach a narrow strip of felt behind the connection, bridging the two sections. This reinforcement is especially helpful for larger decorations because it prevents the face from pulling away from the hat over time. Avoid relying solely on craft glue for the main structural connection. A combination of careful hand stitching and a reinforced backing provides a more durable result for your handmade Christmas wall hanging.
After the main pieces are attached, inspect the perimeter for uneven edges, loose threads, or areas where the stuffing may be visible. Trim stray fibers carefully without cutting into the decorative stitches. If any blanket stitches appear loose, reinforce them with matching embroidery floss. Gently smooth the facial features with your fingertips and redistribute the stuffing if necessary. The goal is to create a soft, lightly dimensional ornament with clearly defined shapes. The reference image features visible stitches throughout the design, so small variations in hand-sewing are part of its charm rather than imperfections that need to be hidden.
You can also personalize your DIY felt Nutcracker ornament while preserving the traditional design. For example, replace the dark green band with navy blue for a more formal military-inspired appearance, or use burgundy felt for the hat to create a vintage Christmas style. Metallic embroidery floss can add sparkle to the golden star, while a small decorative bead may be used for the nose on ornaments intended only for adult decorative use. If making decorations for homes with young children or pets, securely sew all details and avoid loose beads or detachable embellishments. Personalization is an excellent way to make each Nutcracker unique while maintaining the recognizable face, hat, and mustache.
When your decoration is complete, choose a display location that allows its colorful details to stand out. The Felt Nutcracker Face Wall Decoration Pattern looks especially attractive against neutral walls, wooden doors, or simple holiday backdrops. You can hang it near a Christmas tree, incorporate it into a seasonal gallery wall, or use it as part of a handmade Christmas entryway display. Because felt is lightweight, the ornament is easy to hang, but always choose a secure hook appropriate for the wall or door surface. Keep it away from open flames, heaters, and excessive moisture. For long-term care, gently remove dust with a soft brush and store the ornament flat in a dry container after the holidays.
This project also offers a wonderful opportunity to create meaningful handmade gifts for family members, friends, teachers, or fellow craft enthusiasts. You might make several Nutcrackers in coordinated colors, create a smaller version for a Christmas tree, or add a fabric label with the year on the back. Each variation becomes a personal expression of creativity and holiday tradition. More importantly, completing this beginner-friendly felt sewing project helps develop practical skills in pattern preparation, fabric cutting, decorative stitching, layering, stuffing, and assembly. These techniques can later be applied to other felt Christmas ornaments, seasonal wall hangings, and decorative fabric appliqué projects.
Frequently Asked Questions About the Felt Nutcracker Face Wall Decoration Pattern
1. Is the Felt Nutcracker Face Wall Decoration Pattern suitable for beginners?
Yes. This project is suitable for beginners who are comfortable handling scissors and a hand-sewing needle. Although the design includes several small pieces, the construction relies mainly on basic techniques such as running stitch, blanket stitch, and simple felt appliqué. Beginners can work on one facial feature at a time and assemble the ornament gradually. Taking extra care during cutting and placement will help produce a neat result.
2. What type of felt works best for making a Nutcracker wall decoration?
Quality craft felt with a thickness of approximately 1–2 mm is a practical choice. Polyester felt is affordable, widely available, and offered in many colors, making it ideal for festive decorations. Wool-blend felt is another excellent option because it often provides a softer texture and cleaner cut edges. Choose felt that is firm enough to hold its shape without becoming difficult to sew.
3. Can I make this Nutcracker decoration without a sewing machine?
Absolutely. The entire Felt Nutcracker Face Wall Decoration Pattern can be completed using hand-sewing techniques. In fact, hand stitching is particularly appropriate for this design because the decorative stitches are an important part of its appearance. A sewing machine is optional and is not necessary to achieve a beautiful finished ornament.
4. How long does it take to complete this felt Christmas project?
The estimated completion time is approximately 4–7 hours, depending on your experience and the amount of detail you include. Beginners may prefer to divide the project into two or three sessions. Preparing and cutting the templates can be completed first, followed by sewing the facial details and assembling the hat. The final session can focus on stuffing, joining the main pieces, and finishing the hanging loop.
5. Can I change the size of the Felt Nutcracker Face Wall Decoration Pattern?
Yes. You can enlarge or reduce the paper templates while keeping all the pieces proportional. For example, a smaller ornament measuring approximately 15–18 cm tall could work well on a Christmas tree, while a larger version may become a statement piece for a wall or door. Remember to adjust the hanging cord, stuffing quantity, and stitch spacing according to the new size.
6. What is the difference between a running stitch and a blanket stitch?
A running stitch is a simple line of small stitches that passes in and out of the fabric. It is commonly used to attach appliqué pieces such as the star, cheeks, eyebrows, and mustache. A blanket stitch forms a decorative looped edge that helps join two felt layers while protecting and defining the perimeter. Both techniques are useful for creating attractive handmade felt decorations.
7. Should I use stuffing inside the entire Nutcracker decoration?
Light stuffing is recommended for the main face section because it adds dimension and creates the soft appearance seen in the inspiration image. The hat can also contain a thin layer of stuffing, although it should remain relatively flat. Smaller details, such as the nose and mustache, may receive tiny amounts of padding for additional dimension. Avoid overstuffing, as this can distort the shapes and make the ornament difficult to hang neatly.
8. Can I use fabric glue instead of stitching the pieces?
Fabric glue can help hold small felt pieces in position temporarily, but stitching is recommended for the main construction. Sewn connections generally provide better durability, especially around the hanging loop and between the hat and face. Decorative hand stitching also contributes significantly to the traditional handmade appearance of this Nutcracker design.
9. How can I make the facial features symmetrical?
Fold your paper templates in half when creating symmetrical shapes, and use the centerline of the face as a placement guide. Position the eyes, eyebrows, cheeks, and mustache pieces before sewing them permanently. Measuring the distance between each feature and the centerline can help maintain balance. A small amount of natural variation is acceptable and can make the ornament feel more personal.
10. How should I clean and store a handmade felt Nutcracker decoration?
Remove surface dust gently with a soft brush or lint roller suitable for delicate fabrics. Avoid soaking the decoration, especially if it contains stuffing, glue, or jute cord. If necessary, carefully spot-clean a small area with a slightly damp cloth and allow it to dry completely. Store the ornament flat or loosely supported in a dry container, away from direct sunlight and heavy objects that could crush the felt.
11. Can I sell handmade Nutcracker decorations created from this tutorial?
You can generally sell decorations that you personally make using your own original templates and construction work. However, if you use a separately obtained commercial pattern or copyrighted artwork, review its licensing terms before selling finished products. Creating your own shapes and decorative arrangements is a practical way to develop a distinctive handmade product.
12. What are the most common mistakes when making felt appliqué Christmas decorations?
Common mistakes include cutting pieces without checking their proportions, pulling embroidery thread too tightly, using excessive stuffing, and attaching small details before confirming their placement. Another frequent problem is failing to reinforce the hanging loop. You can avoid these issues by preparing paper templates, arranging all components before sewing, keeping stitch tension consistent, and reinforcing structural connections.
13. Can children participate in making this Nutcracker ornament?
Children can participate in age-appropriate stages of the project under adult supervision. Younger children may enjoy choosing colors, arranging felt shapes, and helping design the character’s expression. Cutting with sharp scissors, using needles, and handling small pieces should be reserved for appropriately supervised participants. The finished decoration should be treated as a decorative craft rather than a toy for very young children.
14. What other Christmas decorations can I make using the same techniques?
The same basic sewing methods can be used to create felt Santa faces, Christmas angels, snowmen, gingerbread characters, reindeer ornaments, and decorative Christmas stockings. Once you understand how to layer felt pieces and use decorative stitches, you can adapt these techniques to many seasonal projects. The Nutcracker is an especially useful starting point because it combines several classic appliqué shapes in one design.
Conclusion
Create a Charming Handmade Felt Nutcracker for Christmas
The Felt Nutcracker Face Wall Decoration Pattern is a rewarding Christmas craft that transforms simple felt sheets into a colorful, expressive holiday decoration. Throughout this tutorial, you learned how to choose suitable materials, prepare correctly proportioned templates, cut and assemble facial features, create a traditional red Nutcracker hat, add a golden star and green band, and finish the ornament with decorative stitching and a secure hanging cord.
The project also introduced essential felt sewing techniques, including running stitch, blanket stitch, layered appliqué, light stuffing, and reinforced assembly. These skills are valuable not only for making this particular Nutcracker but also for creating many other handmade felt Christmas decorations.
What makes this ornament special is the combination of recognizable holiday details and personal craftsmanship. From the cheerful eyes and rosy cheeks to the curled white mustache and festive red hat, every element contributes to a decoration that feels warm, nostalgic, and full of character. Whether you display your finished Nutcracker in your home, give it as a thoughtful Christmas gift, or create several ornaments in different colors, this project offers a meaningful way to celebrate the holiday season through creativity.
EASILY FIND THE FREE PDF FOR THIS PATTERN HERE!
Now I would love to hear your sincere opinion! 🎄❤️ What do you think of this Felt Nutcracker Face Wall Decoration Pattern? Would you keep the traditional red, green, and gold colors, or try a different combination? Share your honest feedback, creative ideas, and suggestions for future felt sewing tutorials. Your comments can inspire new projects and help other craft lovers discover beautiful ways to create their own handmade Christmas decorations!