
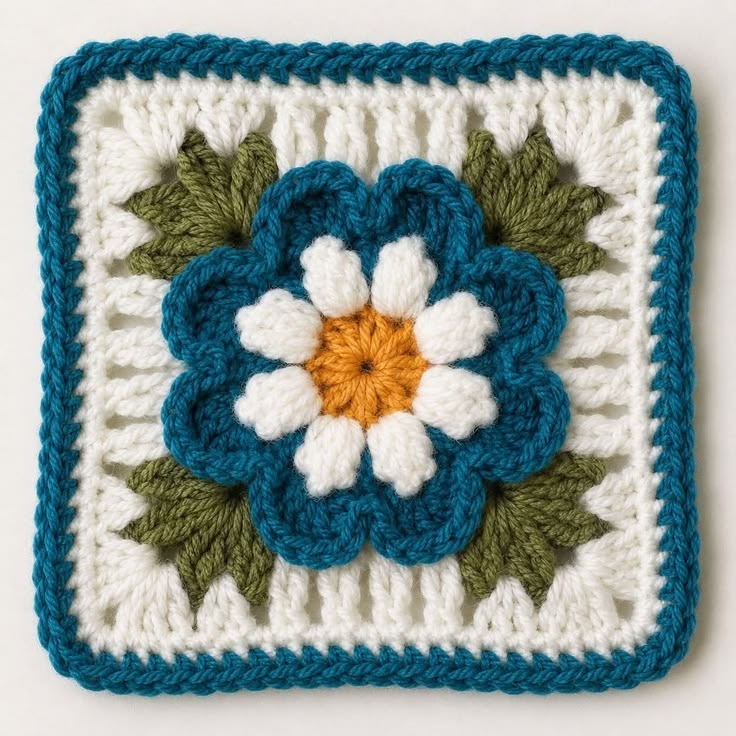
The Crochet Flower Granny Square Tutorial Pattern is a beautiful way to bring texture, color, and handmade charm into your crochet projects. Featuring a dimensional floral centerpiece, delicate green leaves, a soft white square background, and a contrasting blue border, this design combines traditional granny square techniques with modern decorative details. Whether you enjoy making cozy blankets, decorative pillows, table runners, or unique handmade gifts, this crochet flower granny square offers endless creative possibilities. The layered petals create a lovely three-dimensional appearance, while the structured square foundation makes the finished motif practical for joining with other squares. One of the most enjoyable aspects of this pattern is how several simple crochet techniques come together to produce something that looks wonderfully intricate. With patience, a comfortable crochet hook, and a few colorful yarns, you can create a floral square that feels both timeless and fresh.
For crocheters who love experimenting with flower crochet patterns, this design is especially appealing because it combines different stitch textures in a single project. The golden-yellow flower center provides a cheerful focal point, surrounded by raised white petals that resemble a small daisy. Behind these petals, larger blue flower shapes create depth and contrast, making the central blossom stand out against the white background. Olive-green leaves positioned around the flower add a natural botanical element, giving the square a balanced and harmonious appearance. The white outer section uses taller stitches and open spaces to frame the dimensional flower without overwhelming its details. Finally, the blue edging provides a polished finish that complements the larger flower petals. These carefully arranged elements make the Crochet Flower Granny Square Tutorial Pattern a wonderful choice for anyone interested in decorative crochet motifs.
Another reason to love this easy-to-follow crochet granny square tutorial is its versatility. You can use one finished square as a decorative coaster or small textile accent, provided the materials suit its intended use, or combine multiple squares into a larger handmade creation. A collection of matching motifs could become a floral blanket, while several squares joined together could form a colorful cushion cover or an attractive crochet bag. Beginners who already understand basic stitches can use this project to practice working in rounds, changing yarn colors, making clusters, and creating dimensional petals. More experienced crocheters can customize the flower colors, adjust the size, or experiment with different yarn weights to create their own interpretations. Throughout this tutorial, you will learn the materials, abbreviations, stitch combinations, construction sequence, and finishing techniques needed to recreate the main visual features of the photographed square. Because a photograph does not reveal every hidden stitch, the instructions below provide an original, workable interpretation rather than claiming to reproduce an unseen written pattern exactly.
Materials, Crochet Abbreviations, and Preparation for the Flower Granny Square
Before beginning the Crochet Flower Granny Square Tutorial Pattern, gather the materials needed to create a soft, dimensional motif with clearly defined stitches. For a square similar in appearance to the reference image, choose medium-weight cotton or acrylic yarn in five colors: golden yellow for the flower center, white for the raised inner petals and background, deep teal blue for the outer flower and border, and olive green for the leaves. A 4.0 mm or 4.5 mm crochet hook is a useful starting point for worsted-weight yarn, although your ideal hook size depends on your tension and the yarn manufacturer’s recommendations. You will also need scissors, a yarn needle, and several stitch markers. A small ruler or measuring tape will help you check the size and symmetry of your finished motif. Using yarns of similar thickness will make the different sections easier to combine neatly.
DISCOVER MORE FREE PATTERNS HERE!
This tutorial uses U.S. crochet terminology, which is important because American and British stitch names are not always equivalent. The main abbreviations are ch (chain), sl st (slip stitch), sc (single crochet), hdc (half double crochet), dc (double crochet), tr (treble crochet), st (stitch), sp (space), and rnd (round). You will also encounter YO (yarn over), BLO (back loop only), and FLO (front loop only). A chain is made by wrapping the yarn over your hook and pulling it through the loop already on the hook. A single crochet is formed by inserting the hook into a stitch, pulling up a loop, then drawing yarn through both loops. For a double crochet, yarn over, insert the hook, pull up a loop, and draw through two loops twice. Understanding these abbreviations will make each stage easier to follow.
Two special techniques help create the raised floral effect. The first is a puff stitch, which forms the rounded white petals. To make a puff stitch, yarn over, insert your hook into the indicated stitch, yarn over, and pull up a long loop. Repeat this action four times in the same stitch, keeping the loops approximately the same height. Yarn over and draw through all the loops on your hook, then chain one to secure the puff. The second technique is a double crochet cluster, which creates a thicker decorative stitch. For a 3-dc cluster, work three unfinished double crochets into the same space, leaving the final loop of each stitch on your hook, then yarn over and pull through all remaining loops. These techniques give the flower its sculptural appearance without requiring complicated tools.
The finished size of this sample is approximately 15 × 15 cm (5.9 × 5.9 inches), depending on yarn, hook size, and individual tension. The photograph shows a dense floral center surrounded by a comparatively open square frame, so maintaining a balanced proportion is more important than matching an exact measurement. As a practical guide, aim for a central flower approximately 9–10 cm across before adding the square background. If your flower becomes too large, reduce the height of the blue petals or use a slightly smaller hook. If the motif curls inward, loosen your tension or increase the chain spaces in the surrounding frame. Making a small test swatch is helpful when you plan to join several squares into one project.
Color preparation can make a noticeable difference in the finished crochet floral granny square. Wind small yarn balls or bobbins for each color so the strands remain manageable as you work through the different layers. Begin with the golden-yellow center, add the white dimensional petals, and then construct the larger blue petals behind them. The green leaves will be attached to the outer flower before the white background is built around the entire arrangement. This sequence allows the decorative components to remain visible rather than becoming trapped beneath the square frame. Keep your stitch markers nearby because they will help identify the attachment points used when shaping the background.
It is also useful to understand how this particular layered crochet flower pattern differs from a classic granny square. A traditional granny square often begins with groups of three double crochets separated by chain spaces, gradually expanding into a square. This design begins with a circular flower and then transforms that round shape into a square using strategically placed corners and taller stitches. The transformation requires attention to symmetry, especially when the petals and leaves are unevenly distributed around the center. You do not need to make every stitch identical to the photograph, but the four corners should remain evenly spaced. Once the construction sequence is clear, the pattern becomes much easier to repeat.
Step-by-Step Instructions for Crocheting the Yellow Center and Layered Flower Petals
Begin the Crochet Flower Granny Square Tutorial Pattern with the golden-yellow center. Make a magic ring, then chain 2; this beginning chain does not count as a stitch. Work 12 dc into the ring and pull the yarn tail gently to close the center. Join with a slip stitch to the first dc, creating a compact circular foundation. For the second round, chain 2 and work 2 dc into each stitch around, giving you 24 dc. Join with a slip stitch and fasten off the yellow yarn. This small circle forms the center of the flower and provides enough stitches for eight evenly spaced petals. If you prefer a slightly flatter center, you can work the second round using half double crochet instead of double crochet, although the resulting texture will be less pronounced.
Next, introduce the white yarn to create the eight raised petals visible around the golden center. Join the yarn to any stitch in the second round and chain 2. Work one puff stitch into that same stitch, then chain 2 and skip the next two stitches. Repeat the sequence (puff stitch, ch 2, skip 2 stitches) around the circle until you have eight white puffs, using every third stitch of the 24-stitch round. Join to the beginning and fasten off. The puff stitches should appear as soft, oval-shaped petals radiating outward from the yellow center. If they seem too short, pull up longer loops while making each puff. If they appear loose or floppy, tighten the securing chain slightly without compressing the raised texture.
To create the larger blue flower, begin by working behind the white petals rather than directly over their raised surfaces. Turn the flower over and join the teal yarn to an unused back loop or a secure stitch base near the yellow center. Chain 4, then slip stitch into the base behind the next white petal. Repeat around the flower to form eight chain-4 arches behind the white puff stitches. These arches become the foundation for the larger outer petals. Check that each arch sits behind one white petal and that the chain loops are not twisted. The blue foundation should remain mostly hidden when the flower is viewed from the front, allowing the white petals to stand clearly above the second layer.
Now work the decorative blue petals into the chain arches. Slip stitch into the first chain-4 space and work (sc, hdc, 5 dc, hdc, sc) into that same space. Move directly to the next chain arch and repeat the same sequence. Continue until all eight arches contain one blue petal, then join with a slip stitch to the first sc. Each petal should have a rounded, scalloped edge, with the five double crochets creating its fullest section. If you want more pronounced petals, substitute the center three double crochets with treble crochets, but use the same adjustment for every petal. The result should resemble a full blue blossom framing the smaller white-and-yellow flower. Fasten off the yarn after checking that all eight petals are consistent.
For additional dimension, you can add a subtle decorative ridge to the blue petals. Join the teal yarn at the base of one petal and work a row of slip stitches through the front loops of the petal stitches, following the curved outline without pulling too tightly. Repeat this technique around the remaining petals, or use surface slip stitches along the inner edges where the blue petals meet the white center. This optional detail enhances the appearance of layered crochet and can help emphasize the flower’s shape. The reference image shows a richly textured blue section, so an extra ridge or a slightly raised stitch edge is an effective way to approximate that appearance. Keep the ridge soft enough that the petals can still lie comfortably against the square background.
Before continuing, inspect the completed 3D crochet flower from both sides. The yellow center should be visible, the eight white petals should sit above the blue layer, and the blue petals should spread evenly around the center. Use a yarn needle to weave the yellow and white yarn tails into nearby stitches, avoiding the raised petal surfaces. Leave a longer blue tail if you plan to use it for attaching or stabilizing the flower against the square foundation. At this stage, the motif is still circular, which is expected. The green leaves and white square frame will establish the four-cornered structure. Taking a moment to adjust the petals now will make the next stages easier and help maintain a symmetrical finished design.
How to Crochet the Green Leaves and Transform the Flower into a Granny Square
The olive-green leaves are an important decorative feature of this Crochet Flower Granny Square Tutorial Pattern because they create a natural transition between the blue flower and the white background. To make one leaf, chain 8 with green yarn. Beginning in the second chain from the hook, work sl st, sc, hdc, dc, dc, hdc, sc along one side of the foundation chain. Chain 1 at the tip, then work along the opposite side of the chain using sc, hdc, dc, dc, hdc, sc, sl st. Join and fasten off, leaving a tail long enough for sewing. This creates an elongated oval leaf with a pointed end. For a more pronounced point, replace the chain-1 tip with a small picot made from three chains and a slip stitch into the first chain.
Make twelve green leaves using the same method, or create sixteen if you prefer a fuller botanical appearance. Arrange the leaves in four groups around the blue flower, placing three leaves in each diagonal area where the corners of the square will eventually appear. The photograph suggests clusters of overlapping green shapes rather than isolated leaves, so position each group with the leaves pointing in slightly different directions. Use a yarn needle to sew the bases of the leaves securely to the back of the blue flower, keeping the pointed tips free. Avoid stitching across the front of the white petals. When all four leaf clusters are attached, the arrangement should look balanced from every direction.
To prepare the flower for its square background, create a supporting round behind the blue petals. Join white yarn at the back of the flower near the base of one blue petal. Chain 5, then slip stitch into a secure base stitch behind the next blue petal. Repeat this process around the flower to create eight chain-5 arches. These arches should sit behind the green leaves and blue petals rather than passing over them. Because the supporting round is attached to the flower’s back, it provides a stable foundation for the white square without flattening the decorative front. If the arches pull too tightly, replace the chain-5 spaces with chain-6 spaces. The purpose is to establish eight evenly spaced attachment points that can be divided into four corners and four sides.
Begin squaring the motif by identifying every second chain arch as a corner. Slip stitch into the first corner arch and work (3 dc, ch 2, 3 dc) into that space. In the next arch, work (3 dc, ch 1, 3 dc) to form a side section. Repeat this alternating arrangement around the flower, using the larger chain-2 spaces for the four corners. Join with a slip stitch to the beginning of the round. This is the first granny square foundation round, and it begins transforming the circular flower into a four-sided shape. The corner clusters may initially look slightly rounded because of the bulky flower beneath them. Gently spread the stitches with your fingers and check that the green leaf groups remain visible near the corners.
For the next white round, slip stitch into the nearest corner chain-2 space. Work (3 dc, ch 2, 3 dc) into that corner. Along each side, work 3 dc into each available chain-1 space, separating neighboring groups with ch 1 where necessary. Continue to the next corner and repeat the same corner sequence. Follow this arrangement around all four sides, joining with a slip stitch at the end. To approximate the open vertical texture shown in the photograph, you can replace some of the side clusters with taller stitches separated by chain spaces, provided you maintain the same stitch distribution on corresponding sides. This helps the background appear airy while still supporting the dimensional center. If the square begins to ripple, reduce unnecessary chain spaces; if the sides pull inward, loosen the stitches or add a chain between groups.
Continue adding white rounds until the square reaches the desired size, keeping four consistent corners throughout the process. A useful finishing round is to work one dc into each stitch along the sides, with (2 dc, ch 2, 2 dc) in each corner chain space. This creates a relatively even edge for the contrasting border. Make sure each side contains the same number of stitches before moving to the final color. The white background should frame the blue flower without hiding the leaves or compressing the petals. For a sample approximately 15 cm wide, two or three white framing rounds may be enough, depending on the flower size. Fasten off the white yarn and prepare to finish the square with the blue border.
Adding the Blue Border, Blocking the Square, and Creative Project Ideas
The final blue edging gives the Crochet Flower Granny Square Tutorial Pattern a coordinated, professional-looking finish. Join the teal yarn at any corner of the white square and chain 1. Work (2 sc, ch 2, 2 sc) into the corner space, then make one sc into each stitch along the next side. Repeat the same corner treatment at all four corners and continue until you return to the beginning. Join with a slip stitch to the first single crochet. For a slightly thicker border, work a second round of single crochet stitches, placing (sc, ch 2, sc) into each corner chain space. This creates a firm but flexible outline that helps the square maintain its shape. The border should be snug without causing the white background to curl.
If you prefer a more decorative finish, experiment with a subtle reverse single crochet, sometimes called the crab stitch, around the outer edge. This technique is worked from left to right rather than the usual right-to-left direction for right-handed crocheters. Insert the hook into the stitch immediately to the right, yarn over, pull up a loop, then yarn over and draw through both loops. Continue around the edge to create a twisted, cord-like finish. This optional treatment can add a handcrafted detail similar to the textured blue outline visible in the reference image. Keep your tension relaxed so the border does not become overly stiff. When finished, fasten off and weave the remaining yarn tail into the back of the square.
Blocking is one of the most useful finishing techniques for a crochet granny square because it helps improve symmetry and stitch definition. Begin by laying the square on a clean, flat surface and gently arranging the four corners. If your yarn is suitable for wet blocking, lightly dampen the square and place it on a blocking mat. Use rust-resistant pins to secure the corners and straighten the sides, measuring each edge to keep the square even. Allow the motif to dry completely before removing the pins. For acrylic yarn, follow the manufacturer’s care instructions and avoid excessive heat, which can permanently change the fibers. While blocking, take care not to flatten the raised white and blue petals, since their dimensional texture is one of the design’s most attractive features.
Once the square is finished, there are many ways to use this floral crochet granny square pattern in larger projects. For a decorative pillow cover, make several matching squares and join them into panels that fit your chosen cushion insert. A small throw blanket could feature rows of these flowers alternating with plain white or teal granny squares, allowing the floral motifs to become the main visual focus. You could also create a table runner by joining a line of flower squares with narrow crochet borders. For bags and accessories, consider using a tighter stitch gauge and a suitable lining to help maintain the finished shape. Because the flower has raised petals, it is best suited to decorative surfaces that will not experience constant abrasion.
Color customization is another enjoyable part of working with this crochet flower granny square tutorial. The reference design uses teal, white, yellow, and olive green, but you can adapt the palette to different seasons or decorating styles. For a spring-inspired look, try soft pink petals, cream backgrounds, and sage-green leaves. A cheerful summer version might feature coral flowers, bright yellow centers, and turquoise borders. Autumn-inspired squares could use burgundy, mustard, terracotta, and deep forest green. For a more traditional appearance, combine ivory petals with dusty blue or muted lavender. Whatever colors you choose, maintain enough contrast between the inner flower, outer petals, and background so that the dimensional details remain clearly visible.
When joining several squares, choose a method that complements the raised flower without adding unnecessary bulk. The slip stitch joining method produces a relatively flat seam when worked through the back loops of neighboring squares. Place two squares with their right sides facing outward, align the corresponding stitches, and work slip stitches through the selected loops along the edge. Alternatively, use single crochet joining for a more visible decorative ridge. If you prefer a nearly invisible connection, whipstitch the squares together with a yarn needle and matching yarn. Always check that the squares have the same finished dimensions before joining them. Consistent sizing will help prevent uneven seams and make the finished blanket, pillow, or accessory look more polished.
Proper care will help preserve the appearance of your finished handmade crochet flower square. Follow the washing recommendations provided for your yarn, particularly when combining different fiber types. Cotton motifs may benefit from gentle washing and reshaping, while acrylic projects often dry relatively quickly when laid flat. Avoid wringing or stretching the raised petals, as this may distort their shape. If the flower becomes flattened during storage, gently lift and rearrange the petals with your fingers. Store finished motifs in a clean, dry location away from prolonged direct sunlight to help preserve their colors. With careful finishing and appropriate care, your floral granny squares can remain attractive and useful for many years.
Frequently Asked Questions (FAQ)
Is the Crochet Flower Granny Square Tutorial Pattern suitable for beginners?
This pattern is most comfortable for advanced beginners or intermediate crocheters. The basic stitches are approachable, but the layered petals, leaf placement, and transition from a circular flower to a square require attention. Beginners can complete the project by working slowly and practicing the puff stitch and double crochet cluster before starting the full motif.
What type of yarn works best for a 3D crochet flower granny square?
Medium-weight cotton or acrylic yarn is a practical choice. Cotton provides clear stitch definition and a structured appearance, while acrylic can produce a softer and lighter motif. Choose yarns of similar weight for all colors so the flower, leaves, and background remain proportional.
How many crochet petals should the flower have?
The interpretation described in this tutorial uses eight raised white puff-stitch petals and eight larger blue petals. This arrangement creates a balanced flower similar to the reference design. You can adjust the petal count, but doing so requires changing the foundation stitch count and the spacing of the blue arches.
How can I keep my crochet granny square from curling?
Curling often results from tight tension, insufficient stitches, or a background that is too small for the dimensional flower. Check that the chain arches behind the flower have enough room to lie comfortably. Maintain consistent corner increases, avoid pulling the joining stitches too tightly, and block the square after completion.
Can I make this flower granny square larger?
Yes. Add more white granny square rounds before working the final blue border. Maintain the four corners and increase the side stitches consistently with each round. You can also use a thicker yarn and a larger hook, although this will change the overall texture and dimensions.
How many flower granny squares do I need for a blanket?
The number depends on the desired blanket dimensions and the finished size of each square. For example, if your blocked squares measure 15 × 15 cm, a blanket made with 8 squares across and 10 squares down would require 80 squares and measure approximately 120 × 150 cm before accounting for joining seams and any additional outer border.
Can I use this crochet flower granny square for a bag?
Yes. Floral granny squares can be joined into decorative bag panels. For a sturdy result, use a firm yarn, work at a consistent gauge, and consider adding a fabric lining. Reinforce the handles and attachment points because raised floral stitches are primarily decorative rather than structural.
How do I make the white flower petals look fuller?
Use a puff stitch with longer, evenly drawn loops. The sample instructions use four yarn-over insertions for each puff, but you can increase this to five if your yarn and hook allow it. Keep the securing chain firm enough to hold the puff together without flattening it.
What is the difference between a flower granny square and a traditional granny square?
A traditional granny square usually begins with crochet clusters arranged around a central ring, forming a square from the earliest rounds. A flower granny square includes a decorative floral motif that may begin as a circle and is later surrounded by square-forming rounds. This creates additional texture and visual interest.
Can I sell handmade items made using this tutorial?
You can generally sell physical items you make from these instructions. If you sell finished projects, use your own product photographs and descriptions. Avoid presenting someone else’s photograph or original written pattern as your own.
How can I make all my granny squares the same size?
Use the same yarn weight, hook size, stitch counts, and tension for every square. Measure the first completed motif and use it as a reference for the remaining pieces. Blocking each square to the same dimensions before joining will also improve consistency.
What should I do if the green leaves disappear behind the white background?
Position the leaves before starting the white square foundation and check their placement after every framing round. If necessary, use a few small sewing stitches to secure the leaf tips on top of the white background. This helps maintain the botanical appearance without altering the main structure.
Conclusion
The Crochet Flower Granny Square Tutorial Pattern brings together classic crochet techniques and decorative floral details to create a colorful, textured motif. Throughout this tutorial, you learned how to prepare your materials, understand U.S. crochet abbreviations, construct the golden-yellow center, make raised white puff-stitch petals, and crochet the larger blue flower layer. You also discovered how to create green leaves, transform the circular flower into a square, finish the project with a coordinated blue border, and block the completed motif for a more even appearance.
EASILY FIND THE FREE PDF FOR THIS PATTERN HERE!
This crochet flower granny square can become the foundation for many creative projects, from handmade blankets and cushion covers to decorative accessories and thoughtful gifts. The most rewarding part of the process is the freedom to experiment with colors, textures, and arrangements while developing your crochet skills. Each completed square offers another opportunity to refine your technique and create something personal. Now I would love to hear your sincere opinion! 🌸🧶 What do you think of this floral granny square design? Would you keep the original teal-and-white color combination, or would you choose different shades? Share your honest feedback, creative suggestions, and ideas for future crochet tutorials. Your experiences and recommendations can help inspire other crochet enthusiasts and make this wonderful craft even more enjoyable!