
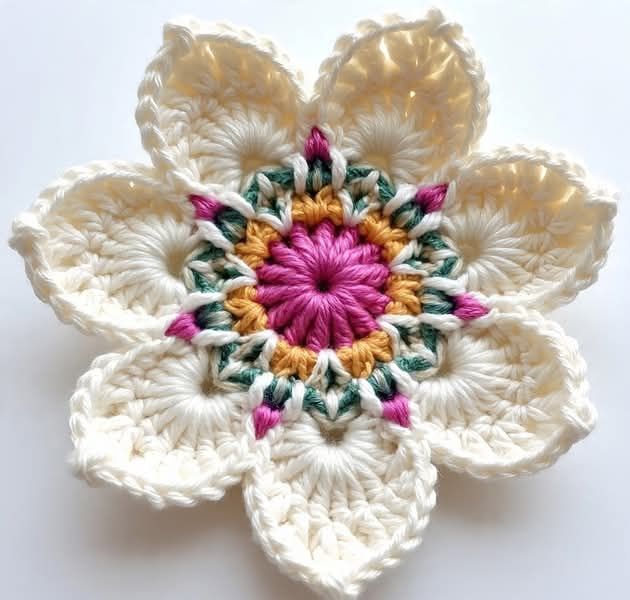
The Crochet Flower Pattern is a beautiful and creative project that brings together delicate stitches, colorful yarn, and the timeless charm of handmade flowers. Whether you are an experienced crocheter or someone just beginning to explore the wonderful world of crochet, this design offers an enjoyable opportunity to create something truly special. Inspired by the flower shown in the image, this pattern features a vibrant pink center, a soft golden-yellow accent ring, decorative green stitches, and six elegant cream-colored petals. The combination of colors and textures creates a dimensional flower that looks lovely on blankets, cushions, handbags, and decorative accessories. One of the most appealing qualities of this crochet flower design is its versatility, allowing you to experiment with different yarn combinations while maintaining the distinctive shape of the original flower. With patience, attention to detail, and a few basic crochet techniques, you can transform simple strands of yarn into a charming floral decoration that adds warmth and personality to almost any handmade project.
Creating a Crochet Flower Pattern is also a wonderful way to practice essential crochet techniques while developing confidence in working with circular patterns and decorative stitches. Unlike large projects that require several days or weeks to complete, a small crochet flower can often be finished in a single crafting session, making it especially rewarding for beginners. The design presented here uses a combination of chain stitches, slip stitches, single crochet, half double crochet, double crochet, and treble crochet, all written using standard American crochet terminology. Each stitch plays an important role in forming the flower’s layered appearance, from the tightly gathered center to the softly curved outer petals. The finished piece is designed to have approximately six rounded petals arranged evenly around a colorful circular center. Although the flower looks intricate at first glance, the construction becomes much easier when divided into manageable rounds. By following the instructions carefully and counting your stitches, you can create a balanced, attractive flower suitable for a variety of decorative purposes.
Another reason to love this easy crochet flower pattern is the opportunity it provides for personal expression through color, yarn texture, and creative finishing techniques. The flower in the reference image uses a cheerful combination of pink, yellow, green, and cream, producing a fresh floral appearance reminiscent of a blooming garden flower. However, the same pattern can be adapted to create seasonal decorations, romantic accessories, or colorful embellishments for children’s clothing. Soft pastel colors work beautifully for spring decorations, while warm orange and burgundy shades can transform the flower into an autumn-inspired accessory. The dimensional petals are especially attractive because their slightly raised edges create shadows and texture, giving the finished flower a more realistic appearance. This tutorial explains the necessary materials, essential crochet abbreviations, detailed construction instructions, and finishing techniques. By the end, you will understand how to crochet each section, assemble the complete flower, and adapt the pattern for your own creative projects.
Materials and Essential Crochet Stitches for the Crochet Flower Pattern
Before beginning your Crochet Flower Pattern, gather all the materials you need and prepare a comfortable workspace with good lighting. For a flower similar to the reference image, choose four coordinating yarn colors: bright pink for the center, golden yellow for the surrounding accent ring, dark green for the decorative details, and cream or ivory for the large outer petals. A small amount of additional pink yarn can be used to create the colorful highlights between the petals. Medium-weight cotton yarn is an excellent choice because it provides clear stitch definition and helps the flower maintain its shape. Cotton-blend or acrylic yarn can also be used, although the final texture and firmness may vary.
DISCOVER MORE FREE PATTERNS HERE!
For this tutorial, a 4.0 mm crochet hook is a practical starting point when using medium-weight yarn. You will also need a yarn needle for weaving in ends, sharp scissors, and several stitch markers to help identify the beginning of each round. If you prefer a smaller flower, choose lighter yarn and a corresponding smaller hook. For a larger, softer flower, consider using thicker yarn and a slightly larger hook. Always check that your stitches are comfortable to work and firm enough to support the raised petals without becoming excessively tight.
The completed flower will measure approximately 12–15 cm across, depending on yarn thickness, hook size, and individual crochet tension. This is an estimated measurement rather than a guaranteed finished size, since the pattern has not been gauge-tested with every yarn type. The construction consists of a circular center, a decorative transition ring, and six broad petals. Each section builds upon the previous one, creating the layered floral appearance seen in the photograph. Beginners may find it helpful to practice the individual stitches before starting the flower, particularly the treble crochet stitch used to add height and fullness to the petals.
Understanding US crochet abbreviations will make the instructions easier to follow. The main abbreviations are ch (chain), sl st (slip stitch), sc (single crochet), hdc (half double crochet), dc (double crochet), tr (treble crochet), st (stitch), sp (space), and rep (repeat). The abbreviation MR refers to a magic ring, which is used to create a neatly closed circular center. A double crochet is made by yarning over, inserting the hook into the designated stitch, pulling up a loop, and completing the stitch in two stages. A treble crochet begins with two yarn overs and is completed by pulling through two loops three times.
A few additional techniques will help you achieve the dimensional appearance of this handmade crochet flower. Working multiple tall stitches into the same space creates a fan or shell, while using shorter stitches at the beginning and end of a petal produces a gently rounded outline. A picot stitch can be made by chaining three stitches and slip stitching into the first chain, creating a tiny decorative point. For this particular design, however, rounded petal edges are preferable to pointed ones. You will also work into chain spaces rather than individual stitches in several rounds, which provides the flexibility needed for the larger petals.
Maintaining consistent tension is especially important when making crochet flower appliqués. If your stitches are too tight, the petals may curl inward and become difficult to shape. If they are too loose, the flower may appear floppy and lose its attractive definition. Aim for an even, relaxed tension throughout the project, especially when changing yarn colors. Since this design uses several small sections, weave in yarn ends securely as you work whenever possible. Once your supplies are ready and you are familiar with the abbreviations, you can begin creating the colorful center that forms the foundation of the flower.
Step-by-Step Instructions: Creating the Colorful Crochet Flower Center
The first stage of the Crochet Flower Pattern is creating the bright pink center. This section resembles a small circular rosette and provides the foundation for the decorative rings and large outer petals. Begin with your pink yarn and make a magic ring (MR). Chain three stitches, which will count as your first double crochet. Work 11 additional double crochet stitches into the magic ring, giving you a total of 12 double crochet stitches. Carefully pull the yarn tail to close the center opening, then join with a slip stitch into the top of the beginning chain-three. You should now have a small, flat circle with evenly distributed stitches.
For Round 2, continue working with the pink yarn to create a fuller, slightly raised center. Chain three, then work one additional double crochet into the same stitch. Work two double crochet stitches into each of the remaining 11 stitches around the circle. Join with a slip stitch into the top of the beginning chain-three. You should now have 24 double crochet stitches. This increase round creates the fullness needed for the central rosette. If you want the center to look slightly more textured, gently push the stitches toward the middle with your fingers, allowing the pink yarn to form a soft, gathered appearance.
Next, introduce the golden-yellow yarn to create the bright accent ring surrounding the pink center. Fasten off the pink yarn and join the yellow yarn to any stitch from the previous round. For Round 3, chain one and work one single crochet into the same stitch. Continue working one single crochet into each of the remaining 23 stitches, then join with a slip stitch to the first single crochet. You should have 24 single crochet stitches. This simple round creates a neat color transition and stabilizes the center before the decorative green details are added.
For Round 4, continue with yellow yarn and create a series of small decorative arches. Chain one, work one single crochet into the first stitch, chain two, and skip the next stitch. Repeat the sequence [sc in next st, ch 2, skip next st] around the entire circle. At the end of the round, join with a slip stitch into the first single crochet. You will have 12 chain-two spaces distributed evenly around the flower. These spaces are essential because they provide the attachment points for the next round and help establish the six-part structure of the outer petals.
For Round 5, join the dark green yarn into any chain-two space. Chain one and work one single crochet into the same space, then chain three. Work one single crochet into the next chain-two space and chain three again. Repeat this sequence around all 12 spaces, finishing with a slip stitch into the first single crochet. You will now have 12 decorative green chain-three arches. These arches create a delicate leafy appearance between the colorful center and the outer petals. Keep the chains relaxed, as overly tight chains can pull the flower inward and distort its circular shape.
For Round 6, introduce the cream yarn and establish the six main petal bases. Join the cream yarn into any green chain-three space, chain one, and work one single crochet into that space. Chain five, skip the next green chain-three space, and work one single crochet into the following green chain-three space. Repeat [ch 5, skip next green arch, sc in following green arch] until you have worked around the flower. After the final chain-five loop, join with a slip stitch into the first single crochet. You should have six chain-five loops, which will become the foundations for the six large cream-colored petals. Check your stitch count before proceeding, because evenly spaced loops are necessary for a balanced flower.
How to Crochet the Six Large Dimensional Flower Petals
The outer petals are the most recognizable feature of this Crochet Flower Pattern. Their broad, softly rounded shape creates the appearance of a blooming flower, while the cream yarn contrasts beautifully with the bright center. Before starting, examine the six chain-five loops created in the previous round. Each loop represents one petal, and all six should be approximately equal in size. If one loop looks noticeably smaller than the others, check your chain tension and adjust it before continuing. Working the petals consistently will help the finished flower look symmetrical and professionally made.
For Round 7, begin in the first chain-five loop. Chain one and work the following sequence into the loop: 1 sc, 1 hdc, 3 dc, 5 tr, 3 dc, 1 hdc, 1 sc. This produces a total of 15 stitches in the first petal. The gradual increase in stitch height creates a rounded fan, with the tallest stitches forming the outermost portion of the petal. Work the same sequence into each of the remaining five chain-five loops. After completing the sixth petal, join with a slip stitch into the first single crochet. You should now have six full petals, each containing 15 stitches, for a total of 90 stitches.
For Round 8, add a gentle finishing edge to the petals using the same cream yarn. Chain one and work one single crochet into each stitch around the flower. At the valleys between adjacent petals, make a slip stitch into the joining area between the fans to emphasize their separation. Continue around all six petals, keeping the edging stitches relaxed enough to preserve their natural curves. Join with a slip stitch and fasten off the cream yarn. This edging round strengthens the outer border and gives the petals a smooth, polished appearance. If the petals begin to ruffle excessively, use a slightly smaller hook or reduce the looseness of your stitches.
To recreate the small pink highlights visible between the petals in the reference image, use a yarn needle and a short length of pink yarn. Bring the needle from the back of the flower to the front near the base of a petal, just above the green decorative ring. Make two or three short satin-style embroidery stitches to create a tiny pink accent. Repeat this detail at the base of each petal, keeping the accents approximately the same size. These decorative stitches are optional, but they add color and visual interest to the multicolored crochet flower pattern.
The green details can also be enhanced to resemble small leaves surrounding the flower’s center. Thread a yarn needle with dark green yarn and make a few short diagonal stitches between the yellow ring and the cream petal bases. Position the stitches carefully so that they follow the natural direction of the existing green arches. Avoid pulling the embroidery thread too tightly, as this may cause the flower to gather or wrinkle. The goal is to create subtle decorative texture rather than cover the underlying crochet stitches. This technique works especially well when you want a realistic crochet flower with several visible layers.
Once the petals and decorative details are complete, place the flower on a flat surface and gently shape each petal with your fingers. Pull the rounded edges outward slightly and adjust the spaces between petals to create a balanced arrangement. The petals should overlap visually near the center while remaining clearly separated along their outer edges. The flower may not lie completely flat because the tall stitches create natural dimension, and this is part of its handmade charm. If you prefer a flatter crochet flower appliqué, you can lightly block the finished piece before attaching it to another project.
Finishing, Blocking, and Creative Ways to Use Your Crochet Flower Pattern
Finishing your Crochet Flower Pattern carefully is just as important as following the stitch instructions. Begin by turning the flower over and checking for loose yarn tails. Thread each tail through a yarn needle and weave it through several stitches on the back of the flower, changing direction at least once to help secure it. Trim the remaining yarn close to the fabric without cutting any of the working stitches. Pay particular attention to the color-change areas, since these are often the places where yarn ends can become visible. Proper finishing will help your flower remain attractive even after regular handling.
Blocking is an optional but useful technique for improving the shape of your crochet flower decoration. If you used cotton yarn, lightly dampen the flower with water and place it on a clean towel or foam blocking mat. Gently arrange the six petals into their desired positions, making sure the center remains circular. Use rust-resistant pins if necessary to hold the petal edges in place. Allow the flower to dry completely before removing the pins. Avoid stretching the petals too far, since excessive stretching can flatten their dimensional texture. For acrylic yarn, use a method appropriate to the yarn label and avoid direct high heat.
One of the most popular ways to use a Crochet Flower Pattern is as an embellishment for blankets and pillows. You can sew several flowers onto a plain crochet blanket to create a cheerful floral design, or arrange them around the corners of a decorative cushion. The cream petals work beautifully against neutral fabrics, while the colorful center adds a playful touch. When attaching the flower, use matching yarn and small, secure stitches around the center and selected petal edges. If the flower will be attached to an item that requires frequent washing, make sure the attachment stitches are strong enough to withstand gentle laundering.
Crochet flowers are also lovely accessories for handbags, headbands, scarves, and hats. A single handmade crochet flower can transform a simple tote bag into a personalized accessory, while several smaller flowers can create a charming floral border on a cardigan. For a headband, attach the flower securely to a crocheted or fabric band, keeping the back as smooth as possible for comfort. If you plan to use the flower on clothing for young children, avoid loose buttons, beads, or detachable decorations that could become choking hazards. Sew the flower securely and check the attachment regularly.
Another creative option is to use this easy crochet flower pattern for home decorations and seasonal crafts. You can make a collection of flowers in coordinating colors and arrange them into a decorative garland, wall hanging, or table centerpiece. For spring, choose soft pink, lavender, yellow, and mint-green yarn. For summer, experiment with bright coral, turquoise, and sunny yellow. Autumn-inspired flowers can feature burnt orange, mustard, cream, and burgundy. During the winter holidays, a combination of white, deep red, and forest green can create festive floral decorations. The same basic construction allows you to explore many styles without learning an entirely new pattern.
Finally, remember that every handmade flower will have its own character. Small differences in stitch tension, petal curvature, and color placement are natural parts of the crochet process. As you become more comfortable with the pattern, experiment with different hook sizes, yarn weights, and decorative details. You might add another edging round, use variegated yarn for the petals, or create smaller flowers by replacing the treble crochet stitches with double crochet stitches. Each variation offers a new opportunity to develop your skills. With practice, this Crochet Flower Pattern can become a favorite project that you return to whenever you want to make something beautiful, useful, and personal.
Frequently Asked Questions About the Crochet Flower Pattern
Is this Crochet Flower Pattern suitable for beginners?
Yes. This beginner-friendly crochet flower pattern is suitable for crocheters who already understand basic stitches such as chains, single crochet, and double crochet. Complete beginners may need a little extra practice with treble crochet stitches, working in rounds, and changing yarn colors. The instructions are divided into manageable stages, making the project easier to follow. Taking time to count stitches after every round is one of the best ways to avoid mistakes.
How long does it take to crochet one flower?
The time required depends on your experience and how comfortable you are with the stitches. An experienced crocheter may complete one flower in approximately 45–90 minutes, while a beginner may need two hours or more. The decorative embroidery and blocking process may require additional time. Working at a comfortable pace will usually produce better results than rushing through the pattern.
What is the best yarn for making crochet flowers?
Cotton yarn is an excellent choice for crochet flower appliqués because it provides good stitch definition and helps the petals hold their shape. Acrylic yarn is another affordable and widely available option, particularly for soft blankets and decorative accessories. Cotton-blend yarn can provide a balance between structure and flexibility. For the flower shown in the image, medium-weight yarn works well because it creates visible texture and full petals.
Can I make this crochet flower larger or smaller?
Absolutely. You can change the size of your Crochet Flower Pattern by choosing different yarn weights and hook sizes. Thicker yarn with a larger hook generally creates a larger flower, while thinner yarn with a smaller hook produces a more delicate result. Keep in mind that changing the yarn may also affect the stiffness and shape of the petals. If you want to maintain the same proportions, follow the original stitch counts and adjust only the yarn and hook.
Why are my crochet flower petals curling?
Petal curling is often caused by tight tension, an unsuitable hook size, or an imbalance between the number of stitches and the available space. If your petals curl inward excessively, try loosening your tension or using a slightly larger hook. If they ripple too much, consider using a smaller hook. Gentle blocking can also help improve the final shape. Some natural curvature is desirable because it gives the flower its dimensional appearance.
How do I change yarn colors neatly?
For a clean color transition, complete the final yarn-over of the last stitch using the new yarn color when appropriate, or fasten off and join the new color at the beginning of the next round. In this pattern, fastening off between the main color sections helps keep the transitions clearly defined. Always secure the yarn tails on the back of the flower and avoid making bulky knots that could affect its appearance.
Can I wash crochet flowers?
Most crochet flowers can be washed if the yarn used is washable. Always check the yarn manufacturer’s care instructions before cleaning your finished project. Hand washing in cool water with a gentle detergent is often a safe choice for delicate decorative flowers. Avoid twisting or wringing the petals. Instead, gently squeeze out excess water with a towel, reshape the flower, and allow it to air-dry flat.
Can I use this Crochet Flower Pattern to decorate clothing?
Yes. This crochet flower design can be sewn onto sweaters, jackets, hats, scarves, and other garments. Choose a yarn that is compatible with the garment’s washing requirements and attach the flower securely with matching yarn. For clothing that stretches, avoid stitching the entire flower too tightly against the fabric, as this may restrict movement. Attaching the center and several points around the petals usually provides a good balance between security and flexibility.
How can I make the flower look more realistic?
To create a more natural-looking flower, focus on color placement, stitch texture, and petal shaping. Use a contrasting center, a slightly darker accent ring, and soft outer petals. Gentle blocking can help create rounded edges, while small embroidered details can imitate natural markings found on real flowers. You can also experiment with slightly different shades of the same color to add depth without changing the overall structure.
Do I need a printed crochet chart to complete this flower?
No. The written Crochet Flower Pattern includes the essential stitch instructions, round sequences, and stitch counts needed to create the flower. However, some crocheters find visual diagrams helpful for understanding stitch placement. If you prefer written instructions, follow the rounds in order and use stitch markers to identify important spaces. Because this is a photo-inspired reconstruction rather than the original designer’s verified chart, minor adjustments may be needed to match the photographed flower exactly.
Can I sell finished crochet flowers made from this pattern?
Finished handmade crochet flowers can generally be sold, although you should respect any applicable copyright, trademark, and design restrictions. If you create your own color combinations or use the flower as part of a larger handmade product, consider photographing your work clearly and describing the materials accurately. Quality craftsmanship, secure finishing, and attractive presentation can help make your handmade flowers appealing to customers.
What should I do if my flower does not have six petals?
If your flower has more or fewer than six petals, return to Round 6 and check the chain-five loops. The pattern requires exactly six loops because each loop supports one complete petal. Count the 12 green chain-three arches from the previous round and make sure you skip one arch between each petal attachment point. Correcting this foundation round will usually solve the problem without needing to remake the entire flower.
Conclusion: Create Your Own Beautiful Crochet Flower Pattern
The Crochet Flower Pattern is a delightful project that combines creativity, color, and essential crochet techniques into one beautiful handmade decoration. Throughout this tutorial, you learned how to choose suitable yarn and tools, create a circular pink center, add golden-yellow and green decorative rounds, and crochet six dimensional cream-colored petals. You also discovered how to add embroidered accents, shape the finished flower, secure yarn ends, and adapt the design for different accessories and home decorations.
One of the greatest pleasures of crochet is the freedom to transform a simple pattern into something uniquely yours. Whether you follow the original color combination or experiment with your favorite shades, this handmade crochet flower offers countless opportunities for creativity. With each flower you make, your stitch consistency, confidence, and understanding of crochet construction can continue to improve.
EASILY FIND THE FREE PDF FOR THIS PATTERN HERE!
I hope this Crochet Flower Pattern inspires you to explore new combinations and create beautiful floral projects for yourself, your home, or someone special. Have you tried making a dimensional crochet flower before? Please share your sincere opinion about this tutorial, tell us which color combinations you would love to try, and leave your suggestions for future crochet patterns. Your experiences, creative ideas, and honest feedback are always welcome and can inspire other crochet enthusiasts to discover the joy of handmade flowers!