
The Fabric Poinsettia Christmas Candle Holder Pattern is a beautiful Christmas sewing project that combines festive colors, soft fabric textures, and the timeless elegance of the poinsettia flower. Inspired by traditional holiday decorations, this handmade centerpiece features layers of red and green fabric petals arranged around a central candle holder. The combination of Christmas-print cotton, decorative stitching, and carefully shaped petals creates a charming decoration that can brighten a dining table, mantel, or holiday display. One of the most appealing aspects of this DIY Christmas fabric decoration is that it looks elaborate while relying on straightforward sewing techniques. With a little patience, basic materials, and careful attention to measurements, even beginners can create an attractive poinsettia-inspired centerpiece. This tutorial explains how to prepare the fabric, cut the petals, assemble the layers, and finish the decoration with a polished appearance.
Creating a handmade fabric poinsettia is also an enjoyable way to explore Christmas sewing traditions while adding something personal to seasonal home decor. Unlike decorations that depend on complicated patterns or specialized equipment, this project uses accessible materials such as cotton fabric, lightweight batting, sewing thread, and a simple circular base. The red petals provide the recognizable poinsettia appearance, while the green leaves create contrast and fullness around the outside. Choosing fabrics with tiny gold stars or subtle metallic patterns can make the finished piece look especially festive. You can also experiment with different combinations of prints and textures to match your existing Christmas decorations. The finished centerpiece works particularly well with a battery-operated LED candle, providing a warm holiday glow without introducing an open flame near the fabric.
Another wonderful feature of the Fabric Poinsettia Christmas Candle Holder Pattern is its versatility. The size can be adjusted to create a small tabletop accent or a larger Christmas centerpiece, and the same petal construction method can be adapted for wreaths, decorative trays, and seasonal wall hangings. This tutorial uses measurements in centimeters and familiar American sewing terminology to make the process easy to follow. Every stage, from preparing the printable petal templates to arranging the finished flower, is explained with practical guidance. You will also learn how to maintain consistent seam allowances, add gentle padding, and secure the petals so they hold their shape. Whether you are making this decoration for your own home or preparing a thoughtful handmade Christmas gift, the project offers an opportunity to turn simple fabric pieces into a memorable seasonal ornament.
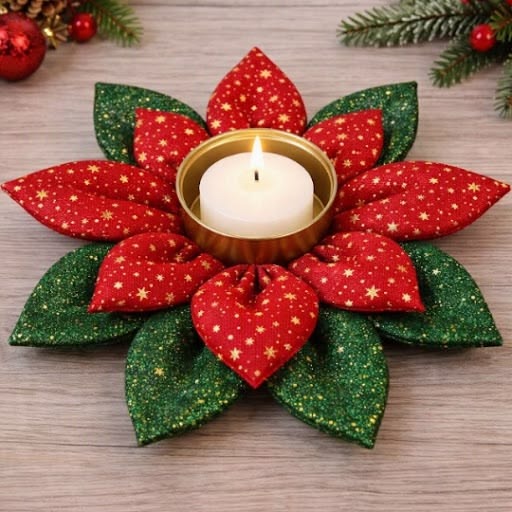
Materials and Tools for the Fabric Poinsettia Christmas Candle Holder Pattern
The first step in creating your Fabric Poinsettia Christmas Candle Holder Pattern is gathering the appropriate supplies. For a centerpiece approximately 32–35 cm across, prepare about 35 × 55 cm of red Christmas cotton fabric and 35 × 55 cm of green cotton fabric. Fabrics with small gold stars, snowflakes, or delicate festive prints are particularly attractive because they add detail without overwhelming the flower’s shape. Quilting cotton is an excellent choice because it is easy to cut, sew, press, and manipulate into decorative petals. Prewashing the fabric is optional for this decorative project, but pressing it before cutting helps improve accuracy.
DISCOVER MORE FREE PATTERNS HERE!
You will also need approximately 30 × 45 cm of lightweight polyester batting or thin quilt batting. This material gives the petals a soft, padded appearance without making them excessively bulky. If you prefer a firmer decoration, lightweight fusible interfacing can be added to the wrong side of the fabric. Avoid using thick foam because it can make the petals difficult to turn and arrange. The objective is to create flexible, gently rounded petals that resemble the layered shapes visible in the reference design.
For sewing, prepare a sewing machine, matching red and green polyester or cotton thread, fabric scissors, sewing clips or pins, a hand-sewing needle, and a fabric marking pencil. A rotary cutter, cutting mat, and acrylic ruler are helpful for achieving accurate measurements, although they are not essential. Use a standard universal sewing machine needle, size 80/12, with a straight stitch length of approximately 2.5 mm. A small turning tool or blunt wooden stick will help shape the pointed ends of the petals without damaging the seams.
The project also requires a stable circular base measuring approximately 13 cm in diameter. This base can be made from two circles of cotton fabric with a layer of firm interfacing or thin, flexible plastic canvas enclosed between them. For additional stability, use a small rigid circular insert inside the covered base, ensuring that no sharp edges remain exposed. The base supports the overlapping petals and provides a defined central area for the decorative candle holder. A removable battery-operated LED candle in a suitable metal or glass holder is the safest option for the finished decoration.
For the decorative arrangement, prepare paper or cardstock for the petal templates. The green leaves will be approximately 14 cm long and 8 cm wide after sewing, while the larger red petals will measure approximately 12 cm long and 7 cm wide. Smaller red petals, measuring approximately 10 cm long and 6 cm wide, create the inner layer. These dimensions refer to the finished shapes, so the paper templates must include the necessary seam allowance. A consistent 0.7 cm seam allowance works well for this project and allows the curved edges to be sewn neatly.
Before beginning, organize your materials on a clean, well-lit work surface. Separate the red and green fabrics, check that the batting is smooth, and prepare the templates before cutting. This small amount of preparation makes the entire sewing process easier and reduces unnecessary fabric waste. The finished Christmas poinsettia candle centerpiece should have balanced layers, evenly spaced leaves, and a neat central opening. Taking time to prepare the supplies properly will help achieve a professional-looking result, even if this is your first attempt at making dimensional fabric flowers.
How to Cut and Sew the Red and Green Fabric Poinsettia Petals
Begin by drawing three different pointed petal templates on cardstock. The green leaf template should measure approximately 14 cm from tip to base and 8 cm across its widest point, excluding seam allowances. Draw a symmetrical, elongated leaf with a rounded lower edge and a gently pointed upper tip. Create a second template measuring 12 × 7 cm for the large red petals and a third measuring 10 × 6 cm for the smaller red petals. Add a 0.7 cm seam allowance around each template. These shapes do not need to be perfectly botanical; soft curves and defined points are more important for achieving the decorative poinsettia appearance.
For the arrangement inspired by the photograph, cut enough fabric to make eight green leaves, five large red petals, and five smaller red petals. Each padded piece requires two matching fabric shapes, so cut 16 green leaf pieces, 10 large red petal pieces, and 10 small red petal pieces. Cut matching batting shapes slightly smaller than the fabric pieces to reduce bulk inside the seams. Arrange the templates carefully on the fabric, keeping the printed designs oriented consistently. This is particularly important when using directional Christmas prints with stars, trees, or other recognizable motifs.
To sew each petal, place two matching fabric pieces with their right sides together. Position a thin batting layer against the wrong side of one fabric piece. Pin or clip the layers securely, making sure the edges remain aligned. Sew around the curved sides and pointed tip using a 0.7 cm seam allowance, leaving an opening approximately 3 cm wide along the lower edge. Backstitch at the beginning and end of the seam to prevent unraveling. Repeat this method for all the green leaves and red petals, maintaining the same seam allowance throughout the project.
After sewing, trim the excess fabric near the pointed tips without cutting through the stitching. Carefully clip the curved seam allowances where necessary so the fabric can turn smoothly. Turn each piece right side out through the lower opening and use a blunt turning tool to gently shape the pointed end. Avoid pushing too forcefully because sharp pressure can break the stitches or damage the fabric. Roll the seams lightly between your fingers to encourage the edges to sit evenly. Press each piece using an iron temperature appropriate for the fabric and batting, protecting synthetic batting from excessive heat.
The next step is adding dimensional shaping to the petals. Fold the lower edge of each petal inward slightly and create one or two small pleats at the base. Secure the pleats with a few hand stitches or a short machine seam. This technique narrows the lower portion of the petal while creating fullness toward the pointed end. The pleats help the red petals overlap naturally, producing the soft, rounded flower appearance visible in the inspiration photograph. For the green leaves, use shallower pleats so they spread outward and provide a broad background layer.
If desired, add decorative topstitching approximately 0.3 cm from the outer edge of each petal. Matching thread creates a subtle finish, while metallic gold or contrasting thread adds a festive detail. You may also stitch a gentle line from the base toward the tip of the green leaves to suggest a central vein. Keep the stitching light enough that the padded petals remain soft and flexible. Once all 18 fabric pieces are complete, arrange them by size and color. The collection of handmade Christmas fabric petals is now ready for assembly into the layered poinsettia centerpiece.
Step-by-Step Assembly of the Fabric Poinsettia Christmas Candle Holder
Begin the assembly by preparing the circular fabric base. Cut two fabric circles approximately 14.4 cm in diameter, allowing for a 0.7 cm seam allowance around a finished 13 cm circle. Place the circles right sides together, add firm interfacing if needed, and sew around the edge while leaving an opening for turning. Turn the circle right side out, smooth the edges, and insert the prepared stabilizing material if your construction allows. Close the opening with a ladder stitch or neat machine stitching. The finished base should remain relatively flat so the petals can be attached securely and the LED candle holder can sit level.
Place the eight green fabric leaves around the outer edge of the base, with their pointed ends facing outward. Position them at approximately equal intervals, like the spokes of a wheel. The lower ends should overlap the base by about 2–3 cm, creating a secure area for stitching. Before sewing, check the arrangement from above to make sure the leaves are evenly distributed. Adjust their angles until the overall silhouette looks balanced. The green layer establishes the foundation of the fabric poinsettia Christmas decoration and provides contrast for the red petals that will be added next.
Secure the green leaves one at a time using strong hand stitches or short machine seams across their pleated bases. If machine sewing becomes difficult because of overlapping layers, hand sewing is often easier and provides better control. Use matching green thread and stitch through the fabric base rather than relying only on adhesive. The leaves should remain firmly attached when the centerpiece is gently lifted. Once all eight leaves are secured, smooth them outward and check that their pointed tips extend evenly around the decoration.
Next, arrange the five larger red petals above the green layer. Position the red petals so their pointed ends extend between the green leaves, creating a balanced flower shape. Overlap the lower ends of the red petals near the center, leaving enough space for the candle holder. Stitch each petal securely to the base, keeping the attachment stitches concentrated near the lower edges. The red fabric should remain slightly raised above the green leaves. This layered construction creates the distinctive appearance of a full Christmas poinsettia, with the red sections forming the visual center of the flower.
Add the five smaller red petals as the final decorative fabric layer. Place them closer to the center, slightly overlapping the larger red petals. Rotate their positions so the points are staggered rather than perfectly aligned with the outer red petals. This arrangement creates depth and makes the flower appear fuller. Use small hand stitches to secure the pleated bases, concealing the stitches beneath neighboring petals whenever possible. If a petal looks too flat, gently adjust its pleats or add a small hand tack underneath to raise it slightly. Continue adjusting until the flower has a natural, symmetrical appearance.
Finish the centerpiece by positioning a removable battery-operated LED candle inside a decorative metal or glass holder at the center of the flower. Choose a holder with a stable, flat bottom that fits comfortably within the central opening. A holder approximately 8–10 cm in diameter works well for the suggested centerpiece dimensions, although the exact size depends on the completed arrangement. Do not use a real flame, tea light, or burning candle with this fabric decoration, because the surrounding cotton and batting are combustible. The LED candle produces a similar warm visual effect without exposing the fabric petals to flame. Once the holder is centered, gently adjust the inner petals to frame it neatly without covering the light.
Decorating, Customizing, and Caring for Your Christmas Fabric Candle Holder
Once the Fabric Poinsettia Christmas Candle Holder Pattern is assembled, you can personalize it with small decorative details. The red and green fabrics already provide a strong Christmas theme, but carefully chosen accents can make the centerpiece feel even more special. Consider using fabrics printed with tiny gold stars, delicate snowflakes, or subtle metallic patterns. A few small decorative stitches can emphasize the petal edges and create additional texture. Keep embellishments lightweight so they do not distort the flower’s shape. Avoid loose glitter or decorations that may shed onto the LED candle holder.
Color selection can dramatically change the overall appearance of the project. Traditional red and forest green create a classic Christmas decoration, while burgundy and sage green offer a softer, more rustic style. White petals paired with silver-patterned leaves can produce an elegant winter centerpiece. For a vintage-inspired version, choose cream-colored cotton, muted red prints, and olive-green leaves. The same Christmas fabric flower sewing pattern can be adapted to many decorative styles simply by changing the fabric colors. Coordinating the thread with the fabric also helps maintain a clean, professional finish.
The size of the finished decoration can be adjusted by changing the petal templates proportionally. For a smaller ornament, reduce the templates to approximately 75% of their original dimensions and use a smaller circular base. For a larger tabletop centerpiece, increase the templates to 125% while maintaining the same basic proportions. Remember that larger petals may require slightly firmer interfacing to prevent them from drooping. Before cutting expensive fabric, test the revised templates with scrap material. This allows you to evaluate the proportions and make corrections without wasting your favorite Christmas prints.
Displaying the finished DIY fabric poinsettia candle holder is simple because the layered flower already provides a complete decorative arrangement. Place it on a flat dining table, sideboard, or covered display surface where the petals can spread naturally. A neutral wooden background highlights the red and green fabrics, while a white tablecloth creates a brighter holiday presentation. You can also coordinate the centerpiece with matching fabric napkins, quilted placemats, or handmade Christmas table runners. Keep the decoration away from open flames, fireplaces, stovetops, and other heat sources, even when using an LED candle.
Proper care will help preserve the shape and color of your handmade centerpiece. Because the decoration contains padded petals, layered stitching, and a structured base, spot cleaning is generally preferable to machine washing. Remove the LED candle holder before cleaning, then use a slightly damp cloth to gently remove dust or small marks. Allow the fabric to dry completely before storing. If the petals become flattened, reshape them carefully by hand. Avoid placing a hot iron directly against assembled synthetic batting, as excessive heat can permanently damage the padding.
When the Christmas season ends, store the decoration in a clean, dry box that provides enough room for the petals to retain their shape. Place a layer of tissue paper beneath the flower and avoid stacking heavy objects on top. If necessary, add loosely crumpled tissue between the petal layers to prevent flattening. Keeping the decoration away from moisture and direct sunlight will help preserve the fabric colors. With thoughtful construction and gentle care, your handmade fabric Christmas centerpiece can become a cherished seasonal decoration that returns to your holiday table year after year.
Frequently Asked Questions About the Fabric Poinsettia Christmas Candle Holder Pattern
1. Is the Fabric Poinsettia Christmas Candle Holder Pattern suitable for beginners?
Yes. This project is suitable for beginners who have basic experience with straight and curved seams. The most important skills are cutting accurate fabric shapes, sewing with a consistent seam allowance, turning padded pieces, and attaching the petals securely. Beginners can simplify the construction by using fewer petals or avoiding decorative topstitching. Working slowly and arranging the pieces before attaching them will make the process easier.
2. What is the best fabric for making a Christmas poinsettia candle holder?
Medium-weight quilting cotton is one of the best choices because it is easy to handle, holds decorative prints beautifully, and works well with lightweight batting. Cotton fabrics with small Christmas patterns create an especially attractive result. Avoid extremely stretchy fabrics because they can distort the petal shapes. Very heavy upholstery fabric may also be difficult to turn and layer.
3. How much fabric do I need for one centerpiece?
For the approximately 32–35 cm version described in this tutorial, about 35 × 55 cm of red fabric and the same amount of green fabric should be sufficient with careful cutting. Additional material may be necessary if your fabric has a directional print or if you want to match the patterns across the petals. Keeping a small amount of extra fabric is helpful for replacing any pieces that do not turn out as expected.
4. Can I use a real candle in the fabric poinsettia centerpiece?
No. A real burning candle is not recommended because the cotton fabric, batting, thread, and decorative materials can catch fire. Even a candle placed inside a metal container can produce significant heat. For this project, use a battery-operated LED candle with a stable holder. This provides a festive glow while avoiding the hazards associated with an open flame near fabric.
5. How can I make the fabric petals look fuller and more realistic?
Use lightweight batting inside each petal and create small pleats near the base before attaching it. Overlapping the petals in staggered layers also creates a fuller appearance. The larger red petals should sit above the green leaves, while the smaller red petals should form a raised inner layer. Gentle shaping with your fingers helps give the finished flower a natural appearance.
6. Can this Christmas sewing pattern be completed without a sewing machine?
Yes. The entire project can be sewn by hand using small backstitches for the petal seams and ladder stitches for closing the openings. Hand sewing takes longer, but it provides excellent control when working with curved shapes and overlapping layers. Use strong thread and keep your stitches consistent to ensure the decoration remains durable.
7. What can I use instead of polyester batting?
Thin cotton batting is a suitable alternative and provides a slightly flatter, more natural texture. Lightweight fusible fleece can also work, depending on the desired structure. If you prefer very soft petals, you may use a small amount of polyester fiberfill, although it can be more difficult to distribute evenly. Avoid excessive stuffing because the petals should remain relatively flat and easy to overlap.
8. How long does it take to make a fabric poinsettia Christmas candle holder?
Most crafters can complete this project in approximately three to five hours, depending on their sewing experience and the number of decorative details added. Preparing the templates and cutting the fabric may take 30–60 minutes. Sewing and turning the petals usually requires the most time. The final assembly can take another hour, especially if the petals are attached by hand.
9. Can I make this pattern in different sizes?
Absolutely. The templates can be enlarged or reduced while preserving their proportions. A smaller version makes a lovely decorative accent for a shelf, while a larger version can serve as a centerpiece for a spacious dining table. Adjust the circular base and LED candle holder to match the new dimensions. Testing the arrangement before final stitching will help maintain a balanced appearance.
10. Is this handmade Christmas decoration a good gift idea?
Yes. A carefully sewn fabric poinsettia Christmas candle holder makes a thoughtful seasonal gift for friends, family members, teachers, and anyone who appreciates handmade decorations. You can personalize the fabric colors to match the recipient’s home decor and include a removable battery-operated LED candle. Adding a small handmade gift tag and simple storage instructions gives the project a polished finishing touch.
11. How do I keep the petals from losing their shape?
Use lightweight interfacing or batting during construction, secure the pleats firmly, and avoid overstuffing the petals. Store the finished decoration in a spacious box rather than folding or compressing it. If a petal becomes flattened, gently reshape it by hand. The combination of stable fabric, careful stitching, and proper storage will help preserve the original appearance.
12. Can I sell finished decorations made from this pattern?
Handmade fabric poinsettia decorations can be an appealing product for Christmas craft fairs and seasonal handmade collections. If you create items for sale, use durable construction methods, maintain consistent quality, and clearly explain that the decoration is intended for use with battery-operated LED candles only. Check any applicable local product-safety and labeling requirements before selling. Attractive fabric combinations and neat finishing can help distinguish your handmade work.
Conclusion: Create a Beautiful Handmade Fabric Poinsettia Christmas Centerpiece
The Fabric Poinsettia Christmas Candle Holder Pattern is a rewarding sewing project that transforms simple pieces of Christmas fabric into a decorative holiday centerpiece. Throughout this tutorial, you learned how to choose suitable cotton fabrics, prepare three different petal templates, cut and sew padded fabric shapes, and create dimension through careful pleating. You also learned how to construct a stable circular base, arrange the green leaves and red petals in balanced layers, and finish the decoration with a removable battery-operated LED candle.
The beauty of this project lies in its combination of accessible sewing techniques and creative possibilities. With different fabrics, colors, and sizes, you can produce decorations that suit traditional, rustic, vintage, or contemporary Christmas settings. Each handmade flower carries its own personality, making the finished piece a meaningful addition to your seasonal home decor.
Most importantly, this DIY Christmas fabric poinsettia centerpiece demonstrates how patience, accurate measurements, and thoughtful fabric choices can turn an uncomplicated sewing project into something special. Whether you make one for your own holiday table or create several as handmade gifts, the finished poinsettia can become part of your Christmas decorating traditions.
EASILY FIND THE FREE PDF FOR THIS PATTERN HERE!
We would love to hear your sincere opinion! ❤️🌺 Have you ever made a fabric poinsettia decoration, or would you like to try this pattern for Christmas? Share your thoughts, creative suggestions, favorite fabric combinations, and any improvements you would make to this tutorial. Your ideas and experiences can inspire other sewing enthusiasts to create their own beautiful handmade Christmas decorations!